
Xử lý dữ liệu từ onboarding trong Unity SDK
Onboardings đã bị deprecated kể từ Adapty SDK v4. Hãy xây dựng flows thay thế: không giống onboardings chạy trong WebView, flows render trực tiếp trên thiết bị — hiệu ứng mượt mà hơn, giao diện native nhất quán, tải nhanh hơn, và không phụ thuộc vào WebView runtime.
Khi người dùng trả lời câu hỏi trong bài kiểm tra hoặc nhập dữ liệu vào trường nhập liệu, phương thức OnboardingViewOnStateUpdatedAction sẽ được gọi. Bạn có thể lưu hoặc xử lý loại trường đó trong code của mình.
Triển khai phương thức OnboardingViewOnStateUpdatedAction trong class của bạn:
Trong SDK 4.1, các interface listener tuân theo quy ước tiền tố I- của C#: hãy implement IAdaptyOnboardingsEventsListener thay vì AdaptyOnboardingsEventsListener. Các phương thức không thay đổi. Xem hướng dẫn migration.
public class OnboardingManager : MonoBehaviour, AdaptyOnboardingsEventsListener
{
    public void OnboardingViewOnStateUpdatedAction(
        AdaptyUIOnboardingView view,
        AdaptyUIOnboardingMeta meta,
        string elementId,
        AdaptyOnboardingsStateUpdatedParams @params
    )
    {
        switch (@params) {
            case AdaptyOnboardingsSelectParams selectParams:
                // handle single selection
                break;
            case AdaptyOnboardingsMultiSelectParams multiSelectParams:
                // handle multiple selections
                break;
            case AdaptyOnboardingsInputParams inputParams:
                // handle text input
                break;
            case AdaptyOnboardingsDatePickerParams datePickerParams:
                // handle date selection
                break;
        }
    }

    // ... other interface methods
}
Các tham số bao gồm:
| Tham số | Mô tả |
|---|---|
elementId | Mã định danh duy nhất cho phần tử nhập liệu. Bạn có thể dùng nó để liên kết câu hỏi với câu trả lời khi lưu dữ liệu. |
@params | Đối tượng dữ liệu đầu vào của người dùng. Có thể là một trong các kiểu sau. |
AdaptyOnboardingsSelectParams | Chọn một tùy chọn. Chứa Id, Value, Label |
AdaptyOnboardingsMultiSelectParams | Chọn nhiều tùy chọn. Chứa danh sách Params (mỗi phần tử có Id, Value, Label)• input: Đối tượng với type, value• datePicker: Đối tượng với day, month, year |
AdaptyOnboardingsInputParams | Trường nhập văn bản. Chứa Input có thể là AdaptyOnboardingsTextInput, AdaptyOnboardingsEmailInput, hoặc AdaptyOnboardingsNumberInput |
AdaptyOnboardingsDatePickerParams | Chọn ngày tháng. Chứa Day, Month, Year (có thể null) |
Ví dụ dữ liệu đã lưu (có thể khác trong triển khai của bạn)
// Example of a saved select action
{
    "elementId": "preference_selector",
    "meta": {
        "onboardingId": "onboarding_123",
        "screenClientId": "preferences_screen",
        "screenIndex": 1,
        "screensTotal": 3
    },
    "params": {
        "type": "select",
        "value": {
            "id": "option_1",
            "value": "premium",
            "label": "Premium Plan"
        }
    }
}

// Example of a saved multi-select action
{
    "elementId": "interests_selector",
    "meta": {
        "onboardingId": "onboarding_123",
        "screenClientId": "interests_screen",
        "screenIndex": 2,
        "screensTotal": 3
    },
    "params": {
        "type": "multiSelect",
        "value": [
            {
                "id": "interest_1",
                "value": "sports",
                "label": "Sports"
            },
            {
                "id": "interest_2",
                "value": "music",
                "label": "Music"
            }
        ]
    }
}

// Example of a saved input action
{
    "elementId": "name_input",
    "meta": {
        "onboardingId": "onboarding_123",
        "screenClientId": "profile_screen",
        "screenIndex": 0,
        "screensTotal": 3
    },
    "params": {
        "type": "input",
        "value": {
            "type": "text",
            "value": "John Doe"
        }
    }
}

// Example of a saved date picker action
{
    "elementId": "birthday_picker",
    "meta": {
        "onboardingId": "onboarding_123",
        "screenClientId": "profile_screen",
        "screenIndex": 0,
        "screensTotal": 3
    },
"params": {
    "type": "datePicker",
    "value": {
        "day": 15,
        "month": 6,
        "year": 1990
        }
    }
}
Các trường hợp sử dụng
Bổ sung thông tin vào hồ sơ người dùng
Nếu bạn muốn liên kết ngay dữ liệu đầu vào với hồ sơ người dùng và tránh hỏi lại cùng một thông tin, bạn cần cập nhật hồ sơ người dùng với dữ liệu đó khi xử lý hành động.
Ví dụ: bạn yêu cầu người dùng nhập tên vào trường văn bản có ID là name và muốn đặt giá trị đó làm tên của họ. Ngoài ra, bạn yêu cầu họ nhập email vào trường email. Trong code ứng dụng, nó có thể trông như thế này:
public class OnboardingManager : MonoBehaviour, AdaptyOnboardingsEventsListener
{
    public void OnboardingViewOnStateUpdatedAction(
        AdaptyUIOnboardingView view,
        AdaptyUIOnboardingMeta meta,
        string elementId,
        AdaptyOnboardingsStateUpdatedParams @params
    )
    {
        if (@params is AdaptyOnboardingsInputParams inputParams) {
            var builder = new AdaptyProfileParameters.Builder();

            switch (elementId) {
                case "name":
                    if (inputParams.Input is AdaptyOnboardingsTextInput textInput) {
                        builder.SetFirstName(textInput.Value);
                    }
                    break;
                case "email":
                    if (inputParams.Input is AdaptyOnboardingsEmailInput emailInput) {
                        builder.SetEmail(emailInput.Value);
                    }
                    break;
            }

            Adapty.UpdateProfile(builder.Build(), (error) => {
                if (error != null) {
                    // handle the error
                }
            });
        }
    }

    // ... other interface methods
}
Tùy chỉnh paywall dựa trên câu trả lời
Bằng cách sử dụng quiz trong onboarding, bạn cũng có thể tùy chỉnh paywall hiển thị cho người dùng sau khi họ hoàn thành onboarding.
Ví dụ: bạn có thể hỏi người dùng về kinh nghiệm thể thao của họ và hiển thị các CTA và sản phẩm khác nhau cho từng nhóm người dùng.
- Thêm quiz trong onboarding builder và gán các ID có ý nghĩa cho các tùy chọn.
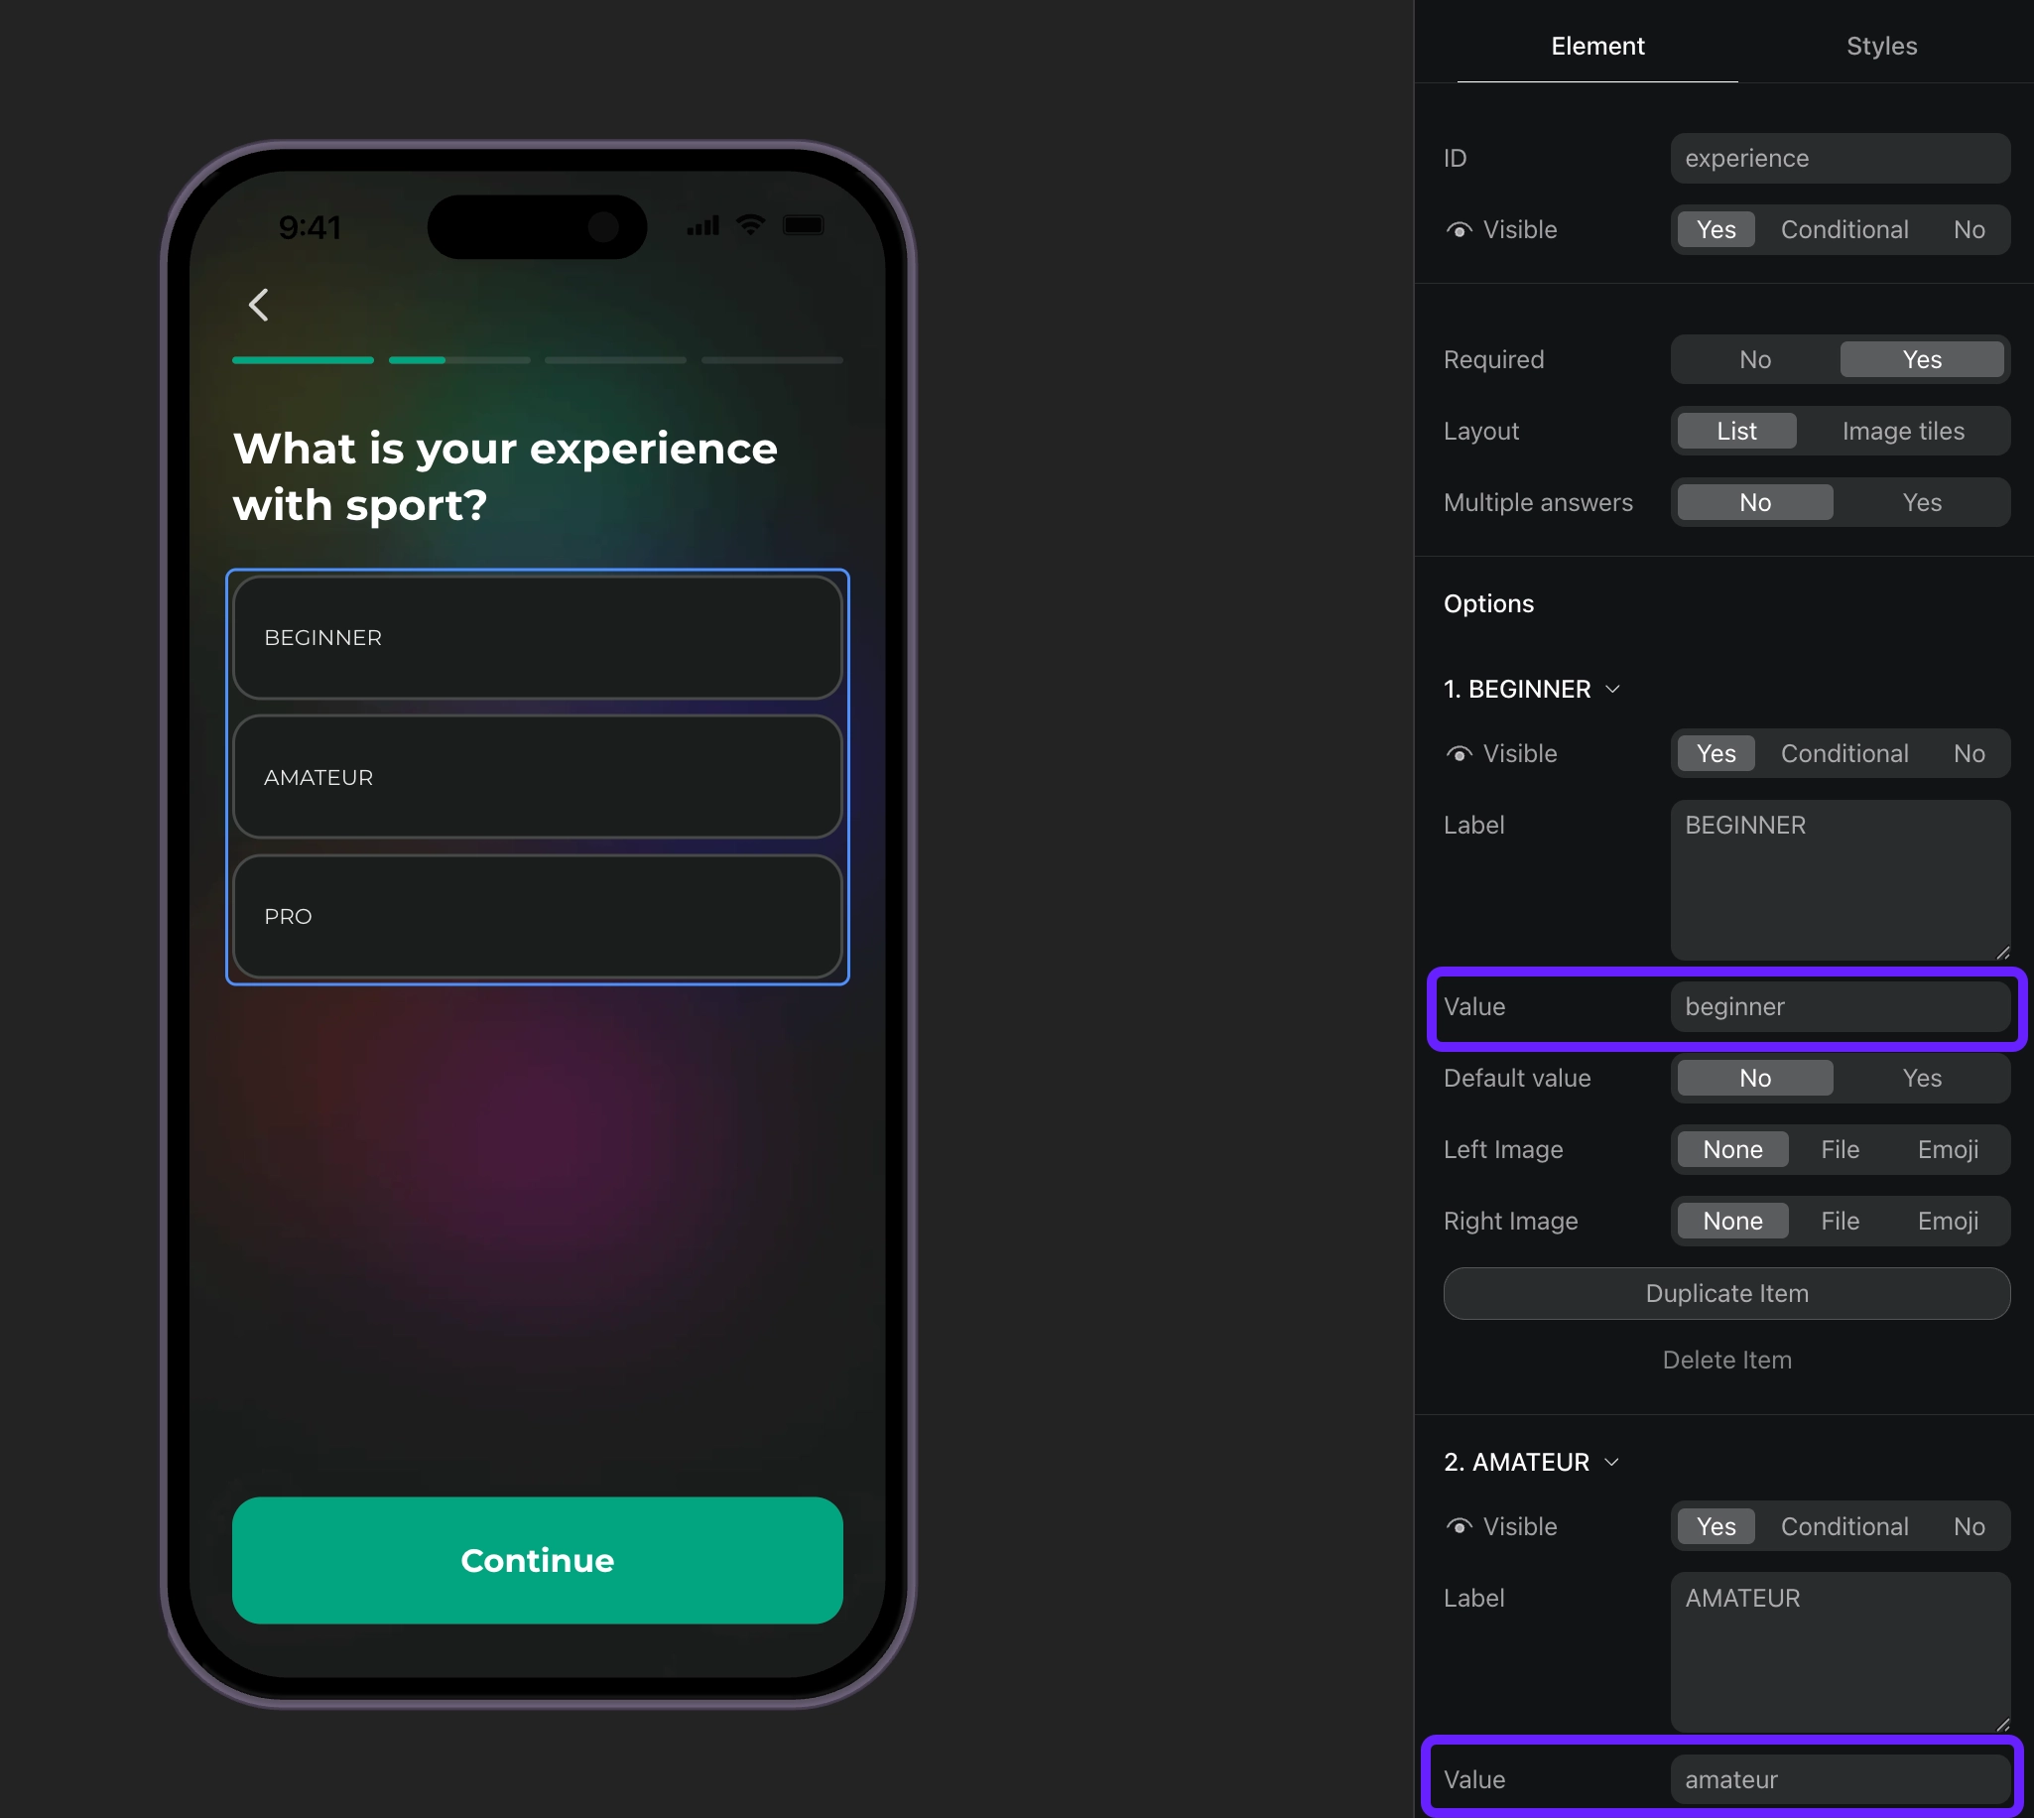
- Xử lý các phản hồi từ quiz dựa trên ID của chúng và đặt thuộc tính tùy chỉnh cho người dùng.
public class OnboardingManager : MonoBehaviour, AdaptyOnboardingsEventsListener
{
    public void OnboardingViewOnStateUpdatedAction(
        AdaptyUIOnboardingView view,
        AdaptyUIOnboardingMeta meta,
        string elementId,
        AdaptyOnboardingsStateUpdatedParams @params
    )
    {
        if (@params is AdaptyOnboardingsSelectParams selectParams) {
            var builder = new AdaptyProfileParameters.Builder();

            switch (elementId) {
                case "experience":
                    // set custom attribute 'experience' with the selected value (beginner, amateur, pro)
                    builder.SetCustomStringAttribute("experience", selectParams.Value);
                    break;
            }

            Adapty.UpdateProfile(builder.Build(), (error) => {
                if (error != null) {
                    // handle the error
                }
            });
        }
    }

    // ... other interface methods
}- Tạo phân khúc cho từng giá trị thuộc tính tùy chỉnh.
- Tạo một placement và thêm đối tượng cho từng phân khúc bạn đã tạo.
- Hiển thị paywall cho placement trong code ứng dụng của bạn. Nếu onboarding của bạn có nút mở paywall, hãy triển khai code paywall như một phản hồi cho hành động của nút đó.