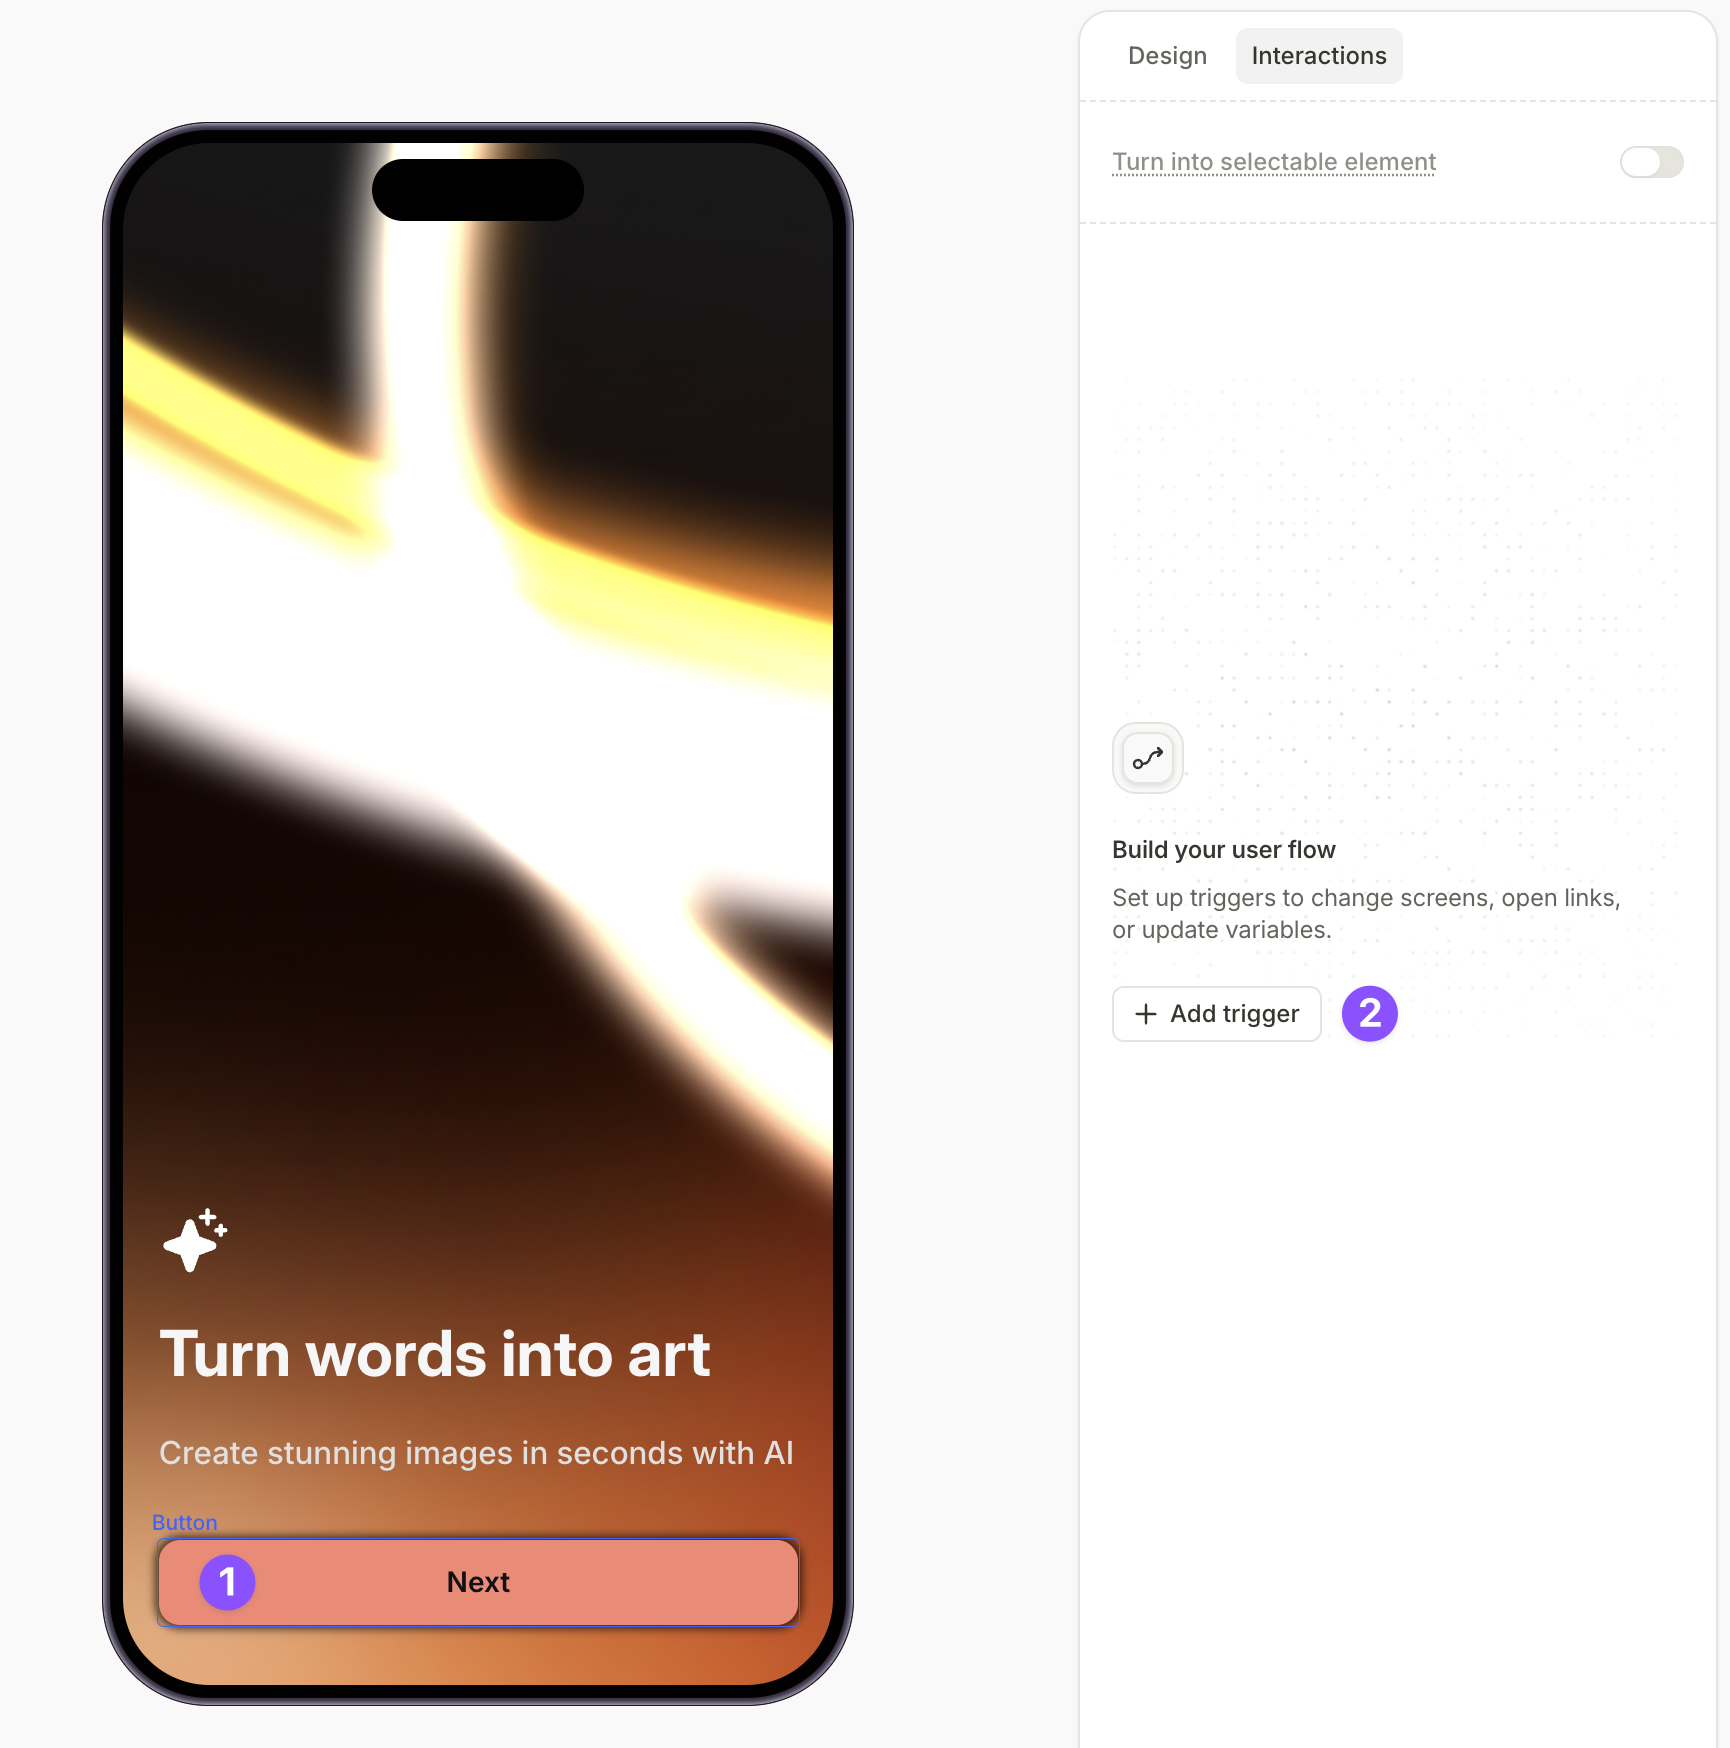
Actions
The Interactions panel lets you define how flow elements respond to events — such as taps, element appearances, and form submissions. For each event, you assign one or more actions: navigate between screens, show or hide elements, open URLs, set variables, and more. Use conditions to customize the flow based on user data.
Each interaction follows a three-part chain:
- Element: The screen component that starts the interaction — a button, quiz answer, input field, or anything else.
- Trigger: The event that activates the logic, such as a tap, an element appearance, or a form submission.
- Action: The task the flow performs in response. A single trigger can run multiple actions in sequence.
Set up interactions
To set up an interaction:
- Select an element on the screen or in the Layers panel.
- On the right, switch to the Interactions panel and click Add trigger.
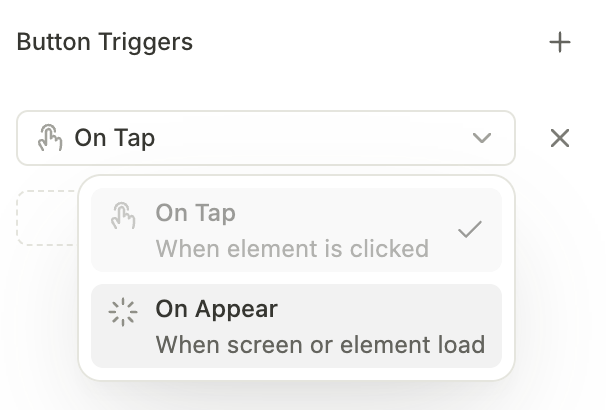
- In the Button triggers section, select the trigger type.
- Click Add action, click the action name, and select an action type from the dropdown in the Edit action window.
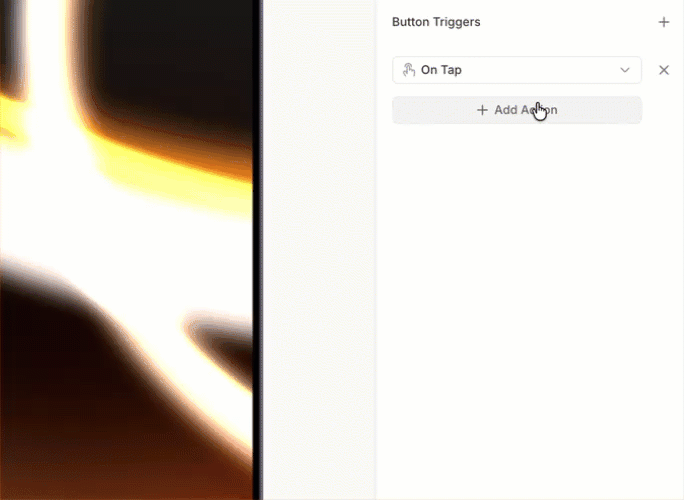
- Configure the action properties based on the action type you selected.
- If needed, click Add action to add more actions for the same trigger.
Trigger types
Triggers fire in response to user behavior, element state changes, or the screen loading. On screen appear is universal; the others are element-specific.
| Trigger | Fires when… | Supported on |
|---|---|---|
| On screen appear | The screen loads | All elements |
| On tap | The user taps the element | Buttons, quiz options, toggles, countdowns, videos |
| On changed | The user changes the input’s value (typing, picking a date or time) | All input elements |
| On submit | The user submits a text input by pressing Enter or Done on the keyboard | Text-based inputs |
| On timer end | A Countdown element reaches zero | Countdown |
| On playback finished | A Video reaches the end | Video |
For elements with no built-in interactions (such as Loader), On screen appear is the only trigger available.
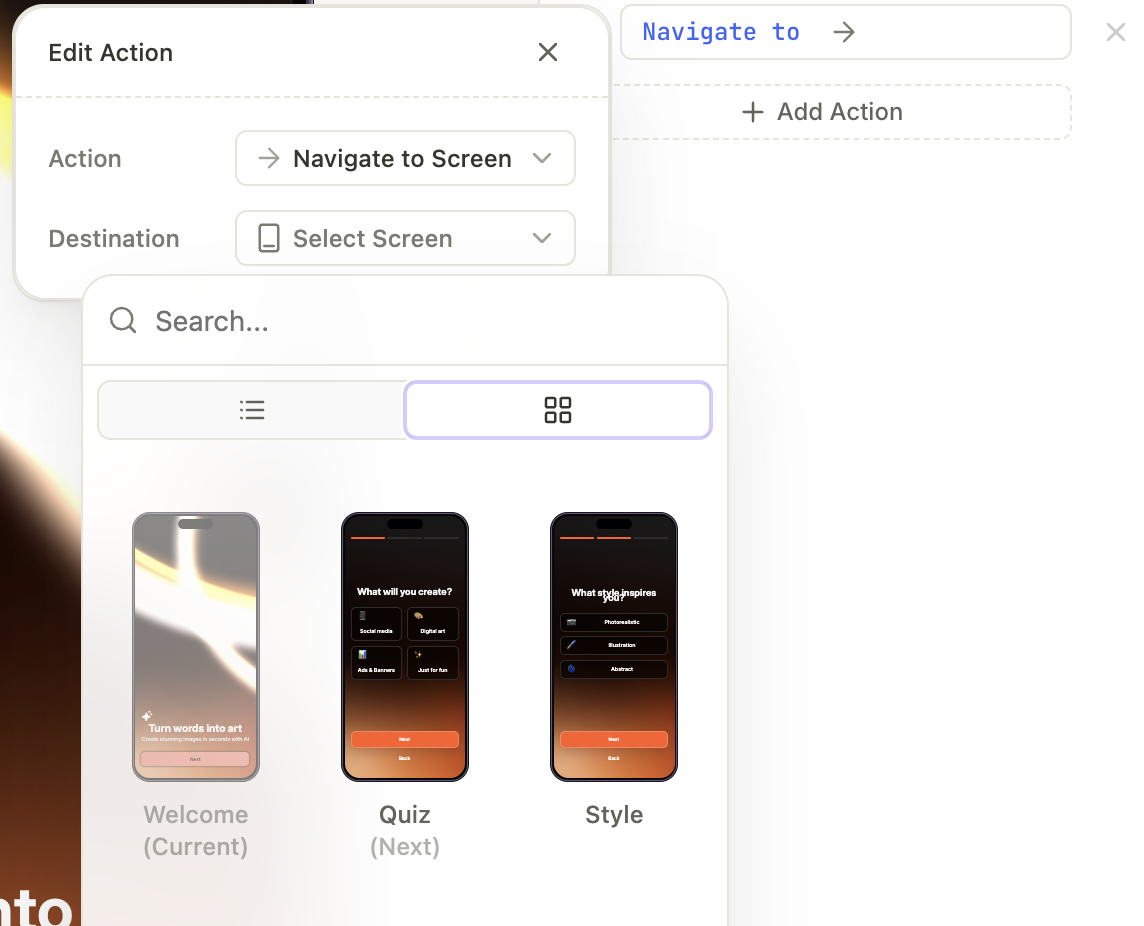
Action types
Any navigation action that moves the user to a different screen should always be the last action in the list. Actions placed after it (like “Set Variable”) may not execute because the app has already changed screens.
Navigate to screen
This is the primary action for moving users between screens. It takes the user to a specified destination screen.
For this action, you only need to set up the destination screen. If you want to enable dynamic navigation, see Navigation and branching or the Conditional actions section.
Navigate next
Advances the user to the next screen in the flow’s screen order. Use this for linear flows, where the order of screens in the editor matches the order you want the users to see them.
Navigate back
Returns the user to the previous screen in their navigation history, rather than the previous screen in the sequence.
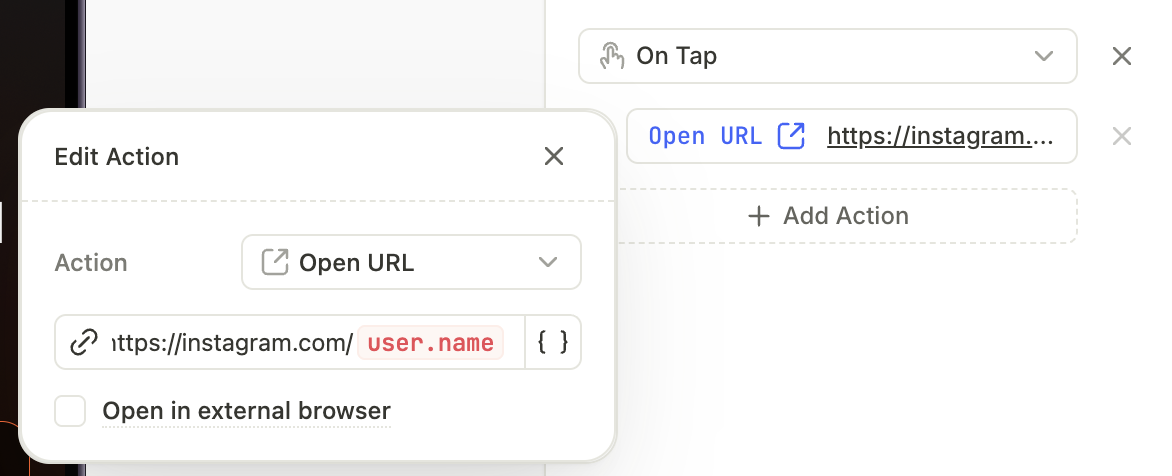
Open URL
Use inline links to insert links to flowing text.
Opens a specific web address. Use this to send users to web pages, articles, or social media profiles outside of your app’s native screens.
For this action, you can configure two settings:
- URL address: Set a URL address. Additionally, you can make it dynamic — for example, to navigate users to different pages based on their quiz answer or using the data they’ve submitted. To do this, click
 and select a variable you want to use.
 - Open in external browser: Define where you want to open external links. By default, they open in an in-app browser to keep users within the app. Select the Open in external browser checkbox if you want to open links in an external browser.
Close flow
Closes the current flow.
Show/hide elements
Shows or hides a specific element on the screen.
This action overrides the initial state set in Visibility in the Design panel. If Visibility is set to Hide, the Show action will make it appear.
A Show or Hide action with no target element blocks previewing and publishing. Select a target or remove the action.
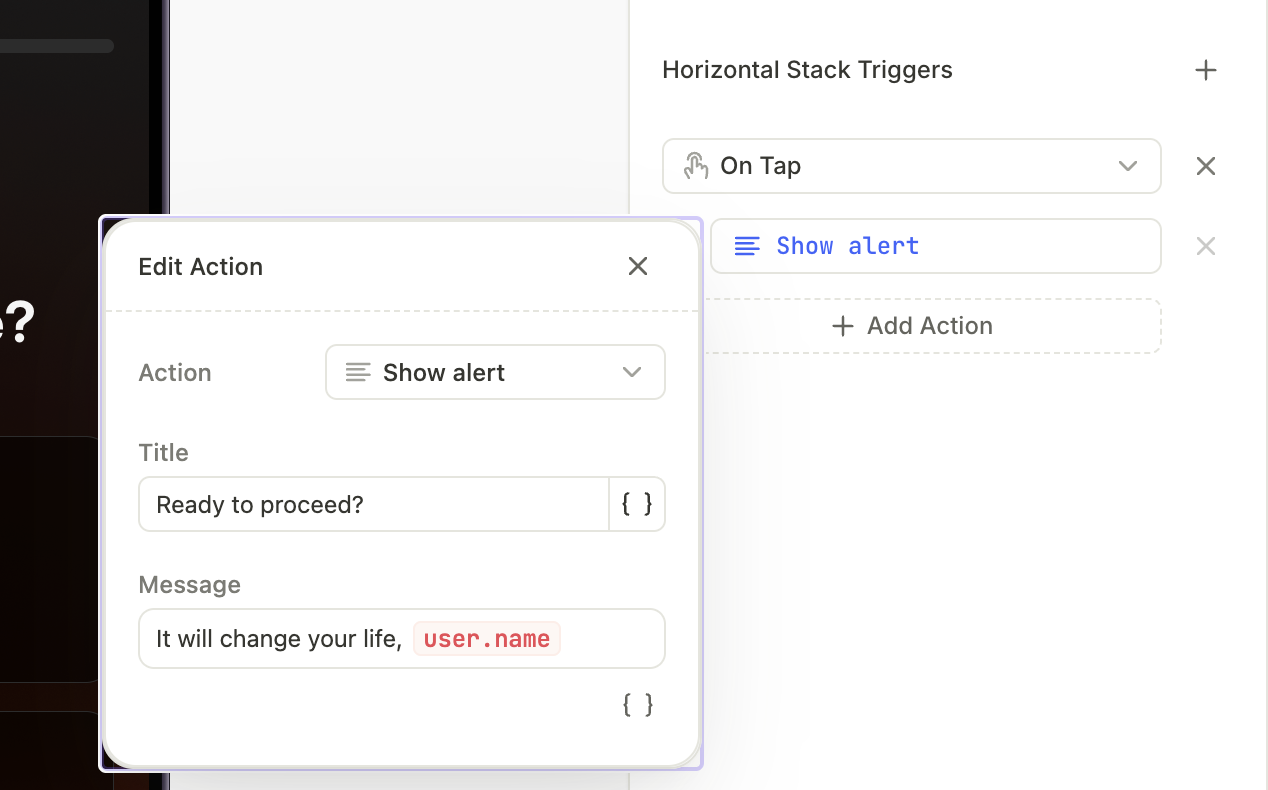
Show alert
Displays a native system pop-up window. Users must tap Ok to proceed.
For alerts, you must set up their Title and Message. In both, you can use variables to make the content dynamic. To do this, click ![]() and select a variable you want to use.
and select a variable you want to use.
A Show alert action with an empty or incomplete configuration blocks previewing and publishing. Fill in both fields or remove the action.
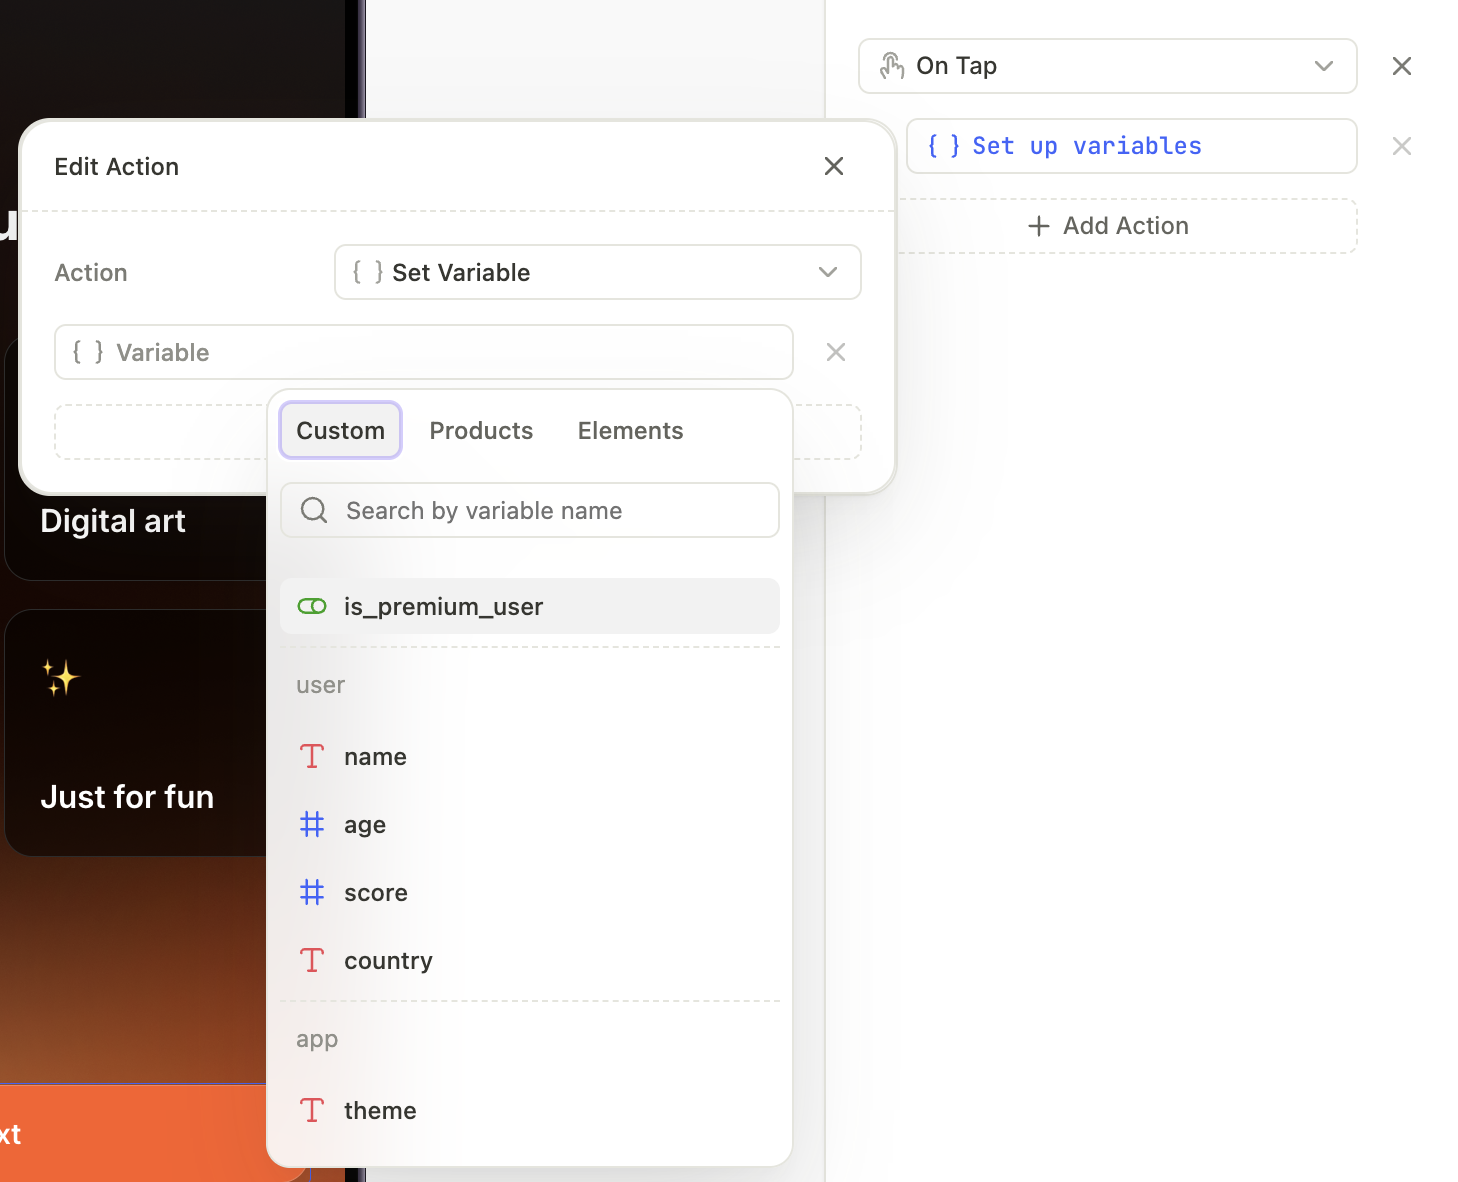
Set variable
Updates the value of a variable in the flow. Before adding this action, create variables in the Variables panel on the left (see Variables).
Click Add variable and set as many variables and their values as you need.
A Set variable action with no assignment blocks previewing and publishing. Configure at least one assignment or remove the action.
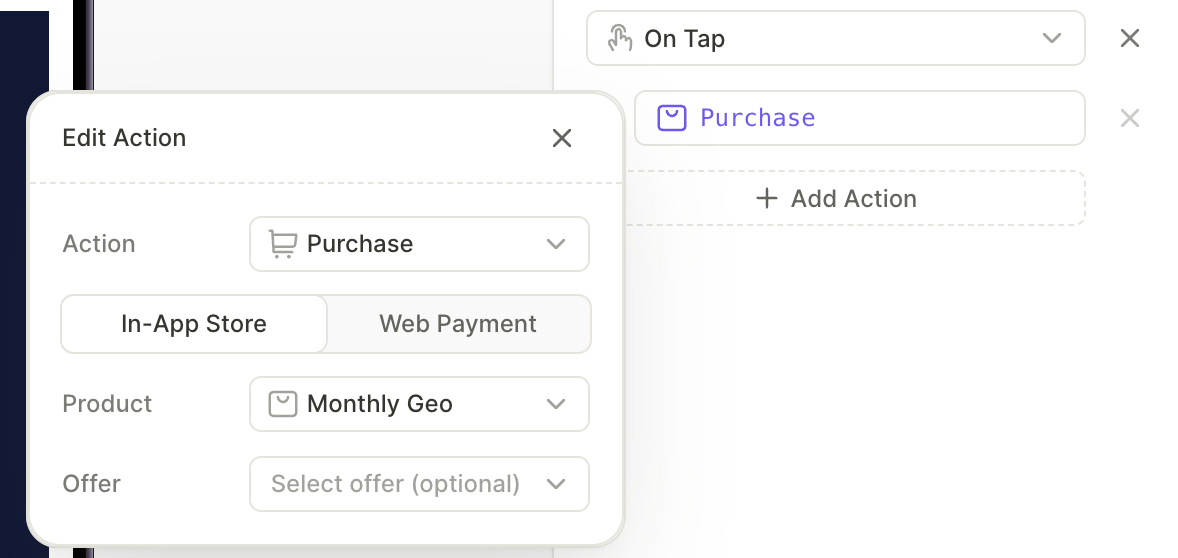
Purchase
Triggers a purchase flow directly from a button or interaction in your onboarding. Use this to let users subscribe or buy a product without leaving the flow.
You can configure two behaviors for this action:
- In-app store: Initiates a native purchase. Set Product to a specific product, or to
products.selectedProductfor the user’s current selection on the screen. - Web payment: Sends the user to a web paywall instead of triggering a native purchase. Use this when you want to handle the transaction outside the app, such as for web-based subscription offers.
A Purchase action without a target Product or Web Paywall URL blocks previewing and publishing. Assign a target or remove the action.
Restore purchases
Triggers the restore purchases flow on the device. Users tap this when they’ve previously bought a subscription on another device or after reinstalling the app, and need to recover access to their entitlements.
There’s nothing to configure for this action — Adapty handles the restore through the native store flow.
The Restore purchases action is also pre-configured on the Restore link in the Links button preset (see Set up purchases).
Custom actions
A custom action fires a named Action ID that your own app code handles. Use it when the built-in action types don’t cover what you need.
Adapty provides the trigger; your app implements the behavior:
- In the builder, you assign an Action ID to an element’s interaction.
- When the user triggers the interaction, the flow passes the ID to your app.
- Your app matches the ID and runs your code.
Set up a custom action
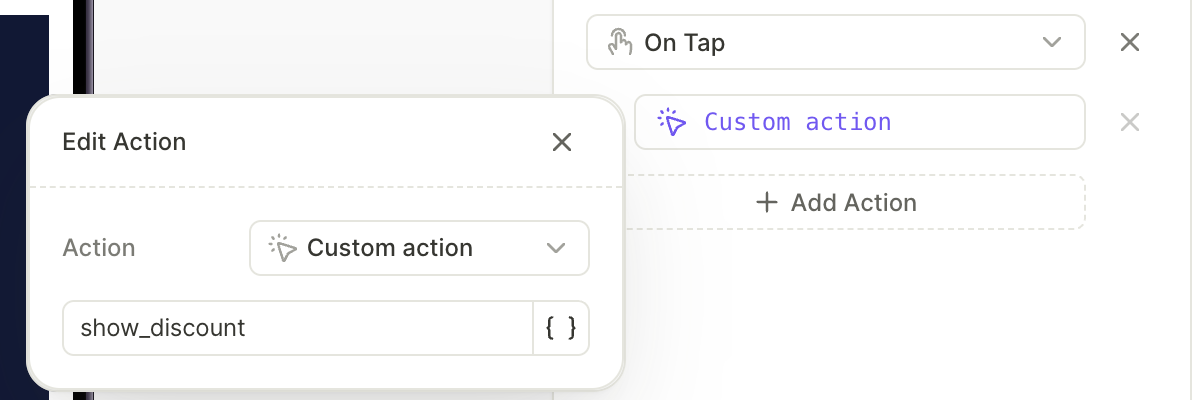
- In the Edit action window, assign an Action ID — a string your app will recognize (for example,
show_discount). - In your app code, implement a handler for this Action ID. See Handle paywall actions for implementation details and code examples.
A Custom action without an Action ID blocks previewing and publishing. Assign an Action ID or remove the action.
What you can do with custom actions
A custom action does nothing on its own. You set a static Action ID in the builder, and your app code handles what happens when it receives that ID. Every use case below follows the same pattern: assign an ID in the flow, then handle it in your code.
- Trigger an in-app event: Fire an ID such as
viewed_special_offer, then log the event to your analytics when your app receives it. - Request a system permission: Fire an ID such as
request_location, then call the OS permission prompt from your app. For permissions the prompt can’t grant, open the phone’s system settings instead. Adapty doesn’t show the prompt — your app does. - Start native authentication: Fire an ID such as
login_google, then present your own login screen. The flow can’t sign the user in. - Apply business logic: Fire an ID such as
apply_discount, then unlock content or change app state on your side. - Pass a quiz answer to your app: Assign a different Action ID to each option (for example,
goal_weight_lossandgoal_muscle), then read the ID in your code. Use the ID to set a custom user attribute you can segment on later. Because the action carries only a fixed ID, this is the only way to report the choice — the flow can’t send the selected value.
A custom action fires the moment the user selects an option. If the user changes their answer, the flow fires the new Action ID too. Your app then receives both in order — for example, goal_weight_loss, then goal_muscle. Make your handler idempotent so the latest signal wins.
What custom actions can’t do
Custom actions are static. The Action ID is fixed when you build the flow — it can’t read variables or user inputs. When the action fires, your app receives only that ID, never the email, phone number, or other input the user entered. Input fields stay inside the flow as variables for branching and personalization. To use those values in your app, collect them through your own UI or API.
Custom actions are also one-way. Your app can’t return a result to the flow, and the flow doesn’t wait for your code to finish. If a Navigate next action follows the custom action, the user moves to the next screen even when your code fails — for example, when the user closes your login screen without signing in. Combined with the static Action ID, this rules out validating user input in your app — for example, checking an SMS code the user entered and branching on the result. If the rest of the flow depends on what your code did, split the flow between two placements.
Continue the flow based on the result
If some screens should appear only after a custom action succeeds — for example, screens that follow a login — split the flow between two placements and let your app decide when to show the second part:
- In the first placement, create a flow that ends with a custom action (for example,
login). - In your app, handle the Action ID: present your login screen and check whether the user signed in.
- If the user signed in, show the flow from the second placement with the follow-up screens.
This way, your app controls the transition based on the actual result, instead of the flow navigating forward regardless of the outcome.
Conditional actions
Use conditional actions to split the flow into different paths based on user data.
Some common use cases include:
- You have a quiz on the screen, and you want to navigate users to different screens based on their answers. In this case, add a conditional action to a button.
- You want to offer different products and offers to different user groups. Place them on different screens and set up conditions for a navigation button.
- You want to skip certain steps for users who have already completed a tutorial in a previous app session.
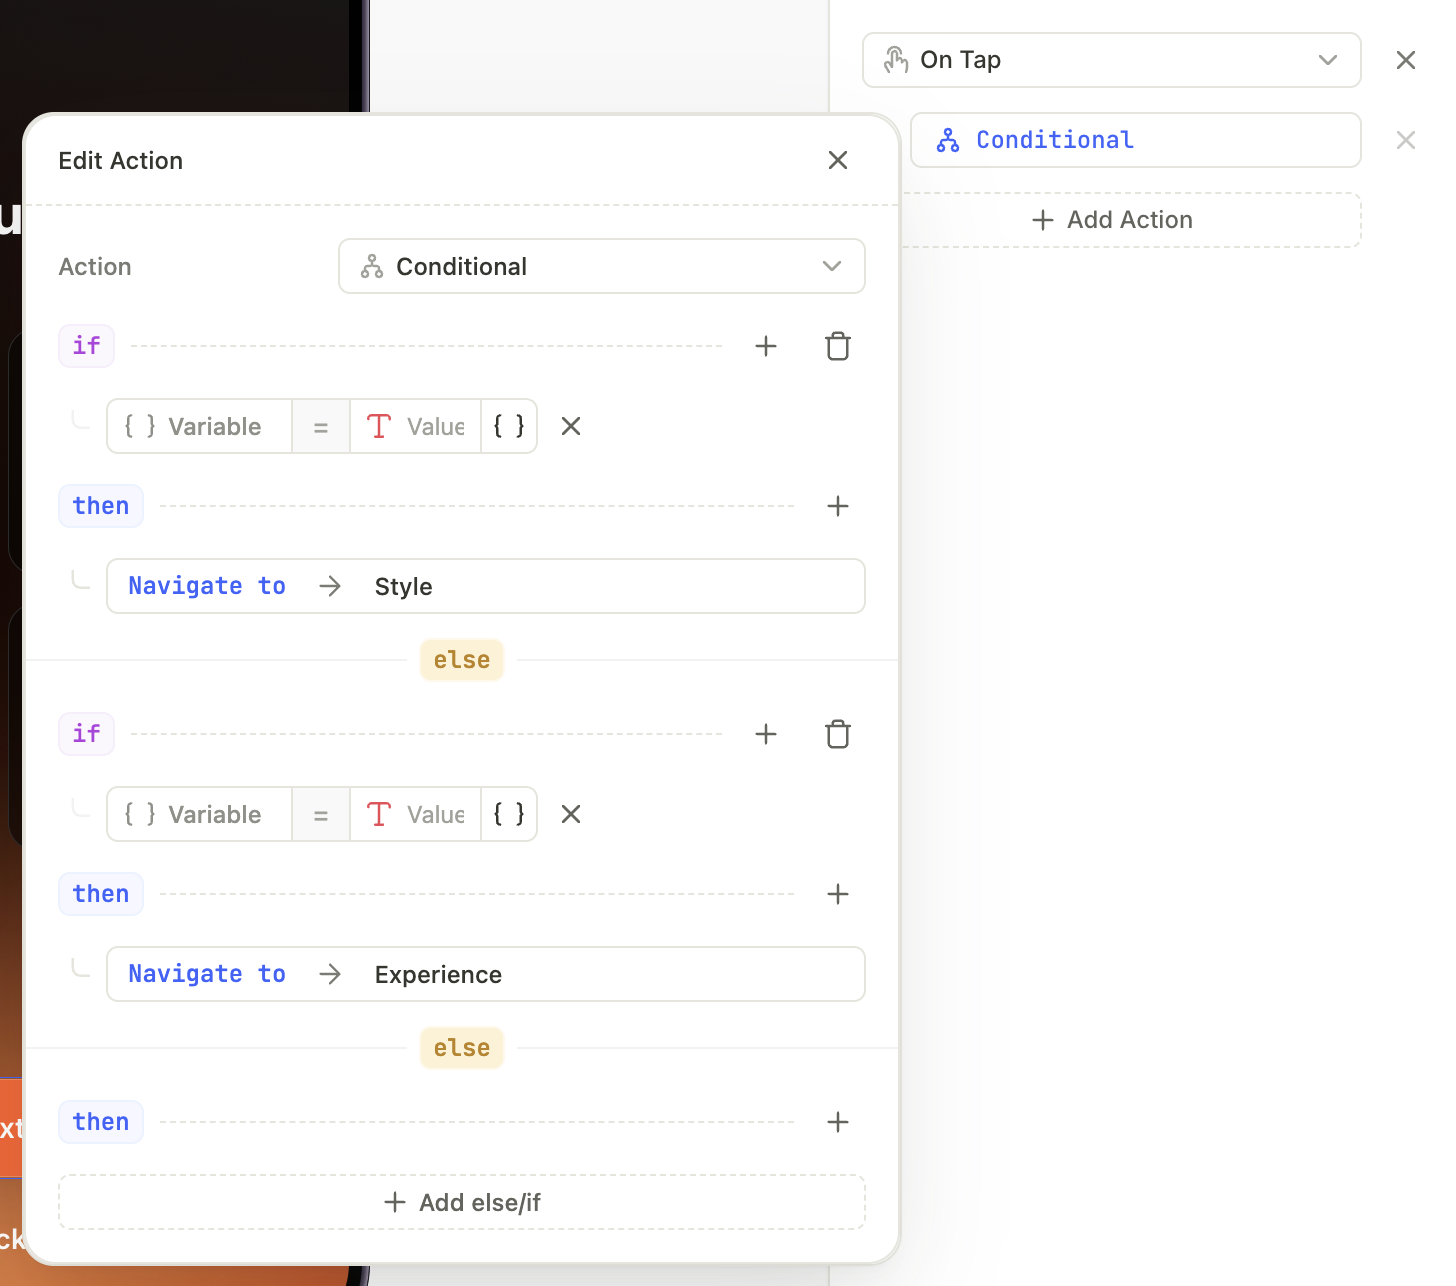
Conditional actions work like an if / else-if / else chain. The app reads the rules from top to bottom and stops at the first match:
- IF: The flow checks the primary condition.
- Is it True? The flow executes the THEN actions immediately and stops.
- Is it False? The flow skips to the next section.
- ELSE IF: You can add extra checks here (e.g., “If not Premium, is the user on a Trial?”).
- ELSE (Fallback): If none of the rules above matched, the flow executes the actions in this final section.
- If a rule is added but has no action assigned, matching the condition results in doing nothing.
- An incomplete rule (no operator or value) blocks previewing and publishing.
For each rule, select a variable to evaluate and an action to run. You can set more than one action per rule.
The flow executes only one rule — the first one it matches. If you need to execute both IF and ELSE IF at the same time, add both actions to IF.
To learn how to make elements selectable and organize them into groups for use in conditions, see Selectable elements and groups.
Troubleshooting
Any action with missing required fields blocks previewing and publishing. See Save & publish flows for the full list.