Add products
Install agent tools
Run the whole Adapty SDK integration from your AI coding tool. Learn more
Installs into any agent that supports skills. To update later, run npx skills update.
After installing, run the skill in your project:
Setting up Adapty programmatically? You can complete this step using the Developer CLI.
Before you can use Adapty’s core features, you need to add each product you sell and link it to every store or payment platform you support. This setup allows you to deliver products to users’ devices and track them in analytics later.
In Adapty, anything your app sells is a product. If the same item exists in the App Store, Google Play, or Stripe, you can group them into a single product in Adapty. Set it up once and manage it across all platforms from one place.
Let’s add your first product.
Add your first product
This quickstart covers the basics you need to create a product. For more details, see the guide on creating products.
Let’s say you want to add a monthly subscription as a product.
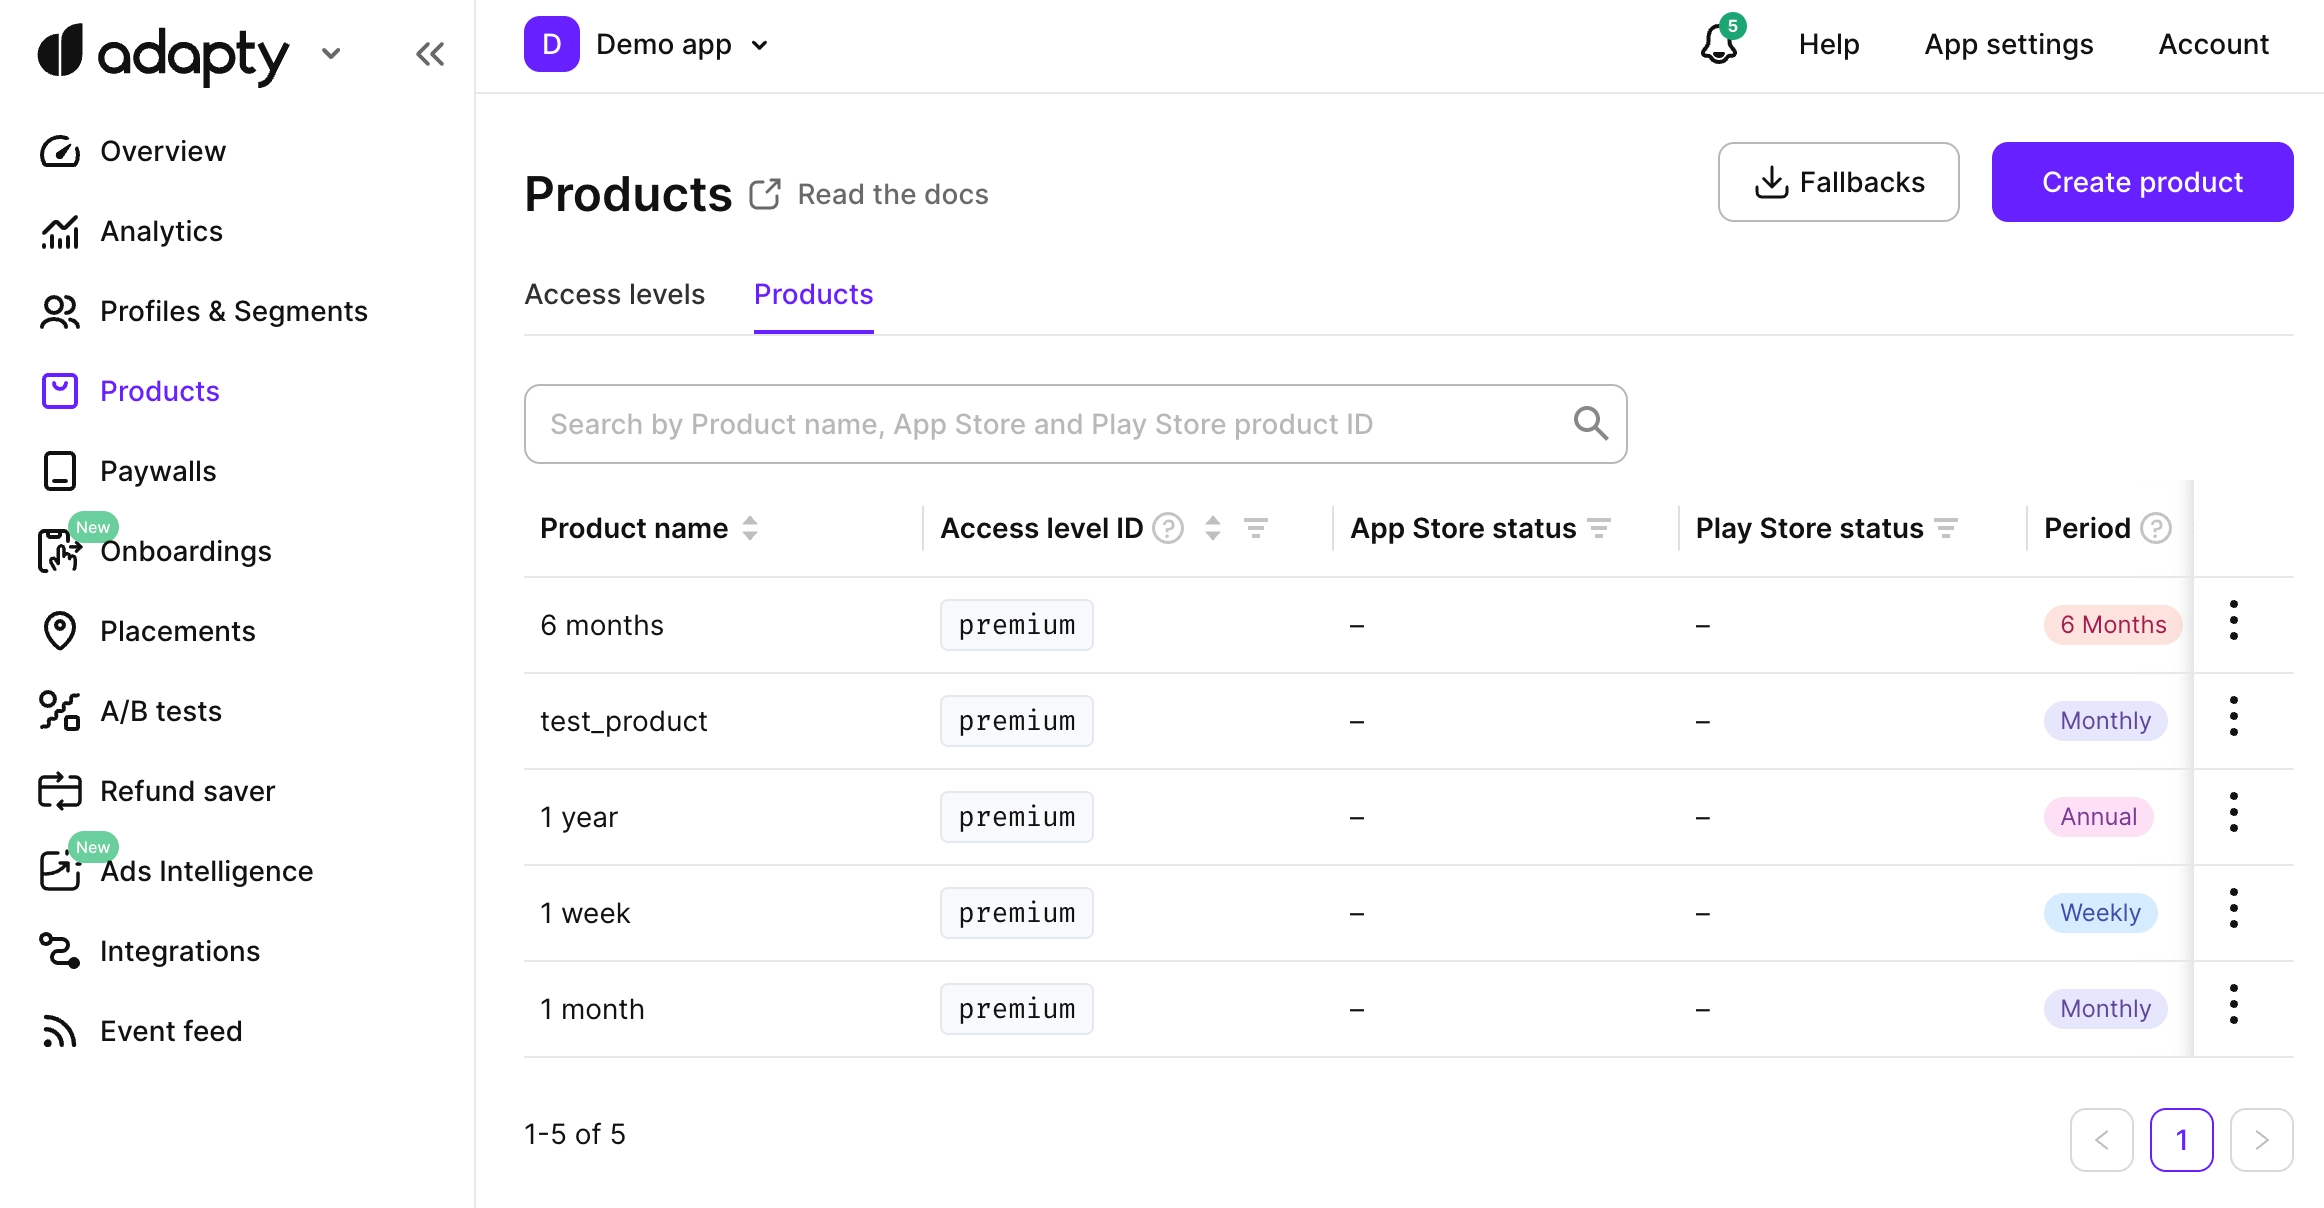
- Go to Products from the Adapty main menu.
- Click Create product at the top right.
The next steps depend on whether you already have products in App Store and/or Google Play:
Before you start, ensure you have configured the integration with App Store and/or Google Play. For App Store, ensure you have added the App Store Connect API key, so Adapty can push products.
-
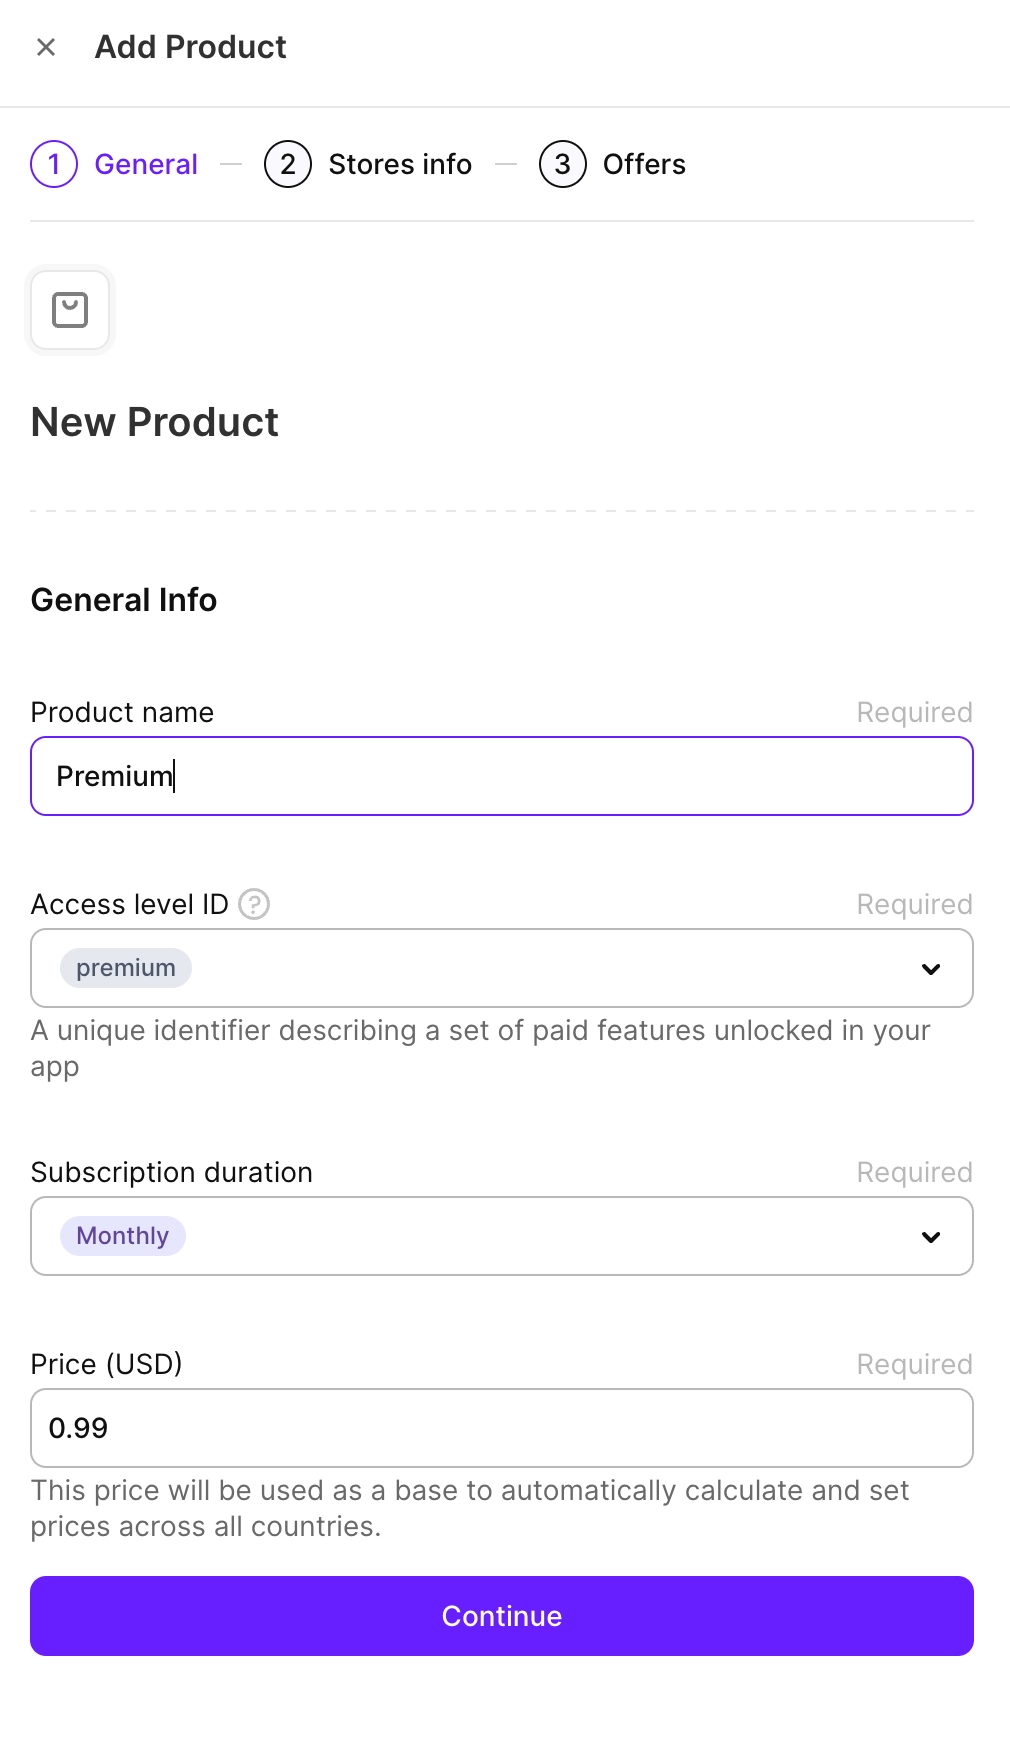
Select Create a new product and push to stores.
-
Add product details:
- Product name: The name visible only to you across the Adapty dashboard.
- Access Level: The unique identifier that determines which features are unlocked after purchase. If all paid users in your app get access to the same features, you can use the default access level:
premium. For more complex setups, create additional access levels. - Subscription duration: Select the duration of the subscription from the list.
- Weekly/Monthly/2 Months/3 Months/6 Months/Annual: The subscription duration.
- Lifetime: Use a lifetime period for the products that unlock the premium features of the app forever.
- Non-Subscriptions: For the products that are not subscriptions and therefore have no duration, use non-subscriptions. These can be unlocked for additional features, consumable products, etc.
- Consumables: Consumable items can be purchased multiple times. They could be used up during the life of the application. Examples are in-game currency and extras. Please consider that consumable products don’t affect access levels.
- Price (USD): The product price in USD. This price will be used as a base to automatically calculate and set prices across all countries. You will be able to customize the price for different countries and regions later.

- Click Save & Continue and switch to the App Store or Google Play tab to fill in the product details for the store.
- Product ID: Create a permanent unique ID for the product.
- Product group: Select an existing product group you’ve created in App Store Connect or click Create new Product Group and set its name and ID. After Adapty creates it, you can select it from the dropdown.
- Screenshot: Upload a screenshot of the in-app purchase that clearly shows the item or service being offered. This screenshot is used for the App Store review only and isn’t displayed on the App Store. See the screenshot size and format requirements here.
If it is your first product for this app, you must manually submit it for review in App Store Connect. This won’t be required later. Once the review is finished, the product status in Adapty will update automatically.
- Base Product ID: Create a permanent unique ID for the product.
- Subscription: Select an existing subscription group you’ve created in Google Play Console or click Create new Product Group and set its name and ID. After Adapty creates it, you can select it from the dropdown.
-
For iOS, configure the introductory offer – free trial – by selecting its Free duration from the dropdown. For this initial setup, you can add an introductory free trial. Once the main product is approved by the stores, you can add more offers (e.g., promotional, win-back) by linking their existing IDs from your store console.
Intro offers don’t sync automatically with Google Play. Unlike App Store, Google Play has no separate “introductory offer” type — free trials and discounted offers are all configured as offers on a base plan. Create the offer in Google Play Console and link it to your Adapty product.
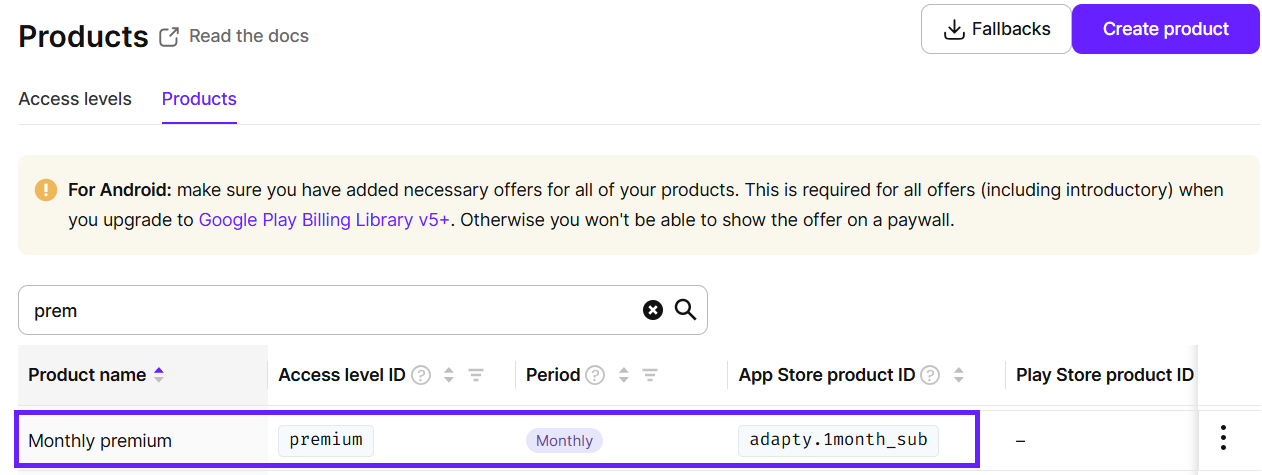
- Select Connect an existing store product.
- Add product details:
- Product name: The name visible only to you across the Adapty dashboard.
- Access level ID: The unique identifier that determines which features are unlocked after purchase. If all paid users in your app get access to the same features, you can use the default access level:
premium. For more complex setups, create additional access levels. - Subscription duration: select the duration of the subscription from the list.
- Weekly/Monthly/2 Months/3 Months/6 Months/Annual: The subscription duration.
- Lifetime: Use a lifetime period for the products that unlock the premium features of the app forever.
- Non-Subscriptions: For the products that are not subscriptions and therefore have no duration, use non-subscriptions. These can be unlocked for additional features, consumable products, etc.
- Consumables: Consumable items can be purchased multiple times. They could be used up during the life of the application. Examples are in-game currency and extras. Please consider that consumable products don’t affect access levels.
- Price (USD): The product price in USD. If your product is already in the store, this value won’t affect its actual price in the store; you can select any value from the list. Later, you can customize prices for different regions right in the Adapty dashboard.
- Add store details. Choose your store:
- App Store Product ID: The unique identifier used to access your product on devices. If you can’t find it, ensure the ID is correct and belongs to the right app.
- Google Play Product ID: The identifier for the product from the Play Store. Select it from the list of existing product IDs. If you can’t find it, ensure the ID is correct and belongs to the right app.
- Base plan ID: The ID that defines the base plan for the product in the Play Store.
- Legacy fallback product: A fallback product is used exclusively for apps using older versions of the Adapty SDK (versions 2.5 and below). Specify the value in the following format
<subscription_id>:<base_plan_id>.
Intro offers don’t sync automatically with Google Play. Unlike App Store, Google Play has no separate “introductory offer” type — free trials and discounted offers are all configured as offers on a base plan. Create the offer in Google Play Console and link it to your Adapty product.
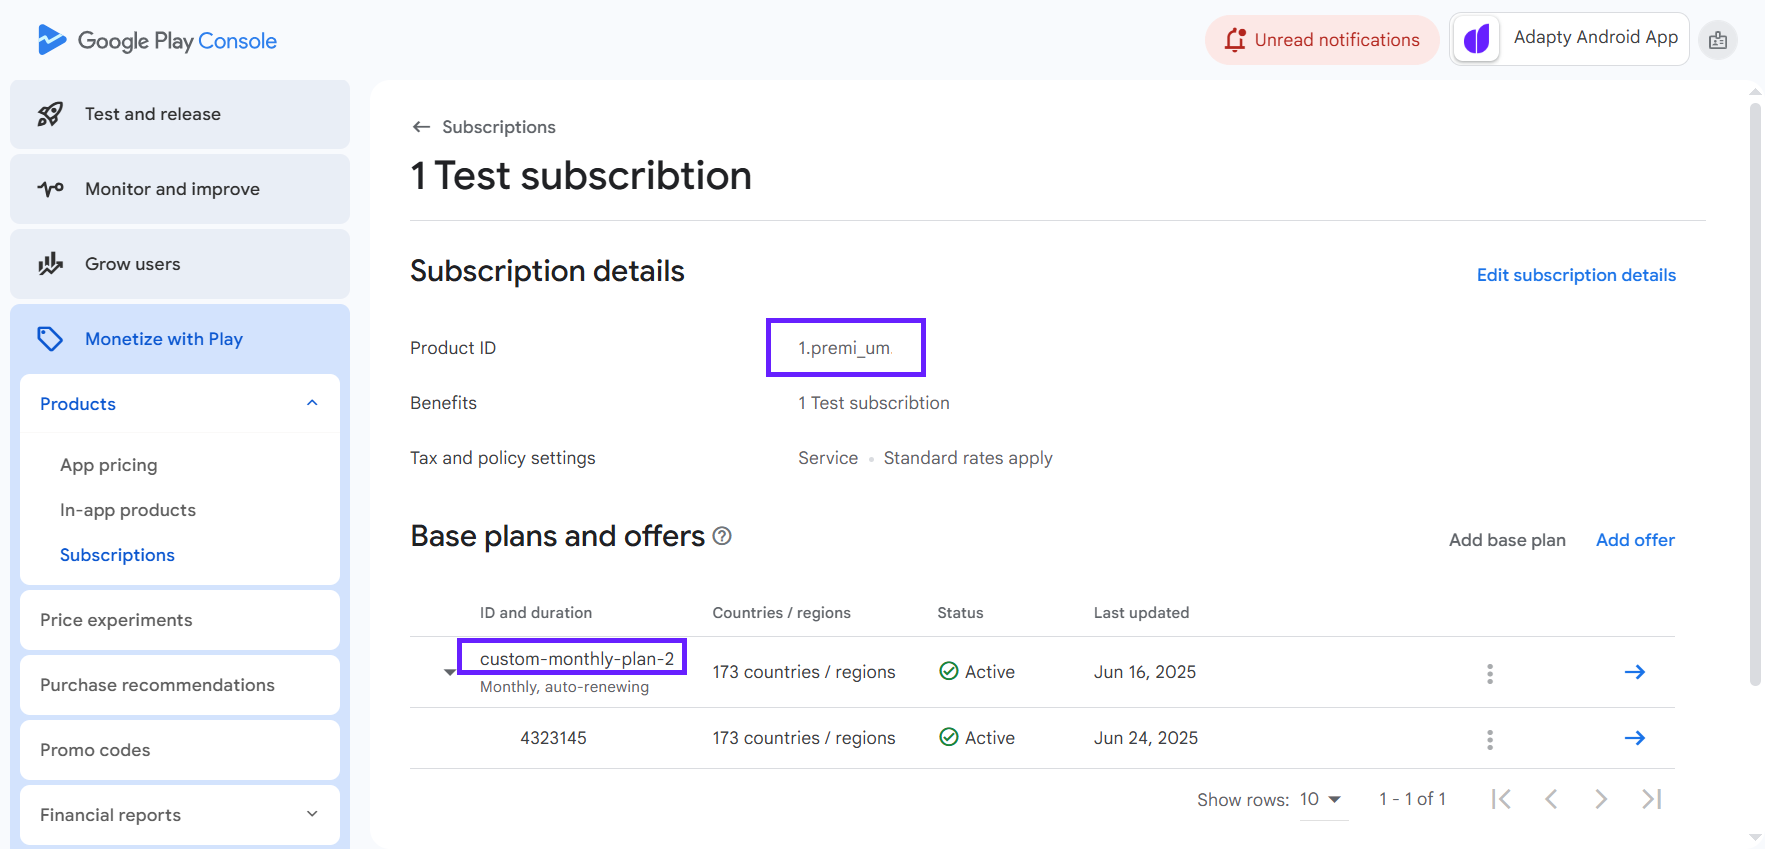
Click here to learn where to find the Google Play Product and Base plan IDs.
- Go to Monetize with Play > Products > Subscriptions in your Google Play Console account.
- Open the Subscription for the purchase.
- You will see the Product ID in the Subscription details section and the Base plan ID in the ID and duration column of the Base plans and offers section.
- Stripe Product ID: The unique product identifier from Stripe.
- Stripe Price ID: The unique identifier from Stripe for the price associated with the product.
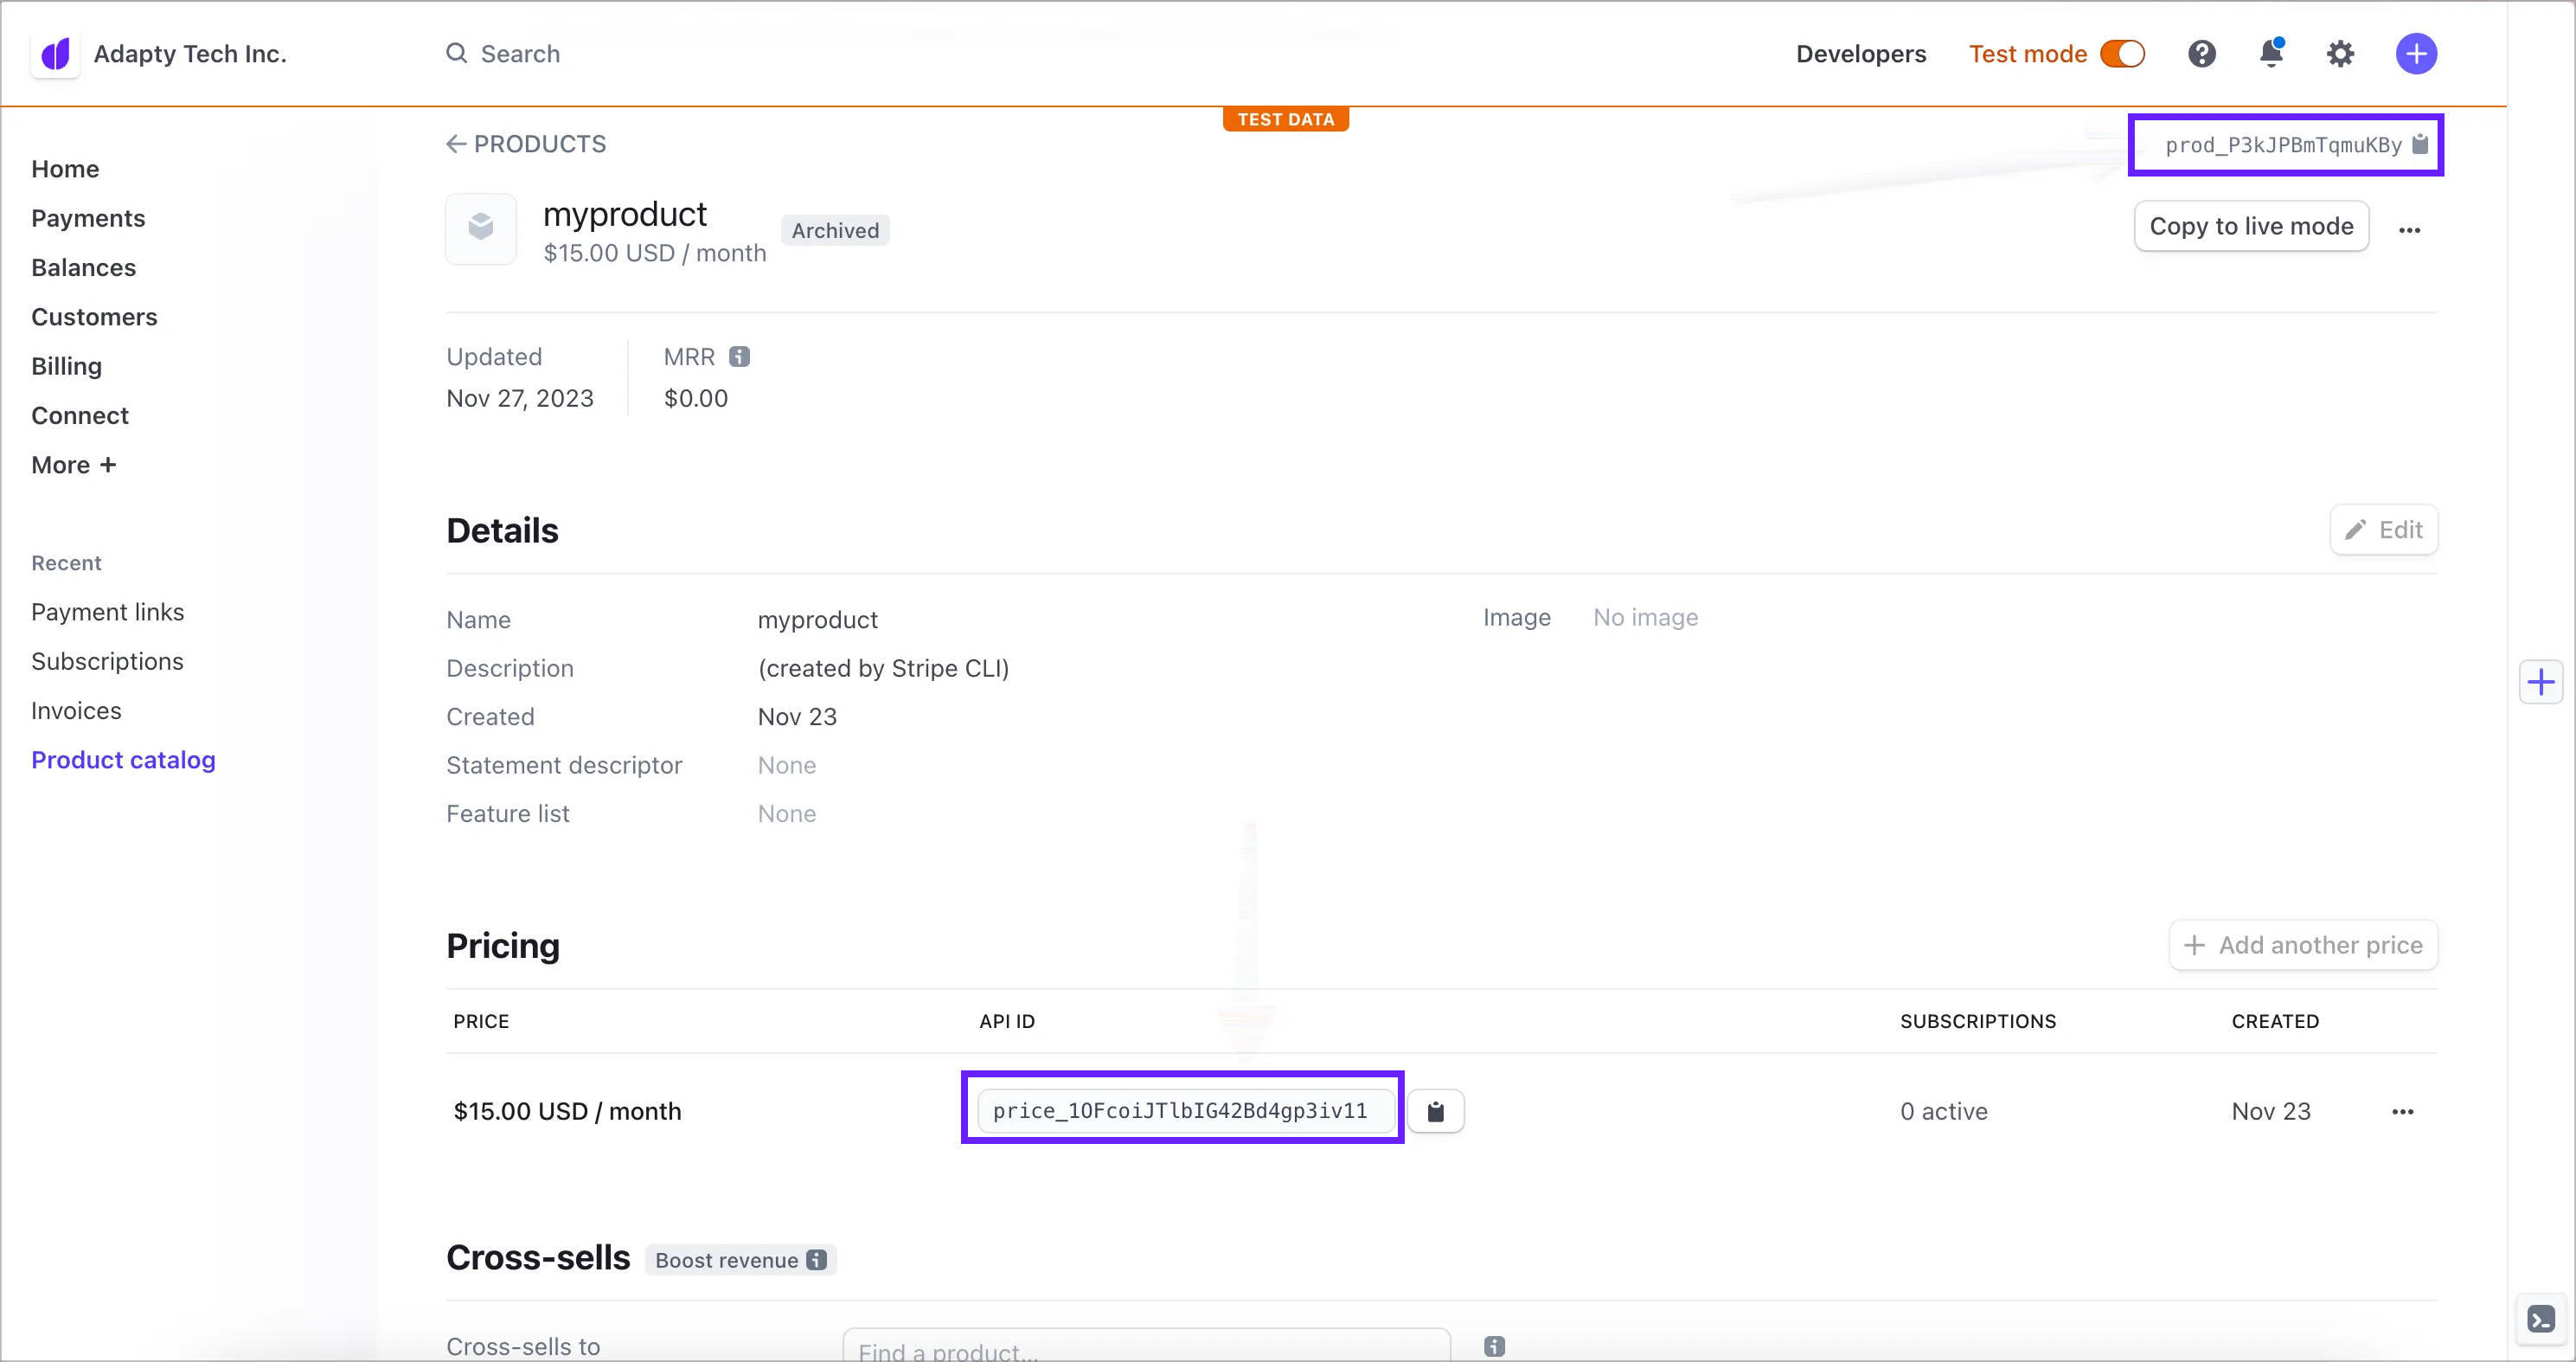
Click here to learn where to find the Stripe Product and Price IDs.
- Go to your Product Catalog in Stripe.
- Open the product you need.
- You will see:
- The Stripe Product ID (looks like
prod_...) in the top right corner. - The Stripe Price ID (looks like
price_...) in the API ID column of the Pricing section.
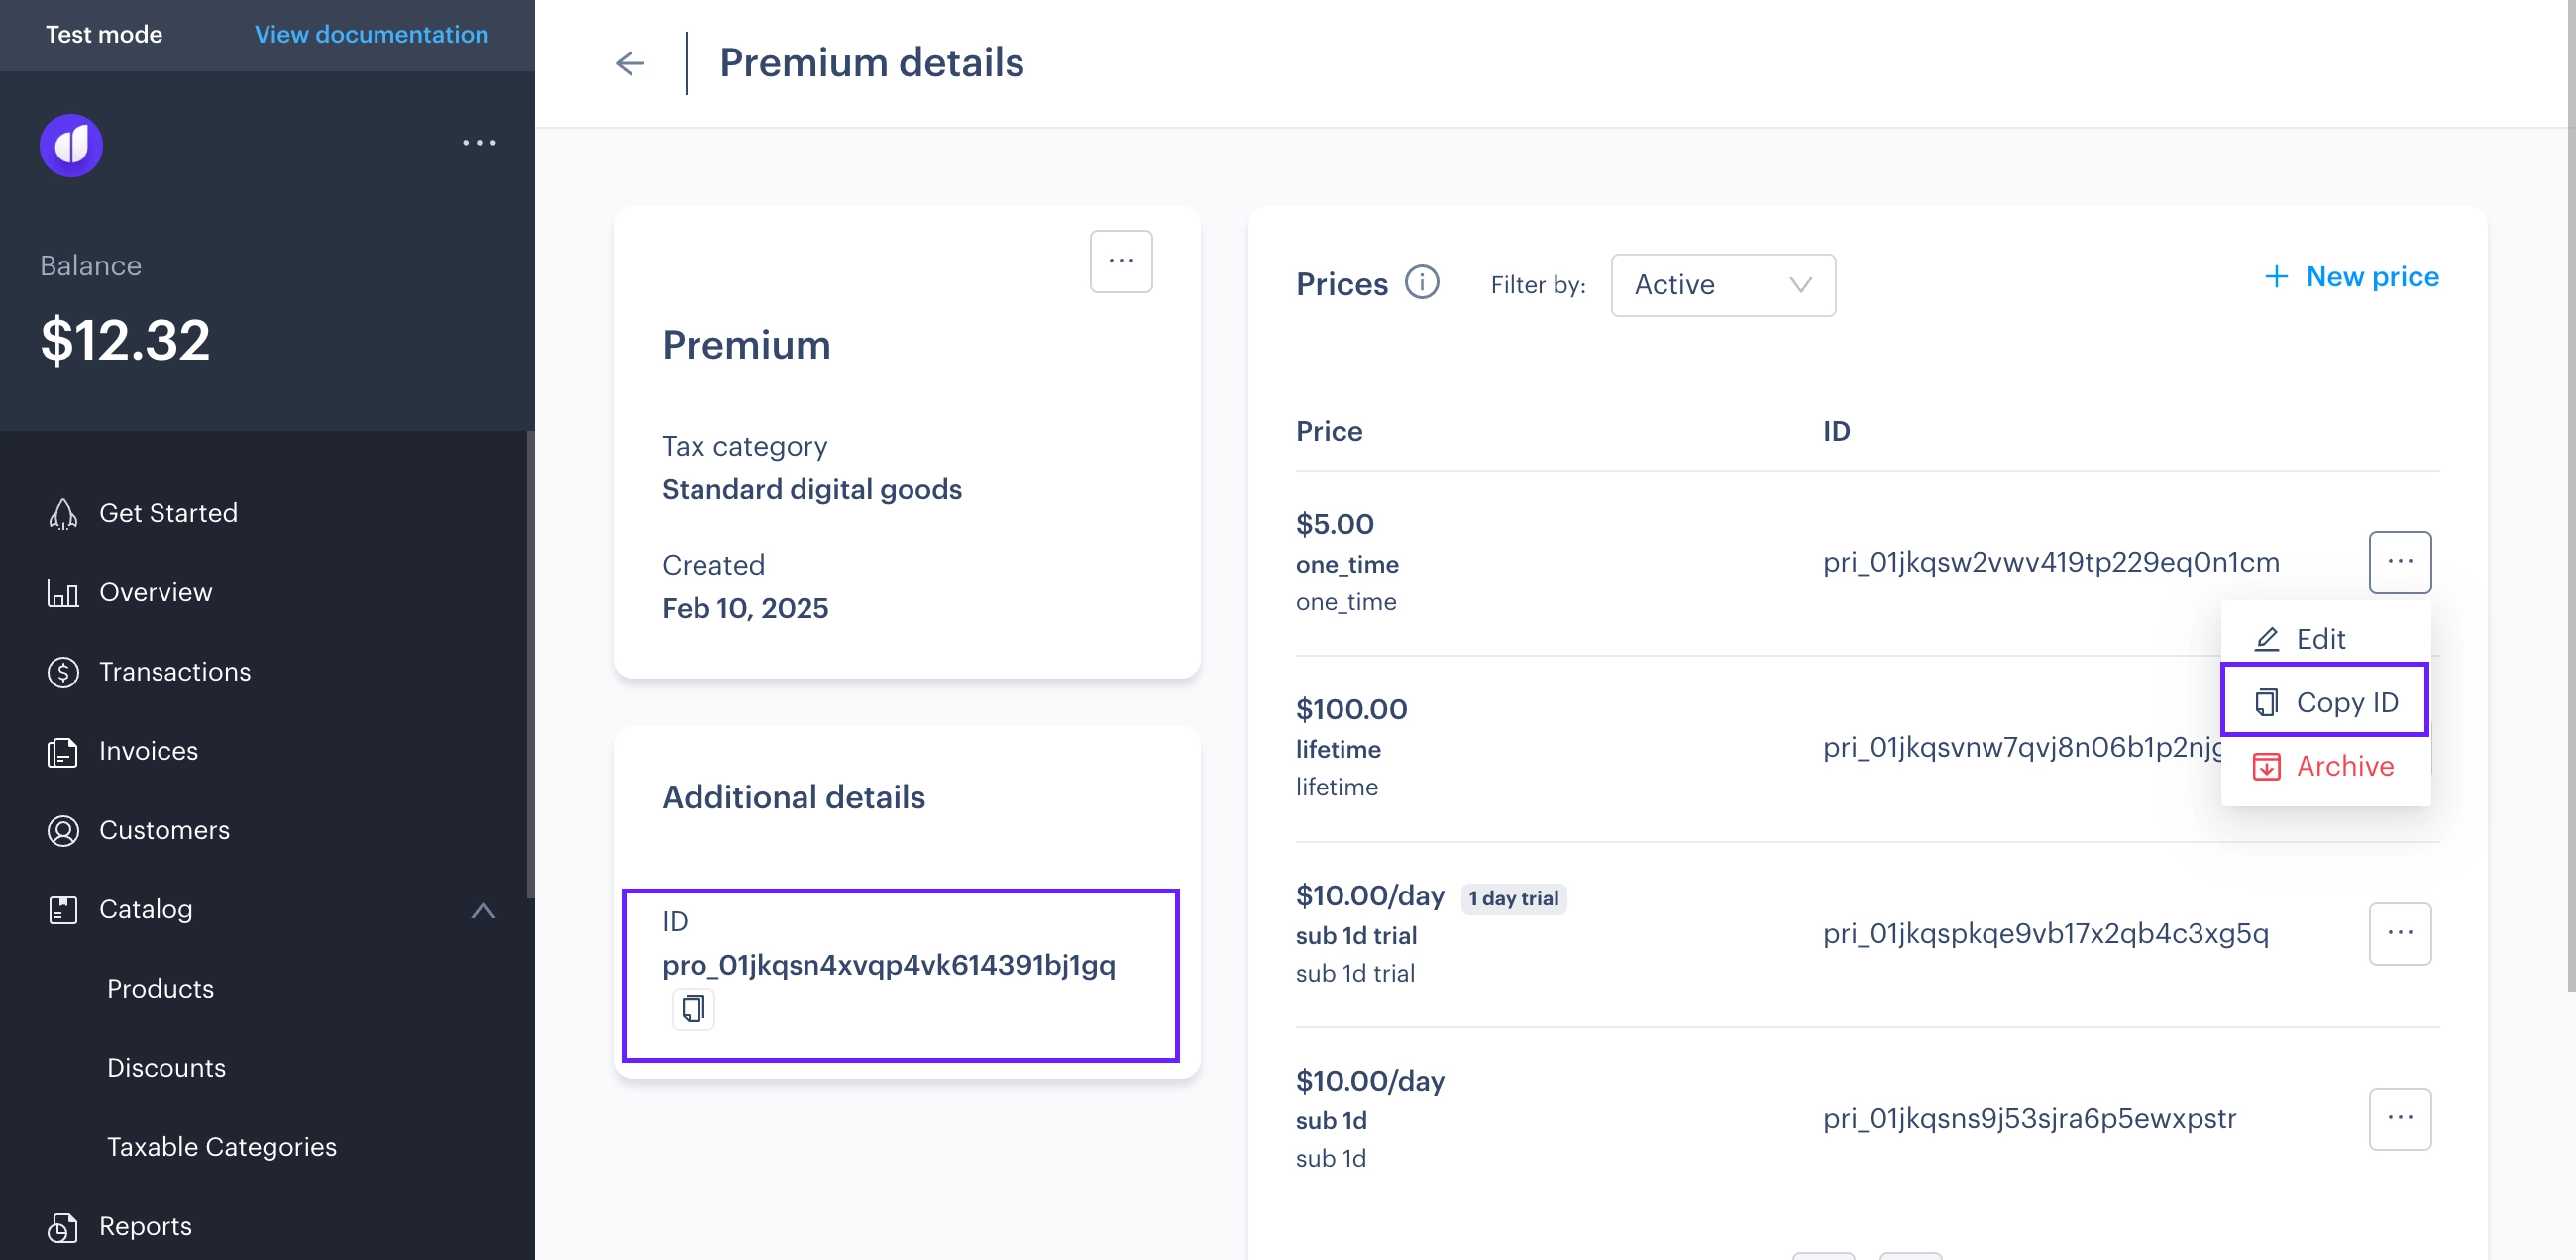
- Paddle Product ID: The unique product identifier from Paddle.
- Paddle Price ID: The unique identifier from Paddle for the price associated with the product.
Click here to learn where to find the Paddle Product and Price IDs.
- Go to your Product Catalog in Paddle.
- Open the product you need.
- You will see:
- The Paddle Product ID (looks like
pro_...) in the Additional details section. - The Paddle Price ID (looks like
pri_...) in the ID column of the Prices section.
You can select an existing custom store or add a new one and associate a product with it.
Keep in mind that Adapty only tracks transactions from the App Store, Google Play, and Stripe. For custom stores, you’ll need to submit transactions using the Adapty server-side API Set transaction method.
- You can create offers for the product if needed. To add offers, click Yes, add offers. Otherwise, click No, thanks.
Your product will appear in the product list.
Next steps
Once you’ve added your products to Adapty, you can move on to setting up paywalls as it’s the only way to start selling them.