Sandbox testing
Once you’ve configured everything in the Adapty Dashboard and your mobile app, it’s time to conduct in-app purchase testing.
Note: none of the test tools charge users when they test buying a product. The App Store doesn’t send emails for purchases or refunds made in the test environments.
Sandbox transactions are excluded from all analytics charts. They still appear on individual profile pages and in the event feed.
To proceed with in-app purchases testing, make sure:
- You’ve completed the quickstart guides on store integration, adding products, and the Adapty SDK integration.
- Your product is marked Ready to submit in App Store Connect.
Sandbox testing
We recommend testing in-app purchases with a real device. While sandbox purchases can run on simulators, real devices are needed to fully test all flows, including payment dialogs and biometric prompts.
You have two main ways to test in-app purchases:
- Build in Xcode and run on a test device: Convenient for developers and QA engineers.
- Use a sandbox test account with TestFlight: Suitable for anyone else.
Both these options are covered in the guide below.
Step 1. Create Sandbox test account in App Store Connect
Create a new Sandbox test account to ensure your purchase history is clean. If you reuse an existing account, any previously purchased products will remain available, and you won’t be able to test buying them again.
You can create a new Sandbox test account in a few clicks:
- Go to Users and Access > Sandbox > Test Accounts in App Store Connect and click +.
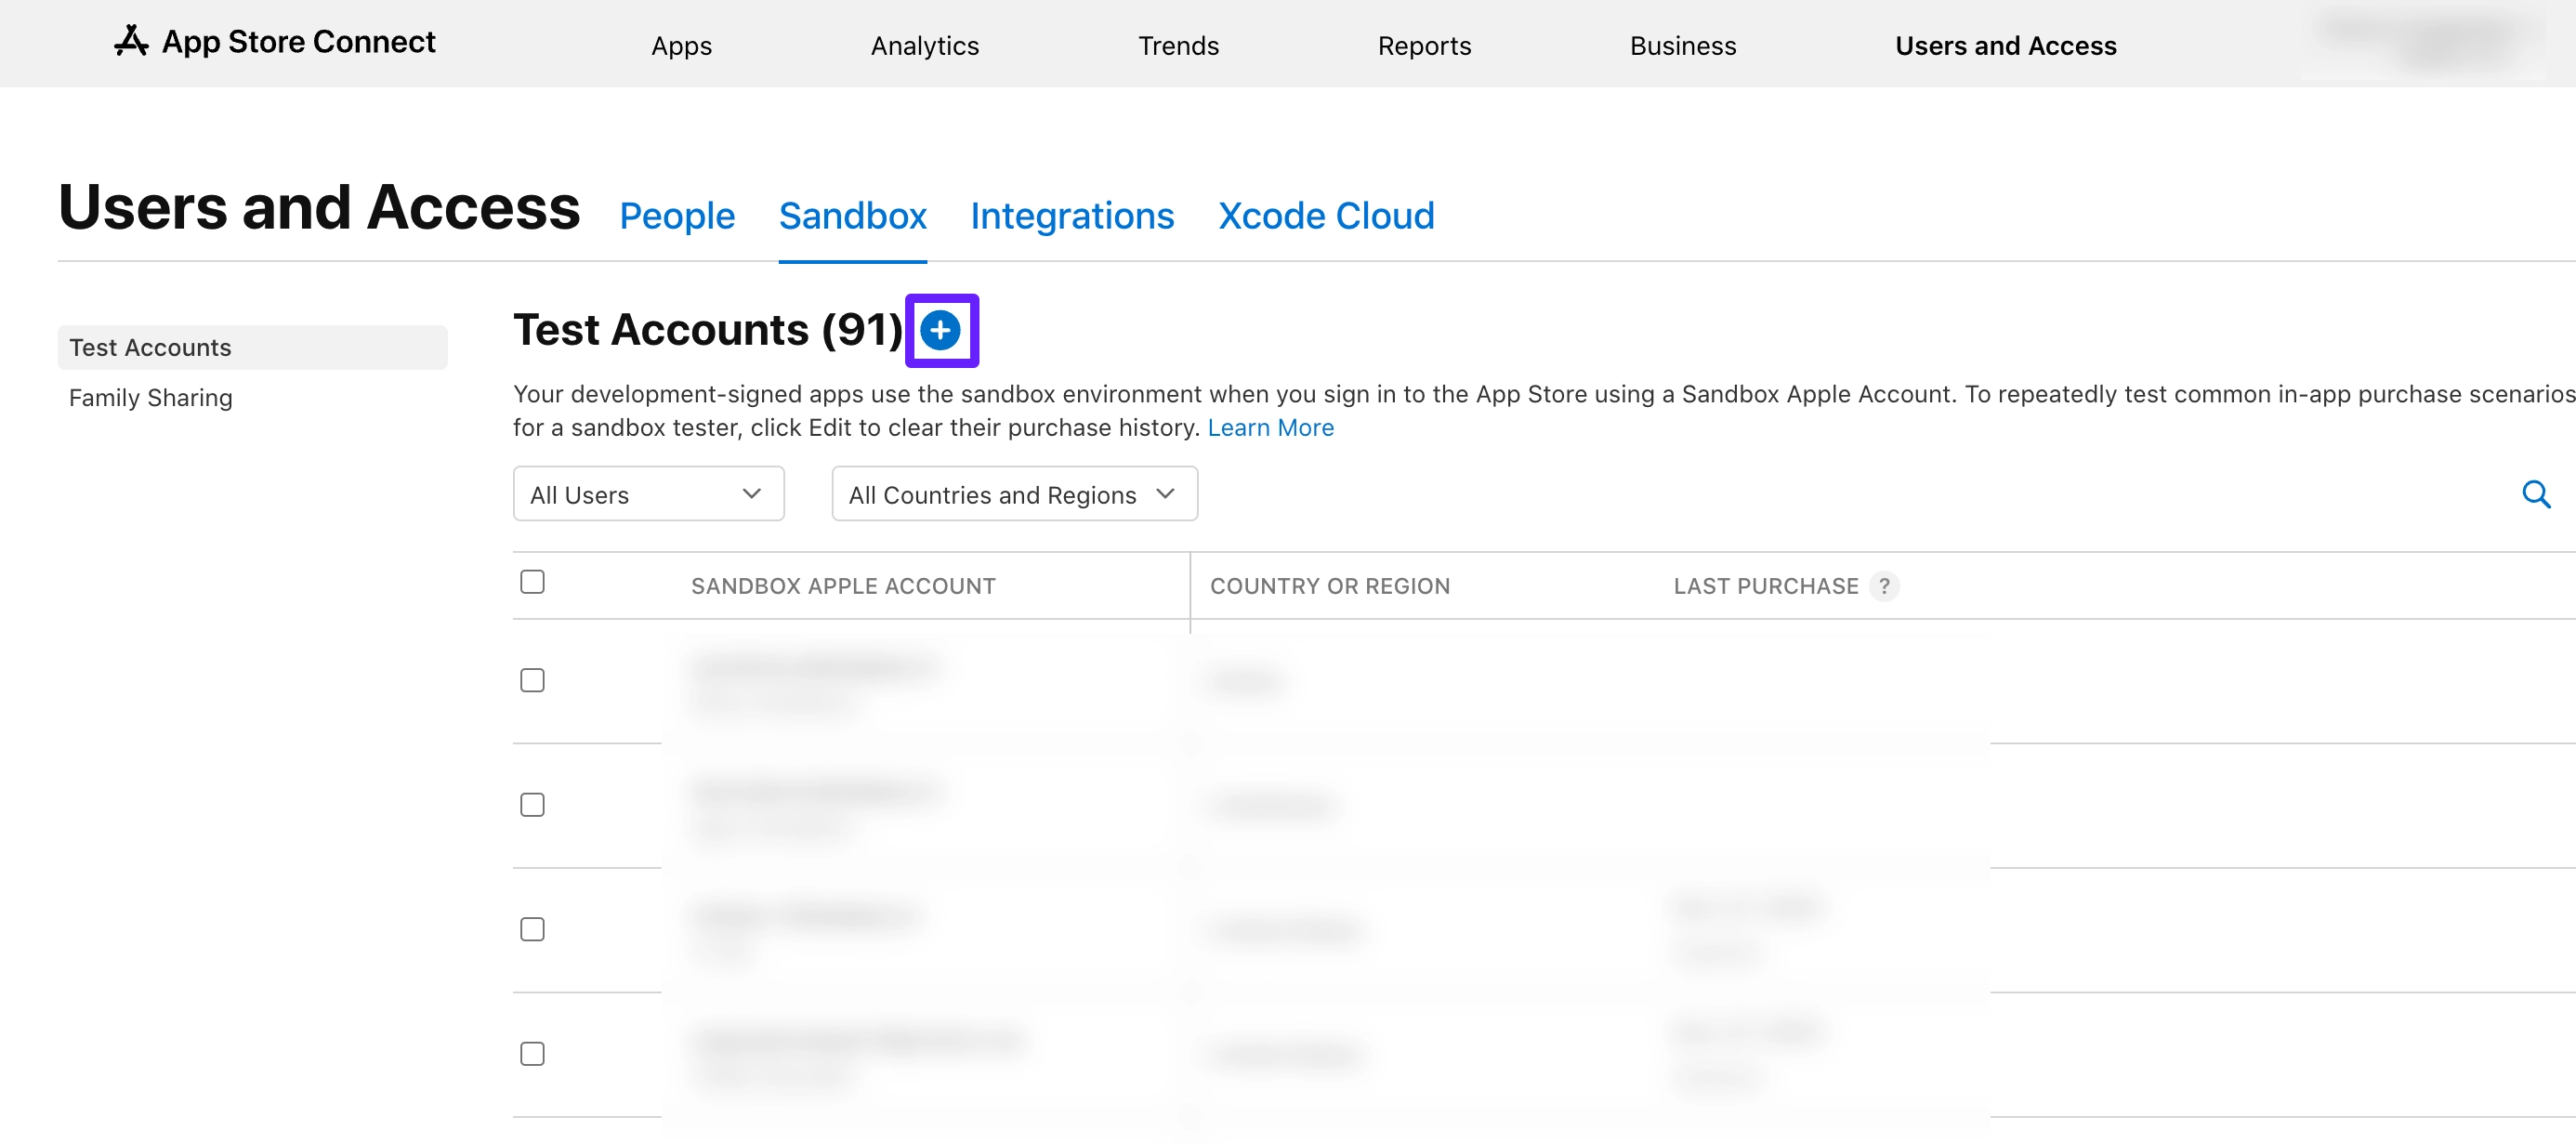
- Enter the test user details. Make sure to define the Country or Region which you plan to test as it impacts the product availability for the region and purchase currency.
- If you use Gmail or iCloud, you can reuse your existing email address with plus sign subaddressing.
- You can use a random email address that doesn’t even exist, but make sure to decline two-factor authentication (2FA) when you sign in on a test device later.
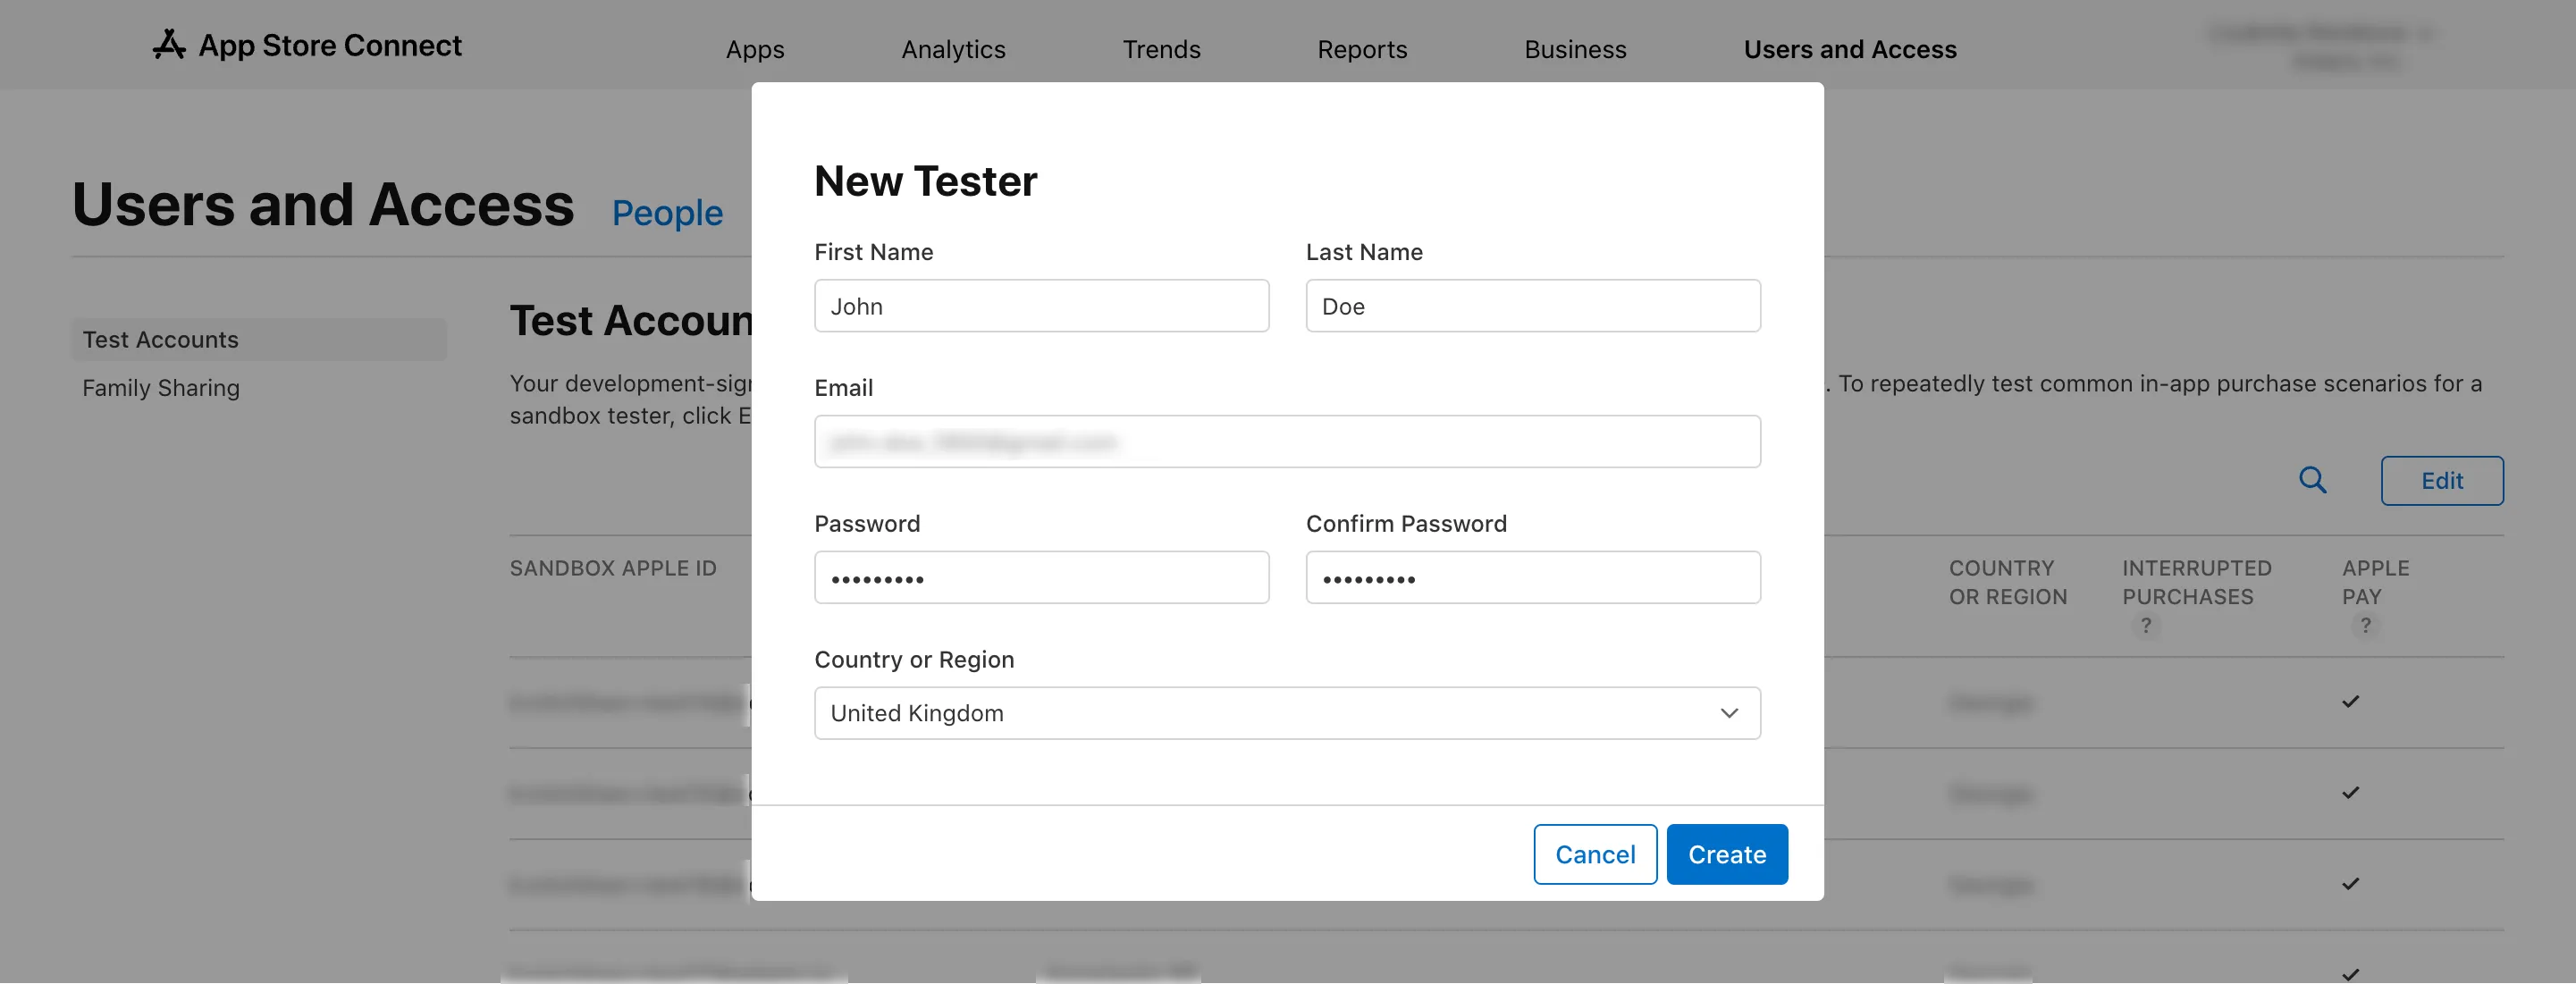
- Click Create.
Step 2. Enable the Developer mode
Skip this step if the Developer mode is already enabled on your test device or if you don’t have a Mac device.
You’ll need a Mac with Xcode installed and your test device cable:
- Open Xcode on your Mac. If you’re going to test in-app purchases with TestFlight, you only need to have XCode installed; you don’t need to have an app there.
- Connect your test device to the Mac using the cable.
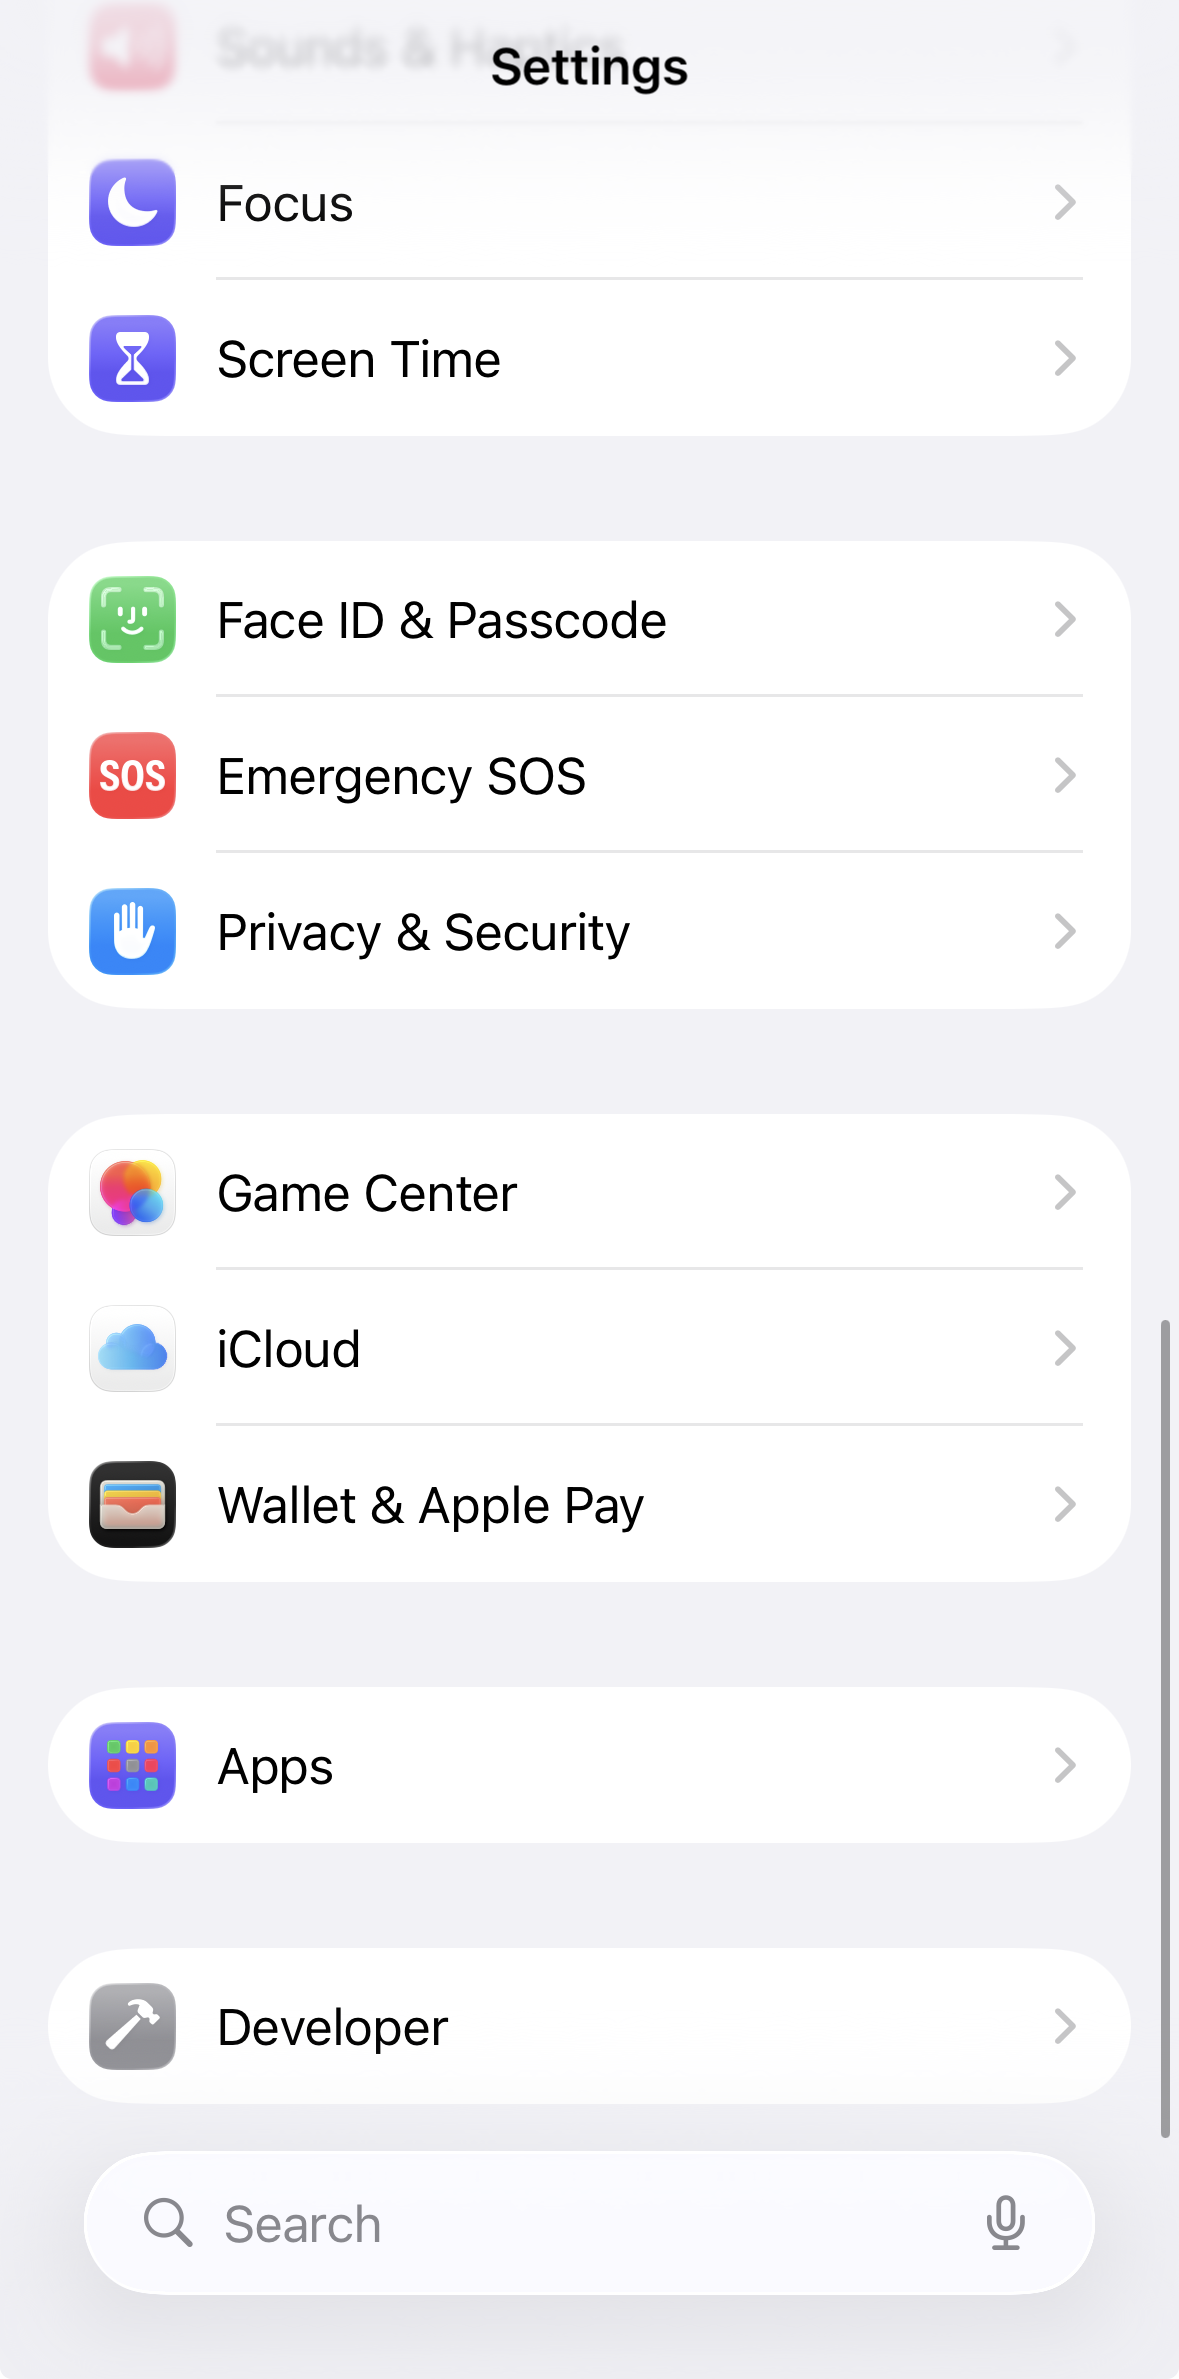
- Go to Settings > Privacy & Security > Developer Mode on your test device and turn on Developer Mode.
Step 3. Download the app from TestFlight
This step applies only if you’re testing with TestFlight. If you’re building the app in Xcode, skip this step.
For details on submitting your app to TestFlight, go to the Apple documentation.
Before downloading the TestFlight app, on your test device, make sure you are signed in with your production Apple Account. Then download the app you test from TestFlight.
Do not open the app once downloaded. Just proceed with the next steps. If accidentally opened, remove it from your test device and download it again. Otherwise, your purchase history may not be clear, and testing in-app purchases will lead to errors.
Step 4. Switch to Sandbox test account
Don’t use a Mac? Here’s a tweak for you
If you don’t work on macOS, you can’t switch to a sandbox account using Xcode. However, you can still do it directly on your test device:
- Go to Settings > Your Apple Account > Media & Purchases on your test device.
- Select Sign Out from the pop-up menu.
- Open the app downloaded from TestFlight and try to purchase a product.
- When prompted to sign in, enter your sandbox account credentials to switch to the sandbox environment
To switch to your sandbox account:
- Go to Settings > Your Apple Account > Media & Purchases on your test device.
- Select Sign Out from the pop-up menu.
- Go to Settings > Developer. If the Developer option is not available, make sure you’ve enabled it in step 2.
- Scroll down to the Sandbox Apple Account section and tap Sign In.
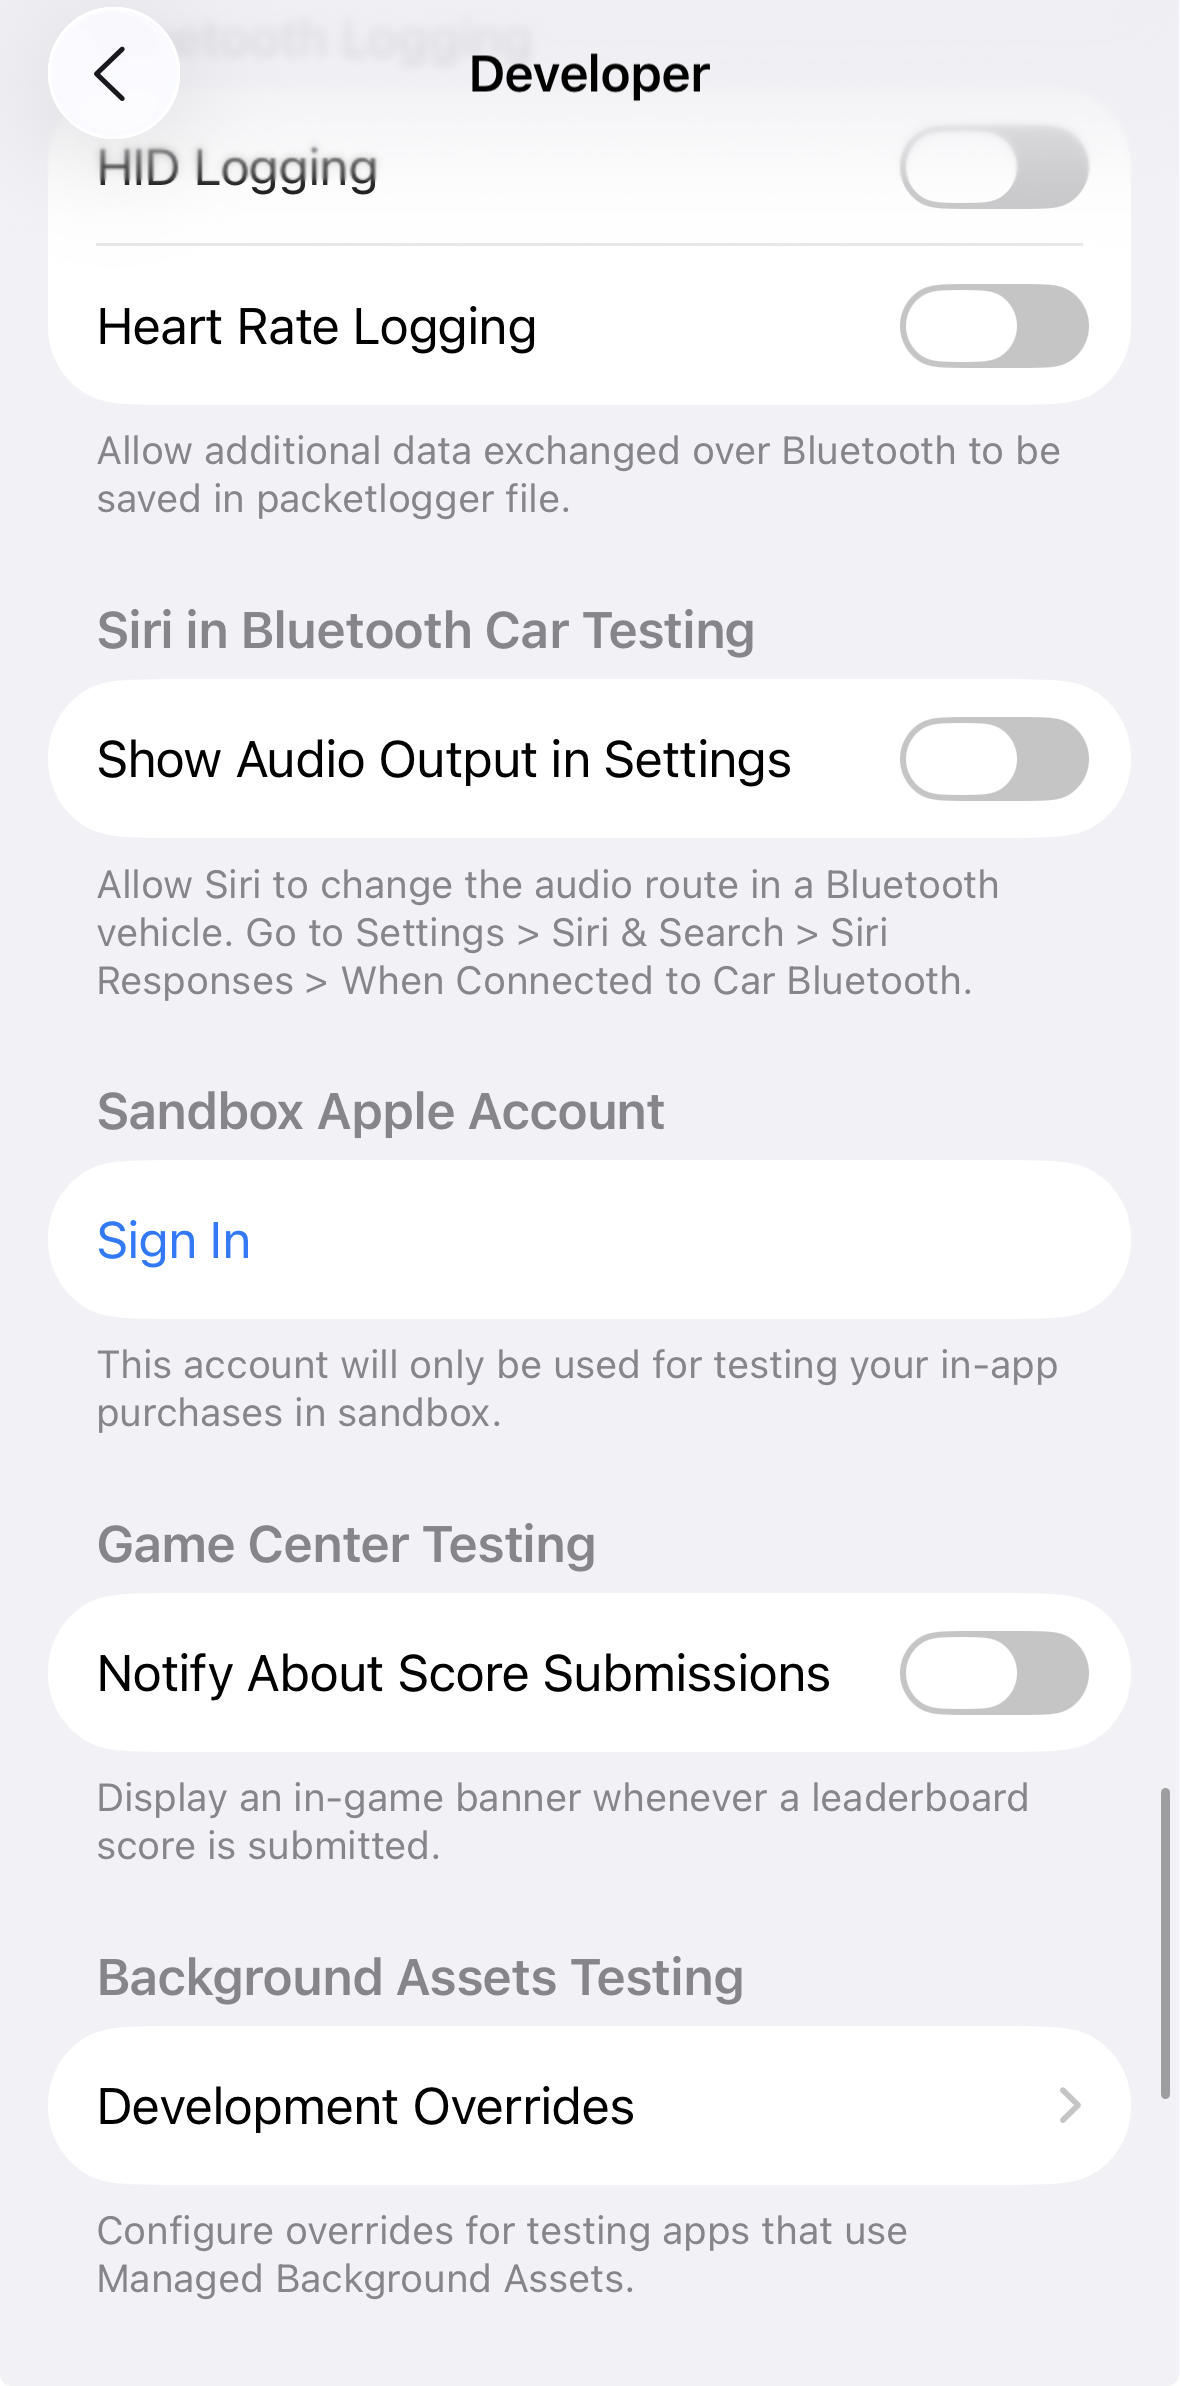
- Sign in with your Sandbox Apple Account credentials.
Step 5. Clear purchase history
If you’ve just created a new Sandbox test account and switched to it, you can skip this step as it only applies to repeated testing using the same Sandbox test account.
- Go to Settings > Developer > Sandbox Apple Account on your test device.
- Select Manage from the pop-up menu.
- Go to Account Settings and tap Clear Purchase History.
This step is required each time you repeat testing using the same Sandbox test account. In this case, you will also need to sign out from your Sandbox test account, then sign in again to clear the purchase history cache on the test device.
Step 6. Build in Xcode and run
This step applies only if you’re testing with an Xcode build. If you’re using TestFlight, skip this step.
- Connect your test device to your Mac.
- Open Xcode.
- Click Run in the toolbar or choose Product > Run to build and run the app on the connected device.
If the build is successful, Xcode will launch the app on your device and open a debugging session in the debug area.
Your app is now ready for testing on the device.
Step 7. Make test purchase
Open the app and make your test purchase through a paywall.
Once done, go to the article on validating test purchases to check your results.
Step 8. Keep testing
Now, your testing environment is all set. If you want to test it once again, clear the purchase history of the sandbox account.
Testing issues
Below are common issues you may encounter when testing an app.
TestFlight issues
You can’t clear your purchase history if you use TestFlight without the Sandbox test account, which results in various issues and false testing outcomes.
If you accidentally forgot to switch to the Sandbox test account and opened the app even once, TestFlight attributes your purchase history to your production Apple Account, which brings unexpected issues.
To fix it, follow these steps:
- Remove the app from the test device.
- Follow the steps for Sandbox testing.
It’s important to not only reinstall the app, but also switch to the Sandbox test account, clear purchase history, and launch it using the Sandbox test account.
Shared access levels issues
If you repeat testing using the same Sandbox test account, you may face unexpected behavior with shared access levels for the test user.
To check if the user has an inherited access level, go to Profiles & Segments from the Adapty Dashboard and open the user’s profile.
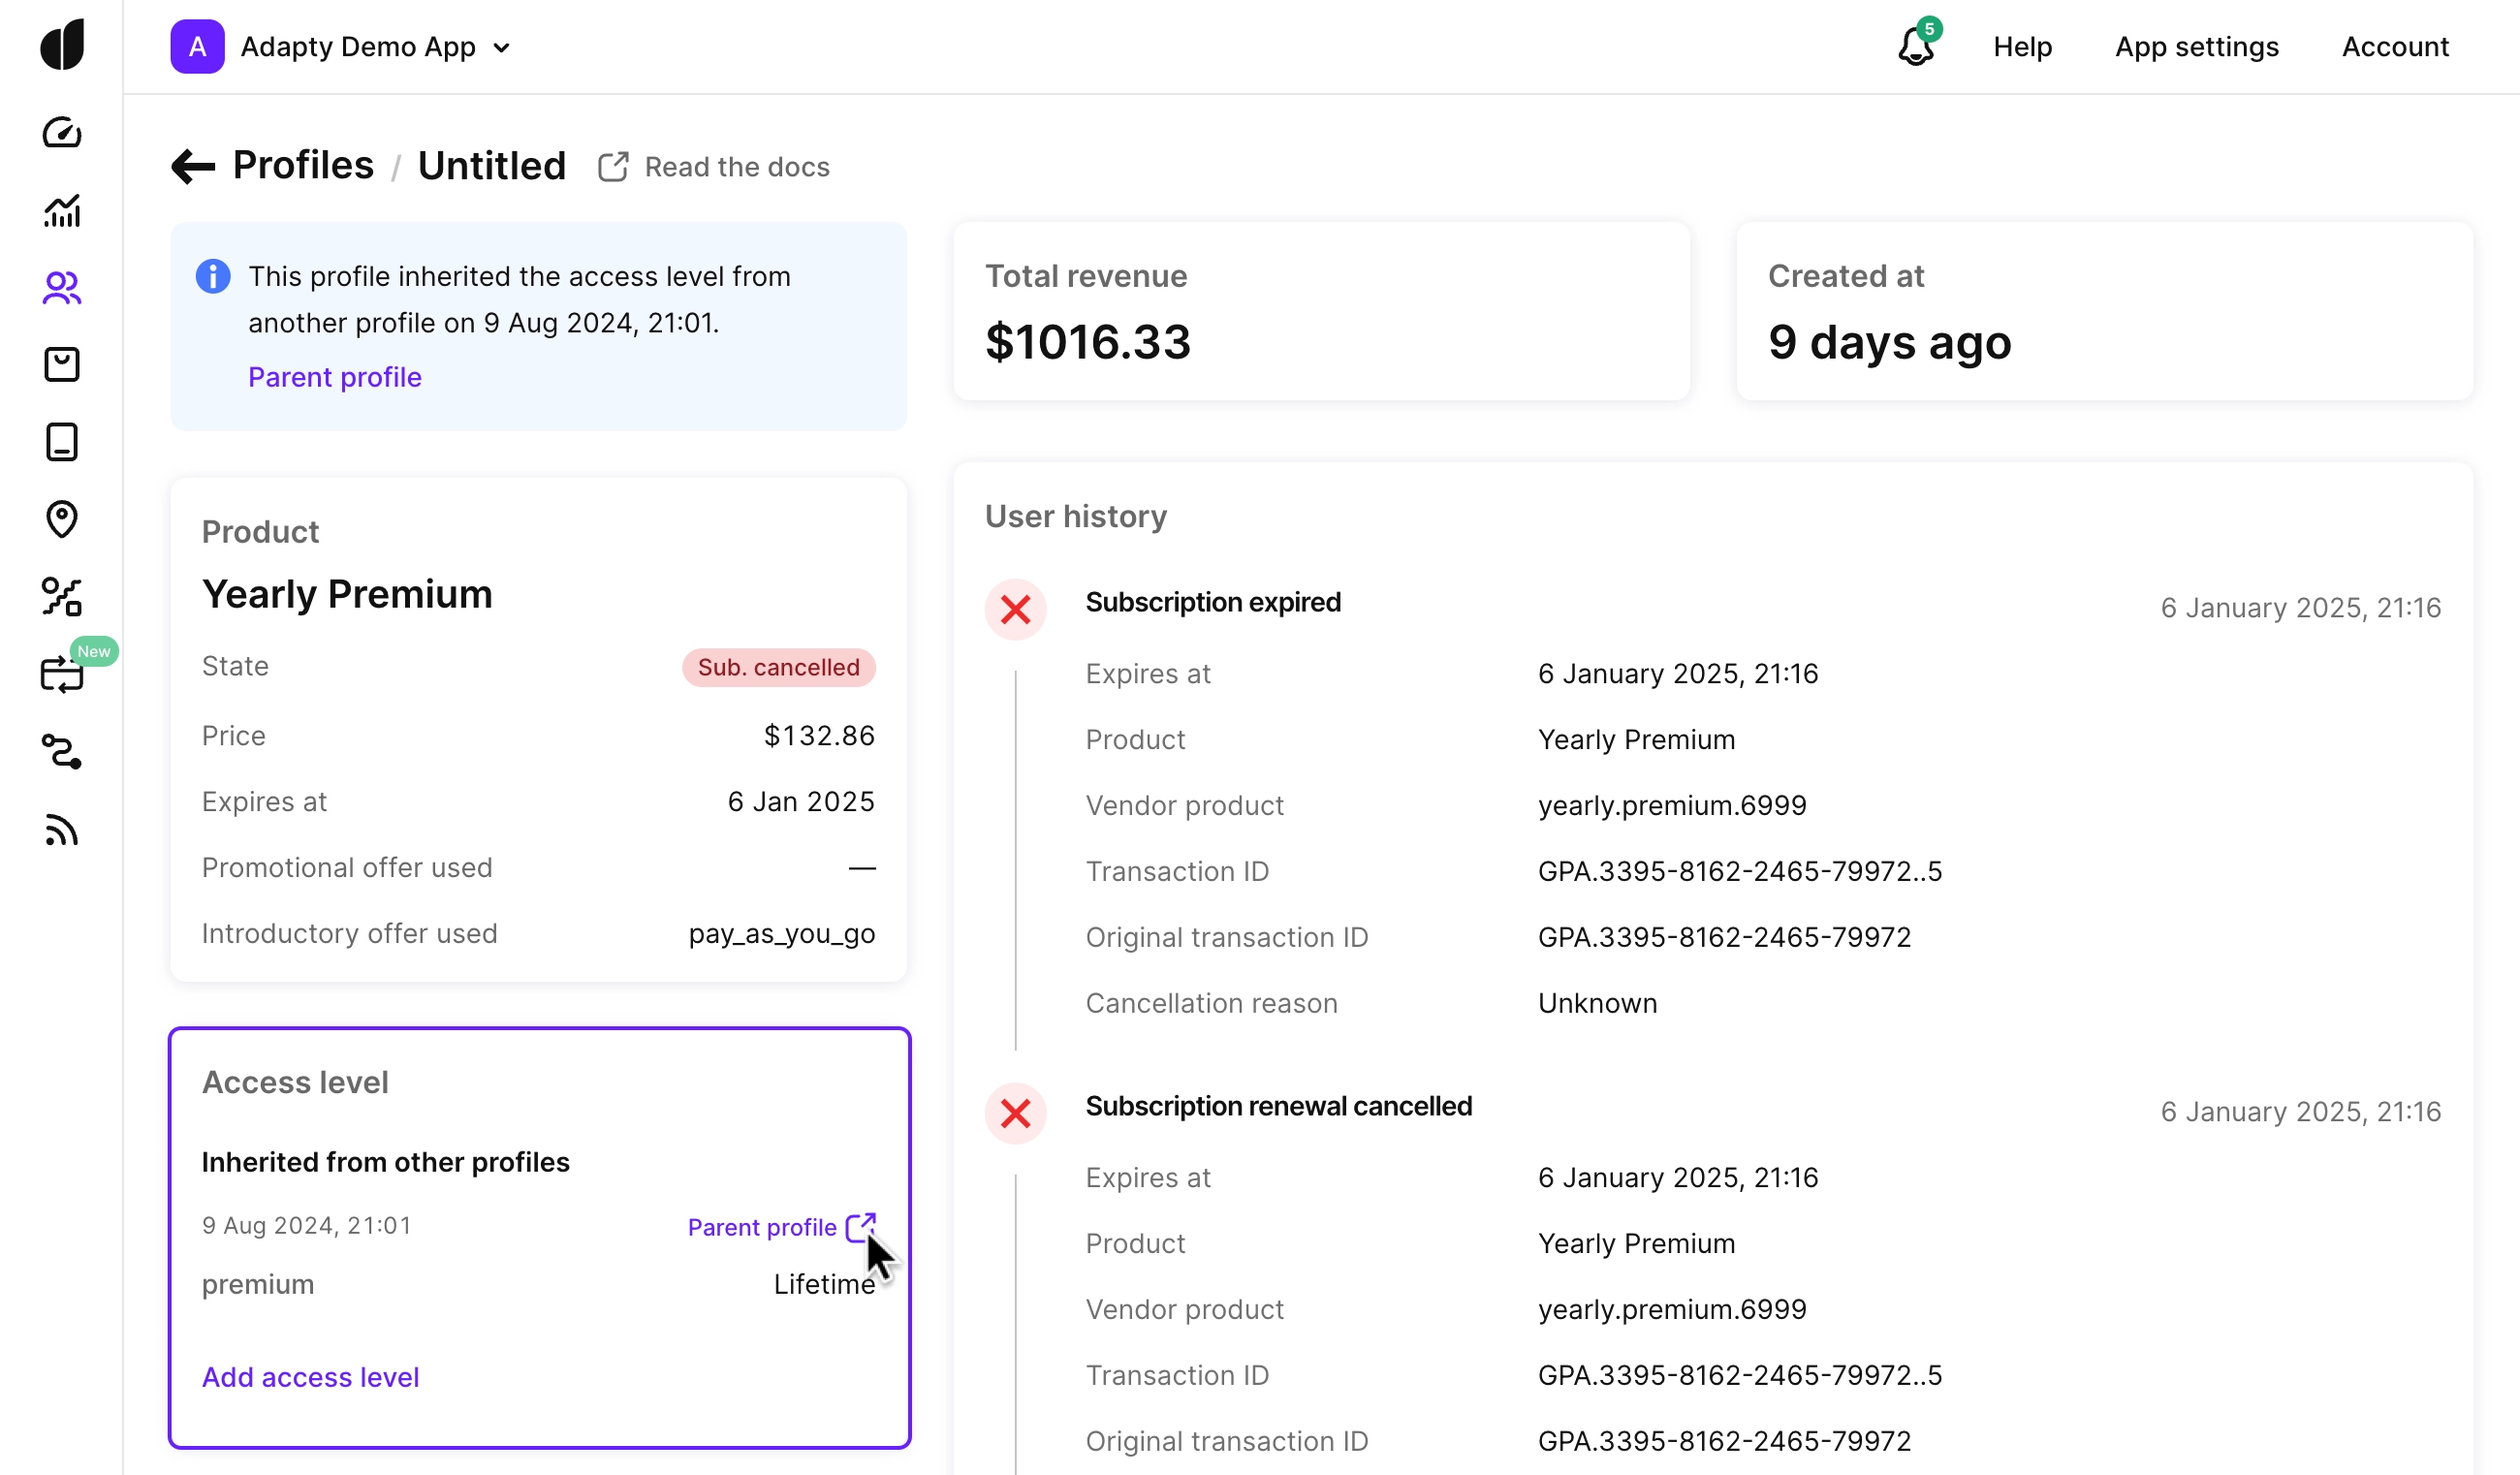
If the user has an inherited access level, follow these steps for accurate testing results:
- Delete the parent profile.
- Remove the app from the test device.
- Download the app from TestFlight.
- Switch to Sandbox test account.
- Clear purchase history.
- Open the app and make your test purchase.
Clearing the purchase history is what resets the store-side purchase. Deleting the parent profile only removes the Adapty-side record. For why a reused account keeps access and which reset actions actually work, see Resetting a tester’s subscription.
Updating app in TestFlight
If the TestFlight app has been updated:
- Remove the app from the test device.
- Download the app from TestFlight.
- Switch to Sandbox test account.
- Clear purchase history.
- Open the app and make your test purchase.
Resetting a tester’s subscription
In the sandbox environment, a purchase belongs to the Apple sandbox account, not to the Adapty profile. Actions you take on the profile — deleting it or editing its access level — don’t remove the purchase from the store account. On the next reinstall or sync, the SDK re-attaches the same transaction, and the tester gets access again.
The table below shows what each reset action changes and what the tester sees afterward.
| Action | Adapty profile | Apple sandbox account | Tester’s access afterward |
|---|---|---|---|
| Delete the profile in the Adapty Dashboard | Deleted | Untouched | Returns — on reinstall, a new profile re-attaches the same transaction chain |
| Delete the profile via the Delete profile API | Deleted | Untouched | Returns — same as deleting in the Dashboard |
| Add a past expiration date via Add access level | Overridden on the next sync | Untouched | Returns at the next renewal — the live subscription re-applies a future expiration date |
| Call the Revoke access level API | Expires now, fires access_level_updated (is_active=false) | Untouched | Returns at the next renewal or reinstall — not a reliable sandbox reset |
| Cancel the subscription in the sandbox account | No direct change | Subscription cancelled | Renewals stop, access ends when the current period expires, and the tester can buy the product again |
| Sign in with a fresh Apple sandbox account | New profile | New, empty account | Clean — recommended for repeat testing |
Reset a tester to a clean state
For repeat purchase-flow testing, use a fresh Apple sandbox account for each test instead of resetting the profile. Follow Step 1 to create the account and Step 4 to switch to it on the device. If you reuse an existing sandbox account, clear its purchase history first — deleting the Adapty profile doesn’t clear it.
Remove access from an existing tester
To remove a tester’s access, don’t backdate the expiration date or call the Revoke access level API. In sandbox, the subscription auto-renews every few minutes. Each renewal restores a future expiration date on the same transaction chain, so access returns on its own. The Revoke access level API does fire an access_level_updated (is_active=false) event, but the next renewal overrides it.
To actually stop access, cancel the subscription on the store side. On the test device, go to Settings > Developer > Sandbox Apple Account, select Manage, and cancel the subscription. Renewals stop, and access ends when the current period expires.
Why deleting the profile brings access back
When a tester reinstalls the app, Adapty receives the sandbox account’s purchase history and links the new install to the existing purchase. The purchase is tied to the store account, not to the profile you deleted.
- Anonymous profiles: A reinstall without a
customer_user_idalways inherits the store account’s access level, regardless of your paid access sharing setting. - Identified profiles: Whether access transfers to a new
customer_user_iddepends on your paid access sharing setting.
For how Adapty links these profiles into a chain, see How profiles work.
Test subscriptions
When testing the app using the Sandbox test account, you can set up the subscription renewal rate for each tester in sandbox. Learn more about editing subscription renewal rates in the official Apple documentation.
By default, subscriptions renew up to 12 times before they stop, according to the following schedule:
| Subscription duration | 1 week | 1 month | 2 months | 3 months | 6 months | 1 year |
|---|---|---|---|---|---|---|
| Subscription renewal speed | 3 minutes | 5 minutes | 10 minutes | 15 minutes | 30 minutes | 1 hour |
| Length of Billing Retry | 10 minutes | 10 minutes | 10 minutes | 10 minutes | 10 minutes | 10 minutes |
| Length of Billing Grace Period | 3 minutes | 5 minutes | 5 minutes | 5 minutes | 5 minutes | 5 minutes |
Keep in mind that test transactions take up to 10 minutes to appear in the Event feed.
Use sandbox to confirm that your app and backend handle renewals, billing retries, and grace periods — not to predict production renewal timing. The accelerated, capped schedule above doesn’t match production. To replay transactions on your server for backend testing, use the Set transaction API.
Test offers
Testing offers requires all user receipts to be deleted for eligibility to work correctly.
The most reliable way to test offers is using a completely new Sandbox test account. Repeated testing using the same Sandbox test account may cause unexpected behavior.
If you repeat testing using the same Sandbox test account, make sure to clear purchase history to avoid eligibility-related issues.