Advertise your app in TikTok for Business
In this step-by-step guide, you will learn how to create and set up ads for your app in TikTok for Business, so you can optimize them and track their performance easily.
Step 1. Add business info
If you are just getting started with TikTok for Business, you need to add your business info first:
- Go to https://ads.tiktok.com and click Get started.
- Sign up using your email or your TikTok account.
- Enter your business info and follow the prompts on the screen.
Once your business account is approved, you will be redirected to creating your first campaign.
Step 2. Create a pixel
You will need a TikTok pixel to connect your campaign data to revenue and get better results:
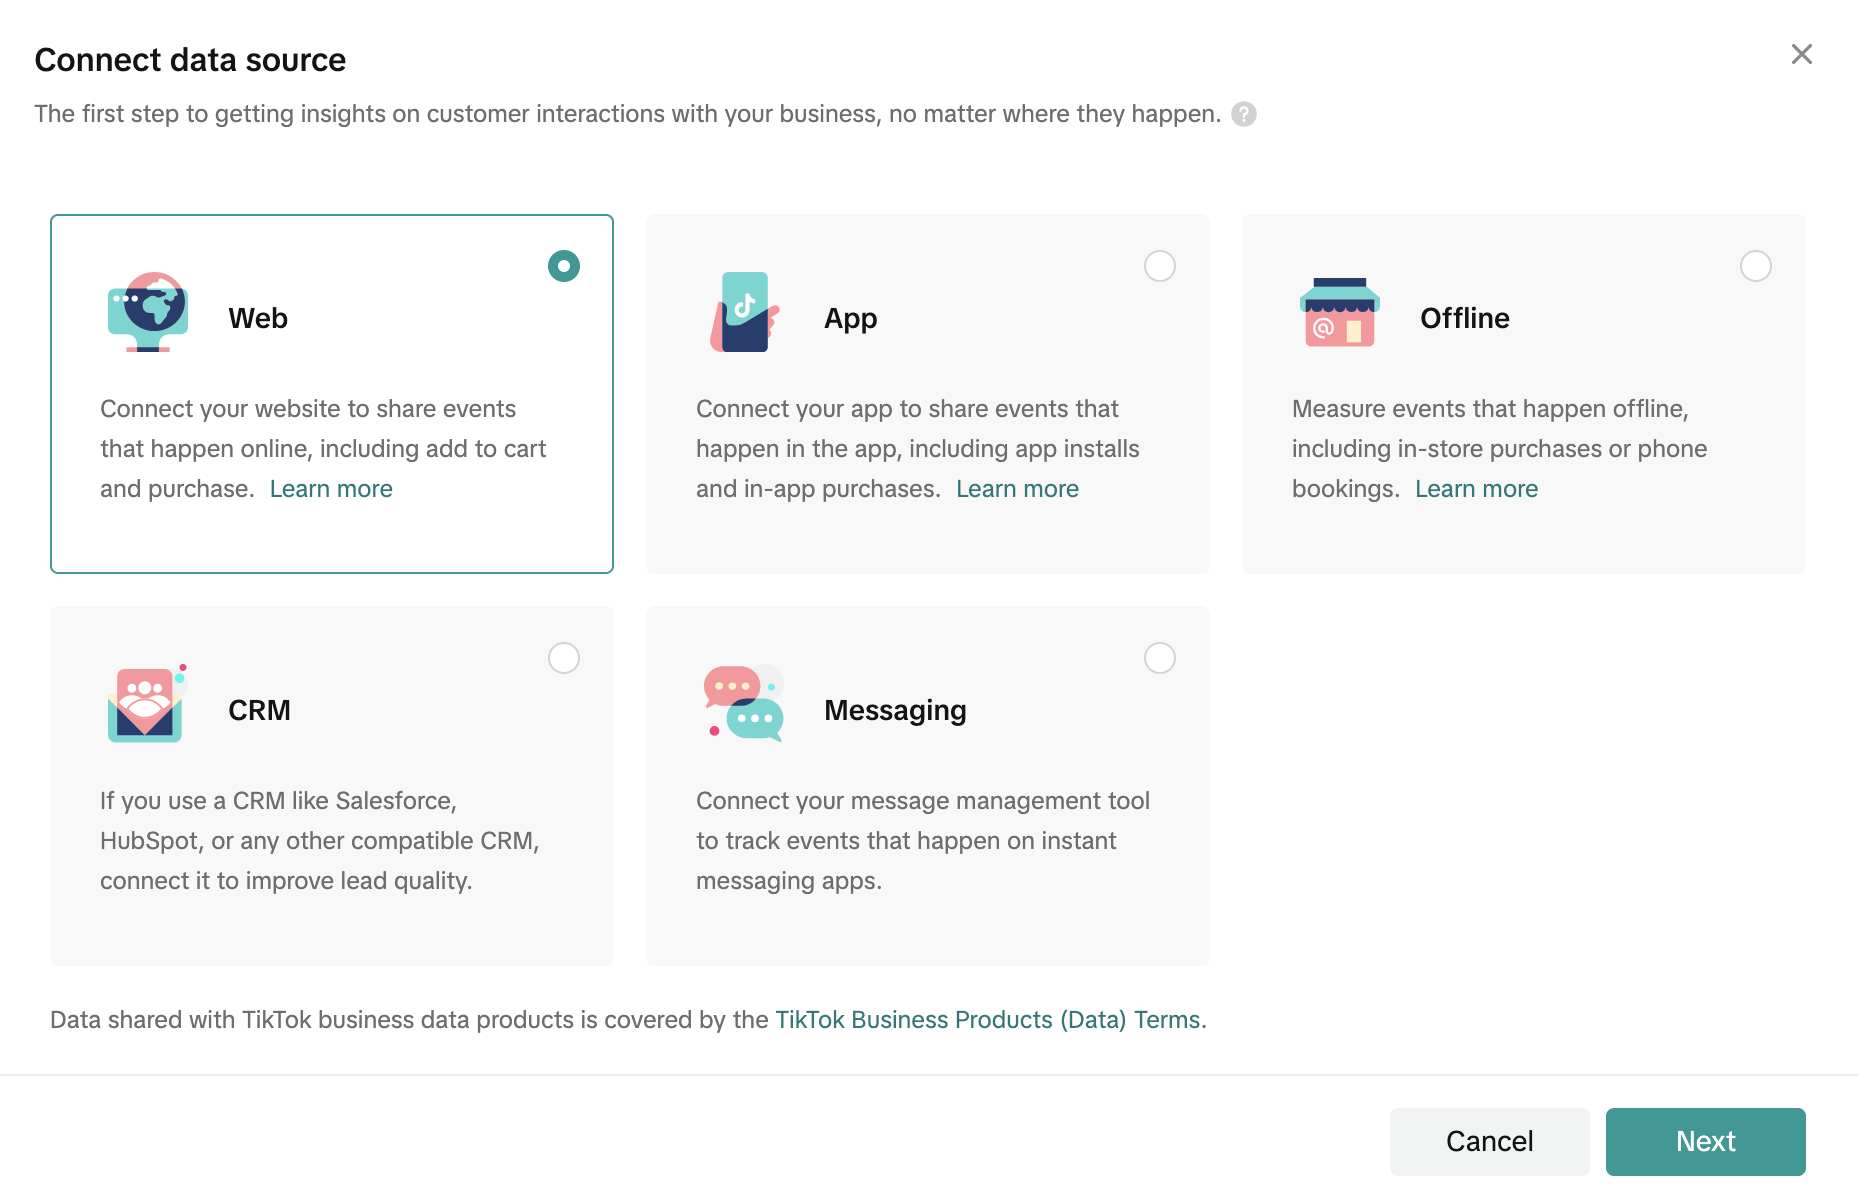
- Go to Events Manager. Click Connect data source.
- Select Web as a data source type.
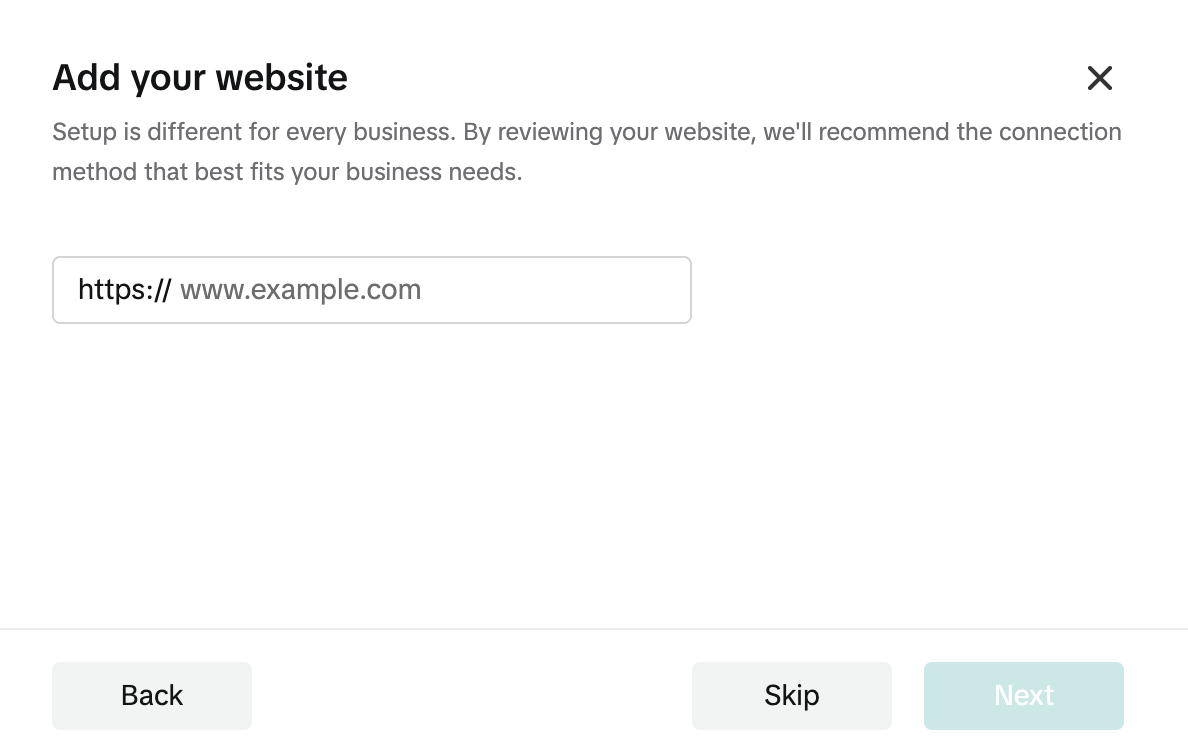
- In the Add your website window, click Skip.
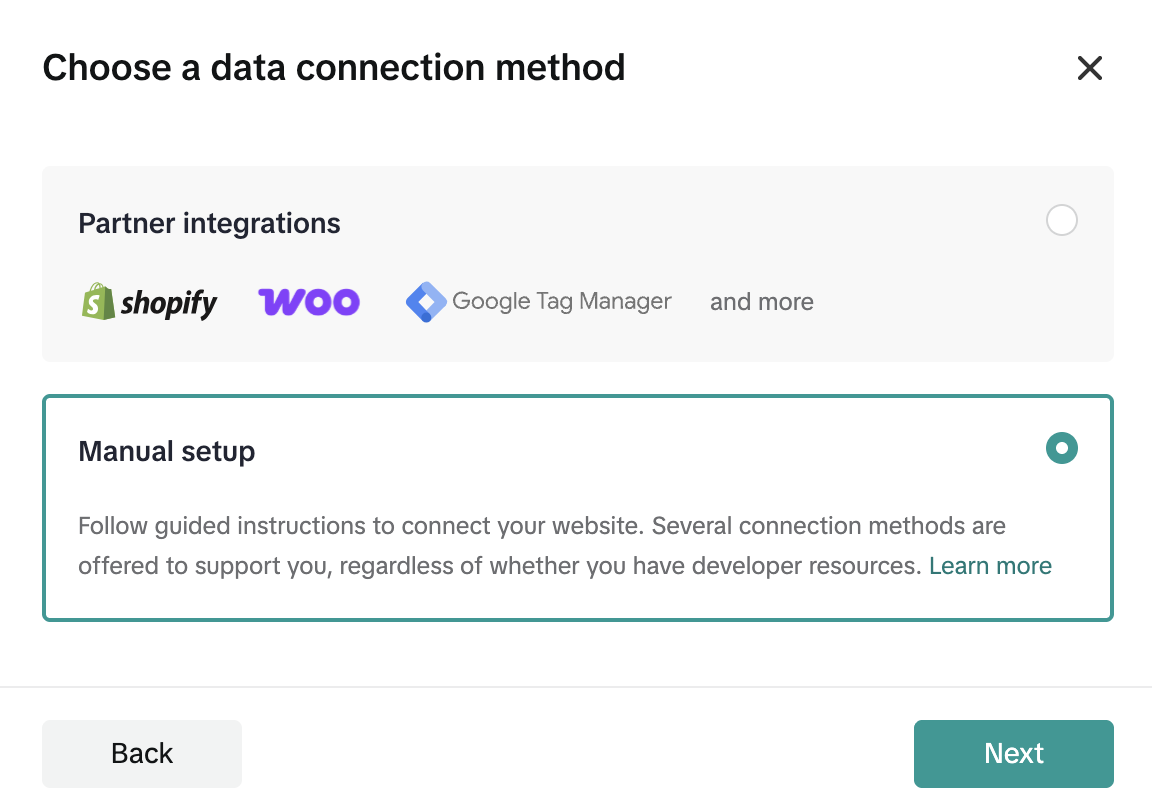
- Select Manual setup and click Next.
- Select TikTok pixel + Events API and click Next.
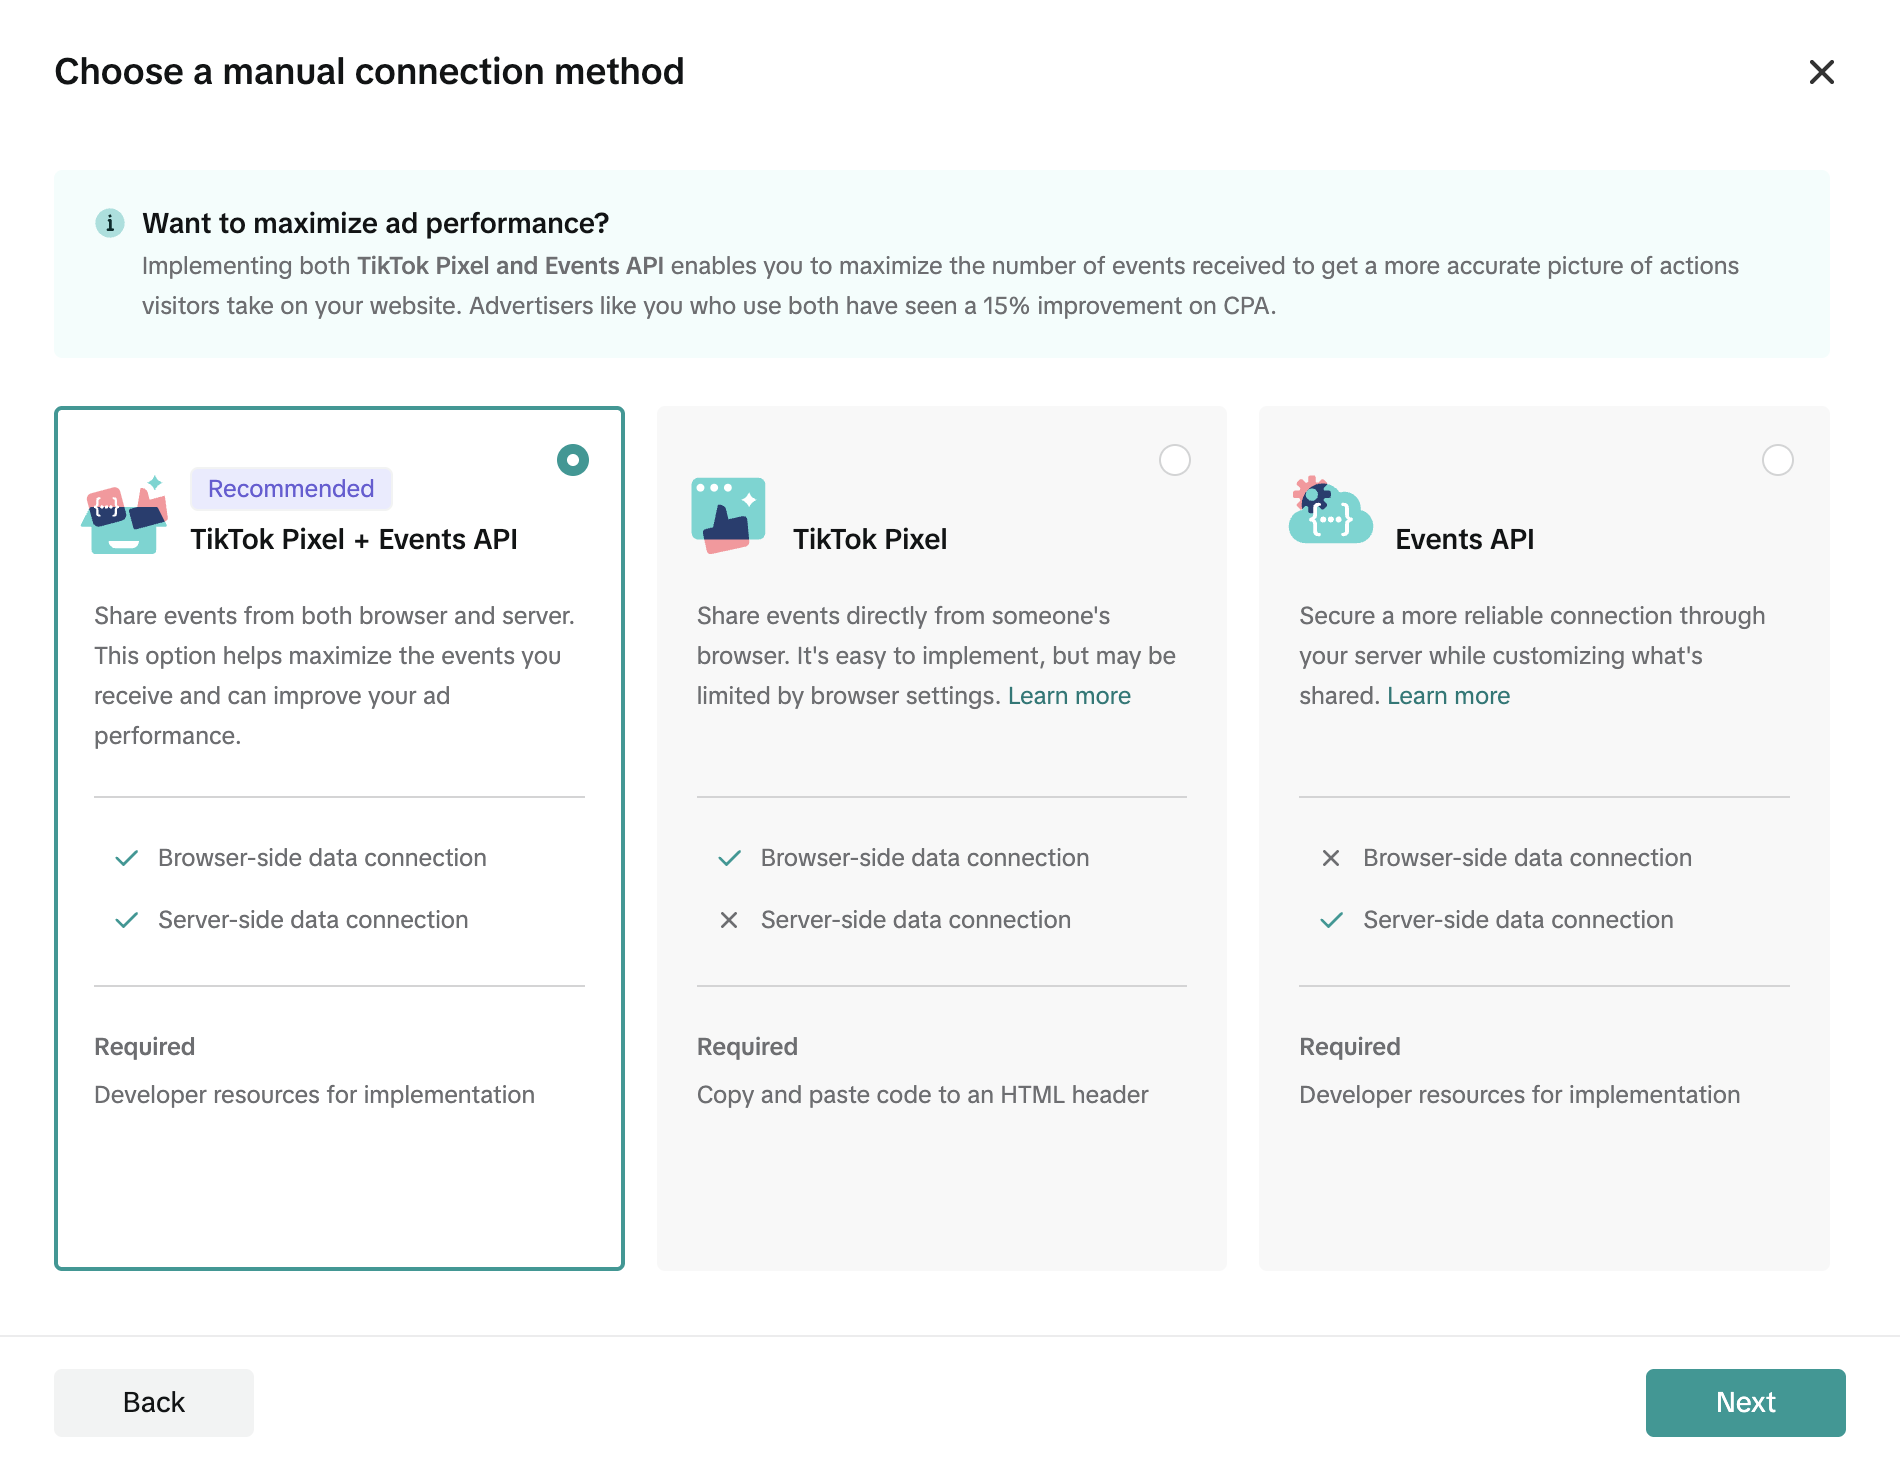
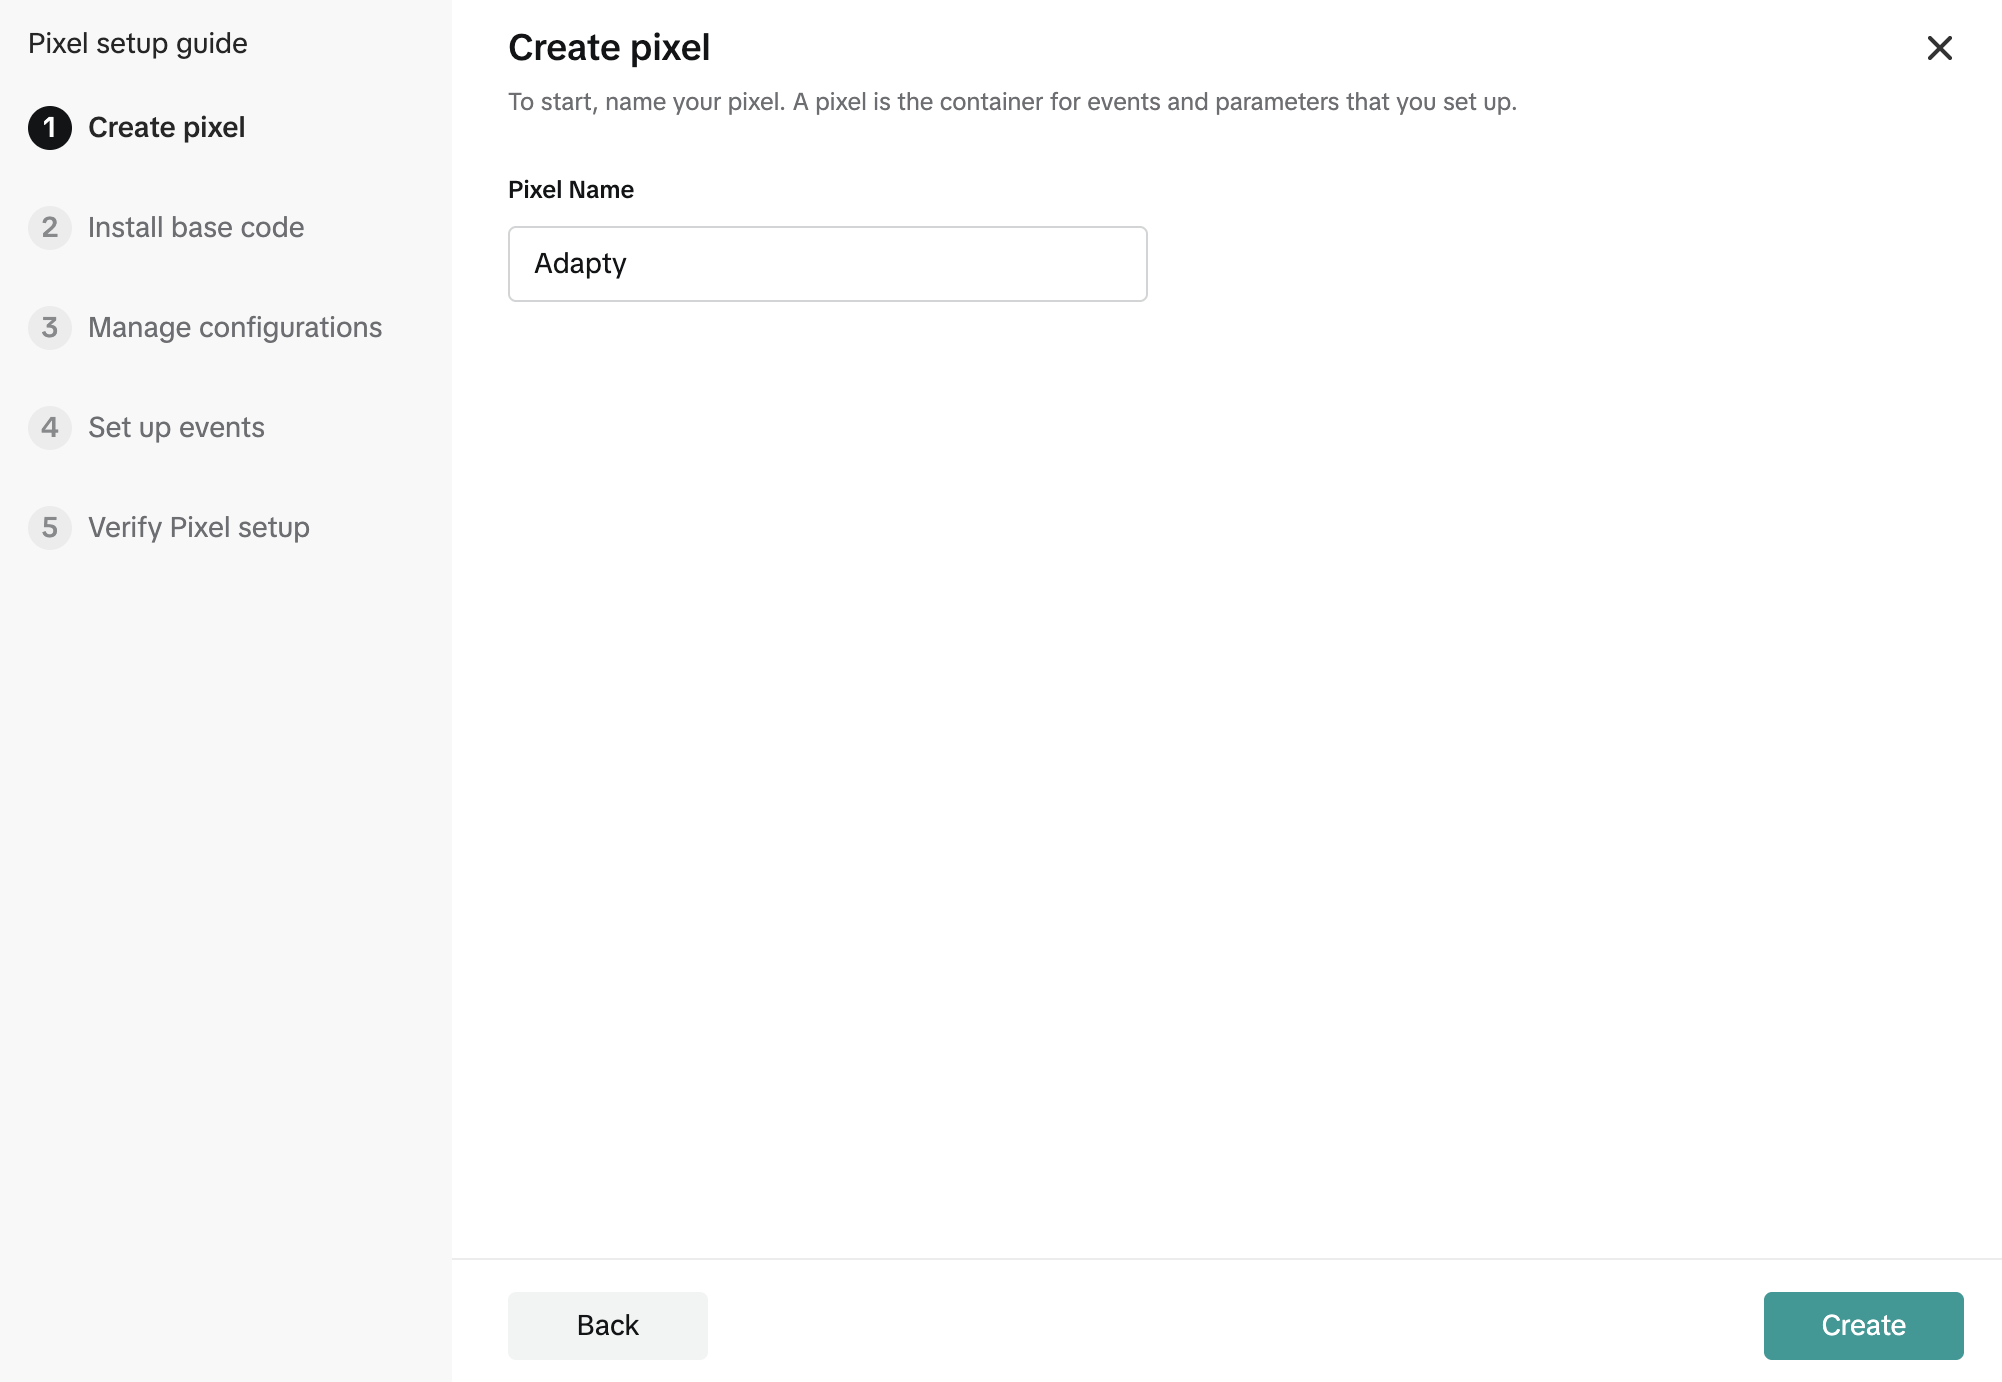
- Give your pixel a name and click Create.
- For Adapty Attribution, you won’t need to complete the full installation of the pixel. So, you can just close the setup window, and your pixel will appear on the list.
- To make this pixel available for use in campaigns, you need to send a test event to it from Adapty Attribution:
- Create a new TikTok campaign.
- Expand a platform-specific section – e.g., iOS.
- Select a pixel from the dropdown.
- Click Send test event.
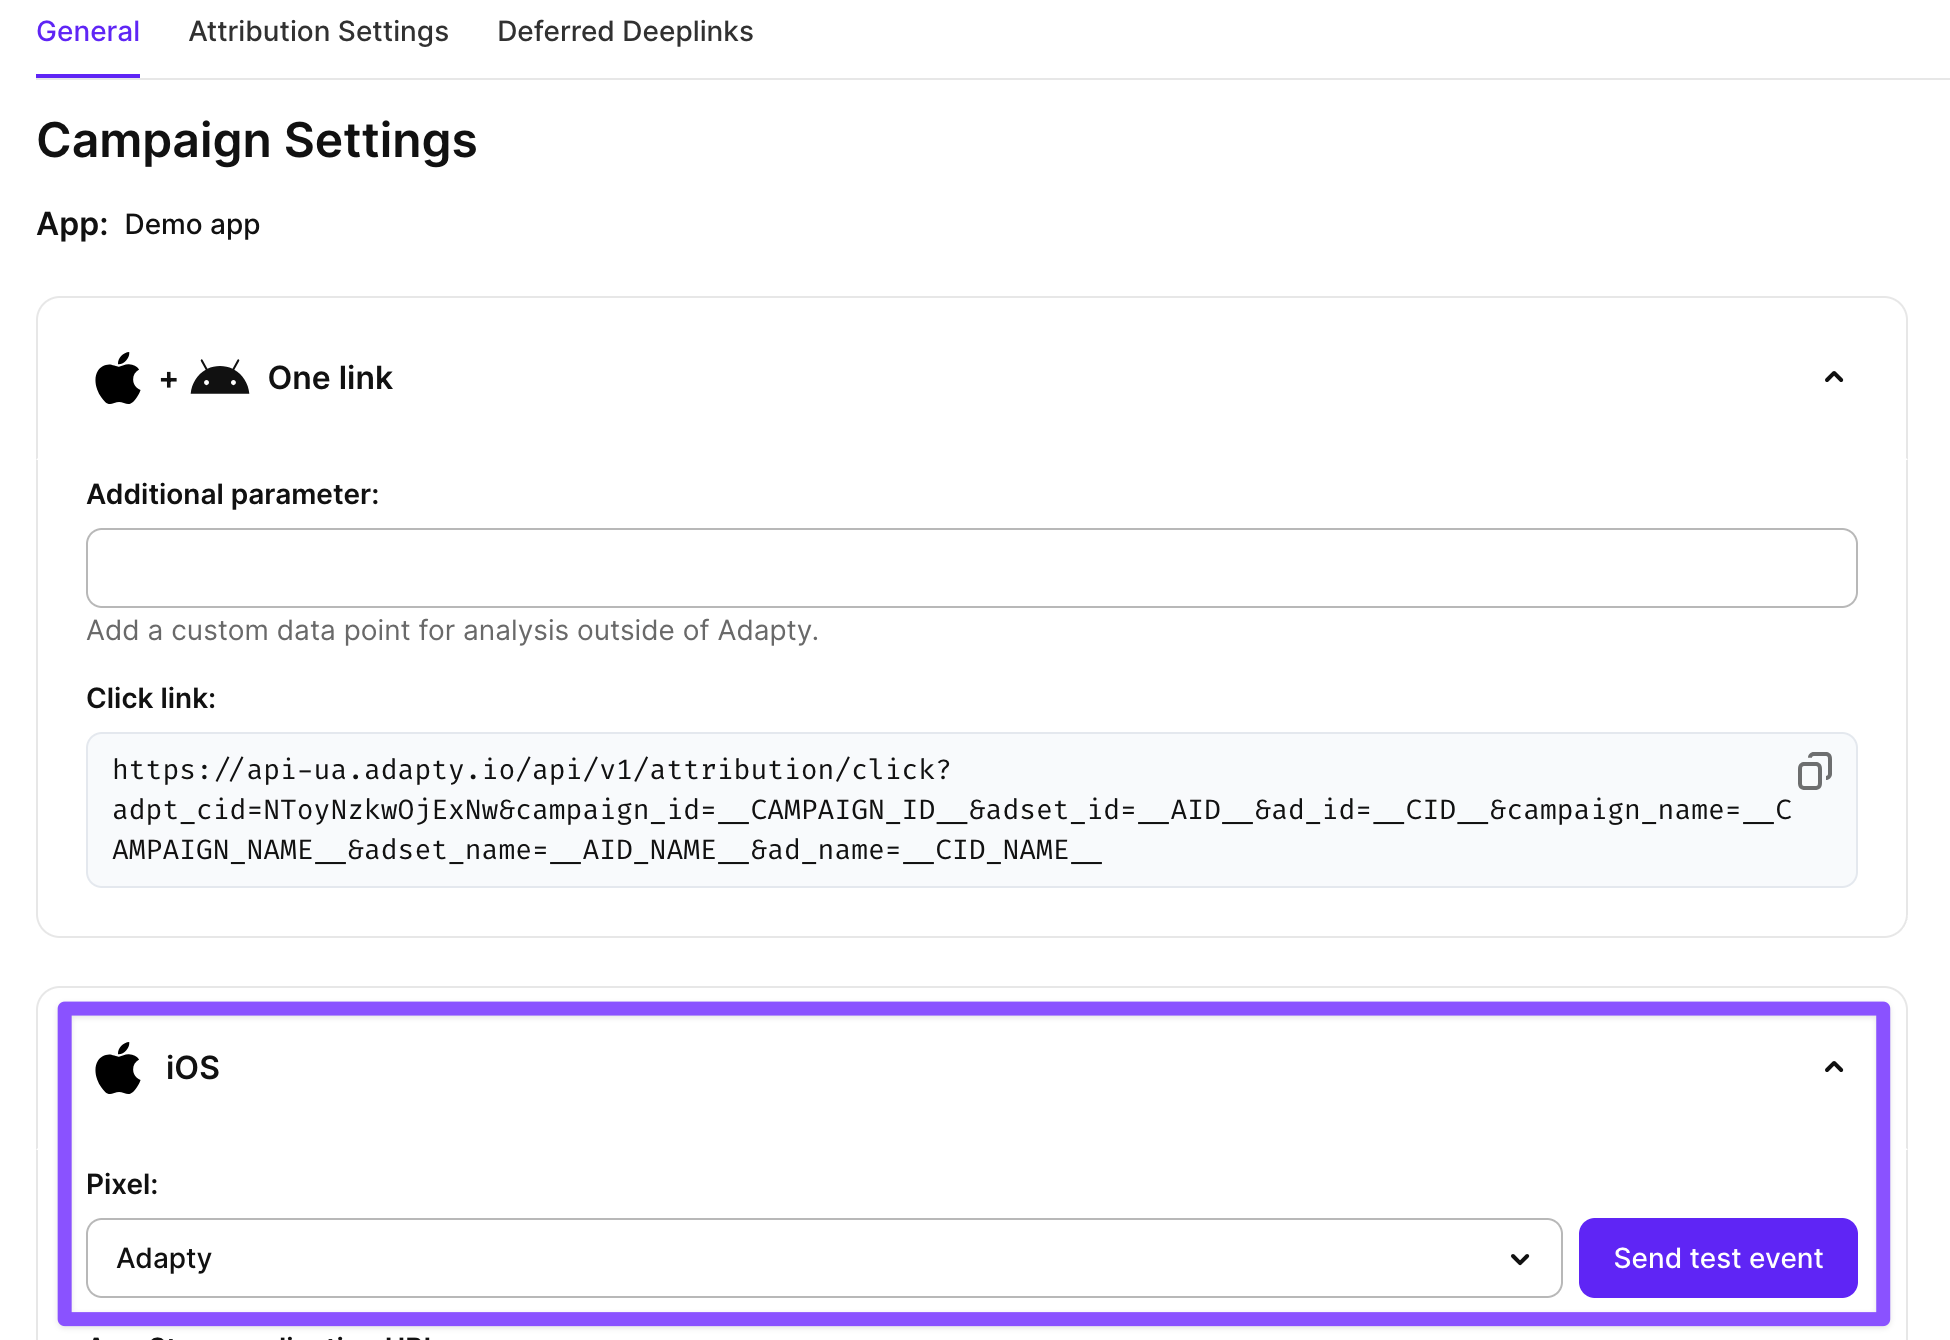
- In the dropdown, select an event you will be using for optimization in the ad.
- In TikTok for Business, open your pixel and switch to the Test events tab. Copy
test_event_code.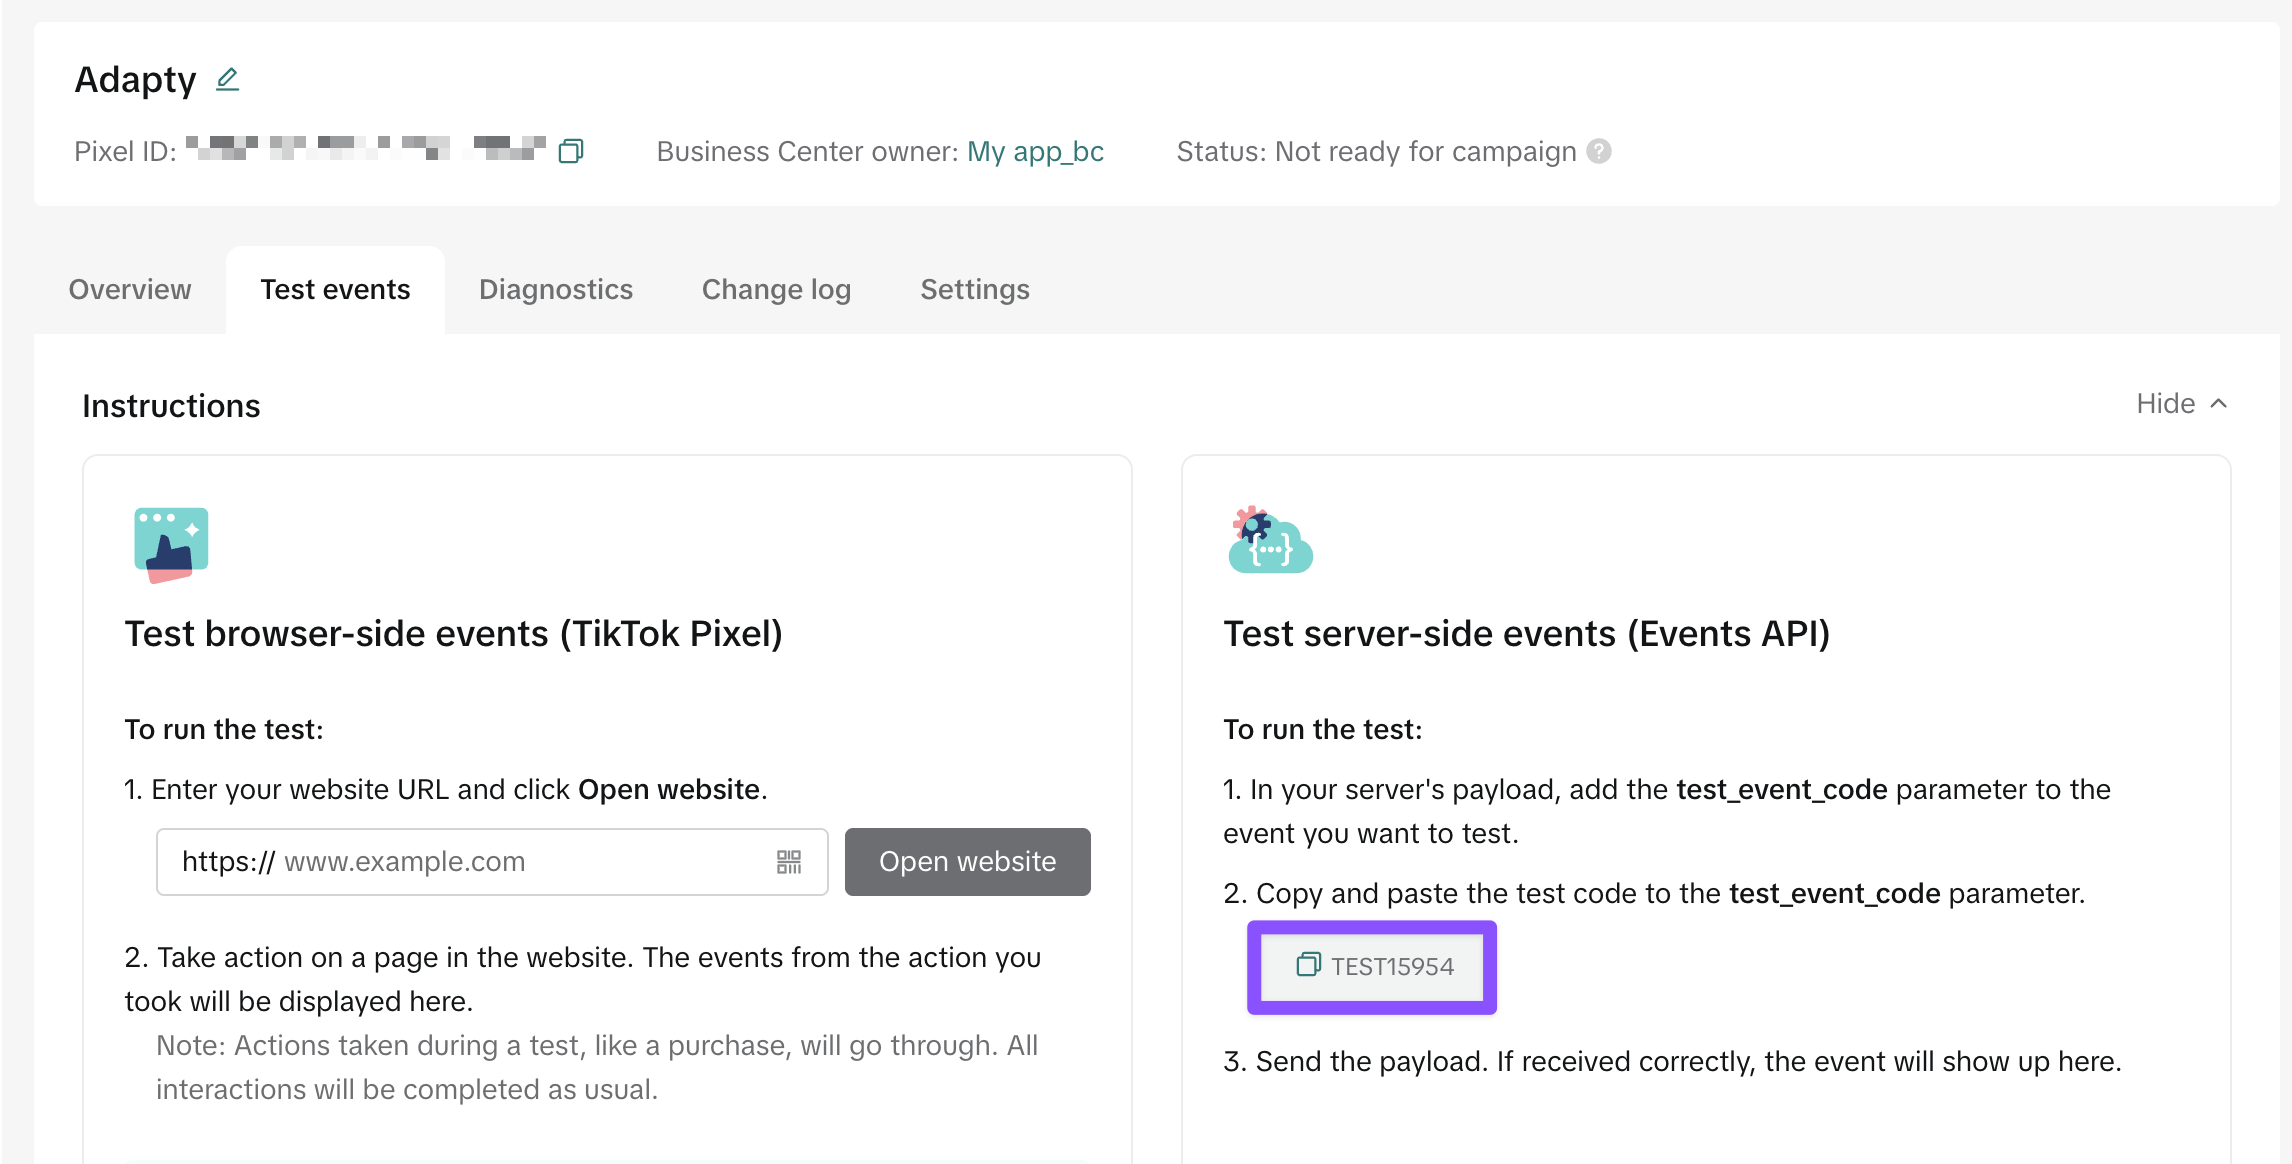
- Paste it to the Test event code field in Adapty and click Send.
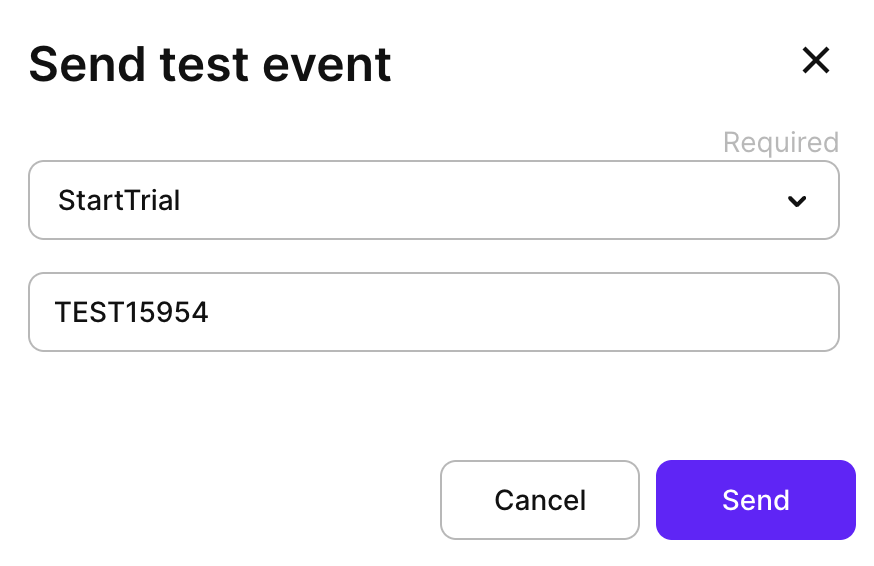
- The test event will appear in TikTok in several minutes. When you see it in your pixel details, you can proceed with the campaign setup in TikTok Ads Manager.
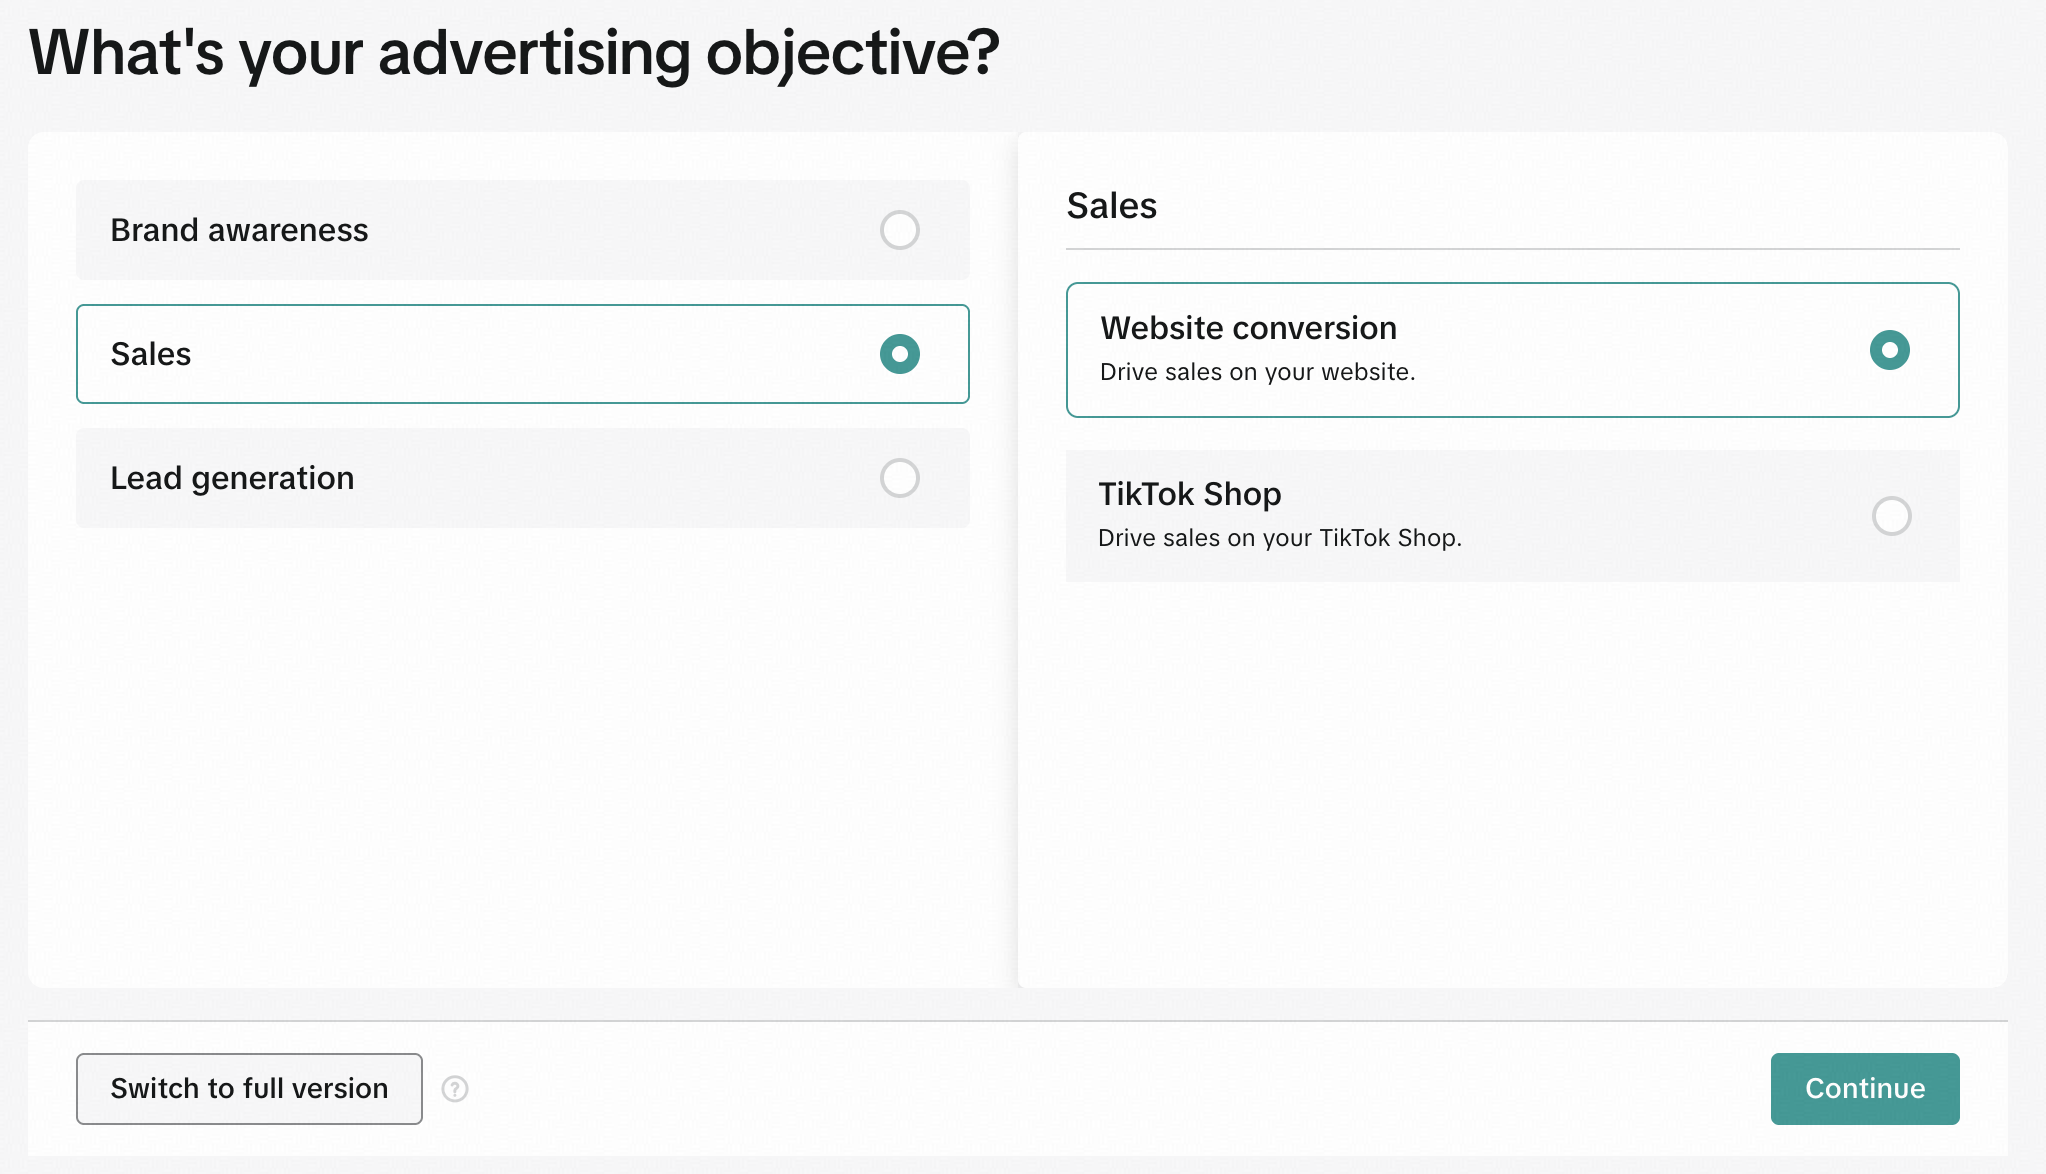
Step 3. Select the campaign objective
This tutorial uses the Quick setup view in TikTok Ads Manager. A few recommended settings appear only in the Full view, which we point out in the relevant steps.
Go to the ad creation page in the Ads Manager.
On the first screen, select the advertising objective and click Continue.
Select Sales > Website conversion.
Step 4. Fill in the campaign info
Next, fill in the campaign info:
- Name your campaign in the Campaign name field.
- In the Optimization goal field, select Conversion.
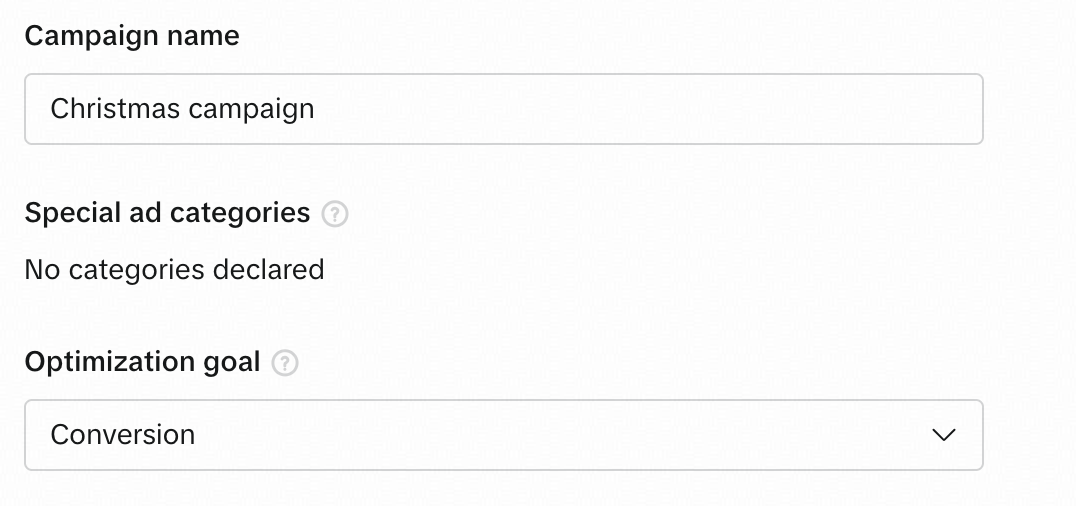
- Select your active pixel from the dropdown and choose an Optimization event. Note that only active events are available for selection. If the event you need is unavailable, send a test event following the instructions in Step 2.
- Your ad will be displayed in the TikTok feed and search. For additional setup, click Advanced settings. In Placements, configure the placement settings:
- User comment: Select if you want to display your ad in the comments section as well. TikTok recommends keeping user comments on to help your ads achieve more impressions.
- Allow video download: Allow viewers to download your ad.
- Allow video sharing: Allow viewers to share your ad.
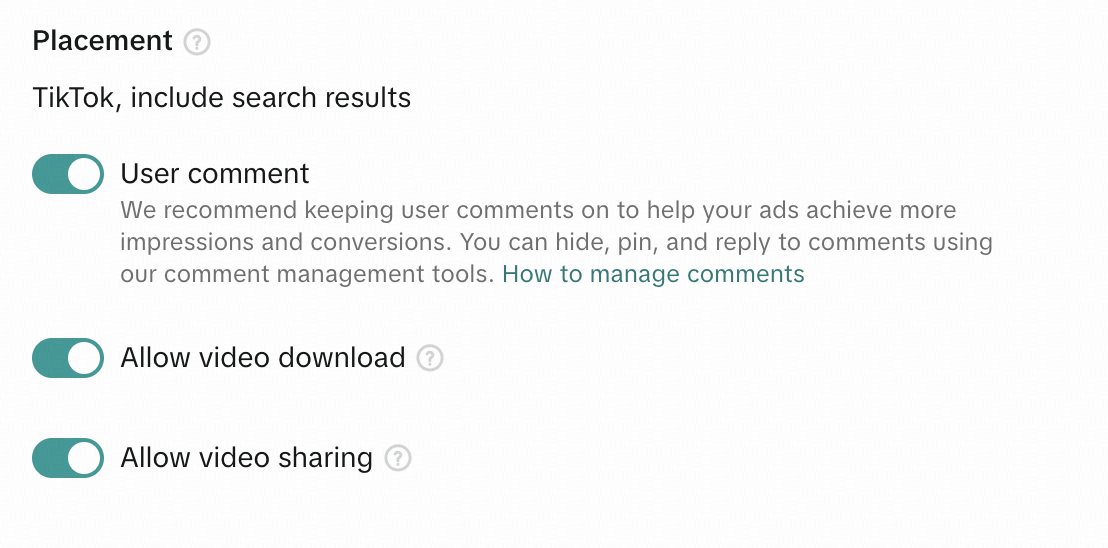
- Click Continue.
Step 5. Add ad content
Now, it’s time to set up your creatives and destination URL:
- In the TikTok account field, select an account that will be used for posting.
- In Adapty Attribution, create a web campaign and paste Click link to the Destination URL field.

- In the Creatives section, click + Videos and images.
- If you want to use your TikTok posts as creatives, select them on the TikTok post tab. Otherwise, switch to the Creative library tab and click Upload. Files you upload there will be accessible from this tab later, so you can reuse them in other campaigns.
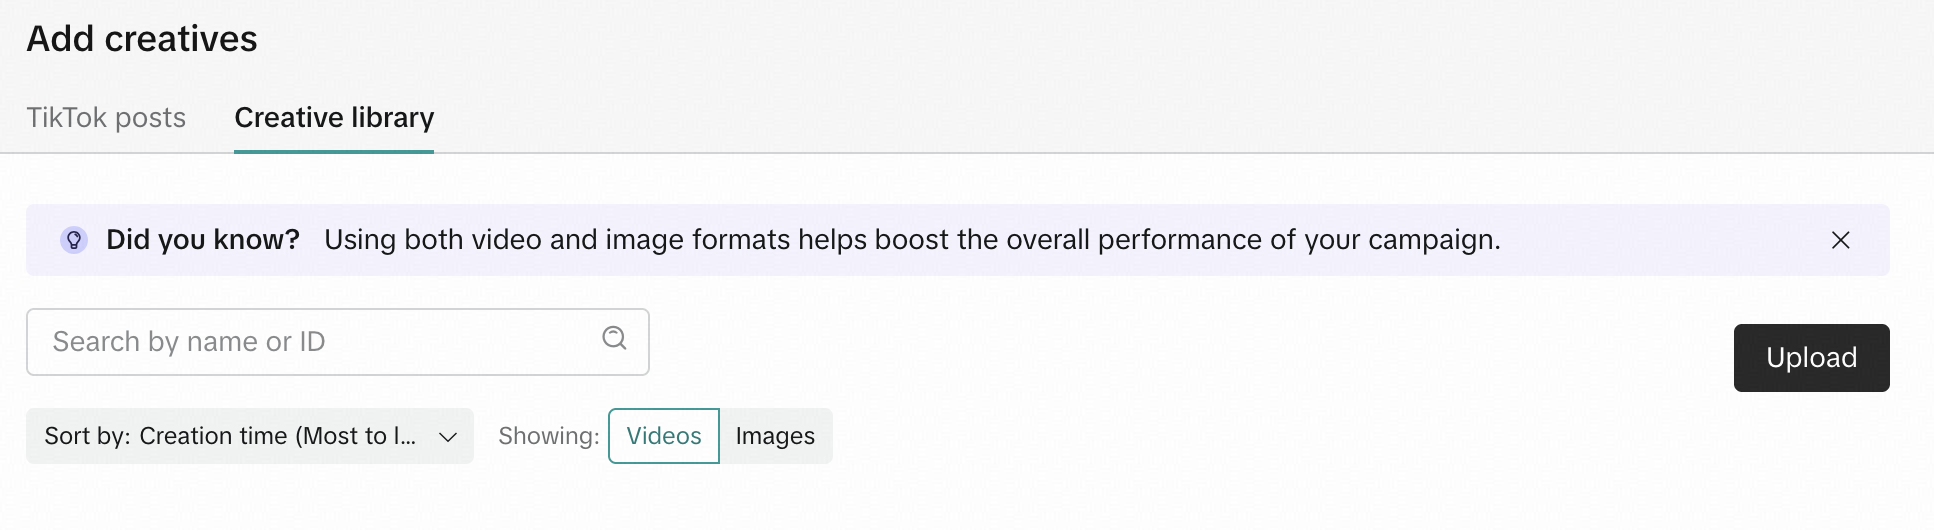
- Crop the creatives to fit the TikTok format and select whether they will be used as single ads or as one carousel.
- Expand the upload creative and click + next to No music selected. You can upload your own mp3 files there. Adding music is required.
- In the Add text field, enter the text that will be used as a description.
- Select Place the ads on this TikTok account as a post if you want to post this ad in your TikTok account.
- In the Call to action field, select or remove calls to action that are relevant to your ad. They will be appended to your ad automatically by TikTok.

- Click Continue.
Step 6. Configure targeting and budget
Finally, set up who should see your ad and how much you plan to pay for it:
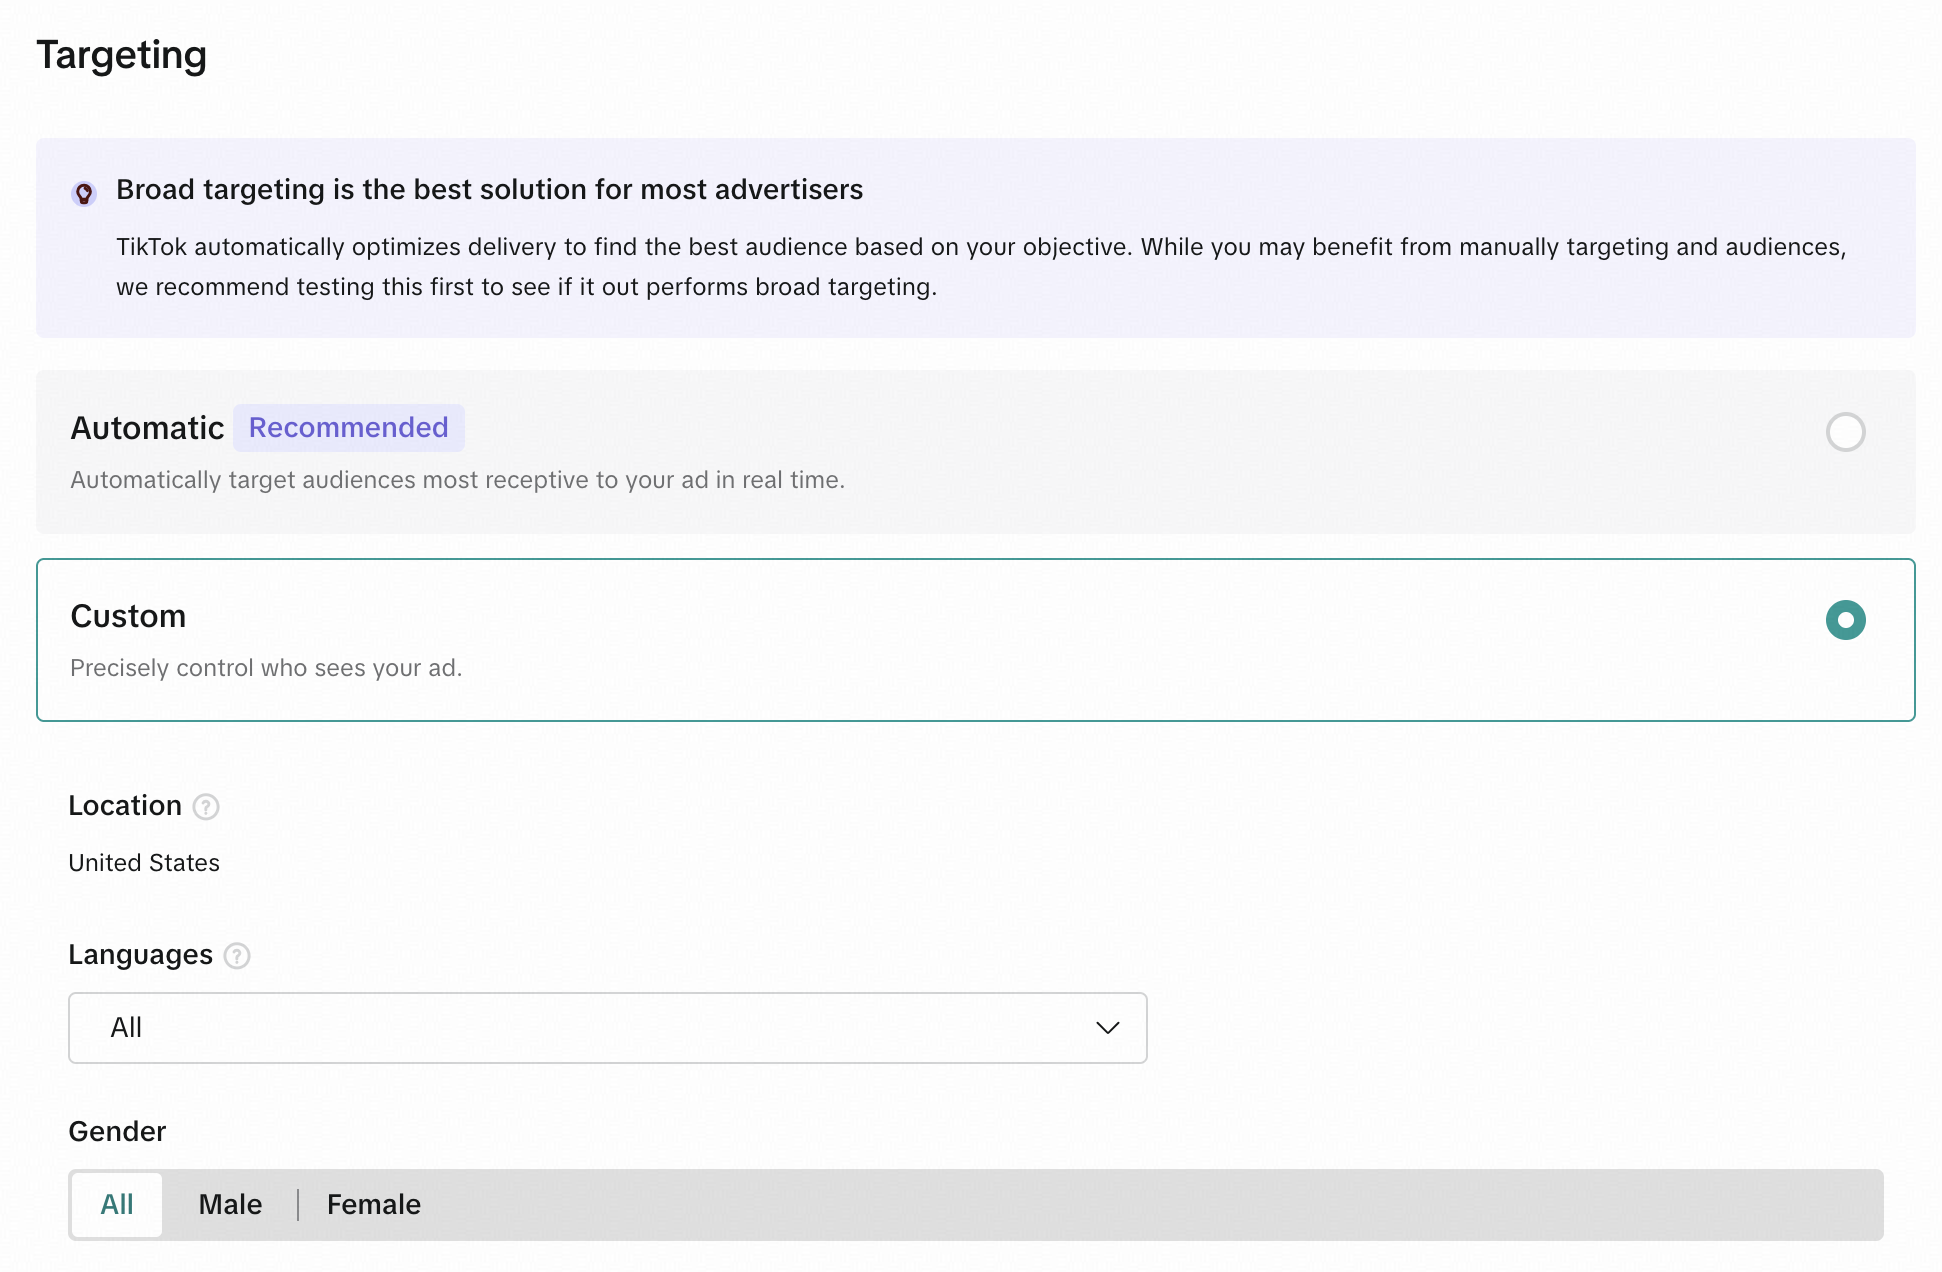
- In the Targeting section, select Automatic or Custom. The Automatic option is the easiest if you don’t understand your audience yet. However, if you select Custom, you can optimize your spending by selecting those user groups who are more likely to respond to your ad.
- If you have selected Custom, configure:
- Location: The default location is the location of your ad account. If you select more than one targeting country or region, ad review results will be returned separately for each location. Actual ads delivery may also vary depending on the supported locations of different placements.
- Languages: By default, all languages are selected. Select the targeting language based on the language used most often in your selected location.
- Gender: By default, all genders are selected.
If you switch to Full mode, you’ll find an additional Device section under Targeting. Here you can limit your audience by device type, OS, and OS version—useful if your app requires a minimum version.
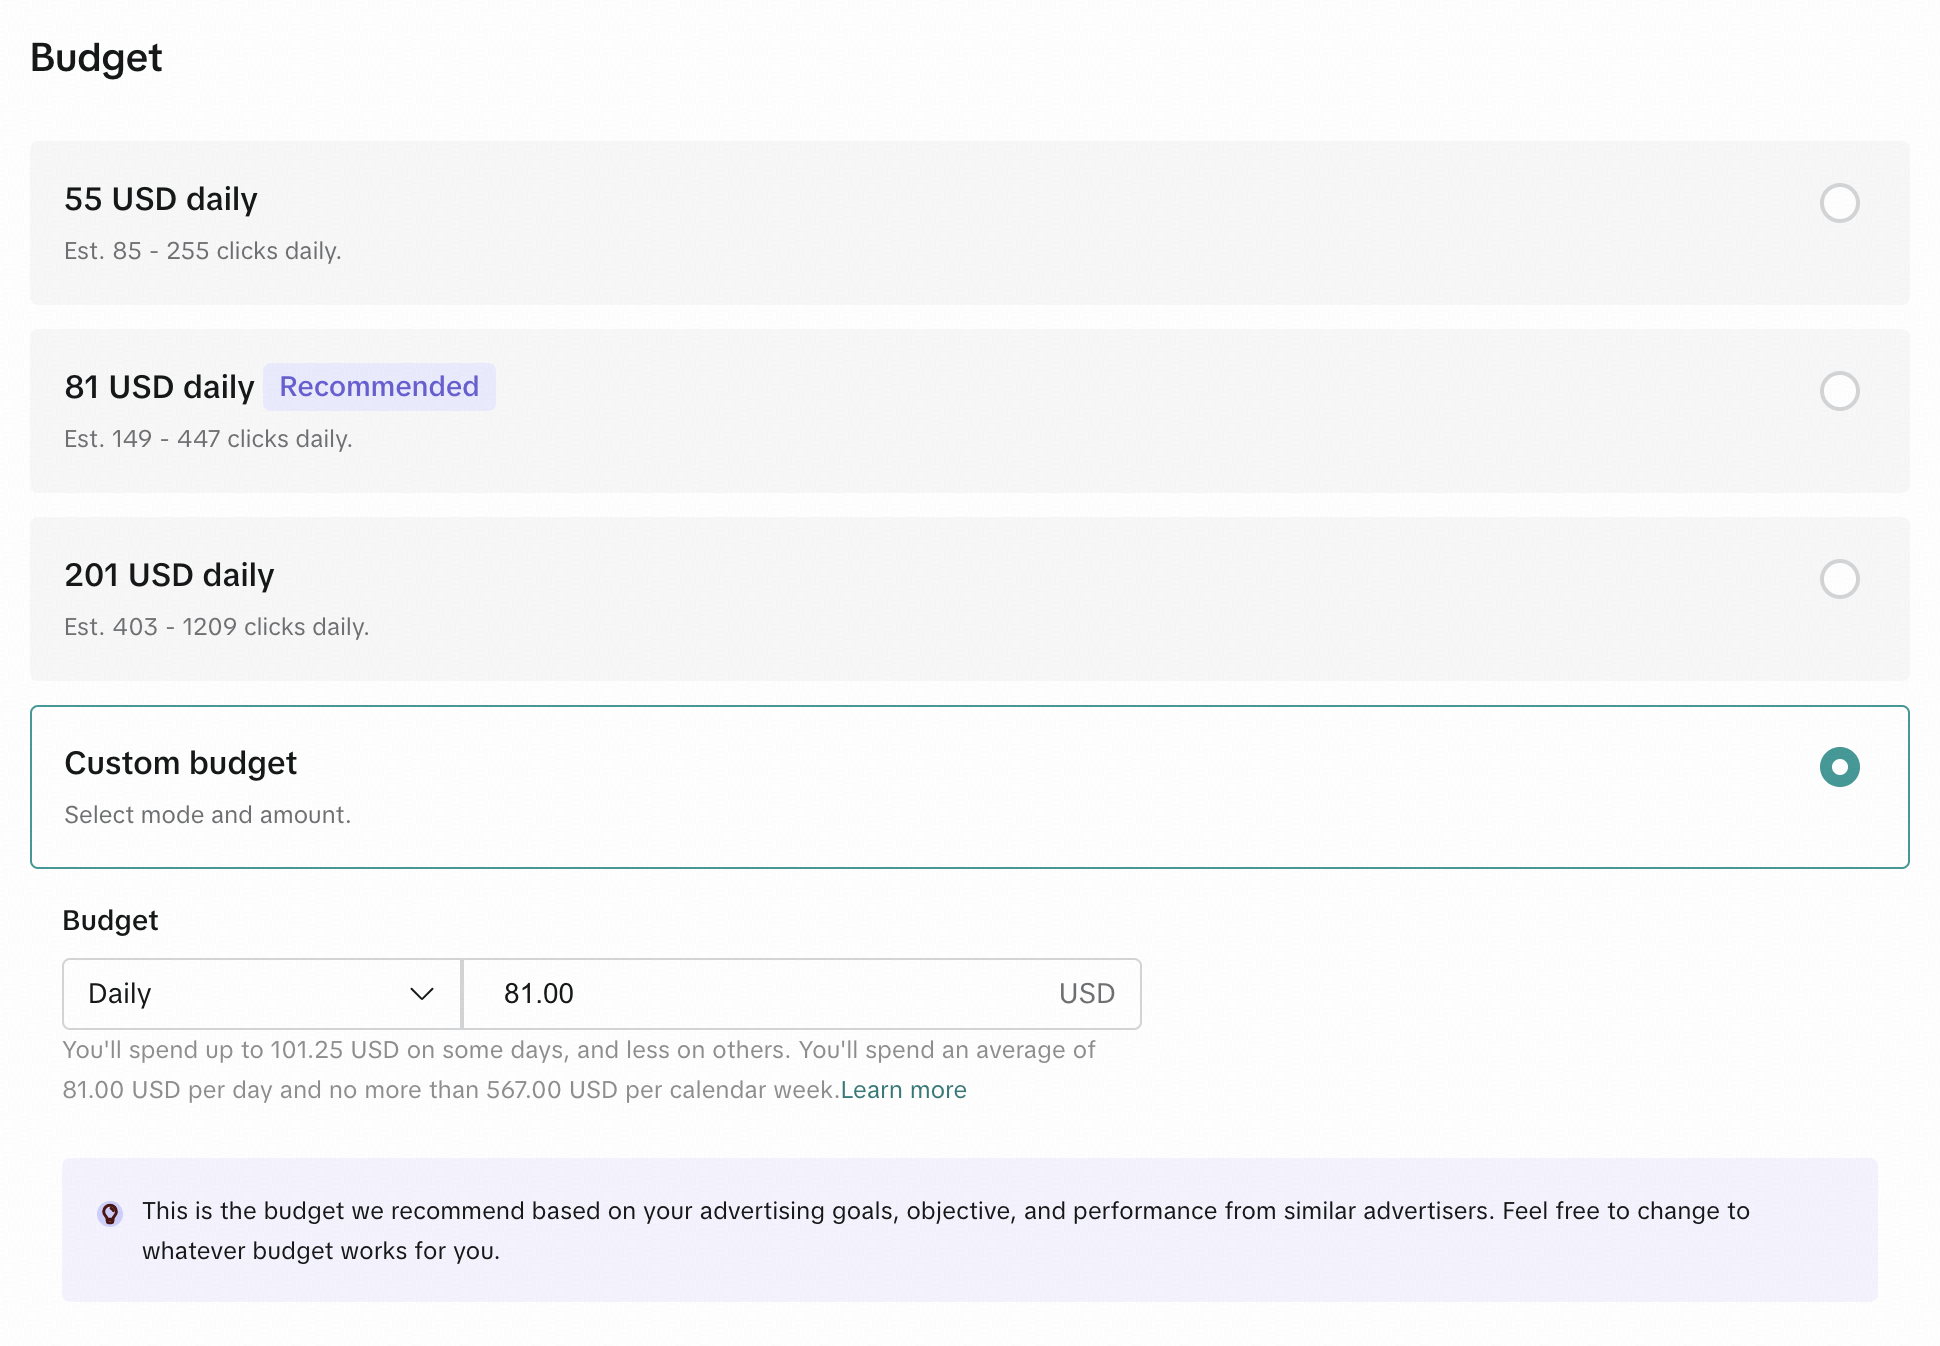
- In the Budget section, select one of the suggested options or select Custom.
- If you have selected Custom, select whether you need Daily or Lifetime budget and enter the limit in your currency. Daily budget allows you more flexibility while you are still learning, so you can start with smaller amounts and gradually adjust them on the go.
- In the Schedule section, select Continue for at least 7 days or Custom. We recommend you to set Custom schedule if your ad is time-sensitive, so you don’t miss the moment when you need to stop it.
- If you have selected Custom, set the start or start and end time for the ads. Note that your account timezone will be used.

- Click Publish.
When you finish, it will create a new campaign with one ad group. The ad group will contain one ad if you have configured a carousel or several ads if you have added creatives as separate ads.
Step 7. Enter payment details
To start running the ad, after you configure targeting and ad budget, enter your payment details. After that, you are all set!
What’s next
Now, you can explore how the campaign affects your app revenue in the Adapty Attribution dashboard.
Not using Adapty Attribution yet? Book a call with us to learn how it can help you track and optimize your ad campaigns.