Handle onboarding events in iOS SDK
Starting from SDK v4, you can build flows as a more powerful alternative to onboardings. Unlike onboardings which run inside a WebView, flows render natively on the device — giving you smoother animations, a consistent iOS look and feel, faster load times, and no WebView runtime dependency. See Get flows & paywalls and Display flows & paywalls to get started.
Before you start, ensure that:
- You have installed Adapty iOS SDK 3.8.0 or later.
- You have created an onboarding.
- You have added the onboarding to a placement.
Onboardings configured with the builder generate events your app can respond to. Learn how to respond to these events below.
To control or monitor processes occurring on the onboarding screen within your mobile app, implement the AdaptyOnboardingControllerDelegate methods.
Custom actions
In the builder, you can add a custom action to a button and assign it an ID.
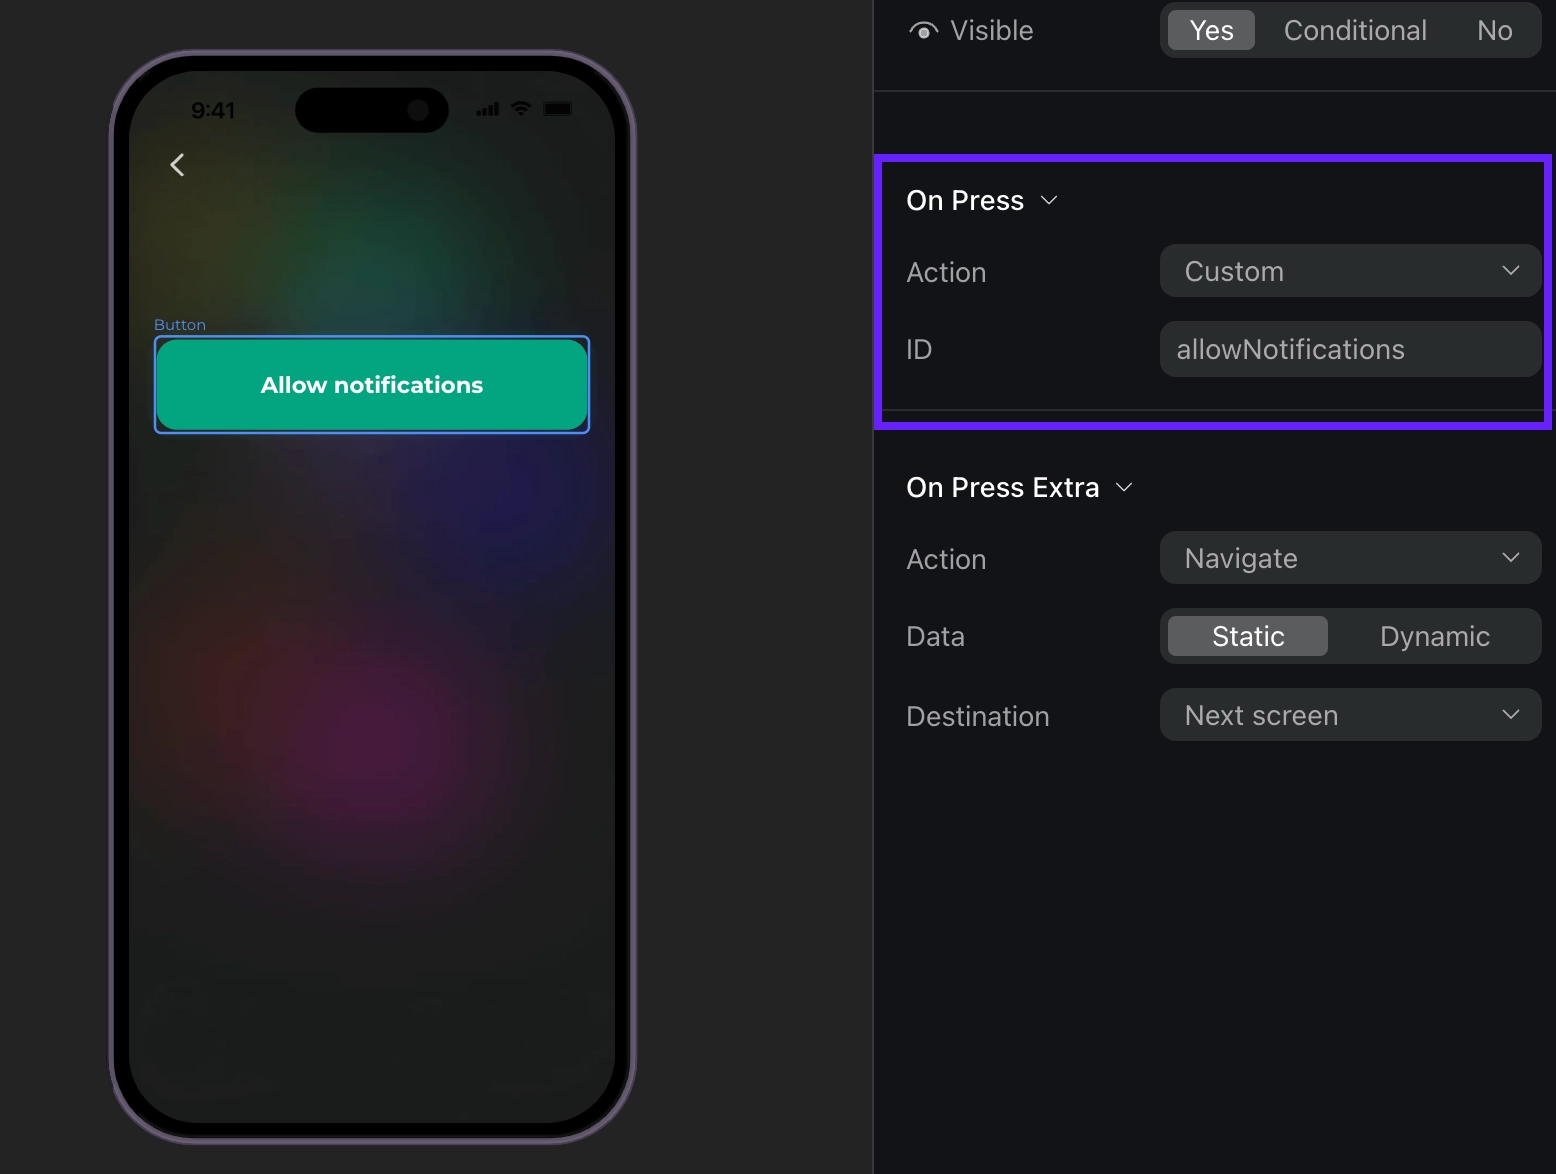
Then, you can use this ID in your code and handle it as a custom action. For example, if a user taps a custom button, like Login or Allow notifications, the delegate method onboardingController will be triggered with the .custom(id:) case and the actionId parameter is the Action ID from the builder. You can create your own IDs, like “allowNotifications”.
func onboardingController(_ controller: AdaptyOnboardingController, onCustomAction action: AdaptyOnboardingsCustomAction) {
    if action.actionId == "allowNotifications" {
        // Request notification permissions
    }
}

func onboardingController(_ controller: AdaptyOnboardingController, didFailWithError error: AdaptyUIError) {
    // Handle errors
}
Event example (Click to expand)
{
  "actionId": "allowNotifications",
  "meta": {
    "onboardingId": "onboarding_123",
    "screenClientId": "profile_screen",
    "screenIndex": 0,
    "screensTotal": 3
  }
}
Closing onboarding
Onboarding is considered closed when a user taps a button with the Close action assigned.
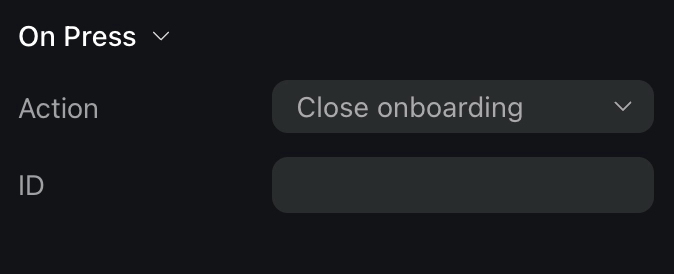
Note that you need to manage what happens when a user closes the onboarding. For instance, you need to stop displaying the onboarding itself.
For example:
func onboardingController(_ controller: AdaptyOnboardingController, onCloseAction action: AdaptyOnboardingsCloseAction) {
    controller.dismiss(animated: true)
}
Event example (Click to expand)
{
  "action_id": "close_button",
  "meta": {
    "onboarding_id": "onboarding_123",
    "screen_cid": "final_screen",
    "screen_index": 3,
    "total_screens": 4
  }
}
Opening a paywall
Handle this event to open a paywall if you want to open it inside the onboarding. If you want to open a paywall after it is closed, there is a more straightforward way to do it – handle AdaptyOnboardingsCloseAction and open a paywall without relying on the event data.
The most seamless way to work with paywalls in onboardings is to make the action ID equal to a paywall placement ID. This way, after the AdaptyOnboardingsOpenPaywallAction, you can use the placement ID to get and open the paywall right away.
Note that only one view (paywall or onboarding) can be displayed on screen at a time. If you present a paywall on top of an onboarding, you cannot programmatically control the onboarding in the background. Attempting to dismiss the onboarding will close the paywall instead, leaving the onboarding visible. To avoid this, always dismiss the onboarding view before presenting the paywall.
func onboardingController(_ controller: AdaptyOnboardingController, onPaywallAction action: AdaptyOnboardingsOpenPaywallAction) {
    // Dismiss onboarding before presenting the flow
    controller.dismiss(animated: true) {
        Task {
            do {
                // Get the flow using the placement ID from the action
                let flow = try await Adapty.getFlow(placementId: action.actionId)

                // Get the flow configuration
                let flowConfiguration = try await AdaptyUI.getFlowConfiguration(
                    forFlow: flow
                )

                // Create and present the flow controller
                let flowController = try AdaptyUI.flowController(
                    with: flowConfiguration,
                    delegate: self
                )

                // Present the flow from the root view controller
                if let rootVC = UIApplication.shared.windows.first?.rootViewController {
                    rootVC.present(flowController, animated: true)
                }
            } catch {
                // Handle any errors that occur during flow loading
                print("Failed to present flow: \(error)")
            }
        }
    }
}
Event example (Click to expand)
{
    "action_id": "premium_offer_1",
    "meta": {
        "onboarding_id": "onboarding_123",
        "screen_cid": "pricing_screen",
        "screen_index": 2,
        "total_screens": 4
    }
}
Finishing loading onboarding
When an onboarding finishes loading, this method will be invoked:
func onboardingController(_ controller: AdaptyOnboardingController, didFinishLoading action: OnboardingsDidFinishLoadingAction) {
    // Handle loading completion
}
Event example (Click to expand)
{
    "meta": {
        "onboarding_id": "onboarding_123",
        "screen_cid": "welcome_screen",
        "screen_index": 0,
        "total_screens": 4
    }
}
Tracking navigation
The onAnalyticsEvent method is called when various analytics events occur during the onboarding flow.
The event object can be one of the following types:
| Type | Description |
|---|---|
onboardingStarted | When the onboarding has been loaded |
screenPresented | When any screen is shown |
screenCompleted | When a screen is completed. Includes optional elementId (identifier of the completed element) and optional reply (response from the user). Triggered when users perform any action to exit the screen. |
secondScreenPresented | When the second screen is shown |
userEmailCollected | Triggered when the user’s email is collected via the input field |
onboardingCompleted | Triggered when a user reaches a screen with the final ID. If you need this event, assign the final ID to the last screen. |
unknown | For any unrecognized event type. Includes name (the name of the unknown event) and meta (additional metadata) |
Each event includes meta information containing:
| Field | Description |
|---|---|
onboardingId | Unique identifier of the onboarding flow |
screenClientId | Identifier of the current screen |
screenIndex | Current screen’s position in the flow |
screensTotal | Total number of screens in the flow |
Here’s an example of how you can use analytics events for tracking:
func onboardingController(_ controller: AdaptyOnboardingController, onAnalyticsEvent event: AdaptyOnboardingsAnalyticsEvent) {
    switch event {
    case .onboardingStarted(let meta):
        // Track onboarding start
        trackEvent("onboarding_started", meta: meta)
    case .screenPresented(let meta):
        // Track screen presentation
        trackEvent("screen_presented", meta: meta)
    case .screenCompleted(let meta, let elementId, let reply):
        // Track screen completion with user response
        trackEvent("screen_completed", meta: meta, elementId: elementId, reply: reply)
    case .onboardingCompleted(let meta):
        // Track successful onboarding completion
        trackEvent("onboarding_completed", meta: meta)
    case .unknown(let meta, let name):
        // Handle unknown events
        trackEvent(name, meta: meta)
    // Handle other cases as needed
    }
}
Event examples (Click to expand)
// onboardingStarted
{
  "name": "onboarding_started",
  "meta": {
    "onboarding_id": "onboarding_123",
    "screen_cid": "welcome_screen",
    "screen_index": 0,
    "total_screens": 4
  }
}

// screenPresented

{
    "name": "screen_presented",
    "meta": {
        "onboarding_id": "onboarding_123",
        "screen_cid": "interests_screen",
        "screen_index": 2,
        "total_screens": 4
    }
}

// screenCompleted

{
    "name": "screen_completed",
    "meta": {
        "onboarding_id": "onboarding_123",
        "screen_cid": "profile_screen",
        "screen_index": 1,
        "total_screens": 4
    },
    "params": {
        "element_id": "profile_form",
        "reply": "success"
    }
}

// secondScreenPresented

{
    "name": "second_screen_presented",
    "meta": {
        "onboarding_id": "onboarding_123",
        "screen_cid": "profile_screen",
        "screen_index": 1,
        "total_screens": 4
    }
}

// userEmailCollected

{
    "name": "user_email_collected",
    "meta": {
        "onboarding_id": "onboarding_123",
        "screen_cid": "profile_screen",
        "screen_index": 1,
        "total_screens": 4
    }
}

// onboardingCompleted

{
    "name": "onboarding_completed",
    "meta": {
        "onboarding_id": "onboarding_123",
        "screen_cid": "final_screen",
        "screen_index": 3,
        "total_screens": 4
    }
}