How to submit your app to the App Store
Everyone needs to start somewhere. Before you can finetune your subscription offerings and optimize the monetization mechanics, you need to at least have the app available to download. With this in mind, we have prepared this guide on publishing an app on the mobile store.
While there are plenty of platforms to choose from, the App Store has historically shown higher revenue per download (Apple devices are responsible for 67% of consumer in-app spending). It has a famously tedious approval process, so it makes sense to start with this platform.
This comprehensive guide is tailored to streamline this process for developers, whether you are seasoned professionals or first-time creators. Some things might seem redundant or evident, but it's always better to check everything in-house rather than to run into an issue later on the road.
Pre-submission checklist
Before diving into the enrollment and submission steps, use this checklist to ensure your app meets Apple's 2026 requirements:
| Category | Item | Status |
| Technical | Minimum iOS version: iOS 15.0 or later | ✓ |
| Technical | Tested on iPhone 12, 13, 14, 15 models | ✓ |
| Technical | All known bugs fixed; tested via TestFlight | ✓ |
| Design | App icon: 1024×1024px PNG | ✓ |
| Design | Screenshots: 1242×2788px, clear copy | ✓ |
| Privacy | Privacy Manifest file (PrivacyInfo.xcprivacy) included | ✓ |
| Privacy | Privacy policy URL (active, HTTPS) | ✓ |
| Metadata | App name, description, keywords proofread | ✓ |
| Legal | COPPA/GDPR compliance (if applicable) | ✓ |
App Store submission requirements
Apple's submission process includes several technical, design, content, and legal criteria outlined in their App Store Review Guidelines. The key ones can be grouped into five categories:
Safety
Apps should not contain offensive or harmful content. This includes avoiding objectionable content like defamatory, discriminatory, or mean-spirited material, realistic violence, illegal or reckless use of weapons, overtly sexual content, and false information.
- If your app allows user-generated content, it must filter objectionable material, provide a mechanism to report offensive content, block abusive users, and include contact information for user support.
- Apps for children must not include inappropriate links, purchasing opportunities, or distractions, and must comply with privacy laws regarding data collection from children.
Performance
Apps must be complete and stable, and beta versions should use TestFlight, with all metadata accurately reflecting the app's functionality. Accurate and up-to-date contact information is crucial for user support and may be legally required in some regions.
Design and development guidelines
Apps should adhere to various guidelines, including UIKit, AppKit, WatchKit, App Extensions, iOS Data Storage Guidelines, and Apple File System.
Legal and privacy considerations
Apps must comply with legal requirements regarding data security and reporting criminal activity. For example, keep local user data on a server physically situated in the country of users' residence. This category also has specific requirements for services for kids, as well as gambling and VPN apps.
As of 2024, all apps must include a Privacy Manifest file declaring what user data is collected and which third-party SDKs are used. This requirement prevents unauthorized tracking and protects user privacy.
Business
As of November 2023, all apps should employ Apple services like Apple Pay and Apple ID to handle their in-app purchases and subscriptions. While there are some exceptions for physical goods, and some bigger apps are allowed to charge users with their own payment ecosystem, as an indie or beginning developer, you should assume that Apple will handle the monetization part of your app—and will charge you a fee for it.
Adhering to these requirements is crucial to avoid common pitfalls that could lead to app rejection. Always refer to the regularly updated App Store Review Guidelines to ensure a seamless and successful process.
What you need to do before submitting an app
Join the Apple Developer Program
Everything Apple-related starts with enrolling in the Apple Developer Program. This program provides a wide array of benefits, tools, and resources essential for successful app development and distribution, from yearly participation in Worldwide Developer Conferences (WWDC) to constant new updates and FAQs, as well as early access to the newer versions of iOS and other operating systems.
Here's what you need to enroll:
- Use or create an Apple ID with two-factor authentication
- Individuals need to write their legal name, while organizations need to provide their legal entity name, a D-U-N-S Number, legally binding authority, and a website
- Pay the annual fee of $99 USD for individuals and organizations, with small variations based on location and different categories of developers
Here's what you get as an Apple Developer:
- Access to the latest OS and SDK beta software releases
- Comprehensive development tools like Xcode and App Store Connect for app building, testing, and management
- Features such as Apple Pay, ARKit, CloudKit, and more enhance app functionality
- Global App Distribution through the App Store and Apple Business
- TestFlight for extensive beta and real-world app testing
Comply with Apple's requirements
As mentioned before, satisfying Apple's detailed guidelines for app design, functionality, and content is a must. They are created to maintain a high standard of quality and user experience across the App Store and are part of the reason people trust and download the apps in the first place.
The first and foremost Apple requirement is adhering to the Human Interface Guidelines. These recommendations, templates, and design assets ensure that an app's user interface is intuitive and consistent with the iOS ecosystem.
Of course, the apps themselves need to be stable, free from bugs, and compatible with Apple's latest hardware and software. This often goes without saying, but a lot of smaller developers let some issues fly hoping that the users won't run into them. However, Apple testers review all applications, and even a small bug can result in a costly delay.
Comprehensive content guidelines highlight that apps should not contain offensive, insensitive, upsetting, or defamatory content. Apple is usually more severe with its definition of "insensitive" and "offensive", so what might be okay for Steam or Android will not be allowed on iOS. User privacy is another important aspect, with Apple requiring that developers disclose what user data their app collects and why.
For the most recent guidelines and updates, regularly check out these platforms:
- Apple's Developer Website is the primary resource for the latest guidelines and updates
- Apple's Developer Forums are a place to discuss and clarify guidelines with other developers
- Apple's WWDC sessions provide insights into best practices and upcoming changes
Privacy Manifest requirements
The Privacy Manifest is a required file (PrivacyInfo.xcprivacy) that declares what user data your app collects and which SDKs you use. Introduced in May 2024, this requirement applies to all new app submissions and SDK updates.
Your Privacy Manifest must include:
- API categories: Declare which sensitive APIs your app uses (e.g., UserDefaults, FileSystem, Network)
- Tracking information: List any SDKs that perform user tracking
- Third-party SDK declarations: Identify all external libraries and their privacy practices
- User-facing explanation: Provide clear text explaining data collection in App Store Connect's Privacy section
Failing to include an accurate Privacy Manifest is a common reason for app rejection in 2026.
Comply with legal requirements
When submitting your app to the App Store, make sure it also satisfies various legal considerations:
- Copyright laws: Ensure all content within the app, including text, images, music, and other media, is either original or properly licensed.
- Privacy regulations: Comply with laws like GDPR (EU), COPPA (US, for users under 13), and local data protection laws.
- Age rating requirements: Accurately rate the app based on its content to ensure appropriate audience targeting.
Legal compliance is critical for app approval in the App Store. Non-compliance can lead to app rejection or issues with the authorities post-release. Remember also to adhere to the local laws and requirements of the country of your fiscal residency regarding sales and revenue taxation, user data collection, and user-generated content responsibility. Apple's legal check is rigorous, but not exhaustive.
Seven steps to publish an iOS app to the App Store
The road from an MVP on your Mac to a working app that generates profit can take weeks if not months. We're hoping that with this step-by-step guide, you'll manage to get to the final point faster.
Step 1: Prepare your app for submission
Before you submit your app to the Apple team and the App Store, go over these key steps:
- Remove any unused code and comments to tidy up your codebase and leave a smaller footprint for the reviewers to analyze
- Thoroughly test and fix all known bugs to ensure smooth app functionality, making sure that the app runs smoothly even on older devices and versions of iOS and iPadOS
- Double-check that the design and the features adhere to Apple's guidelines, including content, privacy, and technical requirements
- Ensure the user interface is intuitive and user-friendly; if possible, account for at least several accessibility features in your app like bigger font and high-contrast colors
- Design a compelling app icon and appealing launch screens that align with Apple's specifications
- Craft an engaging app description, and prepare relevant screenshots and other required metadata
A polished, fully functional app won't have a hard time getting through the App Store submission process. Make sure that it not only functions flawlessly but also looks great on all supported devices, with high-resolution resolutions for different iPhone models, a professional app icon, and launch screens, and it will create a positive first impression with users and App Store reviewers.
Step 2: Create an App Store Connect listing
Creating a new app record in App Store Connect involves a lot of data points. To create a new app listing, log into App Store Connect with your Apple Developer account, navigate to "My Apps" and click the "+" button.
First, provide some basic information:
- Choose a unique, memorable name
- Select the primary language of your app
- Choose a bundle ID registered in your Apple Developer account
- Provide a unique ID for your app within your account
Then, set up the metadata:
- Write a concise, engaging app description that explains what your app does best
- Include relevant keywords for search optimization
- Select the most appropriate category for your app
- Upload graphic assets like app icons and screenshots
- Decide on your pricing strategy and availability regions
- Carefully review all the information and submit your app for review
Step 3: Capture App Store screenshots
The screenshots provide the first taste of your app and are one of the most important marketing assets you will have. Here are key principles for screenshot optimization:
Highlight key features: Each screenshot should focus on the most significant features of your app, effectively showcasing a unique benefit or functionality. The goal is to immediately grab the user's attention by demonstrating what makes your app special and useful.
Remember to follow Apple's specifications: For instance, Apple requires specific dimensions for iPhone screenshots, like 1242 x 2688 pixels for the 5.8-inch display and 1284 x 2778 pixels for the 6.7-inch display. The accepted formats are usually .jpeg or .png (the latter one is better because it usually weighs less and allows for transparency). Adherence to these guidelines ensures that your screenshots are displayed correctly on the App Store.
Design for your audience: Tailor the design and content of the screenshots to get a higher conversion rate from your users who will see that the app works flawlessly on their device. Once the app is up and running, you can run A/B tests to find the better-converting screenshots.
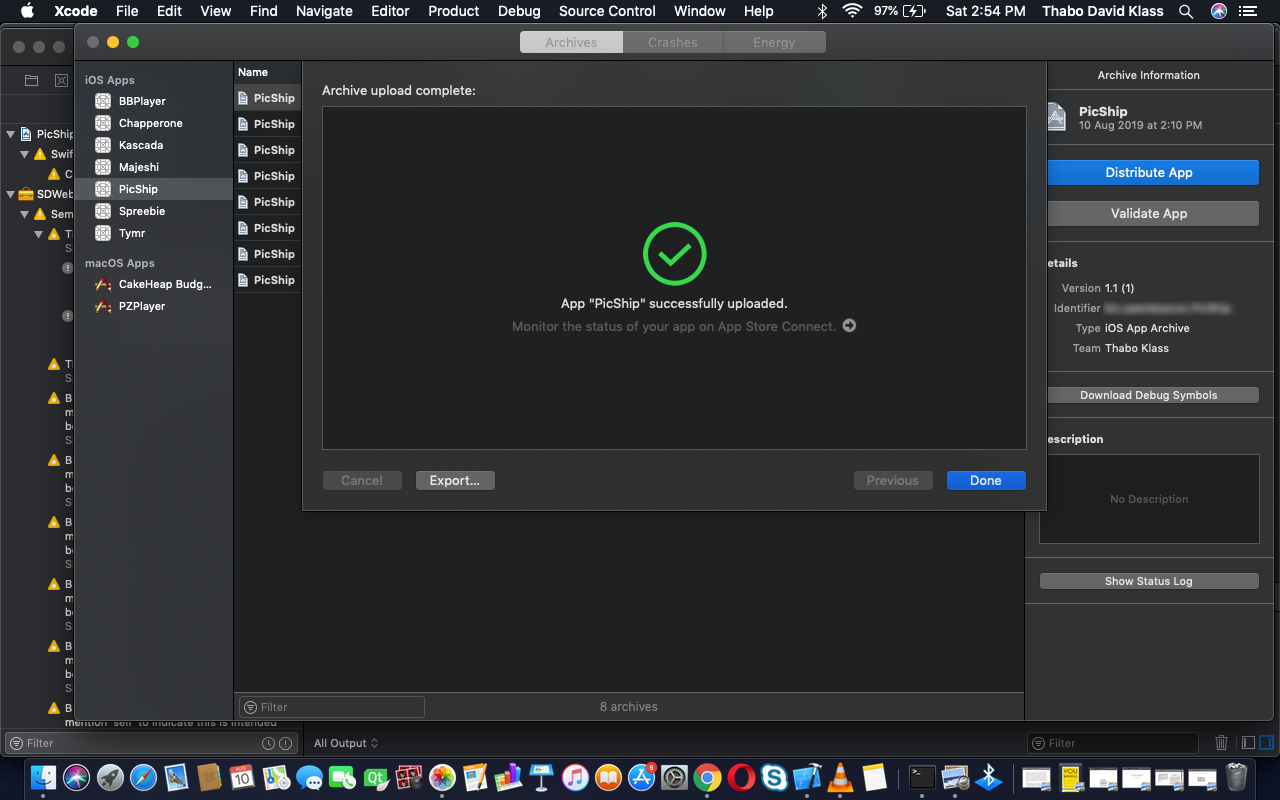
Step 4: Archive and upload the app using Xcode
Archiving and uploading an app to App Store Connect via Xcode involves a few steps. First, prepare the app for release: ensure the app's version number and build number are correctly set, and that its profiles and certificates are valid. You can do this in the 'General' settings tab of your project in Xcode: make sure you check the automated signing and that your team/company's profile is chosen.
Then, select the app's scheme in Xcode, choose 'Product' from the menu, and then 'Archive'. Xcode will compile the app in several seconds or minutes (depending on how big the build is and how new the Mac is) and open the Organizer window once the archive is complete.
In the Organizer, you can upload the build:
- Select the new archive
- Click 'Distribute App' and follow the prompts
- Choose 'App Store Connect' as the distribution method
- Complete the necessary export compliance forms
- Click 'Upload' to submit the build to App Store Connect
You can run into some potential issues during the process:
- Certificate or Profile Issues: Ensure certificates and provisioning profiles are up-to-date
- Network Errors: A stable internet connection is required for upload
- Compatibility Warnings: Resolve any warnings or errors indicated by Xcode before submission
Step 5: Configure your app's settings in App Store Connect
In App Store Connect, you can set up options like pricing, availability, in-app purchases, and age ratings. They directly impact your app's reach and monetization, so it's important you do everything right.
Pricing and regional availability
You can set the price for your app or opt to offer it for free. The pricing tier you choose affects your app's accessibility and revenue. Consider your target audience and competitors when setting the tier, and remember to include regional pricing so that the app is available to more people.
| Tier | USD price | EUR price | Best for |
| Free | $0 | €0 | Freemium with in-app purchases |
| Tier 1 | $0.99 | €0.99 | Paid apps, low barrier to entry |
| Tier 10 | $9.99 | €9.99 | Productivity, utilities, tools |
| Tier 20 | $19.99 | €19.99 | Premium apps with advanced features |
| Tier 99 | $99.99 | €99.99 | Enterprise, niche professional tools |
The go-to strategy these days seems to be to offer a free app, but lock some features inside behind the paywall. Be mindful of local laws and cultural sensitivities when choosing availability by country.
In-app purchases and subscriptions
Offering in-app purchases (IAPs) can be a significant revenue source. You can provide various types of digital goods, like subscriptions, consumables, or unlockable features. The nature of your IAPs should complement your app's functionality and enhance user experience, presenting a higher value than their set price.
If you decide to include subscriptions, we strongly suggest you consider employing Adapty: its subscription analytics tool provides accurate info and actionable insights on how to supercharge your monetization strategy.
The most common subscription models include:
- Free trial: 3–14 days free access before charging (industry standard)
- Introductory pricing: Reduced price for first one or two billing cycles (great for conversions)
- Monthly/annual subscriptions: Recurring charges on a fixed schedule
- Pay-as-you-go: One-time purchases for virtual goods or premium content
Age ratings
Setting an appropriate age rating ensures that your app reaches its intended audience and complies with regulations. The rating depends on your app's content and its suitability for different age groups, so you should consult with a legal professional in the region. If your app includes sensitive or NSFW content, consider including parental controls.
Step 6: Submit your app for App Store review
Once the app is uploaded, configured, and correctly presented, you can submit it for review. During the process, Apple's team will assess your app against their guidelines, focusing on functionality, content, user interface, and legal compliance.
The review timeframe can vary, typically from 24 to 72 hours on average, though first-time submissions may take longer. The more accurately you've checked your app before, the less time it will take.
If Apple requests additional information or rejects your submission, they will provide specific feedback, sometimes citing a specific clause in the guidelines your app seems to be breaking. Address this feedback comprehensively and resubmit your app promptly.
Common reasons for rejection in 2026 include:
- Privacy violations (25% of rejections): Missing Privacy Manifest, unauthorized tracking, SDK compliance issues
- Broken functionality (20%): Crashes, unresponsive UI, non-functional features
- In-app purchase bugs (15%): Subscription trial not working, refund issues, cancellation broken
- Metadata issues (12%): Misleading claims, placeholder text, poor grammar
- Design violations (10%): Non-standard navigation, hidden back button, aggressive dark patterns
- Legal issues (8%): Copyright claims, unlicensed content, trademark violations
Step 7: Check on the approval status of your app
You can monitor the status of your submission in App Store Connect. To check your app's review result, log into App Store Connect and navigate to 'My Apps'. Select your app, and you will see its current status, such as 'Waiting for Review', 'In Review', or 'Rejected'.
If your app is approved, you can release it immediately or schedule it for a specific date. Post-approval, focus on marketing your app through various channels and monitor its performance on App Store Connect, tracking metrics like downloads, user feedback, and revenue. Consider having a soft launch first, limiting the rollout to one or two countries, to see how people react to your product and acquisition strategy.
Post-approval marketing strategy
After your app is approved and live on the App Store, your work is far from over. The following strategies will help you increase visibility and drive downloads:
Promote in-app purchases on the App Store
Promoted in-app purchases allow you to highlight specific IAPs directly within the App Store, making them visible to potential users before they even download the app. This is a powerful marketing feature that can increase conversion rates.
To set up promoted IAPs:
- Log into App Store Connect and select your app
- Navigate to Features > Promote In-App Purchases
- Select up to 30 IAPs to promote (order matters—put your best offer first)
- Customize the preview image, description, and display name
- Changes take up to 24 hours to appear on the App Store
You can run A/B tests on promoted IAP screenshots and descriptions to see which variants drive the highest conversion rates.
Use App Store Events
App Store Events allow you to highlight time-limited content or seasonal campaigns. Your event appears in the app's store card and in search results, creating additional visibility. Common events include new content releases, seasonal campaigns, or limited-time offers. Set these up in App Store Connect under App Clips & Events.
Launch an Apple Search Ads campaign
Apple Search Ads (ASA) allow you to bid on keywords to appear at the top of App Store search results. For new apps, launching a campaign in the first 30 days can generate an immediate download boost. Typical approach:
- Start with a $5–$50/day budget
- Target competitor keywords and branded variations
- Monitor return on ad spend (ROAS): aim for 3–5x return
- Scale campaigns that perform well
Plan a soft launch
A soft launch means releasing your app to a limited geographic region before going global. This strategy allows you to:
- Test your app's performance in a real market with real users
- Gather early reviews and ratings to boost credibility
- Monitor crash rates and stability issues
- Validate your monetization strategy (IAP conversion, pricing)
- Refine your app store listing and ASA strategy
Typical soft launch timeline: 2–4 weeks in 1–2 countries, then expand globally based on performance.
Special considerations for EU developers
If your app targets European users or you're located in the EU, Apple's Digital Markets Act (DMA) and GDPR create additional compliance requirements and opportunities.
Digital Markets Act (DMA) compliance
The DMA is an EU regulation (effective 2024+) that requires gatekeepers like Apple to provide fair access to their platforms. Key changes for app developers:
- Sideloading: EU users can install apps outside the official App Store
- Alternative app marketplaces: Third-party stores like Huawei AppGallery are now viable alternatives
- Alternative payment methods: Developers can use their own payment processor for subscriptions (after year 1), reducing Apple's cut from 30% to 10%
- Core Technology Fees (CTF): High-volume apps (1M+ downloads) may owe €0.50 per download if sideloaded
For developers earning under €1M annually in the EU, the DMA has minimal impact. For larger operations, consider a hybrid approach: App Store for year 1 (Apple handles compliance), then web checkout for year 2+ (you keep more revenue).
GDPR and privacy compliance
Apps targeting EU users must comply with GDPR, which requires explicit user consent for data collection and processing. Key requirements:
- Obtain user consent before collecting personal data
- Keep data localized within the EU (typically on EU-based servers)
- Provide users the right to access, modify, or delete their data
- Use Privacy Manifests (see above) to declare data collection transparently
COPPA compliance for children's apps
If your app targets users under 13, you must comply with COPPA (Children's Online Privacy Protection Act in the US) and similar laws in other countries. Requirements include:
- Parental consent before collecting any data from children
- Parental controls and content restrictions
- No third-party advertising or analytics that track children
- Clear privacy disclosures suitable for children
Final thoughts
In this guide, we've covered the comprehensive journey of preparing and submitting an app to Apple's App Store. Key points include enrolling in the Apple Developer Program, adhering to Apple's stringent guidelines for app design, functionality, and content, and the meticulous process of finalizing and archiving your app for submission.
Communicating with the Apple team openly and in a prompt manner is a sure way to avoid any potential hiccups along the way.
Remember, preparation and strict compliance with Apple's guidelines are pivotal for a successful submission. The app review process often requires patience and persistence, as many successful apps—even those several years in their existence—undergo several iterations before final approval.
Stay encouraged and persistent. Each submission is a learning experience, bringing you closer to having your app featured in the App Store in a shorter period of time. Embrace the process, and with each step, you're paving the way for your app's success.