What is App Store Connect?
App Store Connect is a platform provided by Apple that allows developers to submit and manage their apps on the Apple App Store. Developers can use App Store Connect to upload their apps, view analytics and sales data, manage in-app purchases, and more. It is a central hub for developers to manage all aspects of their apps on the App Store. To access App Store Connect, go to https://appstoreconnect.apple.com and sign in with your Apple ID and password. To access the dashboard, you need to be enrolled in the Apple Developers program, and to see your app’s data, you need to be a part of your company team. Once logged in, you can utilize the platform’s array of tools and resources for managing your apps, such as app analytics, sales data, and app submissions. Don’t worry if you do not see all the features at once: their availability depends on your role in the company (developer, publisher, marketing, finance), which we will discuss a bit later. Now that we are in, let’s look at this comprehensive tool part by part.
Before you begin: Apple Developer Program enrollment
Before you can use App Store Connect, you must enroll in the Apple Developer Program. The annual fee is $99 USD, and the enrollment type you choose directly affects how your name appears on the App Store.
| Feature | Individual | Organization |
|---|---|---|
| Annual fee | $99 USD | $99 USD |
| Name on App Store | Personal legal name | Company legal name |
| D-U-N-S number required | No | Yes |
| Team management | No | Yes (multiple roles) |
| Best For | Solo developers, hobbyists | Businesses, startups, agencies |
If you want your company name to appear on the App Store, you must enroll as an organization. This requires a D-U-N-S Number — a unique nine-digit identifier from Dun & Bradstreet that Apple uses to verify your organization’s identity. You can check if your company already has one (or request a free one) through Apple’s D-U-N-S Number lookup tool. The verification process can take up to two weeks. To enroll, visit the enrollment page, sign in with your Apple ID, provide your information, and pay the annual fee. Approval is usually quick for individuals but may take a few extra days for organizations while Apple verifies your D-U-N-S information. Before you can sell apps or offer in-app purchases, you’ll also need to sign the Paid Applications Agreement and set up your banking and tax information in App Store Connect under the “Agreements, Tax, and Banking” section. This step is easy to overlook but is mandatory before any revenue can flow.
App Store Connect: the main dashboard
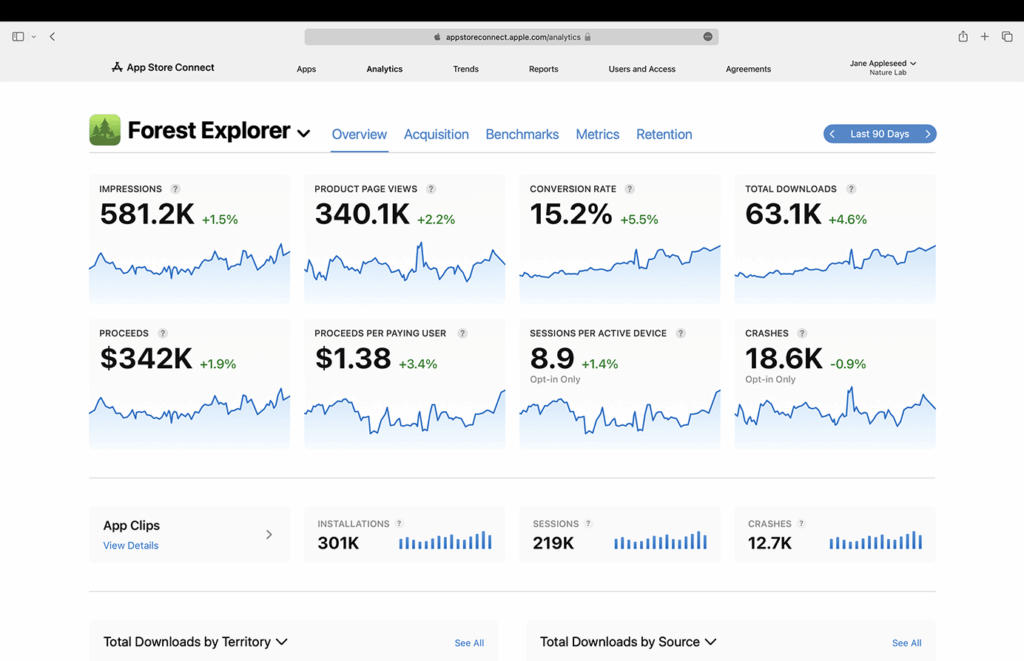
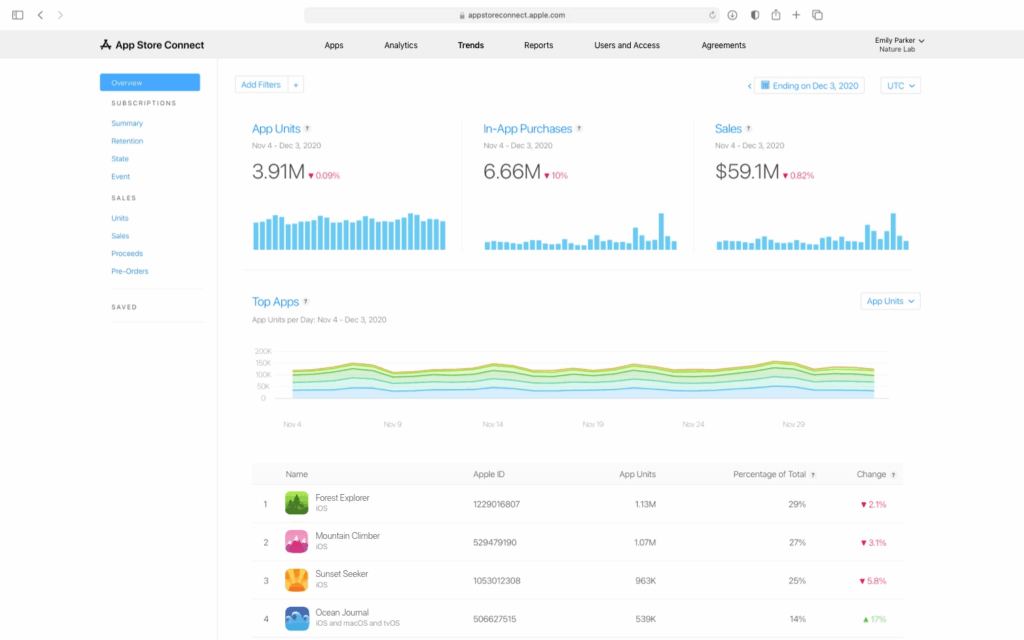
The main dashboard of App Store Connect serves as the central hub for marketers and publishers. It offers a streamlined overview of your app’s status and activities on the App Store. The first screen you see after you’ve logged in is the dashboard, which already should provide you with the most relevant data points and trends about your app. The dashboard layout is designed for efficiency, with sections dedicated to different aspects of app management. Key information displayed includes the current status of each app, such as whether it’s in review, ready for sale, or requires attention due to issues like submission errors or compliance notifications. Recent notifications are prominently displayed, alerting developers to any actions they need to take or updates they should be aware of. On the main screen, you can also find the overall app performance metrics. This includes data on app downloads, revenue, user engagement, and feedback through ratings and reviews. These metrics help you to understand how your app is performing in real time and enable you to make informed decisions on marketing strategies, feature updates, and App Store optimization. On the top, you will see six key parts of the App Store Connect. Here they are:
My Apps
In this part, you can find all the apps you have published on the App Store. Each app is displayed with essential information such as the app name, app icon, bundle ID, app version, and current app status. You can dive deeper into each app to access detailed analytics and performance data, including download and revenue numbers, active devices, user engagement metrics, and more. This data can help you track your app’s success and identify areas for improvement. This section of the App Store Connect is also where you can manage app versions and updates by submitting new versions for review, setting release dates, and managing app metadata such as descriptions, screenshots, and keywords. This allows you to keep your app content fresh and relevant for users. You can also respond to customer reviews and engage with users to address feedback or issues related to your app.
App Analytics
The App Analytics section of App Store Connect stores valuable insights about the performance of your apps. Here you can track key metrics such as app downloads, app store views, installs, and in-app purchases. You can also monitor user engagement and retention rates to gain a better understanding of how users are interacting with their app over time. With these metrics, marketers and publishers can make data-driven decisions to optimize their app’s performance and user experience. This section also allows you to create custom reports with specific data points, if you are looking to gain deeper insights into certain aspects of an app’s performance. You can segment users based on various criteria such as demographics, location, or device type to identify trends and patterns that can inform their marketing and product development strategies. As of WWDC 2025, App Analytics has received a major expansion with over 100 new metrics focused on subscription and monetization data, alongside a redesigned interface that makes it significantly easier to filter and navigate your data.
Sales and Trends
In the “Sales and Trends” part, you can find a financial overview of your app’s performance on the App Store. Developers can track their earnings from app sales, in-app purchases, and subscriptions, with detailed reports on revenue trends over different periods. This section provides a breakdown of sales and downloads by region, allowing developers to understand their app’s global reach and identify key markets. Information on promotional efforts, such as the effectiveness of marketing campaigns or price adjustments, can also be gleaned from this data. Unlike Analytics, this section focuses only on financial insights. For example, if you have an app that offers auto-renewable subscriptions, you can easily assess its business performance by examining subscription data on the summary, retention and churn rates, state, and event pages. Better yet, you can access this data in your Adapty dashboard: it connects directly to the App Store Connect, ensuring 99.99% accuracy, and links financial performance to specific paywalls or A/B tests you have been running. This way you can instantly see the results of your marketing and product experiments.
Payments and Reports
The Payments (on some screens, just Reports) is a critical section within App Store Connect. Here you can access detailed records of your financial transactions and reports related to the apps for financial analytics and tax purposes. Basic monthly financial reports include data on earnings, amount owed, and last payment. These can also be segmented by period, which helps developers track their revenue over time. Where available, this section also provides tax documents necessary for fulfilling legal obligations.
Users and Access
In the “Users and Access” section you can, unsurprisingly, manage users, set their permissions and access their accounts. The main account holder (usually the creator of the company or the designated head) controls what the users can see and do within the account by assigning different roles to team members. The main user roles in App Store Connect are: Account Holder is the main user who has full control over the account. They can add and manage users, revoke access, and make decisions regarding app distribution and financial matters. Admins have similar permissions to the Account Holder but cannot revoke access for the Account Holder. They can add and manage users, set their roles and permissions, and perform various tasks related to app management and distribution. App Managers are allowed to create, edit, and manage apps on App Store Connect. They can submit apps for review, manage app versions and metadata, and view analytics and sales data. Developers have limited permissions and are primarily responsible for building and uploading app binaries. They can access certain parts of App Store Connect to perform tasks related to app development, such as uploading builds and managing TestFlight beta testing. Marketers have permission to view analytics data, sales reports, and customer reviews. They can also create promotional offers, view trends, and track user engagement data within App Store Connect. Here’s a quick comparison of what each role can do:
| Role | Manage Users | Submit Apps | View Analytics | View Financials | Manage IAP |
|---|---|---|---|---|---|
| Account Holder | ✅ | ✅ | ✅ | ✅ | ✅ |
| Admin | ✅ | ✅ | ✅ | ✅ | ✅ |
| App Manager | ❌ | ✅ | ✅ | ❌ | ✅ |
| Developer | ❌ | ❌ | ❌ | ❌ | ❌ |
| Marketer | ❌ | ❌ | ✅ | ✅ | ❌ |
This feature ensures that team members have the access they need to fulfill their roles effectively while maintaining the security and integrity of the app’s information. Be careful not to overshare the access to App Store Connect and only invite the relevant team members.
Agreements, Tax, and Banking
The last section of App Store Connect, “Agreements, Tax, and Banking”, allows for maintaining accurate and up-to-date legal and financial records. Product owners and company leaders can review and accept the latest contracts and agreements from Apple, ensuring their apps comply with current App Store policies. Here you can also update company details, tax information, and set up and update banking details ensuring that the revenue earned from app sales and subscriptions is correctly deposited. It’s worth noting Apple’s App Store Small Business Program here. If your app earns less than $1 million in proceeds per year, you can apply to reduce the App Store commission from 30% to 15%. This can make a significant difference to your bottom line, especially for indie developers and smaller studios. You can check your eligibility and enroll directly through the link above.
Resources and Help
While not a part of the upper menu, we also strongly recommend you open the “Resources and Help” section once in a while. It is a treasure trove of information for developers at all levels. This section contains guides, support articles, and tutorials designed to help developers navigate the various aspects of App Store Connect and the app submission process. While this article is supposed to be the ultimate guide to answer all of your questions, this section might get you to resolve a specific problem quicker.
How to publish an iOS app on the App Store
Publishing your iOS app on the App Store is a big step for any developer. This guide will help you through each step of the process, from setting up your account in the Apple Developer Program to submitting your app for review. For a more detailed analysis, check out the comprehensive guides on our blog: for example, here’s the one about submitting your app to the App Store. In this guide, we will stick to the App Store Connect aspect of this process.
Step 1: Create an iOS distribution profile and generate a distribution certificate
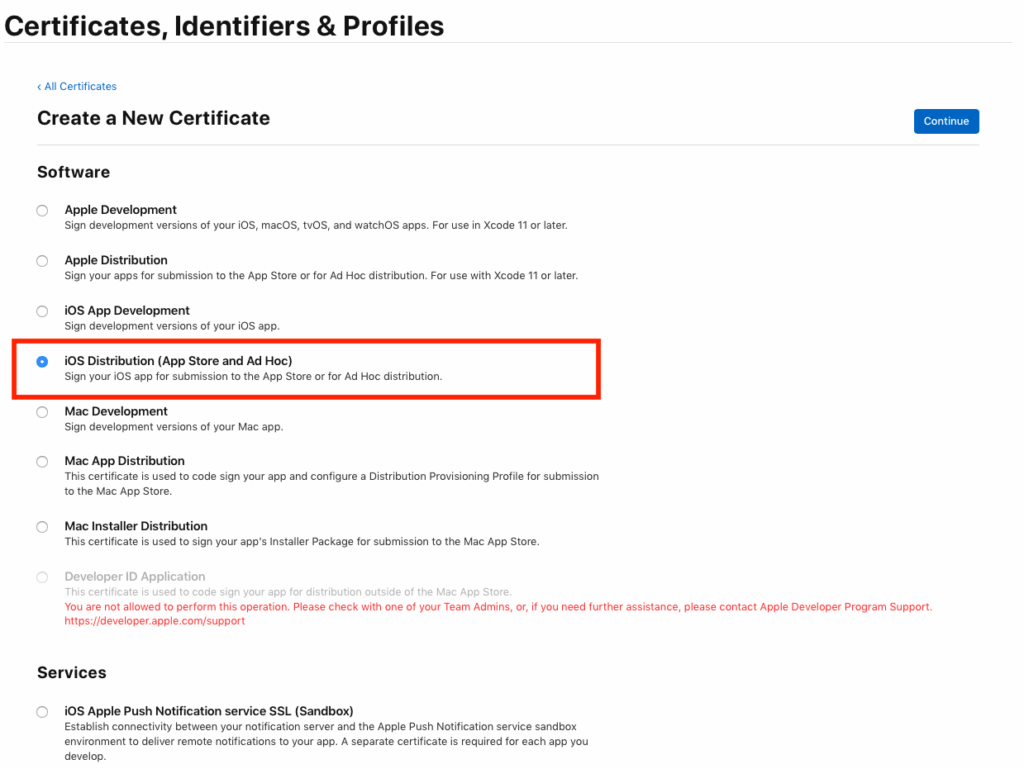
To distribute your app on the App Store, you first need to set up the necessary credentials through the Apple Developer Program. This involves creating a distribution certificate, which confirms your identity to Apple and allows you to sign your apps. Along with the certificate, you’ll need to create a provisioning profile, which links your Apple ID, your devices, and your certificate. Together, these allow Apple to verify that your app comes from a trusted source and is allowed to be distributed on the App Store. Note: if you have “Automatically manage signing” enabled in your Xcode project, Xcode will handle certificates, App IDs, and provisioning profiles for you automatically. In that case, you can skip the manual steps below and proceed directly to Step 2. To create a certificate manually, go to the Apple Developer Member Center, and then — to the Certificates, Identifiers & Profiles part. There, click “+” to create a new certificate, choose the “App Store and Ad Hoc” certificate, and follow the instructions. After this, you can create an App ID at the Developer Portal (but not yet submit the app for review). When creating the App ID, make sure to enable the In-App Purchase capability if your app will offer subscriptions or other purchases. When you have both the App ID and the certificate, return to the Member Center again, but this time choose to create a new Profile — specifically, the “App Store” provisioning profile. Select the app ID, choose the devices on which you want to run the app, and click Generate. After you have generated, downloaded, and installed the profile to Xcode, you should be good to go.
Step 2: Create an app record in App Store Connect
The next step is setting up a new app record in App Store Connect. To do so: 1. Click on “My Apps” at the top of the page. 2. Click on the “+” button to create a new app record. 3. Select the platform (iOS, macOS, watchOS, or tvOS) for your app. 4. Fill in the required details for your app, such as the app name, primary language, bundle ID, and SKU. 5. Upload the necessary assets, including app icons, screenshots, and app previews. 6. Provide all the necessary information about your app, such as its category, ratings, and description. 7. Review all the information you have entered and make sure it is accurate. 8. Click Save to create the app record in App Store Connect. A few tips worth keeping in mind here. The SKU is a unique ID for your app that is not visible to users. There are no strict naming rules, but a good practice is to base it on your Bundle ID — for example, if your Bundle ID is com.example.myapp, consider using ComExampleMyapp as the SKU. The Bundle ID cannot be changed after you upload your first build, so double-check it before proceeding. And the app name has a maximum of 30 characters, so plan accordingly. Once you have created the app record, you can continue to add more details about your app, such as pricing, in-app purchases, and app store optimization (ASO) information. If you accidentally created an app record, you can remove it: go to My Apps, select the app, click App Information under General, scroll to Additional Information, and click Remove App. Note that only Account Holders and Admins can remove apps, and only if the app is in a state that allows removal.
Step 3: Set up your app metadata in App Store Connect
Your app’s metadata plays a significant role in how easily users can find and decide to download your app, so it’s important to think carefully. Of course, you can (and should) frequently update the information later, but why not start on a high note? In App Store Connect, you’ll have the opportunity to upload screenshots and preview videos, craft promotional texts, and choose keywords related to your app. We have dedicated a stand-alone guide to these elements because they are critical for optimizing your app’s visibility in search results and its appeal to potential users. Make sure your screenshots and videos highlight the most compelling features of your app and use your promotional texts to succinctly convey its value proposition. Here are the required screenshot sizes you’ll need to prepare:
| Display size | Resolution (Portrait) | Required? |
|---|---|---|
| 6.9″ (iPhone 16 Pro Max) | 1320 × 2868 px | Optional |
| 6.7″ (iPhone 15 Pro Max) | 1290 × 2796 px | Optional (auto-used for 6.5″ if missing) |
| 6.5″ (iPhone 11 Pro Max) | 1242 × 2688 px or 1284 × 2778 px | ✅ Required |
| 5.5″ (iPhone 8 Plus) | 1242 × 2208 px | ✅ Required |
| 12.9″ iPad Pro | 2048 × 2732 px | Required for iPad apps |
You can upload up to 3 App Previews (videos) and 10 screenshots for each display size. The Promotional text field (max 170 characters) appears above the description and can be updated anytime without requiring a new app submission — use it to highlight seasonal offers or new features. The Description field has a maximum of 4,000 characters, and Keywords should be separated by commas. Don’t forget to add a Support URL (required) and a Privacy Policy URL (required). You can also specify a User Privacy Choices URL where users can manage or delete their collected data.
Step 4: Upload and archive your app using Xcode
Then, you will need to prepare your app for submission to the App Store in Xcode. The process involves “archiving” (essentially, compiling) your app, which prepares it as a final product that can be uploaded to App Store Connect. This step bundles your app and all its resources into one package. Once the archive is complete, Xcode will guide you through uploading this package to App Store Connect, ensuring that it’s ready for the next step in the process. In Xcode, go to Product → Archive to start the archiving process. When it’s complete, the Archives organizer will open automatically (you can also access it via Window → Organizer). From there, click Distribute App, select TestFlight & App Store, and click Distribute. Alternative upload methods: while Xcode is the most common way to upload your build, you can also use Transporter (a free macOS app from Apple) for manual uploads. As of WWDC 2025, Apple now also supports build uploads via the App Store Connect API, which is ideal for teams that want to integrate the upload step into their CI/CD pipelines and automate the entire delivery process without any manual intervention. After uploading, wait a few minutes for your build to appear in App Store Connect. You may also need to answer compliance questions about encryption usage when selecting the build for the first time.
Step 5: Test with TestFlight before submitting
Before submitting your app for official review, it’s strongly recommended to test it with TestFlight — Apple’s beta testing platform built directly into App Store Connect. Even if you are confident in your build, a quick round of beta testing can catch issues that are easy to miss during development. To set up TestFlight testing: 1. After uploading your build from Xcode, go to the TestFlight tab in App Store Connect. 2. Under Testers in the left panel, click “+” next to Internal Testing (for your team members) or External Testing (for a wider beta group). 3. Create a test group, give it a name, and click Create. 4. Click on the group you just created, then add Builds to be tested and Testers by clicking the “+” button next to each section. 5. Testers will receive an invitation and can install your app via the TestFlight app on their device. Internal testers (up to 100 people from your App Store Connect team) can access builds immediately without any additional review. External testing groups (up to 10,000 testers) require a brief beta review from Apple before testers gain access, but this review is typically much faster than a full App Store review. As of the latest App Store Connect updates, you can also review TestFlight feedback, screenshots, and crash logs directly on iPhone and iPad through the App Store Connect mobile app, including digest notifications to manage feedback volume.
Step 6: Submit your app for review
The final step is to submit your app for review. In App Store Connect, go to your app’s version page (e.g., “1.0 Prepare for Submission”), check all your app details, choose the build version you wish to submit, and confirm that all the information and materials are correct and complete. Before submitting, make sure you’ve filled in the App Review Information section. This is not visible to users — it’s only for Apple’s review team. If your app requires sign-in, provide test credentials here so reviewers can access all features. Also add your contact information so the review team can reach you with any questions. You can choose how you want your app released after approval: automatically as soon as it’s approved, or manually at a later date you control. Critical for subscription apps: when submitting a new app with subscriptions for the first time, you must include the in-app purchases in the same submission. Go to your app version, scroll to the “In-App Purchases and Subscriptions” section, click “Select In-App Purchases or Subscriptions,” and check the box next to each product you want to submit. Each subscription must have a status of “Ready to Submit.” Once your first submission is approved, you can submit new in-app purchases independently without a new app version. Once everything is in order, submit your app to Apple, who will review it to ensure it meets their App Store Review Guidelines. Most reviews are completed within 24–48 hours, though it can take longer during busy periods. You can check the current average at developer.apple.com/app-store/review. Or you can avoid the review process completely for paywall changes if you use Adapty. Read more about how to pass the review in our article.
How to optimize and manage your app in App Store Connect?
In this section of our guide, we will talk about strategies and tips to enhance your app’s visibility, engage its users, and comply with Apple’s policies. Since everything you do and change about your app is done through the App Store Connect, a lot can happen just with a wrong click or a spelling mistake. Be attentive — and follow our advice.
App information
First and foremost, you should regularly update your app’s description, keywords, screenshots, and support URLs. Employing your available space to the fullest and matching the text with popular App Store searches for similar apps makes it easier to discover your app and clearly communicates its value. For subscription apps, it’s also important to highlight the benefits of subscribing, such as exclusive content or features, that can improve conversion rates. Since the in-app purchases are visible on the app page, describe the offers clearly. New in 2025: Accessibility Nutrition Labels. Apple has introduced Accessibility Nutrition Labels for App Store product pages. These labels help users learn about your app’s accessibility features — such as VoiceOver, Voice Control, Larger Text, and Captions support — before downloading. You can configure these in App Store Connect by declaring which accessibility features your app provides. While currently optional, Apple has announced that Accessibility Nutrition Labels will be required in the future for all apps and games on the App Store. Getting ahead of this requirement now is a smart move. New in 2025: App Store Tags. Announced at WWDC 2025, App Store Tags are AI-generated labels that improve app discoverability. They are created by large language models using your app’s metadata and undergo human review before going live. You can’t create them manually, but having detailed, accurate, and keyword-rich metadata increases the likelihood of relevant tags being assigned to your app. Tags represent a new ranking factor beyond traditional keyword optimization.
Pricing and availability
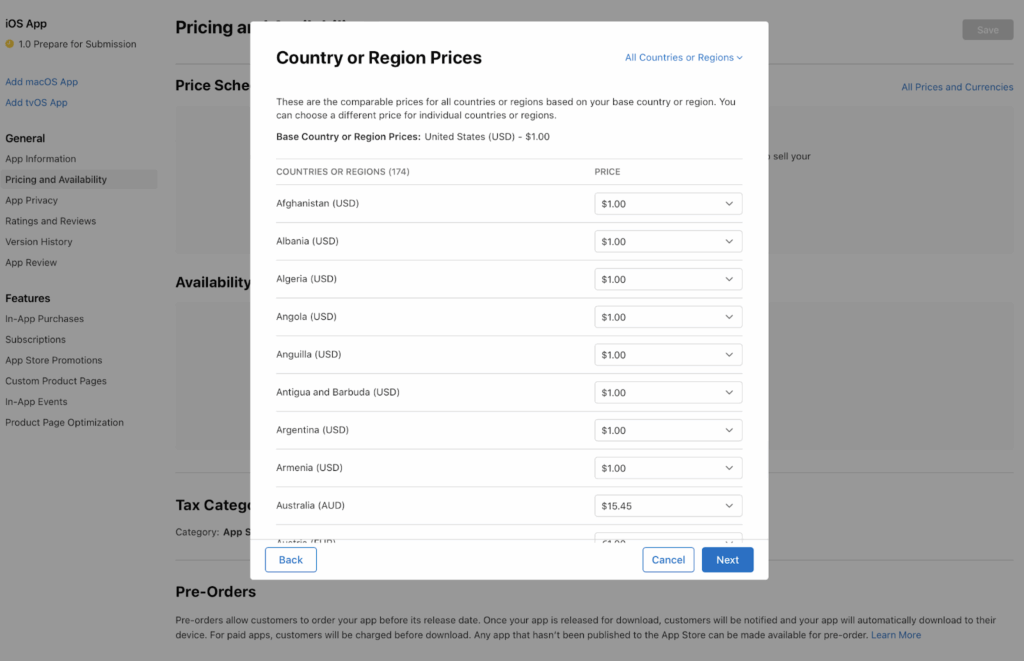
App Store Connect allows for price adjustments, which can be useful for promotions or to react to market changes. Subscription apps can benefit from tiered pricing models, offering different levels of access and features. Geographic pricing strategies can also maximize revenue in different markets. In the App Store Connect, select the app for which you want to update and click on it to access the app details. There, find the “Pricing and Availability” section. This is where you can set the price and availability details for your app. You can choose the pricing tier for your app from the dropdown list, which now includes almost a thousand options both in USD and the local currency. Select the appropriate subscription price for your app and keep in mind the local purchasing power. Speaking of, here you can also choose the availability of your app in different regions. You can either make your app available worldwide or select specific countries or regions where you want your app to be available. A healthy practice is to try a ‘soft launch’ — making your app available only in several countries first to see how the market reacts to it and then sharing the more effective screenshots and marketing strategies with the rest of the world. Regulatory note: be aware of regional pricing and tax changes that can affect your revenue. As of April 2025, Apple applies a 10% Japanese consumption tax (JCT) on paid apps and in-app purchases sold by non-Japan-based developers on the App Store in Japan; your proceeds will be adjusted accordingly. Additionally, South Korea introduced new consent requirements in February 2025 for auto-renewing subscription trials and offers — the App Store will help obtain consent via email, push notification, and in-app price consent sheets, but you should be aware of the impact on your conversion funnel. Always check Apple’s latest announcements for changes that may affect your pricing strategy.
App Privacy
People more and more are acutely aware of what is happening to their data. And since we use these for a long time, it’s even more important for subscription apps. Transparency in data handling reassures users and builds trust, supporting subscription renewals and user retention. The key things you should be able to explain clearly are the data types, purposes, and third-party sharing: Data types are the categories of data that your app collects from users. This can include personal information such as name, email address, phone number, location data, device ID, and more. When filling out the Data Types section in App Store Connect, be specific about the types of data your app collects to ensure transparency with users. Purposes describe why your app collects user data and how it is used. Common purposes include app functionality (e.g., authentication, personalized content), analytics (e.g., user engagement tracking), advertising (e.g., serving personalized ads), and more. As always, be transparent and precise. In the Third-Party Sharing section, you should list any third parties with whom you share user data and disclose the purposes for which the data is shared. Clearly state whether it is shared for analytics, advertising, app functionality, or other purposes. Failing to disclose this information to Apple may result in the app being rejected from the App Store. Note that the App Privacy section can only be edited by Account Holders or Admins. Make sure you have the right role before attempting to update privacy details.
Ratings and reviews
App Store Connect is also the place to monitor and respond to ratings and reviews promptly. This feedback is a goldmine for improving your app and tailoring it to user needs. Positive engagement with users can turn critics into champions, particularly for subscription apps where ongoing satisfaction is key to retention. To respond to a review, navigate to My Apps → select your app → Ratings and Reviews. Click on the review you want to respond to, and then click on the “Reply” button. You can then type your response and submit it. Monitor ratings and reply to both positive and negative reviews regularly to track any trends in user feedback. This can help you make improvements to your app and respond to any concerns or issues raised by users. New in 2025: AI-powered Review Summaries. Apple now uses large language models to generate review summaries — short paragraphs that combine key highlights and sentiments from individual user reviews. This feature activates automatically for apps with sufficient review volume and refreshes regularly to stay current. This makes it even more important to actively manage your reviews, as the AI-generated summary will reflect the overall sentiment of your user base and is visible to potential users browsing the App Store.
App review
You need to go through the App Store review process with every app update you want to push, so prepare thoroughly to avoid rejections. Common pitfalls include bugs, privacy concerns, and lack of compliance with Apple’s guidelines. For subscription apps, ensure clear communication of subscription terms and benefits, and list all payment options available (monthly, annual, or simple payment). A smooth review process accelerates time to market, crucial for keeping content and offerings fresh for subscribers. Important to note: if you use Adapty to create and AB-test paywalls, you don’t need to go through the review process! Connecting the Adapty SDK and creating a ‘placeholder’ paywall once is enough to experiment with several offers in no time. Read more about our no-code Paywall Builder here.
App Store Connect features for subscription apps
And now to the juicy part: how App Store Connect can help you make your app profitable.
In-app purchases
Subscriptions and in-app purchases for iOS are managed in the App Store Connect. Here’s an overview of all the purchase types available:
| Type | Multiple purchases | Expires | Example |
|---|---|---|---|
| Consumable | ✅ Yes | After use | In-game currency, power-ups, extra lives |
| Non-consumable | ❌ One-time | Never | Ad-free upgrade, content packs, premium filters |
| Auto-renewable subscription | ✅ Automatic | End of period (auto-renews) | Monthly/annual premium access |
| Non-renewing subscription | ❌ One-time | End of period | Season pass, time-limited access |
Consumable items can be purchased and used multiple times. Think about in-game currency, power-ups, or extra lives for example. To create consumable items, you need to set them up first in the app and specify the quantity available for purchase. Non-consumable items can be purchased only once and do not expire. Examples include ad-free versions of the app or additional content packs. To create non-consumable items, developers need to set up the items and specify that they are only available for one-time purchase. You also need to specify the type of an item in App Store Connect. The pricing policy for subscription apps deserves a separate guide. To find the optimal price that is both affordable to the customer and profitable to the company, you can research market trends, analyze user behavior, and consider the value of the digital goods or services offered. Manage the in-app purchases by updating the prices or features and ensuring that purchases are accessible to users at all times.
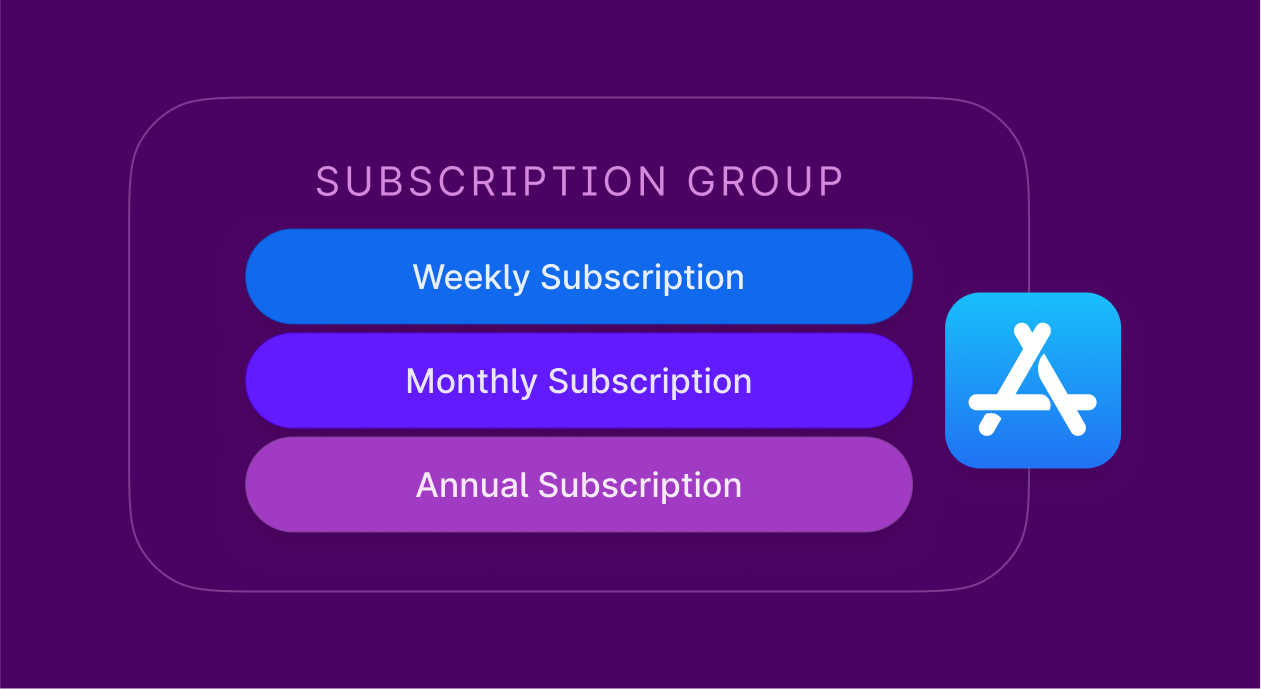
Subscriptions
App Store only recognizes automatically renewable subscriptions: the non-renewable ones are seen as ‘one-time access fees’ and can be set up with other in-app purchases. To create a renewable subscription in the App Store Connect: 1. Select the app for which you want to create a subscription. 2. Go to the “Monetization” section and click “Subscriptions.” 3. Click on the “+” button to create a new Subscription Group. A group contains different subscription levels (e.g., Basic, Pro) — users can only be subscribed to one product within a group at a time. 4. Add subscription products within the group. For each, specify the Reference Name (internal only), Product ID (unique identifier), duration, and price. 5. Add localization — display names and descriptions for each language you support. 6. Configure subscription levels within the group to define upgrade, downgrade, and crossgrade paths. Assign each subscription a level, with Level 1 being the lowest tier. 7. Upload any necessary assets, such as subscription artwork or promotional images. 8. Click “Save” to create the subscription product. Even if you have only one product, consider offering different subscription tiers to cater to various user preferences and budgets. You can specify different subscription periods (weekly, monthly, annual) or tiers (for example, basic, premium, and deluxe options with increasing levels of features or content). Grouping subscriptions based on user needs and interests can streamline the subscription selection process and enhance user experience. Remember to regularly update content, introduce new features, and respond to subscriber feedback. Offering free trials or promotional pricing is also an effective strategy to attract new subscribers and showcase the value of your service.
Sandbox testing for subscriptions
Before going live with your subscriptions, always test them using Sandbox tester accounts. You can create these in App Store Connect under Users and Access → Sandbox Testers. Sandbox testing lets you simulate the full purchase and subscription flow without real money changing hands. A key advantage for subscription testing is that renewal periods are dramatically accelerated in sandbox mode — a monthly subscription renews every few minutes, allowing you to quickly test the entire lifecycle: purchase, renewal, grace period, cancellation, and expiration. This step is essential to make sure your app correctly handles all subscription states, processes receipts properly, and unlocks or restricts content as expected. It’s also worth testing edge cases like restoring purchases on a new device and handling interrupted purchases. If you’re using Adapty’s SDK, sandbox testing will also verify that events and analytics are flowing correctly to your dashboard.
App Store promotions
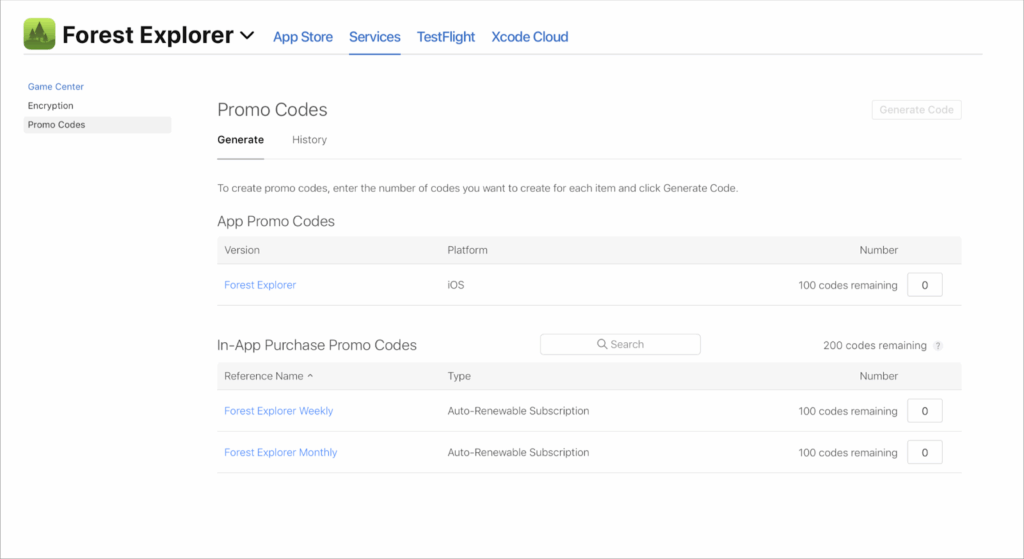
App Store Connect also has tools for effective paid features promotion, like promotional codes, free trials, and discounts. With these tools, you can attract new users, reward loyal ones, and get back those who left the app or stopped paying some time ago. It’s important not to overdo it with lower prices, of course, and to be sure that your product is the most enticing thing about your offer. Important change: promo codes are being replaced by offer codes. As of March 26, 2026, you will no longer be able to create promo codes for in-app purchases in App Store Connect. Offer codes provide greater flexibility — they support not only free access but also discounted pricing, and they are expanding to cover all in-app purchase types (not just subscriptions). Existing promo codes will continue to work until they expire, and promo codes for free app downloads remain available. Start transitioning your promotional strategy to offer codes now to avoid disruption. To create a Promotion, find the “Promotion” section in the left-hand menu and click on the “Create Promotion” button. Fill in the details for your promotion, including the start and end dates, the discount type (such as Price Drop or Introductory Offer), and any other required information. After you’ve ensured that everything is correct, click on the “Create” button to submit the promotion for review. Once approved, it will be live on the App Store for customers to see and take advantage of.
In-app Events
Interestingly enough, you can promote the app or subscriptions without lowering the prices. For this, you can employ in-app events like special promotions or live activities. They provide a visual update to the way your app is presented to engage the users and push the App to their Today app, where more new potential customers can find it. Just like any other promo, events need to be well-planned and relevant to the app’s content. A good update encourages participation and sharing, which in turn can increase the visibility of your app. Subscription apps specifically can employ this power to remind users that even regular payments are worth it for the new features. Read our guide on App Store events for a detailed look at this feature.
Custom Product Pages
Custom Product Pages in App Store Connect are essentially personalized landing pages for apps to showcase features, highlights, and promotions. You can create custom pages to test out a specific marketing campaign or try out a new design and approach. These pages can provide a better user experience and increase app visibility and downloads. Here’s how to create Custom Product Pages in App Store Connect: 1. In your app section, select “Custom Product Pages” from the menu on the left. 2. Click on the “Create Custom Page” button to start creating your custom page. 3. Choose whether to start from a clean slate or just to marginally update the existing page: for example, if you just want to try out different screenshots or apps for the name. 4. Follow the prompts to upload images, videos, and text content; the process is essentially the same as for the initial page setup, but here you should limit the content to be relevant for a specific audience segment or an offer. 5. Preview the Custom Product Page to see how it will look to users on the App Store. 6. Once you are satisfied with the result, submit the page for review. You will also get a specified URL that you can use later in your marketing campaign. People who follow this link will see this custom page, not the default app listing. New in 2025: Custom Product Pages now support keywords, allowing you to optimize each page for specific search terms. This enables more sophisticated A/B testing strategies for how your app appears in search results for different audiences and campaigns. Together with Adapty’s Paywall Testing, this is a great way to finetune your user acquisition funnel and find the copy that performs the best.
Product Page Optimization
In this context, optimizing a Product Page is similar to creating a custom one; but here, instead of generating a new listing and a new link, you can just shuffle around the screenshots or localize the name and the app description to better fit the expectations of a potential consumer that stumbles upon your app. A good practice is to optimize the page and highlight the offerings. You can do so based either on the device (iPhone, iPad, or Mac) — make sure to provide the correctly-sized screenshots and confirm in the description that the app is available for this specific model; or the country: localize the description into the native language of a certain geo, and maybe update the screenshots to highlight a more relevant usage situation. You can also optimize the page to A/B-test any part of your listing: compare photos vs videos in screenshots, different descriptions, and maybe even different logos. For this, you can also create and run a test that will randomly assign customers to one of the several versions of your page. You can launch this test from the App Store Connect: just click on “Create a Test” in the Product Page Optimization screen.
App Store Connect Analytics
For the last — but certainly among the most important parts of this guide — let’s take a look at App Store Connect Analytics. It equips developers and marketers of subscription apps with deep insights to fine-tune their strategies for greater success.
Key Performance Metrics
For subscription apps, these are the most relevant performance data points:
| Metric | What it measures | Why it matters |
|---|---|---|
| Subscriber retention | % of subscribers who renew after expiry | Identifies churn issues and content gaps |
| Conversion rate | Product page visits → subscription purchases | Optimizes your listing and marketing funnel |
| Revenue | Total revenue, ARPU, trends over time | Monitors financial health and growth |
| Subscriber acquisition | Traffic sources: organic, search, referral, campaigns | Identifies the most effective acquisition channels |
| Engagement | Active subscribers, sessions per user, time in app | Predicts retention and overall user satisfaction |
| Peer benchmarks | D1/D7/D28 retention, crash rate, ARPPU vs. competitors | Gauges your performance against the market |

Retention Data
Retention data is important for all apps, but even more so for subscription ones: it sheds light on subscriber loyalty and the effectiveness of customer engagement strategies. The available data points are the percentage of users who return to the app after a certain period, the average retention rate, and user churn rates (which is the antithesis of the retention rate, so retention + churn = 100%). By examining this data, you can evaluate the effectiveness of your app’s user experience and identify growth areas. To know if your app is doing well, you can not just track the growth over time, but compare it with your competitors. While there are plenty of sources online, App Store Connect itself provides peer group benchmarks for conversion rate, retention rates (D1, D7, D28), crash rate, and average proceeds per paying user (ARPPU).
Sales and Trends Data
The Sales and Trends Data section of App Store Connect should be self-explanatory. Here, you can track key metrics such as download and revenue trends, subscriber retention rates, and performance in different markets. You can also view this information per period, per country, or even per a specific offering, to see what works better and what doesn’t. Even more importantly, you can create and download reports with this granular data to later analyze it in any software you prefer; or, just like Adapty, you can use App Store Connect API to have real-time data connected to your marketing efforts.
Enrich your Data with Adapty
That’s right — not only you can analyze your app, but you can also correctly connect it to a specific marketing or paywall effort for a more insightful analysis. Adapty collects the app data using App Store Connect API, so it’s 99.99% accurate (some discrepancies are inevitable due to the differences in time zones and currencies). By quickly deploying updated prices or paywalls, you can see the results of your action play out in real-time — and in real money.
What’s new in App Store Connect in 2026?
Apple continues to evolve App Store Connect with significant updates. Here are the most important recent changes that app developers and marketers should know about: Build uploads via App Store Connect API. You can now upload builds directly through the App Store Connect API, enabling seamless integration with CI/CD pipelines and custom DevOps workflows. This eliminates the need for manual uploads through Xcode or Transporter and opens up more sophisticated automation possibilities. Build upload statuses are now also visible directly in App Store Connect, including detailed insights into delivery progress, warnings, and errors. Webhooks. You can now configure webhooks in App Store Connect to receive automatic notifications to your web server when the status of a build upload, beta build, or Apple-hosted asset pack version changes. This enables development teams to architect systems that automatically trigger downstream processes based on status changes. Apple-Hosted Background Assets. A new content distribution capability supporting files up to 200GB, working independently of app updates. This means you can deploy downloadable content — like media files, data packs, or in-game assets — without going through the full app submission and review process. The feature uses Apple’s CDN and works across Mac, iPhone, iPad, Apple TV, and Apple Vision Pro. OS Data Transfer. You can now set up app mappings for OS data transfer in App Store Connect, enabling users to seamlessly transfer your app’s data between Android and iOS devices. Note that this requires setup both in App Store Connect and with Google. This is a potentially powerful feature for user acquisition from competing platforms. Offer codes for all IAP types. Offer codes are expanding beyond subscriptions to cover all in-app purchase types. Combined with the deprecation of promo codes for in-app purchases (effective March 26, 2026), this gives you more flexible and powerful promotional tools. Updated submission experience. The App Review submission process has been refined with new submission item types and grouped draft capabilities. This allows coordinated submissions of related elements — like In-App Events, Custom Product Pages, and app versions — streamlining the review process for complex app updates. App Store Connect mobile app refresh. App Store Connect 3.1 for iPhone and iPad features a refreshed design with Liquid Glass, the ability to view your app’s age rating across all countries and regions, streamlined review filtering, and the ability to manage TestFlight feedback directly from your phone. 100+ new analytics metrics. App Analytics now includes over 100 new metrics focused on subscription and monetization data, with a redesigned interface for better navigation and filtering to support business growth analysis.