React Native in-app purchases implementation tutorial

Updated: October 10, 2023

Hello there! Hope you are doing well! I’m Ivan. Some days ago I remembered how difficult it was for me to get into mobile development after writing web apps. React Native seems so much of a common language to React, that it is so easy to forget how much of a different mindset it requires.
Out of all the nasty things I’ve done, my in-app code was probably the worst. It had much unnecessary stuff and wasn’t well-structured, so I had to rewrite it almost every time someone found a bug or a new feature was requested.
Maybe this has already happened to you. Maybe this happens to you right now or maybe you are just planning to make your first app — anyway, I want to share my experience with you, so that there may be one less rake on your path to step on.
This article focuses not on blind copy-pasting snippets to make things work, but on discovering the magic behind a stage of React Native. How to make a more informative, maintainable, faster, and ultimately better decision to write code such as in-app purchases?
This article is long. The reason for that is that I’ve tried my best to explain many things that are usually taken for granted in simple terms. If it overwhelms you, just make pause. Understanding magic takes time.
Before we start
I expect you to already have developers’ accounts and have products in them. I also would not explain how to sign your apps and distribute them, as there are a plethora of guides on this subject.
Now, I do not know your current level of experience, so let me reveal my cards here. There are things I mention in this article that might be unfamiliar to you:
- Paywall — a view that prevents users from accessing content, forcing them to buy a subscription (consumable) first.
- Consumable — a non-subscription product.
- Developer Accounts — your accounts at Google Play Console and App Store Connect primarily. They allow you to distribute your app in Google Play and App Store.
- Xcode — the IDE for iOS development by Apple. Helps a lot for pure React Native development, although only available for macOS.
- Expo — a toolset to make React Native development much more high-level. Comes pre-configured, with pre-built native modules and a suite of services.
- Expo Go — an app by Expo to debug your Expo code.
In and out: a 20-minute adventure
Sooner or later in your mobile development journey, you start to wonder how to make in-app purchases and/or subscriptions. And the answer is — it is REALLY hard.
You spend weeks writing logic, debugging it, distributing it to stores, then debugging again, adding forgotten features… So many things require attention: is the user still subscribed? Has he/she canceled their subscription yet? How many subscribed users are there? It drains your soul out…
And that’s only scratching the surface. Do all my products fetch their localized prices? Can I compare what products sell better? How can I promote these to sell more?
Most React Native purchases SDKs are a blessing for us, but still, they do not resolve a lot of hassle.
There aren’t that many of them and I’ve tested them all. I have found Adapty to be the most fluent and nice. I believe it has all the means to diminish your work to a minimum.
Now, I have to be dead honest here, I’m currently a part of the Adapty team and happy with that. You can take my recommendations with a grain of salt, but I believe this article covers many things beyond using SDK handles.
If you already have developer accounts set up, it would be just a few hours until you will be able to access extremely powerful features:
- Convenient purchases API to perform purchases/restores. You can apply all sorts of promo offers from your Adapty dashboard with 0 additional code.
- User profiles to handle every user’s purchase history and active subscriptions. You don’t even need your own backend at all.
- Paywalls with A/B testing in mind to compare what products are users more prone to buy.
- Analytics to get a deeper comprehension of your users, your paywalls, and your products.

Configuring Adapty
Adapty is a service and developer tool that provides you with a Dashboard to configure your paywalls, products, and A/B tests. It allows you to browse your user’s info, view selling analytics, etc.
If you are a React Native app developer or a product owner looking to escalate your conversion rates and in-app subscriptions, look no further! 🚀 Schedule a free demo call with us today! We’ll guide you through integrating Adapty SDK, an essential tool to maximize your React Native in-app subscriptions revenue swiftly and efficiently. 💰 Don’t miss the opportunity to redefine your app’s success and profitability with Adapty!
Signing up & configuration
First of all, we need to create an account. Let’s go to the Adapty site and sign up. I believe this process provides more hints than I’ve ever could have done here.
Try to configure App Store and/or Play Store during your registration.
You can safely ignore the last step that tells you how to install Adapty SDK to React Native project. We will dive into the installation process later.
Once you have a Dashboard, proceed forward.
Creating products
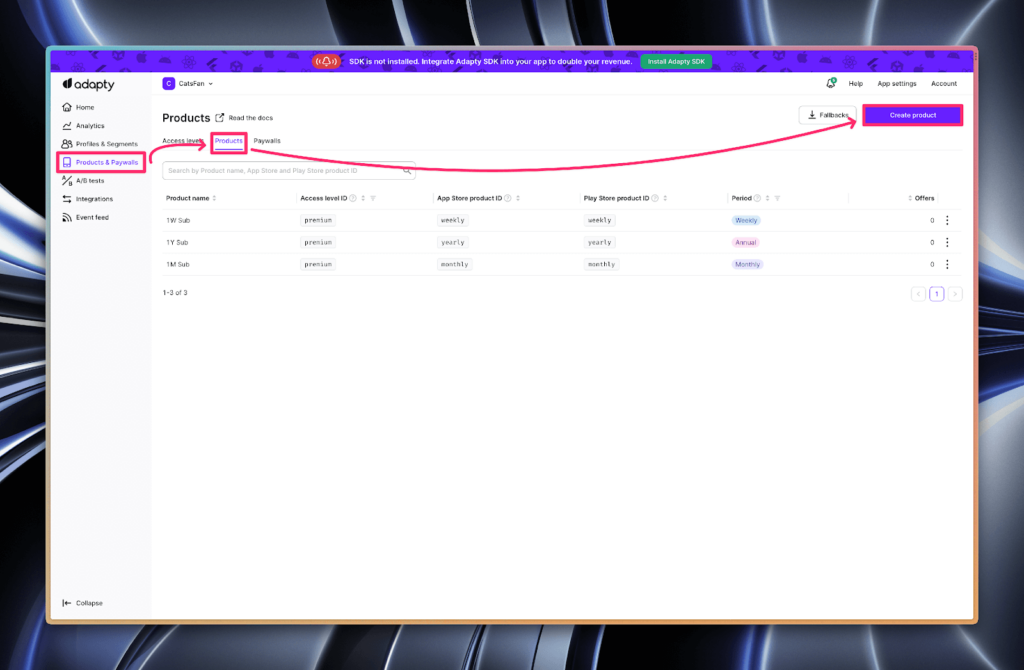
- Go to Products & Paywalls page, switch to the Products tab, click Create product
- Create a product with IDs matching to App Store and Google Play products you have created earlier.
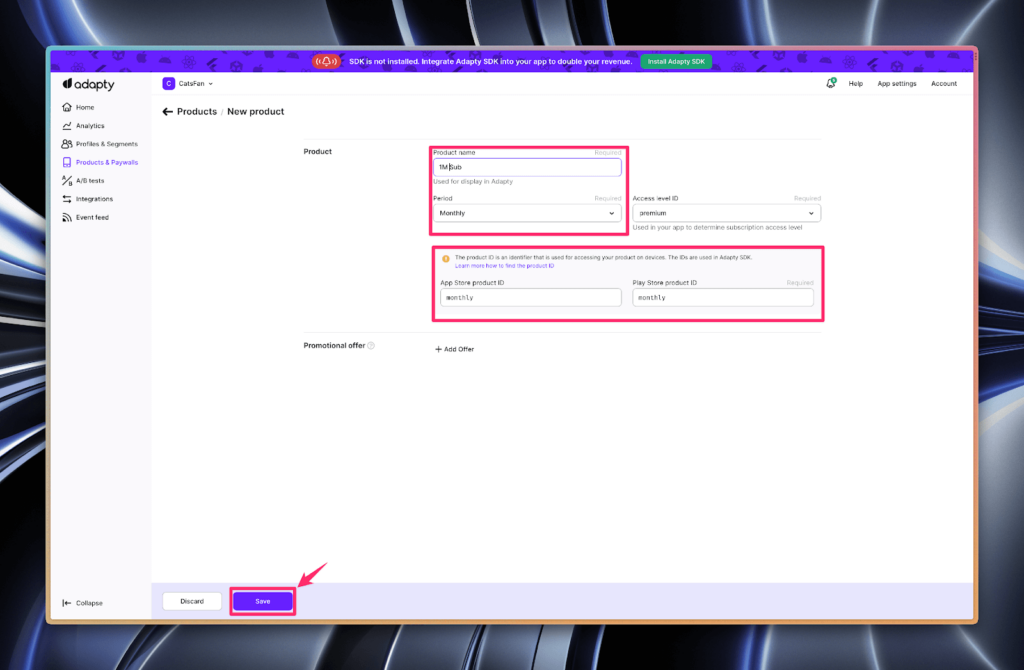
- Repeat for all the products you plan to use in your app.
Creating a paywall
- Go to Products & Paywalls page, switch to Paywalls tab, click Create paywall.
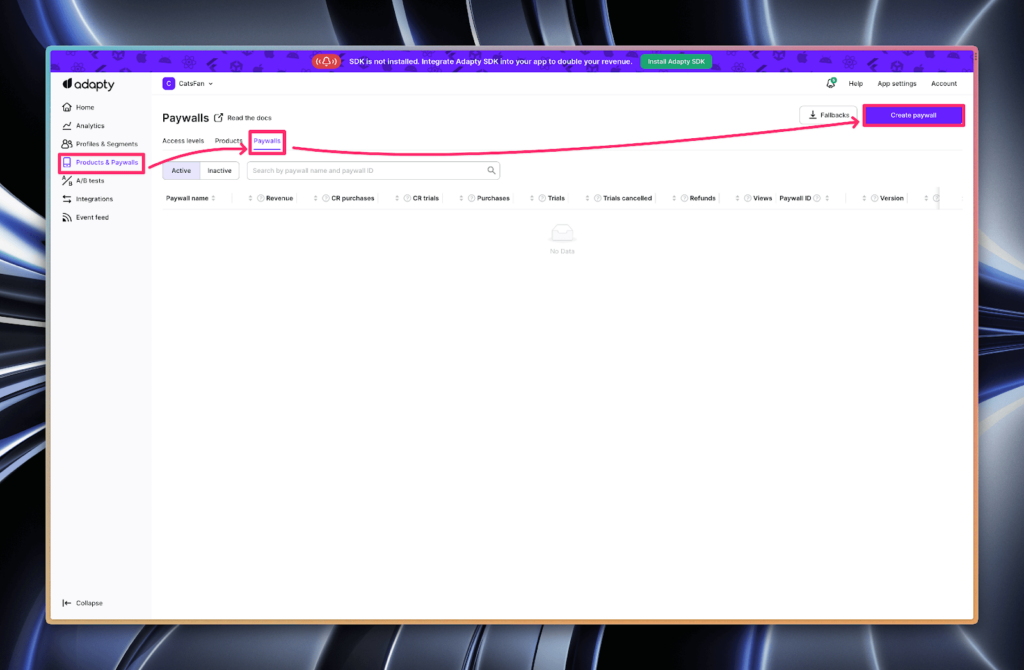
- Fill in the inputs and add products. Remember the Paywall ID value from here, you will use it in code.
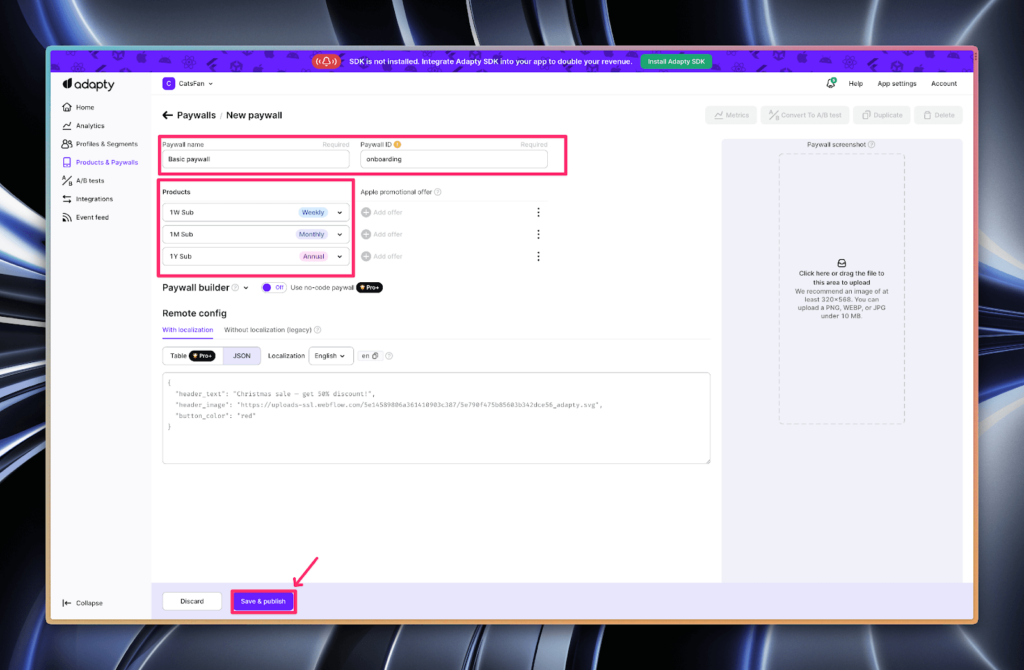
- For our case, one paywall is enough. You can modify your flow here later.
Getting your SDK key
In your App Settings, copy public SDK key or remember where you can find it. We are going to use it soon.
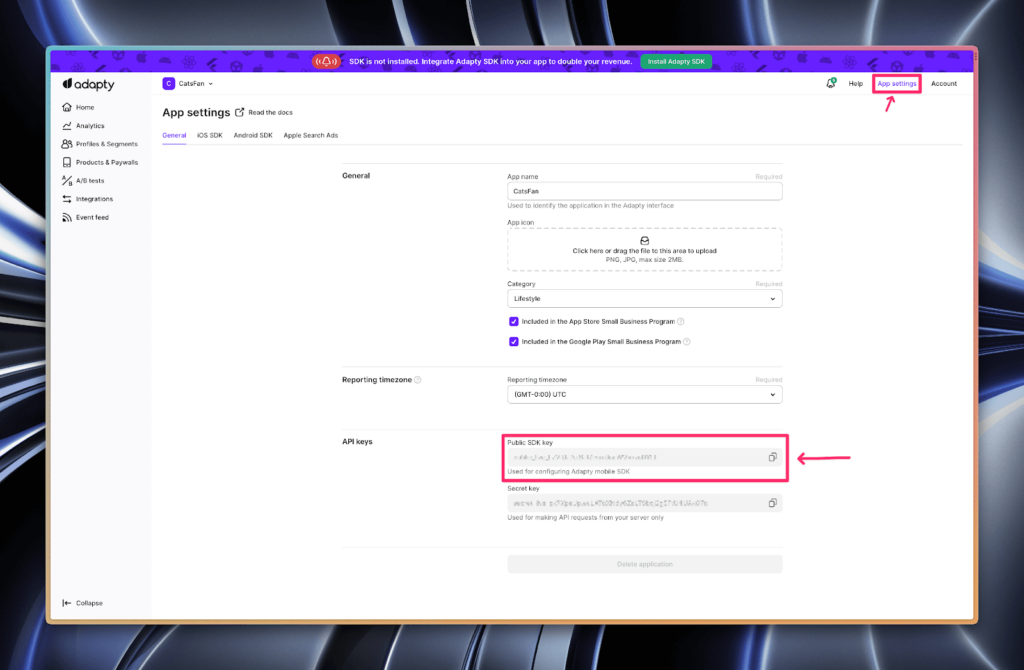
That’s all we are going to need for our app.
Installation
The pure React Native process is pretty straightforward, while Expo is a little bit catchy. Since Expo is being used mostly by beginners, I’d like to explore each step a little deeper, so you can begin to fathom an intricate process of working with Expo Builds.
React Native
1. Add the Adapty dependency to your project:
yarn add react-native-adapty2. For iOS, install the Adapty pod. These guys are like npm modules for iOS development (if you don’t have pod CLI, install from React Native docs):
# in your project root
pod install --project-directory=ios
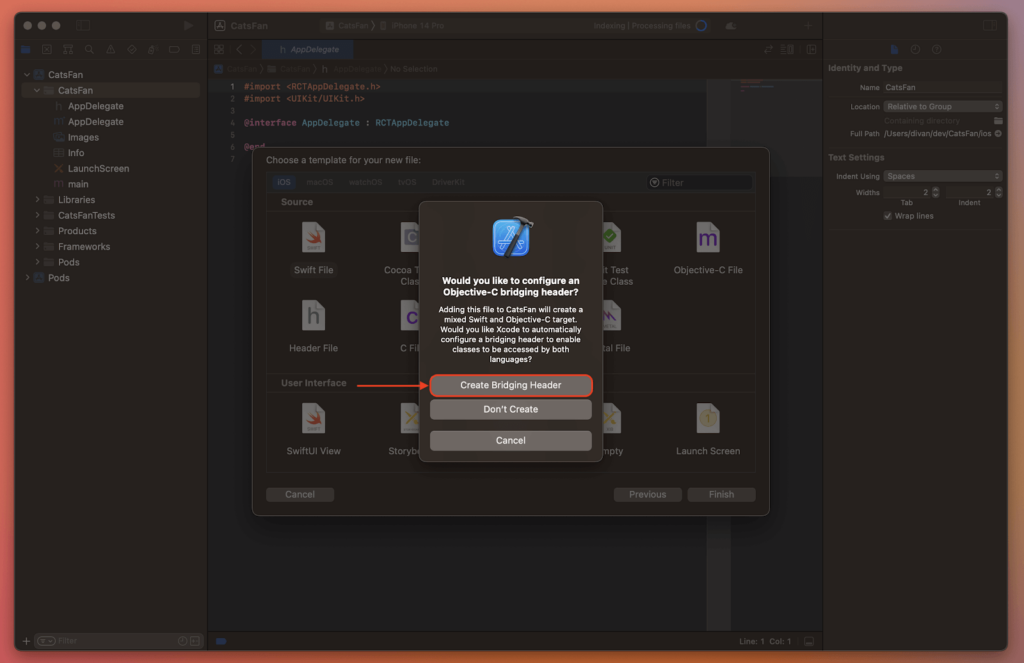
3. For iOS, create a Swift Bridging Header. It allows your React Native iOS projects (written in Obj-C) to use Swift libraries like the Adapty pod you’ve fetched.
3.1. Open your Xcode project
# you can open Xcode via terminal with xed CLI
# in your project root:
xed -b ./ios
3.2. Create a new Swift file with any name
3.3. Xcode will ask you whether you want to create a bridging header. Click “Create Bridging Header”.
3.4. You can safely remove the file you’ve just created. It was made only to prompt Xcode to automatically create a Swift Bridging Header.
4. For Android, add or update kotlin-gradle-plugin to version 1.6.21 or above in src/android/build.gradle under buildscript.dependencies. It adds Kotlin support to your project.
// src/android/build.gradle
...
buildscript {
	...
	dependencies {
		...
		сlasspath "org.jetbrains.kotlin:kotlin-gradle-plugin:1.6.21" // ← Add this
	}
}
5. For Android, set multiDexEnabled: true in src/android/app/build.gradle under android.defaultConfig.
// src/android/app/build.gradle
...
android {
	...
	defaultConfig {
		...
		multiDexEnabled true // ← Add this
	}
}
6. Voila, you’re all set and can g̶e̶t̶ ̶s̶o̶m̶e̶ ̶r̶e̶s̶t̶ start coding! 🎉
Expo
Before installation, let’s understand how Expo works:
- To debug your application, you download the Expo Go app.
- It connects to your development server.
- The development server passes updated JS to the connected Expo Go app.
- The Expo Go app re-evaluates JS while trying to preserve states.
- When releasing, you build kind of your own version of Expo Go without debugging features.
That’s it! Pretty simple. By design, Expo allows you to focus on JS-only development. It is done by mapping certain Expo native code to JS functions. Then, all the Expo libraries you use rely on that exposed API.
This is the beauty and the problem behind Expo. JS is interpreted language, meaning it can be easily passed and be evaluated on the fly. This is not the case with native code — even if you download a native code to your device, it is still required to compile and bundle it. This is not something that is currently possible on the fly. Instead, natively you would: change your code, compile, install to your device, debug, change your code, compile, install to your device, debug, cha… You get it.
In-App Purchases implementation require additional native code. Not long ago, Expo has introduced a way to work with native code — EAS (Expo Application Services) Build.
Eas Build introduction
Nowadays, it is possible to add native code to your Expo-managed projects with the EAS Build service. Let’s take a look at how it works below. Typically, Expo offered the following development flow:
- Start a development server.
- Edit JS code.
- Debug in the Expo Go app.
Now, to work with native code we’ll have to embrace EAS Build flow. Here it is:
- Build an application to a desired platform with the Build service, when your native code changes.
- Start a development server with a special argument to work with your own application.
- Edit the JS code.
- Debug in your app, that you’ve installed on step 1.
Building an application for the first time may be exhausting, but it’s ok, we’ve all been through this! Make sure to set up your developer accounts — you are going to need those to proceed.
Another aspect is veiled in words build when your native code changes. When does it change? Do you have to make a new build after adding every new library? Every time the file changes? Well, without some experience you wouldn’t be able to tell. Since building an app via EAS Build is a long process, I’d rather not build if there is no need. As a rule of thumb, if the library documentation does not mention the EAS building, then you probably can skip a new build. If the new library does not function as it should, then it is probably worth a try to make a new EAS build.
Expo installation process
1. Install EAS CLI globally:
npm install -g eas-cli2. Add expo-dev-client to your project. It allows your debug server to work with your app:
expo install expo-dev-client3. Add Adapty dependency:
expo install react-native-adapty4. Make a build to your desired platform. These commands will build a chassis of your application on Expo servers and provide you with a download link.
4.1. You can build for both platforms at once! If you struggle to provide prompt answers, check out the current EAS dev build documentation
eas build --profile development --platform all
# ----- or ----- #
eas build --profile development --platform ios
# ----- or ----- #
eas build --profile development --platform android4.2. Install your application to your testing device with a QR or URL, that EAS generated for you in the previous step.
4.3. Launch a development server with a --dev-client flag:
yarn start --dev-client4.4 Launch YOUR APP and connect to a dev server. It is very common to launch Expo Go at this step, but IT WOULD NOT WORK. For all your future development sessions, you will need to start a server with a --dev-client flag and debug your application through a dedicated app, instead of Expo Go.
Designing the app
I’d rather not provide you with “paste to production” code. You can easily find those snippets in the official documentation. Instead, I would like to suggest different ways to make better design decisions to match your application needs. Then we can glue all the acquired knowledge into the app.
Let’s take a look at all the oncoming steps. The entirety of the purchase flow is pretty simple:
- We activate SDK, so it can do all the tedious magic.
- We check whether the user has an active subscription.
- If he/she tries to access premium content:
- Without an active subscription: we fetch a paywall we made earlier and display it.
- With an active subscription: display premium content.
- If the user purchases access, go to Step 2.
So, to build that model we basically need a global check isSubscribed / hasAccess and a paywall, that will limit unsubscribed access.
1. Activating Adapty SDK
Adapty SDK does many small things under the hood. One you would certainly notice — listening to the user’s subscription status change. If the subscription has just expired, Adapty would send an event with an updated profile.
All these things require the SDK to be active. That is why you are expected to activate it as soon as the app launches.
There is only one meaningful method for us:
adapty.activate('MY_SDK_KEY');Let’s take a look at how we can work with it.
Activating outside of React components
This is the method I would recommend the most. A call outside of components happens during module evaluation. It can be much earlier, than making a call inside a component’s useEffect.
One thing to know is that module is being evaluated only when it is imported at a current evaluation scope. For us, it means that it is preferable to have an activation call inside the App.tsx file or import a file with activation directly to your App.tsx.
I’m going to call activate function just outside the App component.
You can place this instruction in any other JS file, as long as you import it to a core component. Note, that I use lockMethodsUntilReady a flag to lock all other Adapty calls until the activation is complete:
// /App.tsx
import React from 'react';
import {adapty} from 'react-native-adapty'
// ...
// Replace MY_SDK_KEY with your public SDK key
// You can find it in your Adapty Dashboard
// App settings > API keys > Public SDK key
adapty.activate('MY_SDK_KEY', {
  lockMethodsUntilReady: true,
});
function App(): JSX.Element {
  // ...
}
Note, that this is a shorter way to write this activation. For production, I would consider creating a function that calls activate wrapped in a try-catch block.
Alternative: activating from React Native hook
In some cases, you need to fetch certain data before you can activate Adapty SDK. In other cases, it is more convenient to integrate Adapty activation inside the component’s useEffect, along with other services you initialize.
A problem with this design is concurrency. There is no way that you can guarantee, that the activation call will occur earlier than any other Adapty call. This is called a race condition and might result in bugs if unhandled.
Here is how it works:
- In one component you activate Adapty in a
useEffecthook. - in another component, you try to fetch products from Adapty in a
useEffecthook. - in the third component, you try to fetch the user’s profile in a
useEffecthook.
I’d recommend avoiding this design. Elevating activations outside of React is still the easiest, fastest, and safest way. If you need, you can use something like AsyncStorage to pass Adapty static values, such as your custom userID from previous sessions. This way you would also save an extra locking network call while not risking any serious issues.
How can you be sure that the first component’s useEffect would be evaluated before the second or the third? The answer is you can’t.
import AsyncStorage from '@react-native-async-storage/async-storage';
import {adapty} from 'react-native-adapty';
async function activateAdapty() {
  const userId = await AsyncStorage.getItem('MY_USER_ID');

  // Replace MY_SDK_KEY with your public SDK key
  // You can find it in your Adapty Dashboard
  // App settings > API keys > Public SDK key
  await adapty.activate('MY_SDK_KEY', {
    lockMethodsUntilReady: true,
    customerUserId: userId,
  });
}
activateAdapty();
However, there is a way to safely implement activation inside an effect and there is also a benefit in choosing this activation design.
Locking threads until the SDK is activated in a cold concurrent reality
Activating Adapty in useEffect hook you create a race condition. Some of you might know that synchronization mechanisms can resolve that issue.
JS provides us with await, which allows us to force-synchronize our calls, instructing the interpreter: “wait until SDK is activated, and then proceed”.
The thing is that the Adapty SDK uses memoization on the activate method. It means, that if you call it another time with the same arguments, it would just resolve without any overhead.
This allows you to safely call activate repeatedly. It will either start the activation process or just wait until Adapty SDK is activated if it is already called (because of lockMethodsUntilReady: true).
For this, I would abstract activate call into a function and use it everywhere to activate Adapty only when needed or wait until it is activated otherwise.
import {adapty} from 'react-native-adapty';
export async function activateAdaptyOrWait() {
  // Replace MY_SDK_KEY with your public SDK key
  // You can find it in your Adapty Dashboard
  // App settings > API keys > Public SDK key
  await adapty.activate('MY_SDK_KEY', {
    lockMethodsUntilReady: true,
  });
}
Then, in any function where you need to use purchases SDK, you can start with the activateAdaptyOrWait function:
import React from 'react';
import {adapty} from 'react-native-adapty';
function Paywall(): JSX.Element {
  // ...
  useEffect(() => {
    async function fetch() {
      await activateAdaptyOrWait();
      const paywall = await adapty.getPaywall("yearly");
      // ...
    }
    fetch();
  }, []);
  // ...
}
function Profile(): JSX.Element {
  // ...
  useEffect(() => {
    async function fetch() {
      await activateAdaptyOrWait();
      const profile = await adapty.getProfile();
      // ...
    }
    fetch();
  }, []);
  // ...
}
The important part is to use await with this function to allow the thread to be locked until the promise is resolved.
Whilst I’ve said, that it is better to call activate outside of React components, you might want to consider this design to eliminate Adapty activation overhead and network calls Adapty makes. This might benefit you, If you are making a miniature app that is extremely aware of startup time, battery usage, network usage, etc.
2. Checking the user’s subscription status
I’ll make a subscription status check, but it might really apply to anything related to the user’s profile: purchased products, expiration dates, etc.
There are a lot of ways to design a user’s profile state and these mostly come downs to personal preference. The only thing to consider is whether you need to listen to state changes or whether you can ignore and store them.
I think, for most cases it is unnecessary to have a React state, allowing you to access profiles outside of components, but you can decide in favor of a simpler implementation.
There are not many public handles here. For the most part, we would fetch an adapty.getProfile data and check purchased consumables or active subscriptions.
const profile = await adapty.getProfile();
// premium can be replaced with your access level
const isActive = profile.accessLevels["premium"]?.isActive
Then, there is also an event listener to handle profile updates (purchases, expirations).
adapty.addEventListener('onLatestProfileLoad', profile => {
  const isActive = profile.accessLevels["premium"]?.isActive
  // ...
});
That’s all the API there is. Let’s take a look at how we can work with these.
Fetching to state when needed
The most obvious way to check if a user is subscribed is by making a state in a component where we need to check:
import React, {useState, useEffect} from 'react';
import {adapty} from 'react-native-adapty';
const App = () => {
  const [isSubscribed, setIsSubscribed] = useState(undefined);
  const [isLoading, setIsLoading] = useState(true);
  useEffect(() => {
    async function fetch() {
      setIsLoading(true);
      const profile = await adapty.getProfile();
      setIsSubscribed(profile.accessLevels["premium"]?.isActive);
      setIsLoading(false);
    }
    fetch();
  },[]);
  // ...
};
While this flow is perfectly clear it might introduce unwanted re-renders.
Listening to profile updates
You also can listen to profile updates. Events fire, when a new purchase is resolved or a subscription has expired.
One event will fire right after the app’s startup (and Adapty activation).
import React, {useState, useEffect} from 'react';
import {adapty} from 'react-native-adapty';
function App(): JSX.Element {
  const [isSubscribed, setIsSubscribed] = useState(undefined);
  const [isLoading, setIsLoading] = useState(true);
  useEffect(() => {
    async function fetch() {
      setIsLoading(true);
      const profile = await adapty.getProfile();
      setIsSubscribed(profile.accessLevels["premium"]?.isActive);
      setIsLoading(false);
    }
    fetch();
    adapty.addEventListener('onLatestProfileLoad', profile => {
      setIsSubscribed(profile.accessLevels["premium"]?.isActive);
    });

    return () => {
      adapty.removeAllListeners();
    }
  },[]);
  // ...
};
Alternative: memoizing network calls
For most apps, there is no reason to fetch profiles this frequently. The system would most likely offload the app’s state or the user would restart the app before the subscription expires.
To keep data fresh, there would be an active event listener, that would push updates to a cached value.
// /profile.ts
import {adapty, AdaptyProfile} from 'react-native-adapty';
// do not expose
let _profile: AdaptyProfile | undefined = undefined;
export async function getProfile(): AdaptyProfile {
  if (!_profile) {
    // consider wrapping in try-catch
    const profile = await adapty.getProfile();
    _profile = profile;
  }
  return _profile;
}
// For event
export function setProfile(profile: AdaptyProfile) {
  _profile = profile;
}
And then in App.tsx subscribe to profile updates:
// /App.tsx
import {adapty} from 'react-native-adapty';
import {setProfile, getProfile} from './profile';
// ...
function App(): JSX.Element {
  // ...
  useEffect(() => {
    adapty.addEventListener('onLatestProfileLoad', setProfile);
    return () => {
      adapty.removeAllListeners();
    }
  }, []);
  // ...
}
This allows you to use fresh profile data without constantly making network calls and also use profiles outside of components too.
3. Paywall
Nice visuals should be backed up with a nice user experience. We don’t want to show your user a loader when he/she is ready to support your product.
There are three meaningful methods for us: getPaywall, logShowPaywall and getPaywallProducts:
const paywall = await adapty.getPaywall('paywall_id');
await adapty.logShowPaywall(paywall);
const products = await adapty.getPaywallProducts(paywall);getPaywallfetches a paywall based on paywall IDlogShowPaywalllogs, that the user has opened a paywall to your DashboardgetPaywallProductsfetches a list of products for the provided paywall
Fetching to state when needed
There is always the simplest choice. This is a good starting point to develop the overall paywall design.
import React, {useEffect, useState} from 'react';
import {adapty, AdaptyProduct, AdaptyPaywall} from 'react-native-adapty';
interface PaywallProps {
  paywallId: stirng | undefined;
}
export function Paywall(props: PaywallProps): JSX.Element {
  const [paywall, setPaywall] = useState<AdaptyPaywall | undefined>();
  const [products, setProducts] = useState<AdaptyProduct[]>([]);
  const [isLoading, setIsLoading] = useState(true);
  useEffect(() => {
    async function fetch() {
      if (!props.paywallId) {
        return;
      }
      setIsLoading(true);
      // consider wrapping into try-catch for production use
      const paywallResp = await adapty.getPaywall(props.paywallId);

      const productsResp = await adapty.getPaywallProducts(paywallResp);

      setPaywall(paywallResp);
      setProducts(productsResp);
      setIsLoading(false);
    }

    fetch();
  }, [props.paywallId]);
  // ...
}
This way it does the job, but forces the user to wait, until when the paywall is opened.
Alternative: pre-fetching paywalls and products
I believe it is best to not waste your users’ time, when possible. There is probably a lot of opportunity to fetch a paywall beforehand without affecting performance.
There is a huge chance, that you know what paywall and what products you want to show to your user before it’s time to render the view. In our case, I will consider making a single paywall controller with a static ID.
There are several ways you can design this, but I will create a custom hook. It is a simple solution to handle the case, when a paywall requests data, while it is still loading.
import {useState, useEffect} from 'react';
import {
  adapty,
  AdaptyError,
  AdaptyPaywall,
  AdaptyProduct,
} from 'react-native-adapty';
interface PaywallState {
  paywall: AdaptyPaywall | null;
  products: AdaptyProduct[];
  loading: boolean;
  error: AdaptyError | null;
  logShow: () => Promise<void>;
  refetch: () => Promise<void>;
}
const PAYWALL_ID = "MY_PAYWALL_ID";
export function usePaywallData(): PaywallState {
  const [paywall, setPaywall] = useState<PaywallState['paywall']>(null);
  const [products, setProducts] = useState<PaywallState['products']>([]);
  const [isLoading, setIsLoading] = useState(false);
  const [error, setError] = useState<PaywallState['error']>(null);
  const fetch = async (): Promise<void> => {
    try {
      setIsLoading(true);
      setError(null);
      const paywallResp = await adapty.getPaywall(PAYWALL_ID);
      const productsResp = await adapty.getPaywallProducts(paywallResp);
      setPaywall(paywallResp);
      setProducts(productsResp);
    } catch (error) {
      console.error(error.message);
      setError(error);
    } finally {
      setIsLoading(false);
    }
  }
  const logShow = async (): Promise<void> => {
    try {
      if (!paywall) {
        return console.error("Tried to log show empty paywall");
      }
      await adapty.logShowPaywall(paywall);
    } catch (error) {
      console.log(error.message);
    }
  }

  useEffect(() => {
    if (!paywall && !isLoading && !error) {
      fetch();
    }
  }, []);

  return {
    paywall,
    products,
    loading: isLoading,
	error,
    logShow,
    refetch: fetch,
  };
}
From here you want to pre-fetch paywall data. For example, in your App.tsx, just use this controller hook:
function App(): JSX.Element {
  // fetches paywall data, not using here
  usePaywallData();
  // ...
}
And then you can use pre-fetched data from this hook in your Paywall component:
function Paywall(): JSX.Element {
  const {paywall, products, loading, error} = usePaywallData();
  // ...
}
Opting out of requests
The solution above can absolutely skip the visible loading phase, but it also introduces a small issue. If your user is subscribed, their device would still perform useless network calls. It can be a nice detail to consider disabling this.
I would not provide code snippets, as they should be simple and minor.
Writing the app
I wanted to write an app, that shows pictures of cats. It allows you to swipe three cats per day for free but then shows a paywall.
What we need at this point:
- To have developer accounts with products.
- To have a configured Adapty account.
- To have at least one paywall in Adapty Dashboard.
I’ll start with a pure React Native TypeScript template. All the following steps would work with any project configuration, so no worries if you use Expo.
In case you don’t have a project yet, you can follow the React Native documentation to create one.
npx react-native@latest init CatsFanRight after this command I’ll install Adapty as described above and sign my app for development in Xcode.
I’d like to delete a lot of pre-created code to leave a blank view. In the end, my App.tsx looks like this:
import React from 'react';
import {
  SafeAreaView,
  StatusBar,
  StyleSheet,
  useColorScheme,
} from 'react-native';
function App(): JSX.Element {
  const isDarkMode = useColorScheme() === 'dark';
  const styles = useMemo(() => getStyles(isDarkMode), [isDarkMode]);
  return (
    <SafeAreaView style={styles.app}>
      <StatusBar
        barStyle={isDarkMode ? 'light-content' : 'dark-content'}
        backgroundColor={styles.app.backgroundColor}
      />
    </SafeAreaView>
  );
}
function getStyles(dark: boolean) {
  return StyleSheet.create({
    app: {
      backgroundColor: dark ? 'rgb(44,44,46)' : '#fff',
      width: '100%',
      height: '100%',
    },
    container: {
      marginTop: 32,
      paddingHorizontal: 24,
      fontWeight: '700',
    },
  });
}
export default App;
SDK Activation
I would create a file /credentials.ts that would include some constants like SDK public key, paywall ID, etc. You absolutely can replace these constants with string values.
Then, I create /adapty.ts, which would include activateAdapty function:
// /adapty.ts
import {adapty} from 'react-native-adapty';
import {MY_API_KEY} from './credentials';
export async function activateAdapty() {
  try {
    await adapty.activate(MY_API_KEY, {
      lockMethodsUntilReady: true,
    });
  } catch (error) {
    console.error('Failed to activate Adapty: ', error);
  }
}
And call that function before the App component, so it is evaluated as early as possible.
// /App.tsx
// ...
import {activateAdapty} from './adapty';
// ...
activateAdapty();
function App(): JSX.Element {
  // ...
Visuals
Let’s make a quick detour to make our app pretty. This article is bloated as it is, so I’m going to do as little as I can.
The card component
There are two types of cards in our app: a cat image card and a paywall card. Here is the Card component from which we’ll make an image card and a paywall card.
I’m going to use react-tinder-card for this example:
npm install --save react-tinder-card
npm install --save @react-spring/[email protected]
Here is a basic component:
// /Card.tsx
import React, {ForwardedRef, PropsWithChildren, useMemo} from 'react';
import {StyleSheet, View, useColorScheme} from 'react-native';
import TinderCard from 'react-tinder-card';
type CardProps = PropsWithChildren<{
  onSwipeCompleted?: (direction: string) => void;
  onLeftScreen?: (id: string) => void;
  preventSwipe?: string[];
  synthetic?: boolean;
}>;
export const CARD_RADIUS = 12;
export const Card = React.forwardRef<any, CardProps>(
  (
    {
      children,
      preventSwipe = ['up', 'down'],
      onSwipeCompleted = () => undefined,
      onLeftScreen = () => undefined,
      synthetic = false,
    }: CardProps,
    ref: ForwardedRef<any>,
  ) => {
    const isDarkMode = useColorScheme() === 'dark';
    const styles = useMemo(() => getStyles(isDarkMode), [isDarkMode]);
    // if synthetic, we don't want to use the tinder card,
    // as it will cause issues with the pressables
    if (synthetic) {
      return (
        <View style={{...styles.container, marginLeft: 12}}>{children}</View>
      );
    }
    return (
      <TinderCard
        ref={ref}
        onSwipe={onSwipeCompleted}
        onCardLeftScreen={onLeftScreen}
        preventSwipe={preventSwipe}>
        <View style={styles.container}>{children}</View>
      </TinderCard>
    );
  },
);
function getStyles(dark: boolean) {
  return StyleSheet.create({
    container: {
      position: 'absolute',
      backgroundColor: dark ? '#rgb(28,28,30)' : '#ddd',
      width: '100%',
      justifyContent: 'center',
      alignItems: 'center',
      height: 500,
      shadowColor: '#000',
      shadowOpacity: 0.05,
      shadowRadius: CARD_RADIUS,
      borderRadius: CARD_RADIUS,
      resizeMode: 'cover',
    },
  });
}
Let me explain the synthetic prop. In my further testing, I found out that I cannot use Pressables and Buttons inside a TinderCard. This wrapper does not propagate tap events into presses that I need in a paywall card. You’ll see soon enough!
The cardimage component
For images card we’ll make a very simple component:
import React from 'react';
import {Card} from './Card';
import {Image, StyleSheet} from 'react-native';
interface CardImageProps {
  onSwipeCompleted?: (direction: string) => void;
  url: string;
}
export function CardImage(props: CardImageProps): JSX.Element {
  return (
    <Card onSwipeCompleted={props.onSwipeCompleted}>
      <Image style={styles.image} source={{uri: props.url}} />
    </Card>
  );
}
const styles = StyleSheet.create({
  image: {width: '100%', height: 500, borderRadius: 12},
});
Data pool
Probably, the only thing you wonder about is where would I get a ton of images of cats — don’t you worry no more, there is TheCatAPI for that.
The basic idea is to fetch 5 image URLs and load them into cards.
Here is my API controller:
// /images.ts
import {CATAPI_KEY} from './credentials';
const LIMIT = 5;
const getEndpoint = (page: number) =>
  `https://api.thecatapi.com/v1/images/search?limit=${LIMIT}&page=${page}&api_key=${CATAPI_KEY}`;
export interface CatImage {
  id: string;
  url: string;
  width: number;
  height: number;
}
export async function fetchImages(page: number = 0): Promise<CatImage[]> {
  const response = await fetch(getEndpoint(page));
  const data = await response.json();
  return data;
}
Let’s try to make a data controller. That would be something like a queue (FIFO) with cards. They can have a paywall or an image type. Once there are little cards left, we request a new set of cards.
For our first sketch, I’ll consider our app does not have premium content:
// /data.ts
import {useRef, useState} from 'react';
import {AdaptyPaywall, AdaptyProduct} from 'react-native-adapty';
import {fetchImages} from './images';
type CardInfo =
  | {type: 'image'; id: string; url: string}
  | {
      type: 'paywall';
      id: string;
      paywall: Promise<AdaptyPaywall>;
      product: Promise<AdaptyProduct[]>;
    };
interface CardsResult {
  cards: CardInfo[];
  fetchMore: (currentCard?: CardInfo) => Promise<void>;
  removeCard: (card: CardInfo, index: number) => void;
  init: () => Promise<void>;
}
// When to start fetching new data
export const TOLERANCE = 1;
export function useCards(): CardsResult {
  const [cards, setCards] = useState<CardsResult['cards']>([]);
  const page = useRef<number>(0);
  const init = async () => {
    await fetchMore();
  };
  const removeCard = async (card: CardInfo, index: number) => {
    if (index === TOLERANCE) {
      fetchMore(card);
    }
  };
  const fetchMore = async (currentCard?: CardInfo) => {
    const images = await fetchImages(page.current);
    const result = images.map<CardInfo>(value => {
      return {
        type: 'image',
        // // CatAPI returns duplicates, so we mark them with page number, so React keys are unique
        id: page.current + '__' + value.id,
        url: value.url,
      };
    });
    const requestedAtIndex = cards.findIndex(v => v.id === currentCard?.id);
    const newCards = [...result, ...cards.slice(0, requestedAtIndex)];
    page.current += 1;
    setCards(newCards);
  };
  return {
    cards,
    init,
    fetchMore,
    removeCard,
  };
}
Testing the core feature
At this point, we should be able to swipe cat images endlessly. Here is my App component, that allows testing our app:
// App.tsx
import React, {useEffect, useMemo} from 'react';
import {
  SafeAreaView,
  StatusBar,
  StyleSheet,
  Text,
  View,
  useColorScheme,
} from 'react-native';
import {activateAdapty} from './adapty';
import {useCards} from './data';
import {CardImage} from './CardImage';
activateAdapty();
function App(): JSX.Element {
  const isDarkMode = useColorScheme() === 'dark';
  const styles = useMemo(() => getStyles(isDarkMode), [isDarkMode]);
  const {cards, fetchMore, removeCard, init} = useCards();
  useEffect(() => {
    init(); // fetch initial cards
  }, []);
  return (
    <SafeAreaView style={styles.app}>
      <StatusBar
        barStyle={isDarkMode ? 'light-content' : 'dark-content'}
        backgroundColor={styles.app.backgroundColor}
      />
      <Text style={styles.headerText}>CatsFan</Text>
      <View style={styles.cardsContainer}>
        {cards.map((card, index) => {
          switch (card.type) {
            case 'paywall':
              return null;
            case 'image':
              return (
                <CardImage
                  key={card.id}
                  onSwipeCompleted={() => removeCard(card, index)}
                  url={card.url}
                />
              );
          }
        })}
      </View>
    </SafeAreaView>
  );
}
function getStyles(dark: boolean) {
  return StyleSheet.create({
    app: {
      backgroundColor: dark ? 'rgb(44,44,46)' : '#fff',
      width: '100%',
      height: '100%',
    },
    headerText: {
      fontWeight: '700',
      fontSize: 32,
      marginHorizontal: 24,
      marginTop: 24,
      marginBottom: 12,
      color: dark ? '#fff' : '#000',
    },
    container: {
      marginTop: 32,
      paddingHorizontal: 24,
      fontWeight: '700',
    },
    cardsContainer: {
      width: '100%',
      paddingHorizontal: 12,
      height: 500,
    },
  });
}
export default App;
Here is what we have:

2024 subscription benchmarks and insights
Get your free copy of our latest subscription report to stay ahead in 2024.
Paywalling
That’s good! Let’s now restrict users from watching these adorable creatures for free.
Displaying the paywall card
My idea is to show a user up to three images with cats. After that, the user would be presented with the paywall card, which cannot be dismissed. To do this let’s modify our data controller in data.ts. At last, we’ll use just a few strings of Adapty SDK:
// /data.ts
import {useRef, useState} from 'react';
import {AdaptyPaywall, AdaptyProduct} from 'react-native-adapty';
import {fetchImages} from './images';
+import {MY_PAYWALL_ID} from './credentials';
type CardInfo =
  | {type: 'image'; id: string; url: string}
  | {
      type: 'paywall';
      id: string;
      paywall: Promise<AdaptyPaywall>;
      product: Promise<AdaptyProduct[]>;
    };
interface CardsResult {
  cards: CardInfo[];
  fetchMore: (currentCard?: CardInfo) => Promise<void>;
  removeCard: (card: CardInfo, index: number) => void;
  init: () => Promise<void>;
}
// When to start fetching new data
export const TOLERANCE = 2;
+// Where to insert a paywall
+export const PAYWALL_POSITION = 2;
export function useCards(): CardsResult {
  const [cards, setCards] = useState<CardsResult['cards']>([]);
  const page = useRef<number>(0);
+  const shouldPresentPaywall = useRef<boolean>(true);
  const init = async () => {
    await fetchMore();
  };
  const removeCard = async (card: CardInfo, index: number) => {
    if (index === TOLERANCE) {
      fetchMore(card);
    }
  };
  const fetchMore = async (currentCard?: CardInfo) => {
    const images = await fetchImages(page.current);
    const result = images.map<CardInfo>(value => {
      return {
        type: 'image',
        // // CatAPI returns duplicates, so we mark them with page number, so React keys are unique
        id: page.current + '__' + value.id,
        url: value.url,
      };
    });
    const requestedAtIndex = cards.findIndex(v => v.id === currentCard?.id);
    const newCards = [...result, ...cards.slice(0, requestedAtIndex)];
+    // insert a paywall at the third position, if user is not subscribed
+    if (shouldPresentPaywall) {
+      const paywallPromise = adapty.getPaywall(MY_PAYWALL_ID);
+      const productsPromise = paywallPromise.then(paywall =>
+        adapty.getPaywallProducts(paywall),
+      );
+
+      newCards.splice(2, 0, {
+        type: 'paywall',
+        id: 'paywall_' + page.current,
+        paywall: paywallPromise,
+        products: productsPromise,
+      });
+    }
+
    page.current += 1;
    setCards(newCards);
  };
  return {
    cards,
    init,
    fetchMore,
    removeCard,
  };
}
That would place a paywall card at the third position and also pre-fetch that paywall and its products three cards before it should be rendered.
However, users can just re-launch the app and watch three more cat images. And then again. Let’s prevent this cheating by preserving the state.
I’ll use basic AsyncStorage:
npm install @react-native-async-storage/async-storageIt also requires additional setup. It would depend on your configuration. I’ve just followed the docs.
Now is the perfect moment to create helpers.ts, it will include utility functions, that we will use in our data controller:
// /helpers.ts
import AsyncStorage from '@react-native-async-storage/async-storage';
// How many cards user have swiped
export const KEY_TODAY_VIEWS = '@views';
// When user last swiped a card (timestamp)
export const KEY_VIEWED_AT = '@viewed_at';
export async function getTodayViews(): Promise<number> {
  const lastViewTs = await AsyncStorage.getItem(KEY_VIEWED_AT);
  const now = Date.now();
  if (!lastViewTs) {
    return 0;
  }
  const diff = now - parseInt(lastViewTs, 10);
  // If it's been more than a day since last view, reset views
  if (diff > 24 * 60 * 60 * 1000) {
    await AsyncStorage.setItem(KEY_TODAY_VIEWS, '0');
    return 0;
  }
  const views = await AsyncStorage.getItem(KEY_TODAY_VIEWS);
  if (views) {
    return parseInt(views, 10);
  }
  return 0;
}
export async function getLastViewedAt(): Promise<number | null> {
  const lastViewTs = await AsyncStorage.getItem(KEY_VIEWED_AT);
  if (lastViewTs) {
    return parseInt(lastViewTs, 10);
  }
  return null;
}
export async function recordView(viewsAmount: number): Promise<void> {
  await AsyncStorage.setItem(KEY_VIEWED_AT, Date.now().toString());
  await AsyncStorage.setItem(KEY_TODAY_VIEWS, viewsAmount.toString());
}
Now we can modify our logic in data.ts, so the user cannot exploit app reloads:
import {useRef, useState} from 'react';
import {AdaptyPaywall, AdaptyProduct, adapty} from 'react-native-adapty';
import {fetchImages} from './images';
import {MY_PAYWALL_ID} from './credentials';
+import {getLastViewedAt, getTodayViews, recordView} from './helpers';
type CardInfo =
  | {type: 'image'; id: string; url: string}
  | {
      type: 'paywall';
      id: string;
      paywall: Promise<AdaptyPaywall>;
      products: Promise<AdaptyProduct[]>;
    };
interface CardsResult {
  cards: CardInfo[];
  fetchMore: (currentCard?: CardInfo) => Promise<void>;
  removeCard: (card: CardInfo, index: number) => void;
  init: () => Promise<void>;
}
// When to start fetching new data
export const TOLERANCE = 2;
// Where to insert a paywall
export const PAYWALL_POSITION = 2;
export function useCards(): CardsResult {
  const [cards, setCards] = useState<CardsResult['cards']>([]);
  const page = useRef<number>(0);
  const shouldPresentPaywall = useRef<boolean>(true);
+  const sessionViews = useRef<number>(0);
+  const lastViewedAt = useRef<number | null>(null); // Date timestamp
  const init = async () => {
+    sessionViews.current = await getTodayViews();
+    lastViewedAt.current = await getLastViewedAt();
    await fetchMore();
  };
  const removeCard = async (card: CardInfo, index: number) => {
+    sessionViews.current += 1;
+    recordView(sessionViews.current);
    if (index === TOLERANCE) {
      fetchMore(card);
    }
  };
  const fetchMore = async (currentCard?: CardInfo) => {
    const images = await fetchImages(page.current);
    const result = images.map<CardInfo>(value => {
      return {
        type: 'image',
        // // CatAPI returns duplicates, so we mark them with page number, so React keys are unique
        id: page.current + '__' + value.id,
        url: value.url,
      };
    });
    const requestedAtIndex = cards.findIndex(v => v.id === currentCard?.id);
    const newCards = [...result, ...cards.slice(0, requestedAtIndex)];
    // insert a paywall at the third position, if user is not subscribed
    if (shouldPresentPaywall) {
      const paywallPromise = adapty.getPaywall(MY_PAYWALL_ID);
      const productsPromise = paywallPromise.then(paywall =>
        adapty.getPaywallProducts(paywall),
      );
+      // viewing is from the last to first
+      const index =
+        newCards.length - Math.max(PAYWALL_POSITION - sessionViews.current, 0);
-      newCards.splice(2, 0, {
+      newCards.splice(index, 0, {
        type: 'paywall',
        id: 'paywall_' + page.current,
        paywall: paywallPromise,
        products: productsPromise,
      });
    }
    page.current += 1;
    setCards(newCards);
  };
  return {
    cards,
    init,
    fetchMore,
    removeCard,
  };
}
That’s just enough logic for now. Let’s make the paywall component.
The cardpaywall component
Although the paywall and products are pre-fetched, I’m going to add a loader for an edge-case, when the paywall is rendered first (the user swiped three times today). I’ve also decided not to lock the fethcMore method previously, so here we have the paywall and product promises.
PaywallCard is locked into place and to move it I utilize a passed reference.
// /CardPaywall.tsx
import React, {useEffect, useRef, useState} from 'react';
import {StyleSheet, Text, TouchableOpacity, View} from 'react-native';
import {
  AdaptyError,
  AdaptyPaywall,
  AdaptyProduct,
  adapty,
} from 'react-native-adapty';
import {Card} from './Card';
interface CardPaywallProps {
  onSwipeCompleted?: (direction: string) => void;
  paywall: Promise<AdaptyPaywall>;
  products: Promise<AdaptyProduct[]>;
}
export function CardPaywall(props: CardPaywallProps): JSX.Element {
  const [isLoading, setIsLoading] = useState(true);
  const [paywall, setPaywall] = useState<AdaptyPaywall>();
  const [products, setProducts] = useState<AdaptyProduct[]>([]);
  const [error, setError] = useState<AdaptyError | null>(null);
  const [isLocked, setIsLocked] = useState(true);
  const card = useRef<any>(null);
  useEffect(() => {
    async function fetch() {
      try {
        setError(null);
        const paywallResult = await props.paywall;
        const productsResult = await props.products;
        // log paywall opened
        adapty.logShowPaywall(paywallResult);
        setPaywall(paywallResult);
        setProducts(productsResult);
      } catch (error) {
        setError(error as AdaptyError);
      } finally {
        setIsLoading(false);
      }
    }
    fetch();
  }, []);
  async function tryPurchase(product: AdaptyProduct) {
    try {
      await adapty.makePurchase(product);
      setIsLocked(false);
      // wait until card is unlocked :(
      setTimeout(() => {
        card.current.swipe('left');
      }, 100);
    } catch (error) {
      setError(error as AdaptyError);
    }
  }
  const renderContent = (): React.ReactNode => {
    if (isLoading) {
      return <Text style={styles.titleText}>Loading...</Text>;
    }
    if (error) {
      return <Text style={styles.titleText}>{error.message}</Text>;
    }
    if (!paywall) {
      return <Text style={styles.titleText}>Paywall not found</Text>;
    }
    return (
      <View>
        <Text style={styles.titleText}>{paywall?.name}</Text>
        <Text style={styles.descriptionText}>
          Join to get unlimited access to images of cats
        </Text>
        <View style={styles.productListContainer}>
          {products.map(product => (
            <TouchableOpacity
              key={product.vendorProductId}
              activeOpacity={0.5}
              onPress={() => tryPurchase(product)}>
              <View style={styles.productContainer}>
                <Text style={styles.productTitleText}>
                  {product.localizedTitle}
                </Text>
                <Text style={styles.productPriceText}>
                  {product.localizedPrice}
                </Text>
              </View>
            </TouchableOpacity>
          ))}
        </View>
      </View>
    );
  };
  return (
    <Card
      onSwipeCompleted={props.onSwipeCompleted}
      synthetic={isLocked}
      preventSwipe={['up', 'left', 'down', 'right']}
      ref={card}>
      {renderContent()}
    </Card>
  );
}
const styles = StyleSheet.create({
  titleText: {
    color: 'white',
    fontSize: 16,
    paddingLeft: 10,
    fontWeight: '500',
  },
  descriptionText: {
    color: 'white',
    marginTop: 8,
    marginBottom: 8,
    paddingLeft: 10,
    maxWidth: 210,
  },
  productListContainer: {
    marginTop: 8,
    width: '100%',
  },
  productContainer: {
    marginTop: 8,
    width: '100%',
    flexDirection: 'row',
    paddingHorizontal: 10,
    paddingVertical: 16,
    borderRadius: 12,
    backgroundColor: '#0A84FF',
  },
  productTitleText: {
    color: 'white',
    fontSize: 16,
    fontWeight: '500',
    flexGrow: 1,
    marginRight: 32,
  },
  productPriceText: {
    color: '#FF9F0A',
    fontWeight: '500',
    fontSize: 16,
  },
});
Notice, how shallow is the purchasing process. We don’t even need to notify other components about a successful purchase, they will know soon enough. But first, let us render Paywall cards.
Adding the paywall cards into the stack in app.tsx
Let’s glue all our progress up until now into App. All we need to do is just add CardPaywalls to be rendered:
// /App.tsx
// ...
{cards.map((card, index) => {
  switch (card.type) {
    case 'paywall':
      return null;
    case 'image':
      return (
        <CardImage
          key={card.id}
          onSwipeCompleted={() => removeCard(card, index)}
          url={card.url}
         />
      );
    }
  }
)}
// ...
If you are feeling a bit lost, don’t worry! I’ll soon show you the entire code of App.tsx.
User profile status check
We made the thing. Users can now buy access and swipe forward.
But wait, for the next stack of 5 cards user is presented with this paywall again! And if he/she relaunches our app, they probably will encounter the paywall momentarily!
We need a way to check, that user has purchased the unlimited access. Let’s do just that.
Adapty has a very simple function for that, but I don’t want to wait until the network request is performed at a startup, so I want to store IS_SUBSCRIBED right into the device’s memory.
The first stack of cards would only consider IS_SUBSCRIBED from a device, meanwhile, this field would be updated in the background.
Let’s make a helper for that:
// /helpers.ts
// ...
// Does user have premium
export const IS_PREMIUM = '@is_premium';
export async function getIsPremium(): Promise<boolean> {
  const isPremium = await AsyncStorage.getItem(IS_PREMIUM);
  return isPremium === 'true';
}
export async function setIsPremium(isPremium: boolean): Promise<void> {
  await AsyncStorage.setItem(IS_PREMIUM, isPremium.toString());
}
Now all we need to do is to listen to profile updates in our data controller, so we’ll know it is time to disable the paywall showing or enable it back. Here is how we can do it with Adapty:
// /data.ts
import {useEffect, useRef, useState} from 'react';
import {AdaptyPaywall, AdaptyProduct, adapty} from 'react-native-adapty';
import {fetchImages} from './images';
import {MY_PAYWALL_ID} from './credentials';
import {
+  getIsPremium,
  getLastViewedAt,
  getTodayViews,
  recordView,
+  setIsPremium,
} from './helpers';
type CardInfo =
  | {type: 'image'; id: string; url: string}
  | {
      type: 'paywall';
      id: string;
      paywall: Promise<AdaptyPaywall>;
      products: Promise<AdaptyProduct[]>;
    };
interface CardsResult {
  cards: CardInfo[];
  fetchMore: (currentCard?: CardInfo) => Promise<void>;
  removeCard: (card: CardInfo, index: number) => void;
  init: () => Promise<void>;
}
// When to start fetching new data
export const TOLERANCE = 2;
// Where to insert a paywall
export const PAYWALL_POSITION = 2;
export function useCards(): CardsResult {
  const [cards, setCards] = useState<CardsResult['cards']>([]);
  const page = useRef<number>(0);
  const shouldPresentPaywall = useRef<boolean>(true);
  const sessionViews = useRef<number>(0);
  const lastViewedAt = useRef<number | null>(null); // Date timestamp
+  useEffect(() => {
+    adapty.addEventListener('onLatestProfileLoad', async profile => {
+      // premium is an access level, that you set in Dashboard -> Product
+      shouldPresentPaywall.current =
+        profile?.accessLevels?.premium?.isActive || false;
+
+      const isPremium = await getIsPremium();
+      if (isPremium !== shouldPresentPaywall.current) {
+        setIsPremium(shouldPresentPaywall.current);
+      }
+    });
+
+    return () => {
+      adapty.removeAllListeners();
+    };
+  }, []);
  const init = async () => {
    sessionViews.current = await getTodayViews();
    lastViewedAt.current = await getLastViewedAt();
+    shouldPresentPaywall.current = !(await getIsPremium());
+    try {
+      // do not await, as it's not critical for the app to work
+      adapty.getProfile().then(profile => {
+        const isSubscribed = profile?.accessLevels?.premium?.isActive || false;
+        if (isSubscribed !== shouldPresentPaywall.current) {
+          setIsPremium(isSubscribed);
+          shouldPresentPaywall.current = isSubscribed;
+        }
+      });
+    } catch (error) {
+      console.error('failed to receive user profile', error);
+    }
+
    await fetchMore();
  };
  const removeCard = async (card: CardInfo, index: number) => {
    sessionViews.current += 1;
    recordView(sessionViews.current);
    if (index === TOLERANCE) {
      fetchMore(card);
    }
  };
  const fetchMore = async (currentCard?: CardInfo) => {
    const images = await fetchImages(page.current);
    const result = images.map<CardInfo>(value => {
      return {
        type: 'image',
        // // CatAPI returns duplicates, so we mark them with page number, so React keys are unique
        id: page.current + '__' + value.id,
        url: value.url,
      };
    });
    const requestedAtIndex = cards.findIndex(v => v.id === currentCard?.id);
    const newCards = [...result, ...cards.slice(0, requestedAtIndex)];
    // insert a paywall at the third position, if user is not subscribed
    if (shouldPresentPaywall) {
      const paywallPromise = adapty.getPaywall(MY_PAYWALL_ID);
      const productsPromise = paywallPromise.then(paywall =>
        adapty.getPaywallProducts(paywall),
      );
      // viewing is from the last to first
      const index =
        newCards.length - Math.max(PAYWALL_POSITION - sessionViews.current, 0);
      newCards.splice(index, 0, {
        type: 'paywall',
        id: 'paywall_' + page.current,
        paywall: paywallPromise,
        products: productsPromise,
      });
    }
    page.current += 1;
    setCards(newCards);
  };
  return {
    cards,
    init,
    fetchMore,
    removeCard,
  };
}
And that’s it! Have you noticed how little change we have introduced to obtain such powers? This is because of two factors:
- Adapty offers very simple and flexible APIs.
- We’ve made design decisions that complimented our app’s needs.
They say, teamwork makes the dream work and that is exactly what has started to happen at this scale. Further modifications may naturally bloom into a nicely designed app.
Final Result
Here is my final App.tsx:
import React, {useEffect, useMemo} from 'react';
import {
  SafeAreaView,
  StatusBar,
  StyleSheet,
  Text,
  View,
  useColorScheme,
} from 'react-native';
import {activateAdapty} from './adapty';
import {useCards} from './data';
import {CardImage} from './CardImage';
import {CardPaywall} from './CardPaywall';
activateAdapty();
function App(): JSX.Element {
  const isDarkMode = useColorScheme() === 'dark';
  const styles = useMemo(() => getStyles(isDarkMode), [isDarkMode]);
  const {cards, init, removeCard} = useCards();
  useEffect(() => {
    init(); // fetch initial cards
  }, []);
  return (
    <SafeAreaView style={styles.app}>
      <StatusBar
        barStyle={isDarkMode ? 'light-content' : 'dark-content'}
        backgroundColor={styles.app.backgroundColor}
      />
      <Text style={styles.headerText}>CatsFan</Text>
      <View style={styles.cardsContainer}>
        {cards.map((card, index) => {
          switch (card.type) {
            case 'paywall':
              return (
                <CardPaywall
                  key={card.id}
                  onSwipeCompleted={() => {}}
                  paywall={card.paywall}
                  products={card.products}
                />
              );
            case 'image':
              return (
                <CardImage
                  key={card.id}
                  onSwipeCompleted={() => removeCard(card, index)}
                  url={card.url}
                />
              );
          }
        })}
      </View>
    </SafeAreaView>
  );
}
function getStyles(dark: boolean) {
  return StyleSheet.create({
    app: {
      backgroundColor: dark ? 'rgb(44,44,46)' : '#fff',
      width: '100%',
      height: '100%',
    },
    headerText: {
      fontWeight: '700',
      fontSize: 32,
      marginHorizontal: 24,
      marginTop: 24,
      marginBottom: 12,
      color: dark ? '#fff' : '#000',
    },
    container: {
      marginTop: 32,
      paddingHorizontal: 24,
      fontWeight: '700',
    },
    cardsContainer: {
      width: '100%',
      paddingHorizontal: 12,
      height: 500,
    },
  });
}
export default App;
And here is the result:

Instead of a conclusion
So, the app works. I think the chassis we’ve made is solid enough to develop into a much larger frame. Adapty offers a really flexible SDK so we can design an easy and maintainable code. For a closer look at how Adapty can optimize your monetization strategies, elevate user experiences and accelerate your revenue growth, schedule a free demo call with us.
Were our decisions here more maintainable? Only time would tell. For now, thank you for reading, and see you at the next rake that will certainly come by.
Recommended posts


