How to run A/B tests for subscription onboarding
When subscriptions began to reign in the world of mobile apps, the main goal of mobile marketing became to hook and retain as many users as possible. Developers and publishers resorted to all kinds of trickery in order to lure the wide-eyed user into their app and get a freshly purchased subscription. And it’s still the way things are in the mobile market, where the average subscription price is growing 1,29% month over month and the users are still willing to pay their money for subscription-based apps.
Here at the Adapty blog, we talk a lot about paywalls and their importance in the user-developer relationship. And it is true, the paywall still remains the main place in the app where the user makes their purchasing decision. But there’s one more important step that leads to the paywall and can make it look 10 times more appealing – the onboarding: several introductory screens that are meant to show the essence and the value of the app, and at the same time make the user as comfortable as possible… before asking them for money.
The importance of such an introduction should never be underestimated, and this is why we highly recommend thoroughly gauging every aspect of the onboarding screens. But changing even a small element on an onboarding screen would require a re-release of the app and may lead to a higher bounce rate if the users don’t like it. And you’ll have to roll back the previous iteration or hastily come up with something new. However, it’s not an issue with Adapty, as it allows not only to remotely change onboarding elements but also to run A/B tests and check which iteration works best for your app. Let’s explore these possibilities in more detail.
What is mobile app onboarding?
As we mentioned before, onboarding is a process of familiarizing the user with the app on a step-by-step basis, while at the same time making the app seem as much appealing as possible. Usually, the scheme consists of 2-3 introductory screens followed by the paywall. In the intro screens, you creatively provide important information about your app or somehow convey the experience the user will get with it. After “clicking” through the onboarding screens, the user faces the paywall, where they can purchase a subscription to the app or skip it (if it’s allowed by the developer) to get into the app but with limited functions.
At the beginning of the article we talked about hooking the user, and this is exactly what onboarding is for. Your main task here is to make the user interested in your app, feel like it’s something they can’t do without, and eager to spend their money on. And like with anything else, there’s no universal way of doing that. The main idea is always to make the user come to the paywall prepared and willing to make a purchase. But how you design your onboarding and how you will communicate the values of your app depends on many factors, including the type and functionality of your app, your target audience, current trends, etc. But there seems to be one solution that should help you ease the process – A/B testing.
Is it possible to run tests with onboarding?
Let’s recall: Adapty enables you to create paywalls and then configure them with the help of remote configuration – meaning without having to release a new version of the app. You do need to make a few adjustments in the app code beforehand, but then you’ll be able to remotely change paywall elements according to your hypotheses and even run A/B tests with different versions of your paywall.
But the paywall is the final stage of the onboarding process, what about the previous steps? Here’s where Adapty provides you with a pleasant surprise – the same remote config logic can be used for the onboarding screens as well! If you code several variables into your onboarding steps, you’ll be able to remotely adjust them to change the background image, text, button color, etc. Let’s try to get a clear picture of all the aspects.
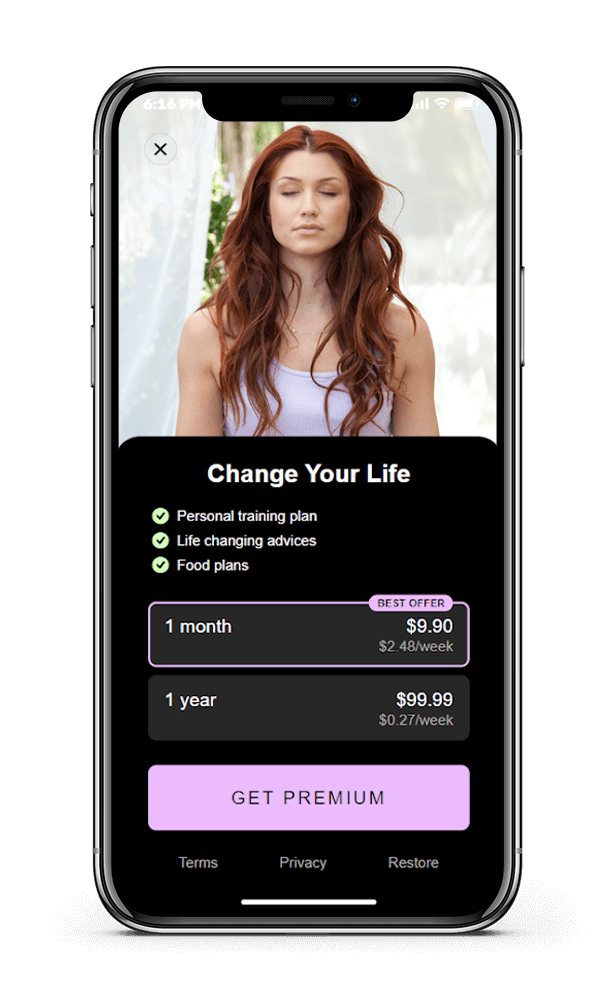
This is a paywall of a dummy yoga app that we created with Adapty. It’s a simple two-product paywall that has several visual elements, like background image, title text, app values, buttons, etc. This very paywall was created with the help of Adapty’s paywall builder.

It provides a ready-made template that you can customize to your liking by filling in the pre-arranged text fields, uploading any background image, and manually choosing the color scheme of the elements. Another option for creating a paywall with Adapty would be to use the remote config feature that looks like a JSON file where you can provide variables for any paywall element and provide context for them.
The main advantage of both of these approaches is that you can easily change any element of your paywall and immediately run an A/B test with no releases. But if the paywall builder is actually meant to create paywalls, the JSON field of the remote config can be used for other screens as well. Have a look at this example:

This is the onboarding for the yoga app that we came up with. We created two introductory screens that lead the user to the paywall. It’s just a basic notion of what onboarding can look like, so you’re free to have more screens. The main point here is that in terms of remote config logic, all these screens share the same JSON file corresponding to the paywall entity and can be easily edited from the paywall editing menu in Adapty. Now, let’s see how we can add onboarding screens and run A/B test with them later.
Come up with a hypothesis first
So you’re creating the onboarding with an idea to add onboarding to your app and then test it to the maximum results. It means that you must have an initial understanding of what your first iteration should look like and have a couple of more ideas of what else you can test if the initial figures aren’t satisfying. In order to tweak the screens with the remote config, it’s important to mentally dismantle them into separate elements, so that you knew which elements you can change or substitute. Let’s have a look at the first screen of our onboarding:
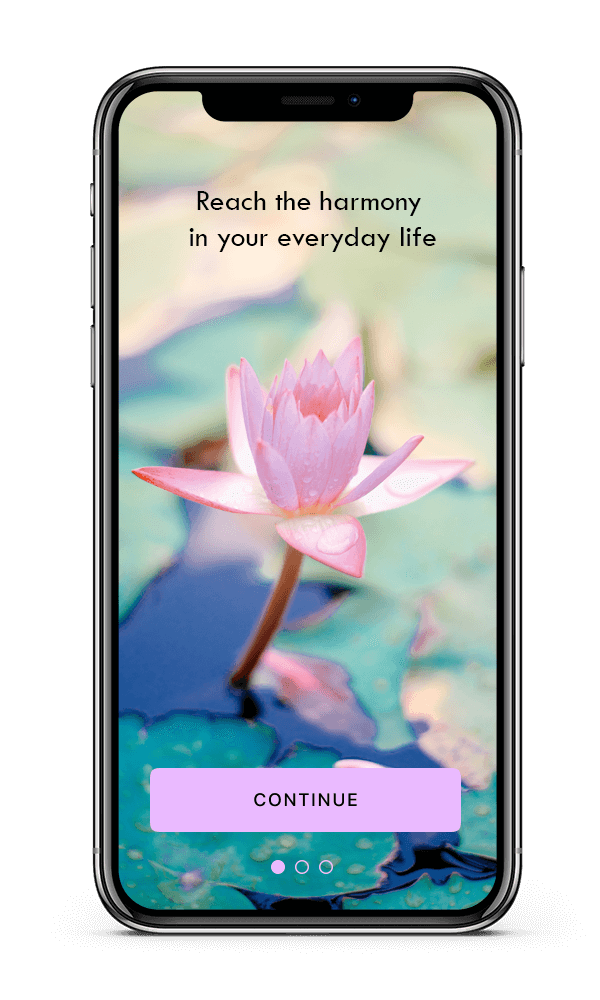
It basically consists of 4 elements:
- Title text
- Background image
- Continue button
- Slide indicators at the bottom
So having 4 separate elements implies that only these elements can be manipulated with the help of remote configuration. There may be more or less, depending on your needs and the hypotheses you come up with.
When you have one set of screens and a paywall, have a closer look and think about what you could change there, then form one or several hypotheses. Let’s say the current color scheme looks too feminine and may scare away your male audience. On top of that, the title text may seem too long, so you’d want it to be much shorter and more upfront. So with these ideas in mind, you choose to:
- Make the title text shorter and more straightforward
- Change the color of the button and slider
- Consequently, change the images to contrast with the new color
- And as a result, change the image and color scheme of the paywall
And here’s the result you may come up with in the end:
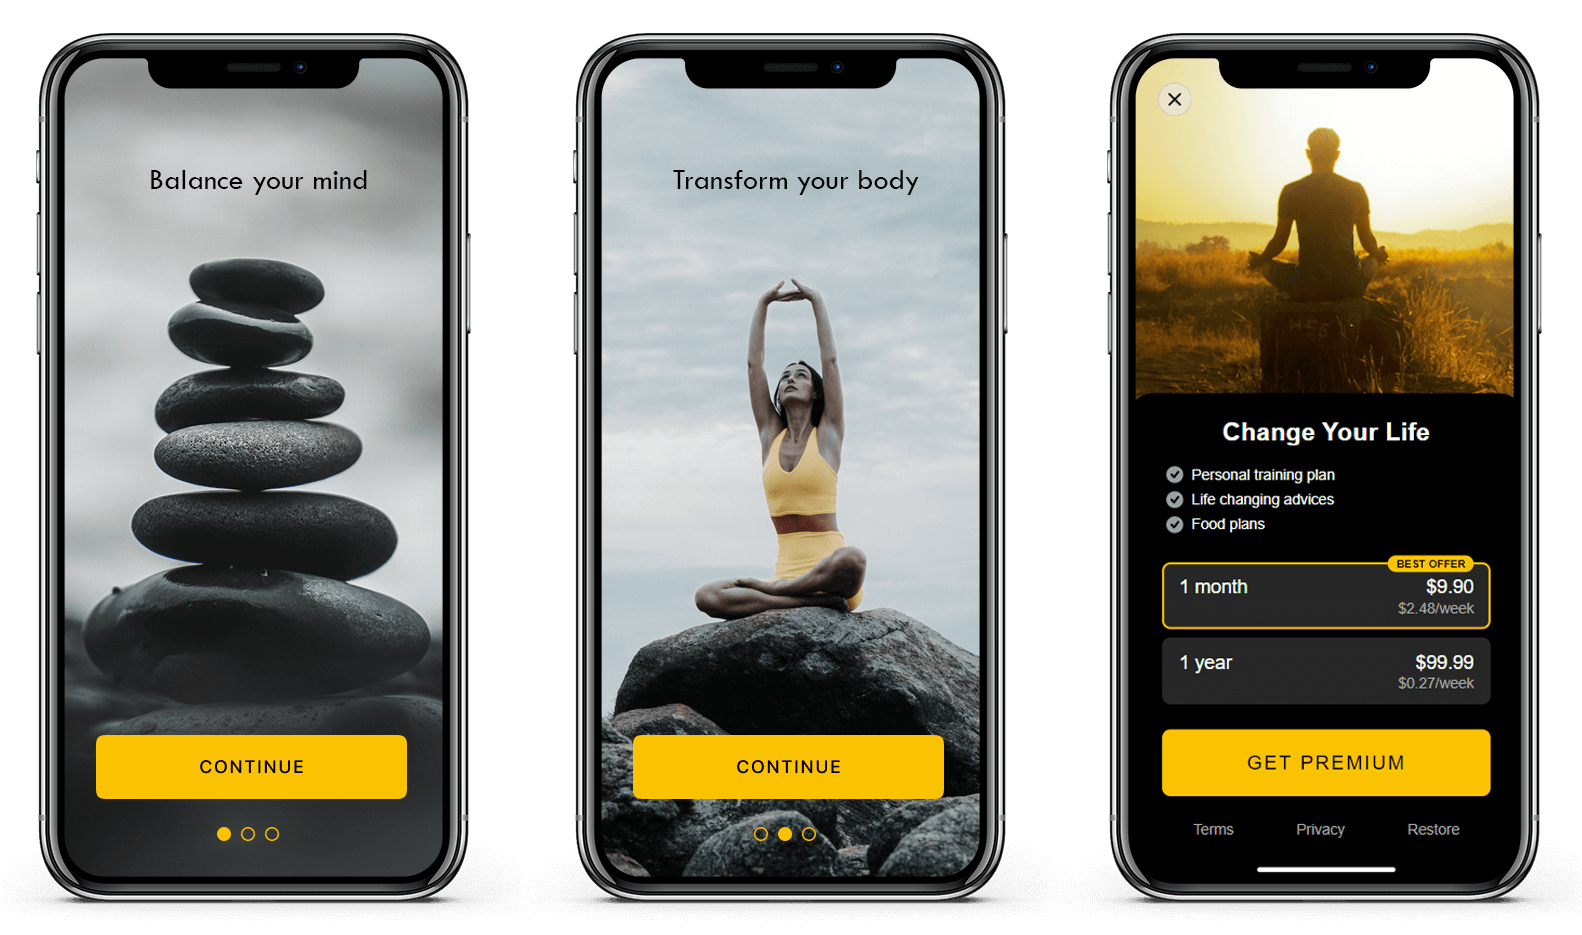
You may either create a mockup of your second iteration or simply visualize it in your mind, but it’s something that you should think about beforehand for sure. Now that you know what needs to be done visually, let’s get down to the technical aspect.
Prepare the paywall
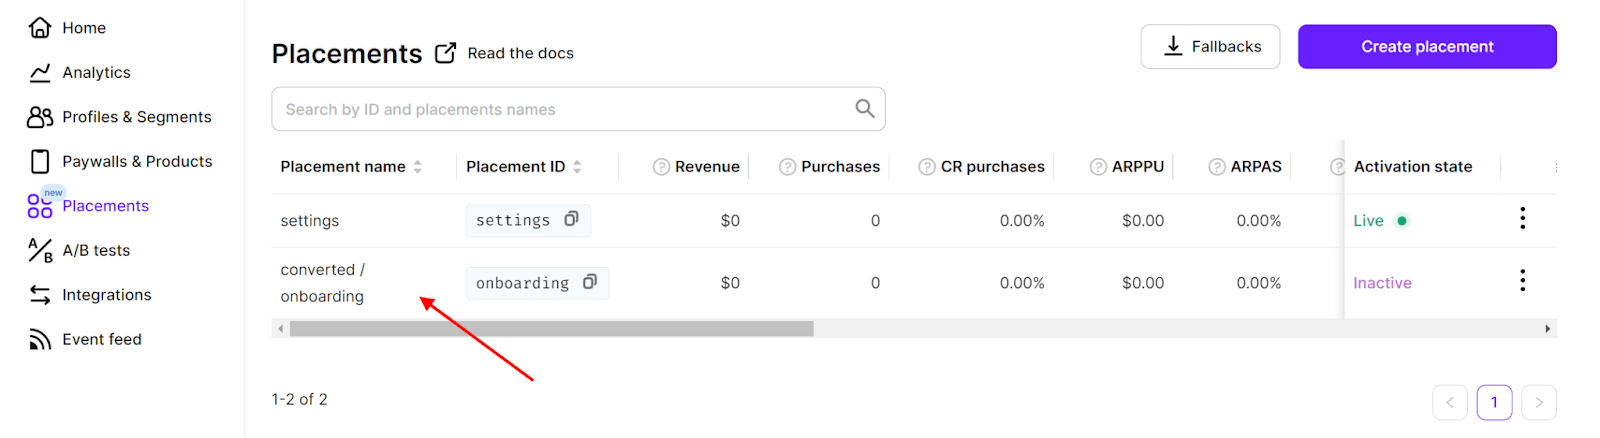
Note that Adapty now has a new paywall management system that is built around Placements, so make sure you have a placement set for onboarding, like the one in the screenshot below. Check the documentation to find out how to set it up.
To add onboarding to your app, you must already have a paywall integrated with Adapty. You may either create and integrate a new paywall for this purpose, or use the one you already have.
Go to the Paywalls & Products panel in Adapy and open the paywall you want to use.
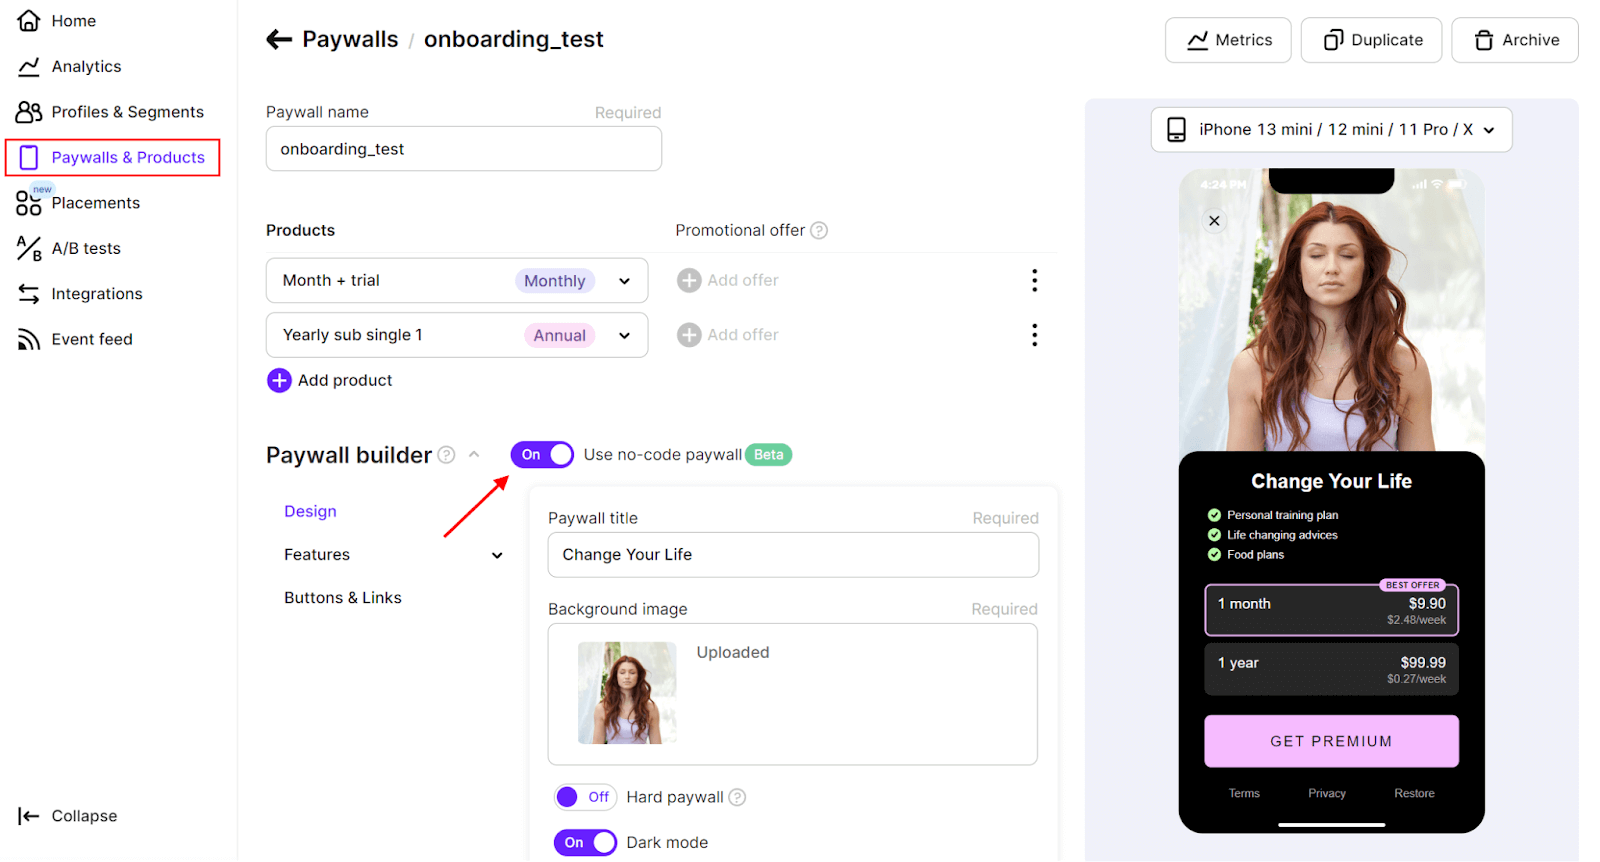
This is what the paywall for our yoga app looks like. And here’s where you need to make sure that your paywall’s design is aligned with the onboarding screens you came up with. We used the paywall builder to create this one. It’s activated by the toggle and makes it easier to set up and adjust any element on the page. You can find more information about how to work with the builder in our recent article. If you’re using JSON for the design part, simply go to the next step.
Set up the JSON for the remote config
When you know which elements you want to be able to change, it’s time to set the remote configuration. It’s a multi-step process that will require some interaction with the app code as well. In brief, here’s what you’ll have to do:
- Come up with short names for the elements, they’ll be used as names for the variables that we’ll be changing in the JSON later.
- Code these variables into your app’s onboarding screens to match the corresponding elements.
- Prepare the JSON file containing all the media information for the variables.
Let’s see how it should be done using our example screen. In our case, we have 4 elements, and it’s possible to simply give them names and move on to the next step, but let’s get a bit more creative and let us some room for future experiments.
The first element on the screen, from top to bottom, is a piece of text. But apart from the textual content it also has color. So if you later change the background image to a much darker one, such black text will be lost. So it’s important to split the textual element into two variables: "title" and "title_color".
It’s much simpler with the background image, we may simply call it "image".
Next, we have the button and slide indicator. You may notice that they use the same main color, so let’s provide one mutual variable for this purpose - "accent_color". Then for the button text, we’ll also set two separate variables: "contrast_color" and "button_title".
So it happens, that sometime you may need a bit more variables, than the number of elements you have. Here’s the table with all our variables:
| "title" | Text for the title |
| "title_color" | The color of the title text |
| "image" | Name of the image resource inside the app bundle or URL for download |
| "accent_color" | The main color of the button and slider |
| "contrast_color" | Color of the button text |
| "button_title" | Text for the button |
Note: if you’re already using JSON for your paywall, it wouldn’t be something new for you. You will just have to take into consideration the variables you already use for the paywall and optimize the whole list to be convenient for you.
The next step for you will be to assign these variables to the elements in your app. This step is unique for every app depending on its architecture and the platform used, so we hope that there’s no one who knows your app better than you. In order to remotely configure your screens in the published version of the app, you need to send the newly modified version with variables for review. When it’s published, you’ll be able to make changes to the elements without any other reviews. Before that, you’ll be able to use the test version of your app to check how the remote config works.
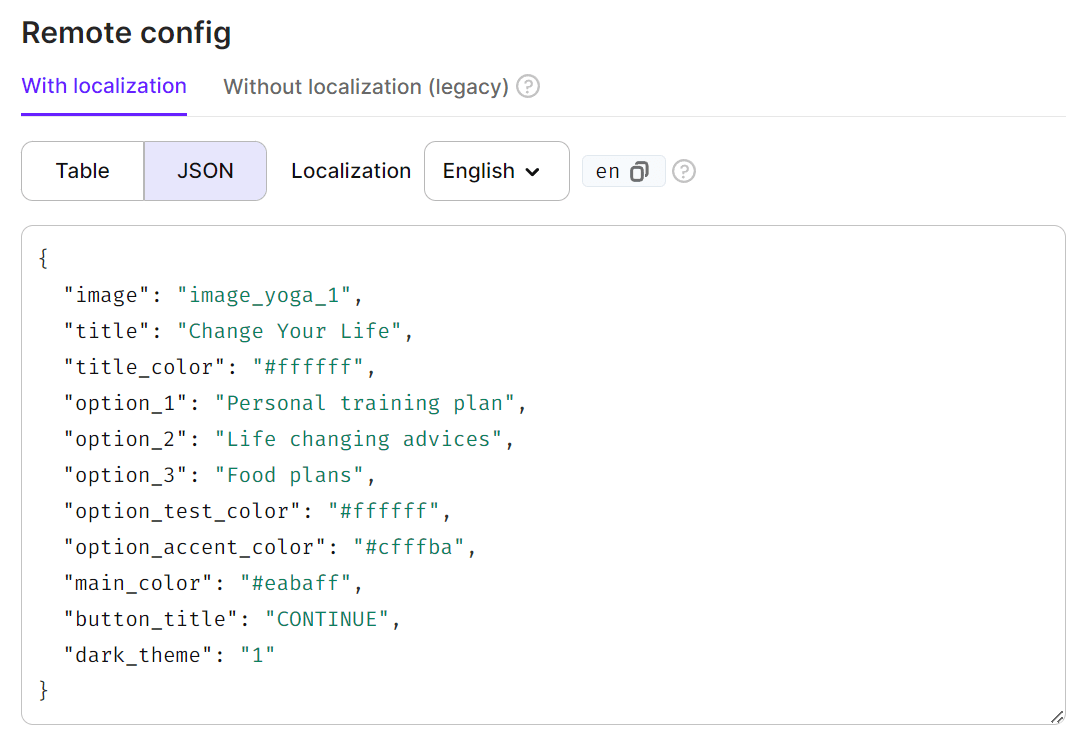
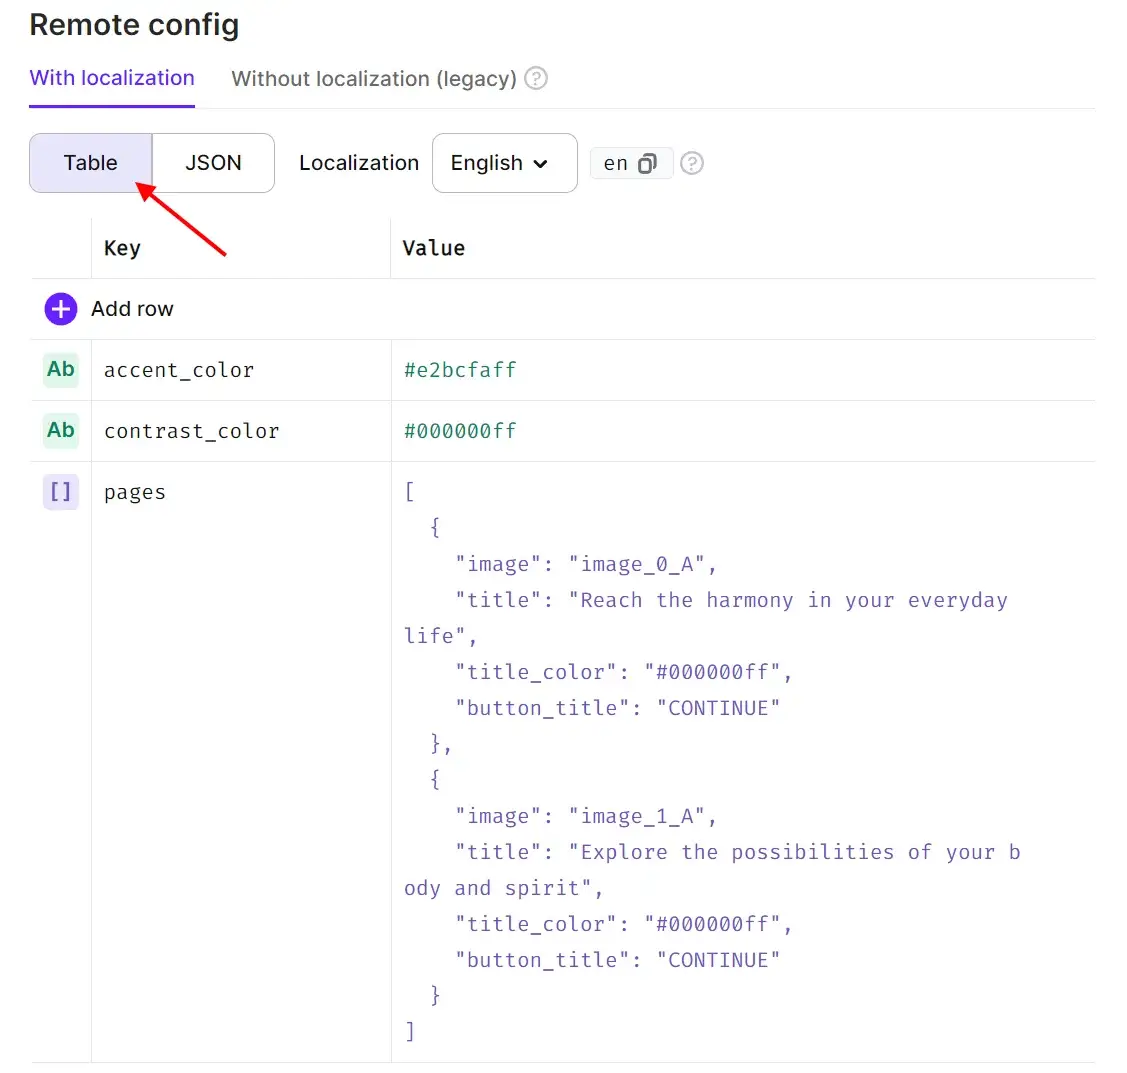
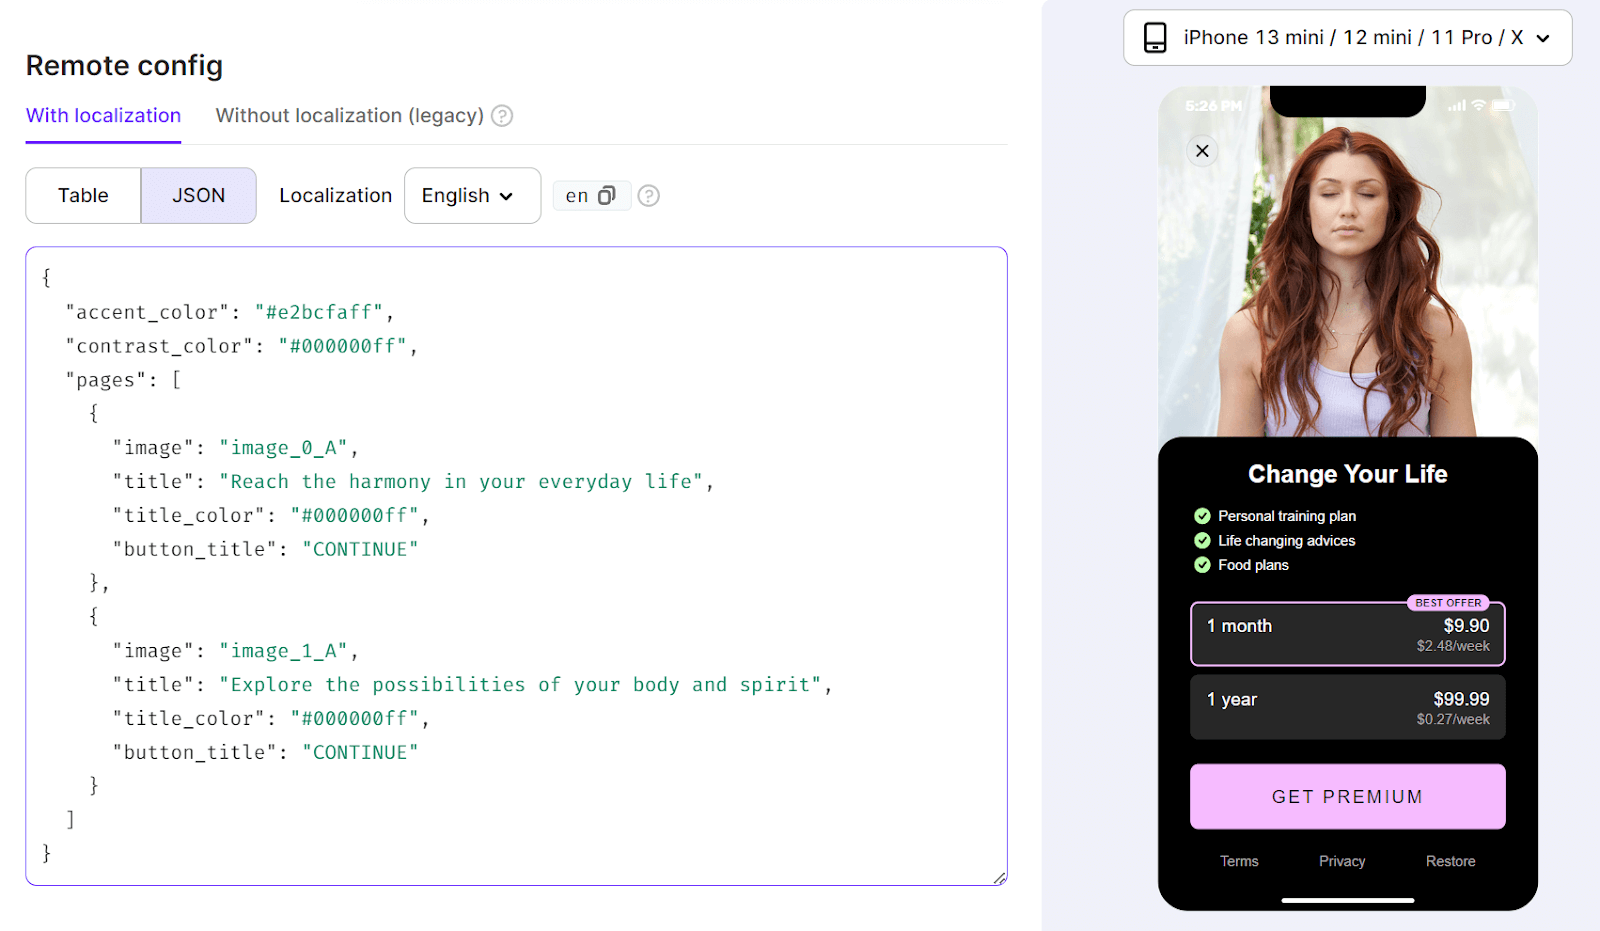
When the integration is complete, it’s time to go back to Adpaty and edit the paywall we created. On the paywall editing page, find Remote config and click on the JSON field. This is the place where the variables we created will receive their meaning. Here’s what the JSON for our initial onboarding looks like:

Let’s break down every line. Firstly, let’s remember that we’re using one paywall and one JSON correspondingly to visualize two screens (if you use the JSON for your paywall too, you will have a longer file with parameters for three screens). It means, that before setting parameters for each screen, let’s see if we have parameters that would be mutual for both screens. We happen to have two mutual variables for both screens: "accent_color" and "contrast_color". So we place them at the beginning to avoid having to repeat them for each screen and provide them with corresponding color hex codes.
Then we create a list of parameters that would be different for each screen, it’s called “pages”. There we put “image” and provide either the name of the file that you have in the app assets or a URL to the image. We chose the first variant. For the “title” variable you provide the text that should be displayed, as well as the hex code for the “title_color” parameter. And finally, provide the text for “button_title”. Then repeat this for the second screen.
Note: The size of the JSON file is limited to 10 kB, so you can post as much data there as you want but within the size limit.
It’s also possible to make the process of working with the remote config easier by using the table view. It allows you to work with the same parameters in a more user-friendly way.
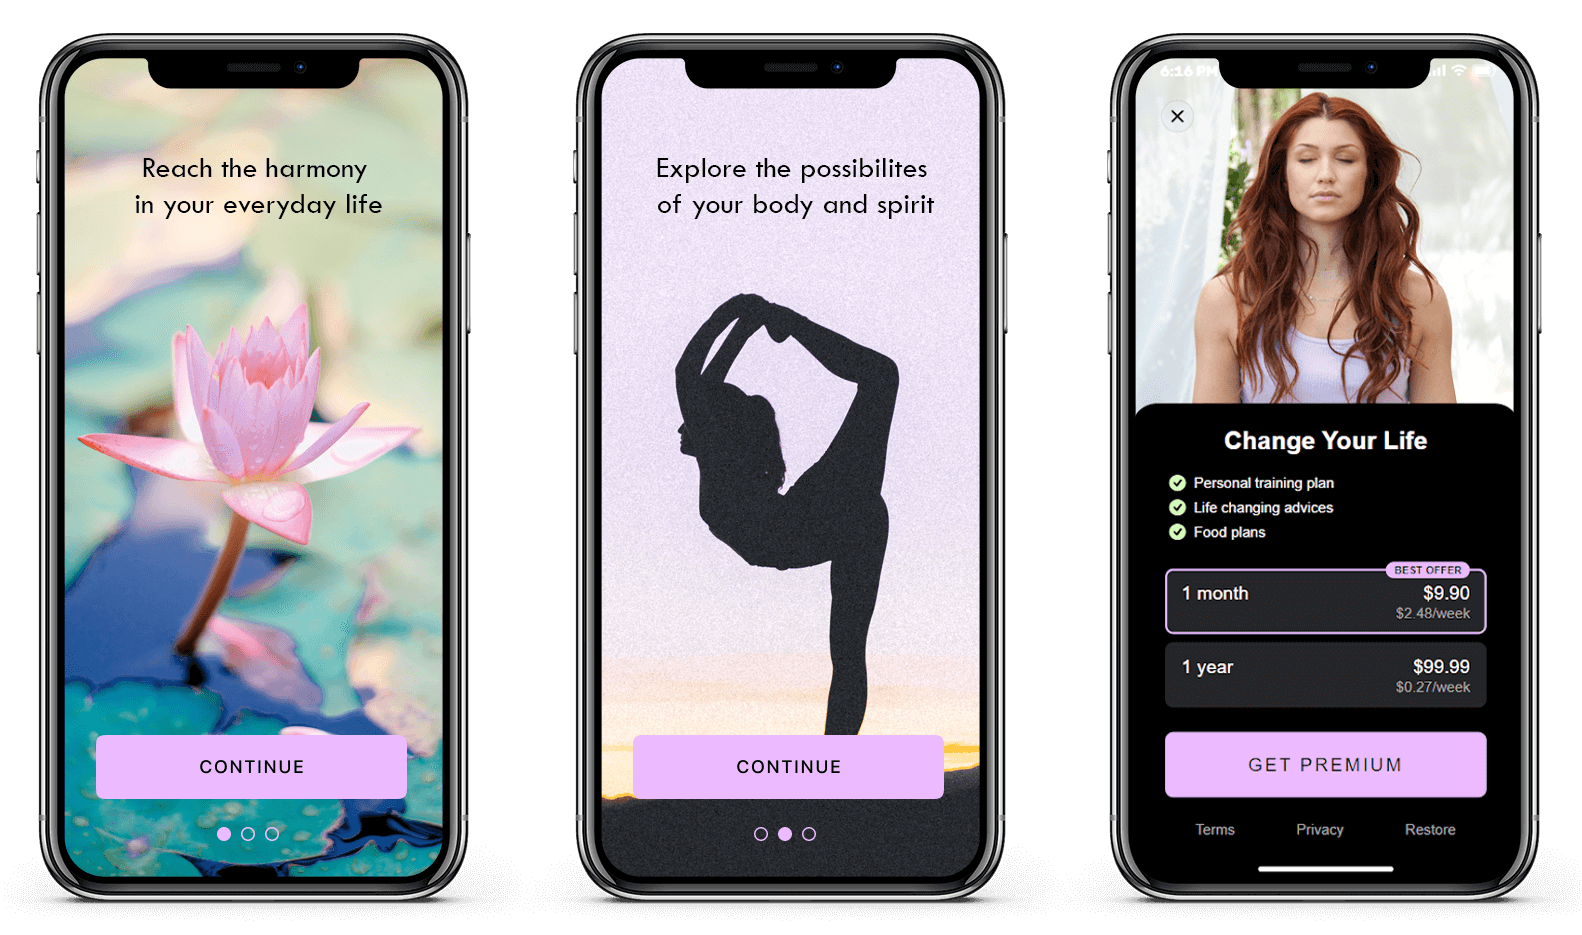
After you hit Save & Publish all the changes will be applied and if you’ve done everything right so far, in your app, you will get the desired onboarding screens with the paywall in the end:
This way we’ve managed to implement the desired design to our onboarding screens for its primary iteration. Now, let’s see how we can edit the current onboarding and even run A/B tests with it to find which iterations work best.
Run A/B tests with your onboarding
A couple of steps before we already prepared the second iteration for our onboarding. If you still think your current onboarding design leaves much to be desired, let’s change it. And here you have two ways to go:
- Simply substitute the current design with a new one and see how it performs in the long run.
- Make a copy of the first iteration, change it, and run a split test to see which one performs better.
Let’s see how to implement each of these variants.
How to change or edit the current onboarding
To change the current design, you need to simply apply changes to your paywall (in our case the paywall is tightly connected to the onboarding screens in terms of design and color palette, but it’s not always the case) and the JSON for the onboarding screens. This is our initial onboarding:
And here’s the second iteration, where we changed the color scheme and the image for the paywall with the help of the builder and manually updated the JSON file with new content for the same parameters:
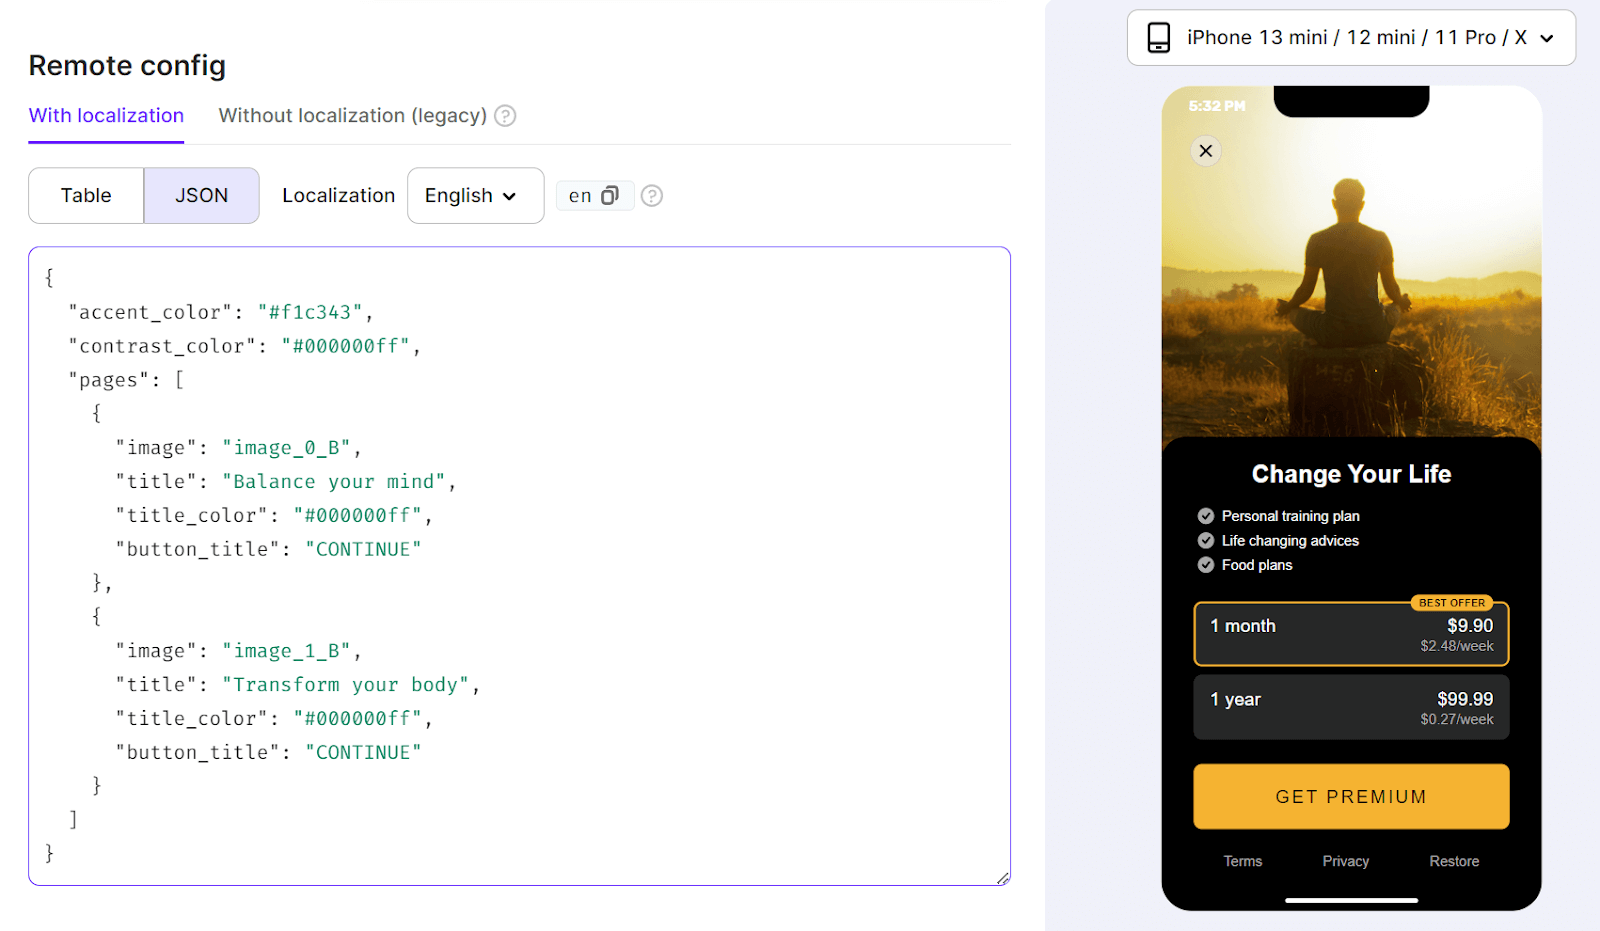
After the changes are applied, your onboarding will be changed correspondingly to this:

How to run an A/B test with your onboarding
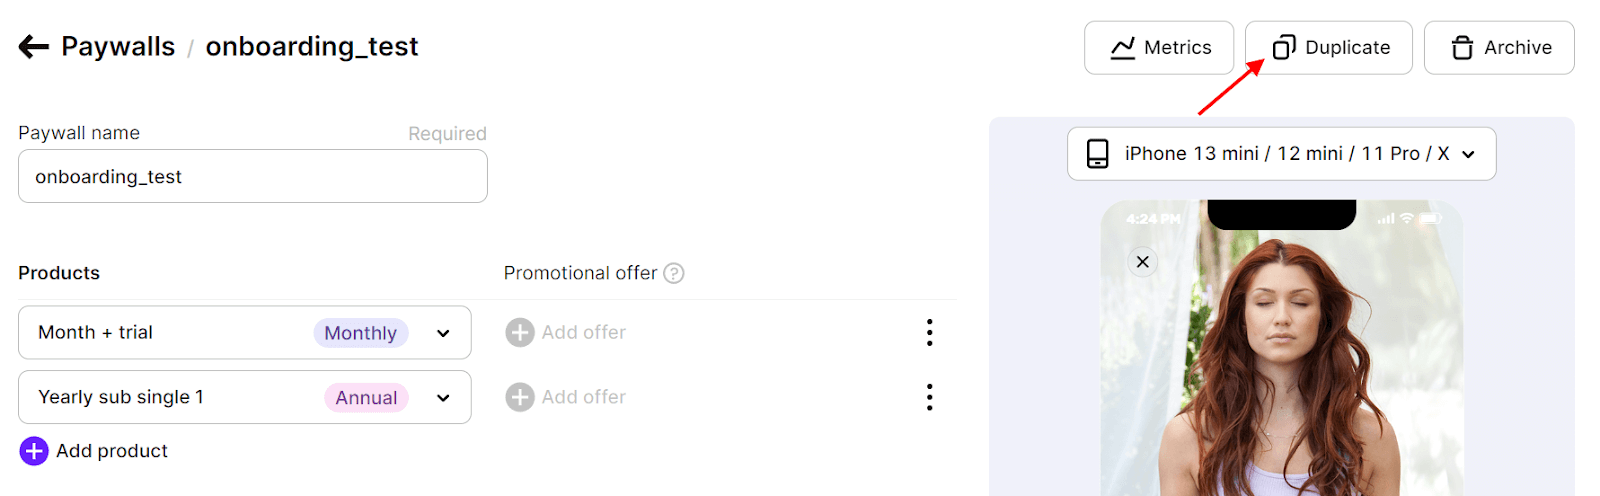
Applying drastic permanent changes to your onboarding is rather bold, so we’d recommend running A/B tests first, no matter how good your hypothesis is. To start, open the paywall page used for your current onboarding and click the Duplicate button.
In the newly created copy of your paywall, apply all the changes in the same manner as described in the previous step. When you’re satisfied with the result, hit Save & publish.
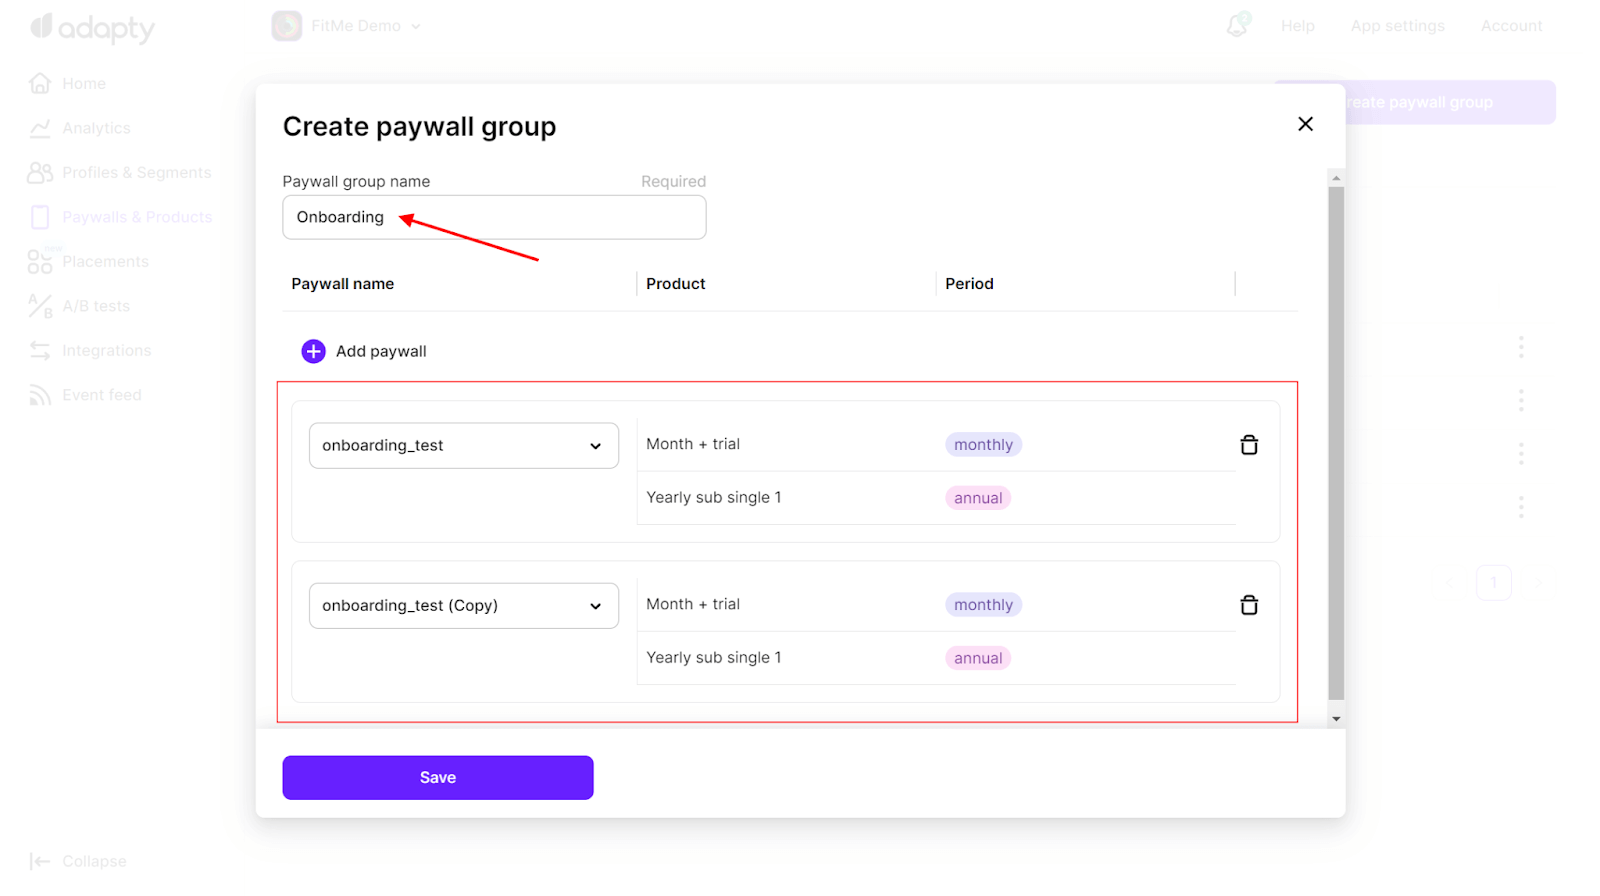
The next step is to create a new paywall group. In the same Paywalls & Products panel get to the Paywall groups tab and click Create paywall group.
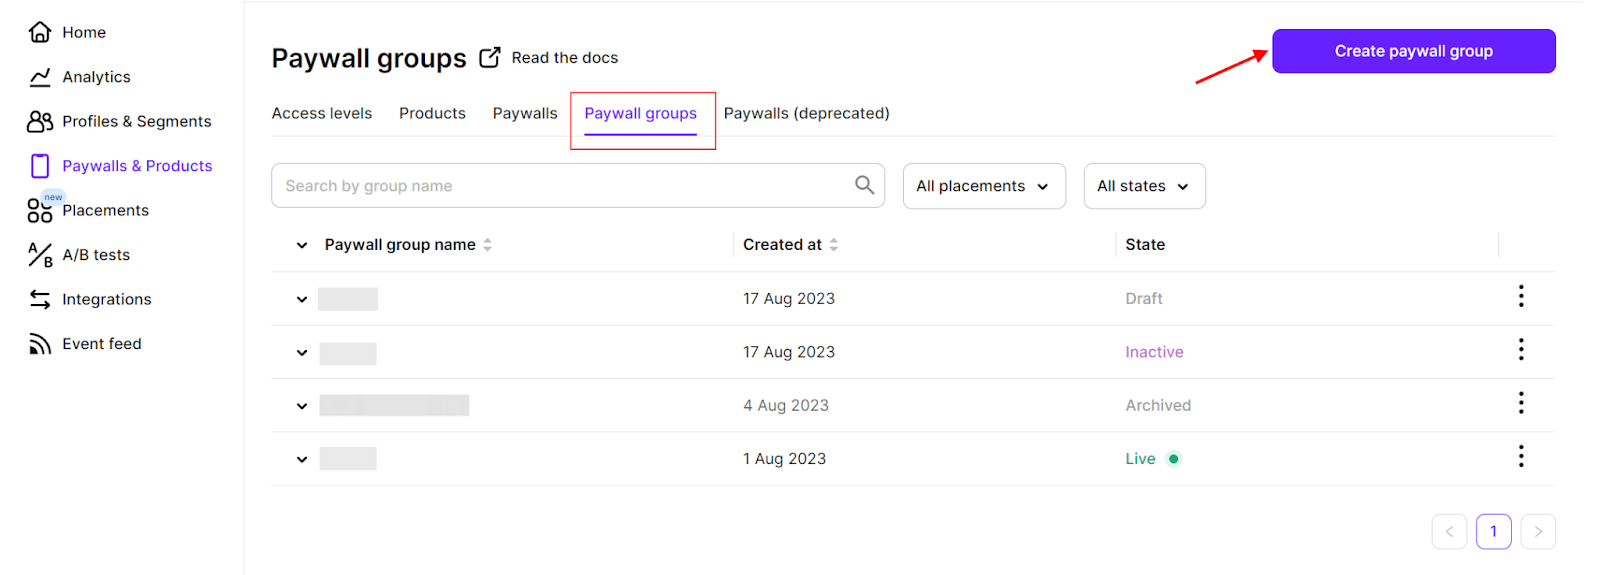
In the window opened, fill in the name of the group and add the two prepared paywalls – the original and the copy. Click Save, when you’re done.
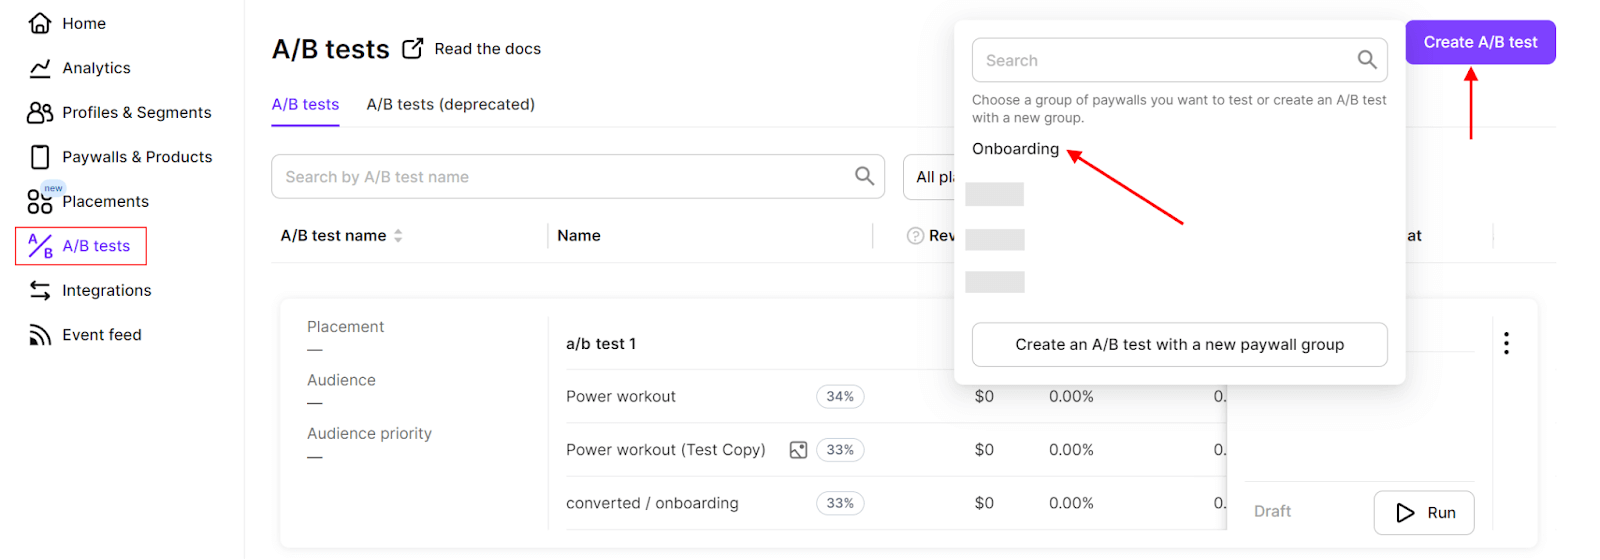
Now it’s time to set up the test, so go to the A/B tests panel in the left-side menu, click Create A/B test and choose the paywall group you’ve just created.
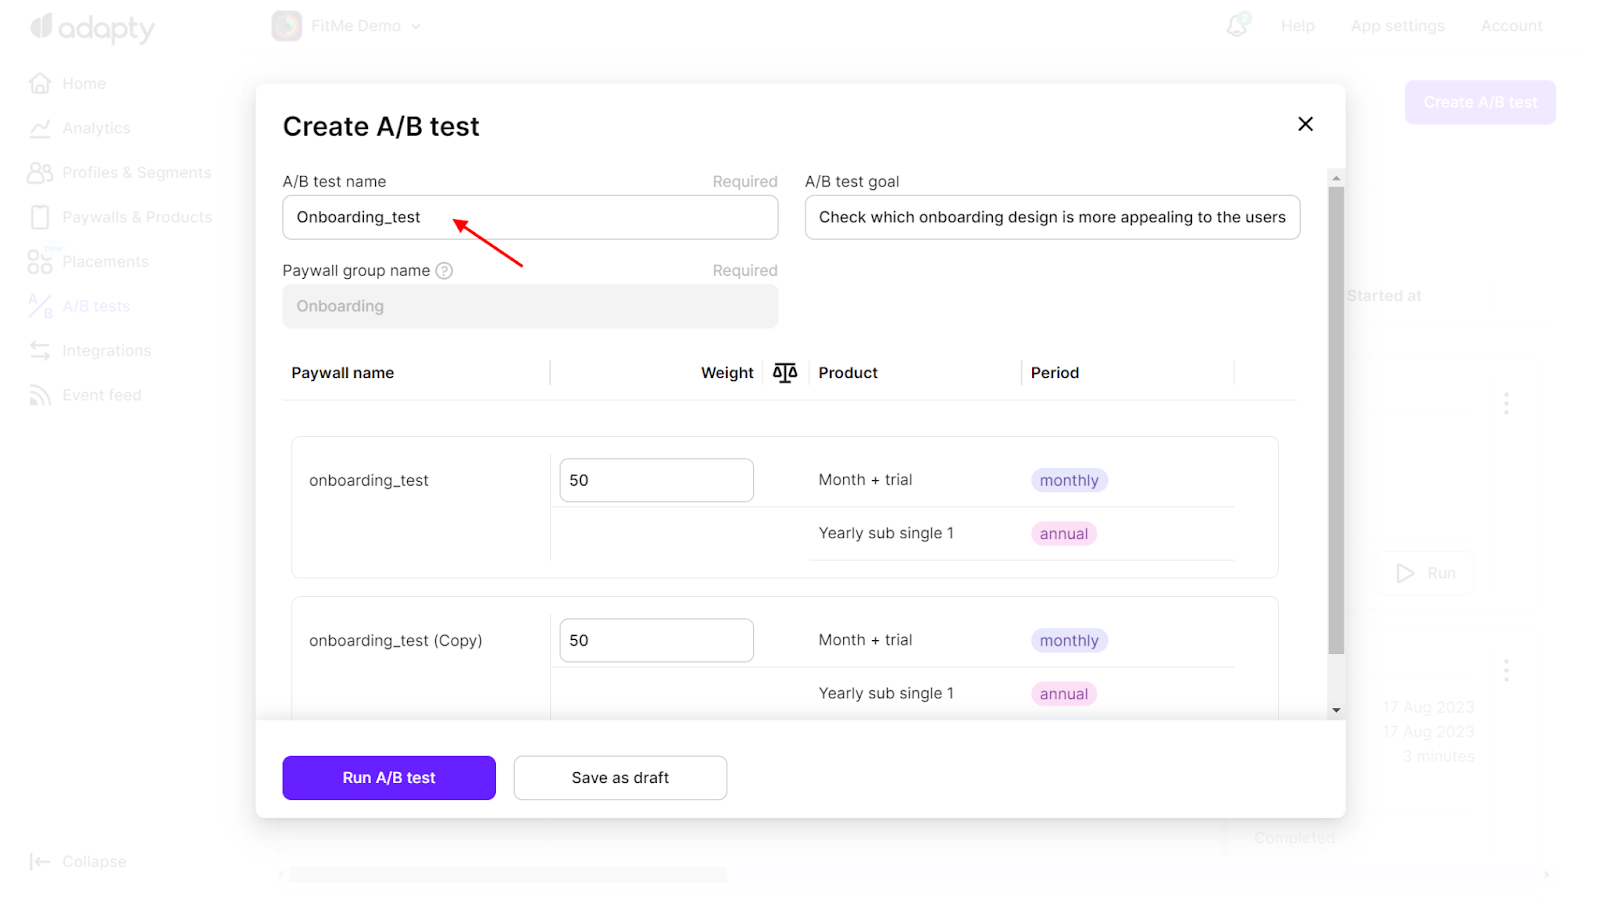
Give your test a name and, optionally, set the goal for the test in the corresponding field. Set the weight ratio and hit Run A/B test.
Conclusion
It’s just one way of running onboarding tests with the remote config, but it’s possible to alter and improve these steps if you spend some creative time on it. Adapty shows that creating and testing onboarding can be easy and may drastically affect your app’s economy. It may be worth it to go even further and test ad creatives and store page screenshots along with the onboarding, but it’s a much more complex task. The goal of this article is to show the process of setting up and running A/B tests with mobile app onboarding in Adapty, so if you also want to get a few tips and best practices on how to approach the design part, check out this article.