The guide to iOS in-app purchases: Build apps with StoreKit 2
TL;DR:
This is the most up-to-date, end-to-end guide to building in-app purchases (IAPs) on iOS using StoreKit 2 — covering everything Apple shipped through WWDC 2025 and iOS 18.4: SwiftUI StoreKit views, win-back offers, Streamlined Purchasing, the App Store Server Library, and the new transaction fields you need to know about.
Want to monetize your iOS app with subscriptions or one-time purchases? This is the most up-to-date, end-to-end guide to building in-app purchases (IAPs) on iOS using StoreKit 2 — covering everything Apple shipped through WWDC 2025 and iOS 18.4: SwiftUI StoreKit views, win-back offers, Streamlined Purchasing, the App Store Server Library, and the new transaction fields you need to know about.
Whether you're shipping your first paid feature or migrating from StoreKit 1 (now formally deprecated as of iOS 18), this tutorial walks you through the App Store Connect setup, all four IAP types, modern SwiftUI paywalls, sandbox and TestFlight testing, refunds, server-side validation, and the App Store commission rules that apply in 2026.
iOS in-app purchases at a glance
Before we dive in, here's the quick context that answers the three questions everyone searches for:
How do in-app purchases work on iOS? Your app uses Apple's StoreKit framework to fetch product metadata from the App Store, present a purchase to the user, and verify the resulting transaction. Apple processes the payment, takes a commission (15% or 30% depending on your program), and credits the rest to your developer account. Your app then unlocks the corresponding feature.
How do I make in-app purchases on iOS? Three high-level steps: (1) configure your products in App Store Connect, (2) add the In-App Purchase capability to your Xcode project and integrate StoreKit 2, (3) test with a local .storekit file and the App Store sandbox before submitting for review.
How do I set up in-app purchases? Sign the Paid Apps Agreement, create your products under Monetization → In-App Purchases or Monetization → Subscriptions in App Store Connect, generate an In-App Purchase Key, and link the products to your bundle identifier in Xcode. Detailed walkthrough below.
The four types of in-app purchases
Pick the right type before you write any code — switching later requires creating new products in App Store Connect.
| Type | Best for | Family Sharing | Where it's stored |
| Consumable | Currency, lives, boosts, credits | No | Transaction.all with the iOS 18 plist key (see below) |
| Non-consumable | Permanent unlocks, ad removal, premium tier | Yes | Transaction.currentEntitlements |
| Auto-renewable subscription | SaaS apps, content libraries, streaming | Yes | Transaction.currentEntitlements + renewal info |
| Non-renewing subscription | Season passes, time-boxed courses | No | Custom logic — track expiration yourself |
Apple permits in-app purchases only for digital goods and services. Physical products must use a separate payment processor outside the app.
Prerequisites and version matrix
The minimum stack you need:
- Xcode 16 or later (Xcode 26 recommended for the latest StoreKit features)
- iOS 16+ deployment target — the absolute minimum for StoreKit 2's modern Swift APIs
- An active Apple Developer Program membership ($99/year)
- The Paid Applications Agreement signed in App Store Connect
- SwiftUI familiarity
Some features are version-gated. Plan your deployment target accordingly:
| Feature | Minimum iOS version |
StoreKit 2 core APIs (Product, Transaction) | iOS 15 |
StoreKit views (SubscriptionStoreView, ProductView, StoreView) | iOS 17 |
SubscriptionOptionGroup and grouped subscription tiers | iOS 18 |
| Win-back offers | iOS 18 |
Streamlined Purchasing and PurchaseIntent.offer | iOS 18 |
| Purchase methods with UI context | iOS 18.2 |
appTransactionID and originalPlatform | iOS 18.4 (back-deployed to iOS 15) |
| Offer codes for consumables, non-consumables, non-renewing subs | iOS 18.4 (back-deployed to iOS 16.3) |
StoreKit 1 is now deprecated — what that means for you
At WWDC 2024, Apple finished deprecating the original StoreKit 1 APIs (SKProductsRequest, SKPaymentQueue, the verifyReceipt endpoint, and the rest), formally renaming them "original API for in-app purchase". The verifyReceipt endpoint was deprecated a year earlier. They still work for now, but new features ship only on StoreKit 2, and Apple expects everyone to migrate.
This tutorial uses StoreKit 2 throughout. If you're maintaining a legacy codebase still on StoreKit 1, this is the year to migrate. The Adapty iOS SDK handles both transparently if you'd rather not rewrite the integration yourself.
Two paths to in-app purchases
There are two reasonable architectures in 2026:
- Path A — StoreKit views (recommended for most apps). Apple's SwiftUI views handle product fetching, eligibility checks, restore button, upgrades, and downgrades for you. You can ship a working paywall in a handful of lines.
- Path B — Custom UI on top of StoreKit 2. Use
Product,Transaction, andProduct.purchase()directly when you need full control over the paywall layout, A/B testing, or non-standard flows.
We'll cover Path A first because it's faster and ships sooner. Then we'll go through Path B in depth so you understand what's happening underneath — and so you can build custom paywalls when StoreKit views aren't flexible enough.
Path A: build a paywall with StoreKit views
Introduced at WWDC 2023 and refined at WWDC 2024 and 2025, StoreKit views are SwiftUI views that handle the entire purchase UI for you. Three views matter:
StoreView— a list of products by ID, intended for stores with multiple offerings.ProductView— a single product, useful for inline upsells.SubscriptionStoreView— a full subscription paywall for one subscription group, complete with picker, CTA, terms text, and restore button.
The simplest possible paywall
This is a complete, working subscription paywall:
import StoreKit
import SwiftUI

struct PaywallView: View {
var body: some View {
SubscriptionStoreView(groupID: "21465536")
}
}Pass the subscription group ID from App Store Connect (it looks like a numeric string), and StoreKit will fetch the products, render the picker, handle eligibility for introductory offers, show the renewal terms, and present the system payment sheet on tap. Restore Purchases works automatically.
Adding marketing content and styling
The default look is plain. In production, you'll want a hero image, value props, and brand styling. SubscriptionStoreView takes a ViewBuilder closure for marketing content above the picker:
SubscriptionStoreView(groupID: "21465536") {
VStack(spacing: 16) {
Image("paywall-hero")
.resizable()
.scaledToFit()
.frame(height: 180)

Text("Premium membership")
.font(.largeTitle.bold())

FeatureRow(icon: "checkmark.circle.fill", text: "Unlimited content")
FeatureRow(icon: "checkmark.circle.fill", text: "Offline downloads")
FeatureRow(icon: "checkmark.circle.fill", text: "No ads, ever")
}
.padding()
}
.subscriptionStoreControlStyle(.prominentPicker)
.subscriptionStoreButtonLabel(.multiline)
.storeButton(.visible, for: .restorePurchases)
.storeButton(.visible, for: .policies)
.containerBackground(.thinMaterial, for: .subscriptionStoreFullHeight)Each modifier serves a purpose: subscriptionStoreControlStyle swaps between picker, buttons, and prominent picker; subscriptionStoreButtonLabel(.multiline) shows the renewal price under the CTA; storeButton(.visible, for: .restorePurchases) displays the Restore button (required by App Review Guideline 3.1.1); containerBackground styles the view's background. storeButton(.visible, for: .policies) exposes the standard Terms and Privacy links — also required by review.
Reacting to subscription status with SwiftUI
Use subscriptionStatusTask to gate premium content reactively. The view automatically refreshes whenever the subscription state changes:
struct ContentView: View {
@State private var hasPremium = false

var body: some View {
Group {
if hasPremium {
PremiumContentView()
} else {
PaywallView()
}
}
.subscriptionStatusTask(for: "21465536") { state in
switch state {
case .success(let statuses):
hasPremium = statuses.contains { status in
status.state == .subscribed || status.state == .inGracePeriod
}
case .failure, .loading:
hasPremium = false
@unknown default:
hasPremium = false
}
}
}
}For non-subscription products, use currentEntitlementTask(for:) with a product ID to get the same reactive behavior on a single non-consumable.
Subscription tiers with SubscriptionOptionGroup
If you sell two or more tiers (Basic, Pro, Premium), iOS 18 introduced grouped picker UI:
SubscriptionStoreView(groupID: "21465536") {
MarketingView()
}
.subscriptionStorePickerItemBackground(.thinMaterial)
.subscriptionStoreControlStyle(.pagedProminentPicker)Combined with App Store Connect's tiered subscription configuration, this renders a clean tab-style layout where users can switch between tiers before subscribing.
Handling purchase events
By default, completed purchases flow through Transaction.updates (we'll cover this in Path B). If you want to react inline, attach onInAppPurchaseCompletion:
SubscriptionStoreView(groupID: "21465536")
.onInAppPurchaseCompletion { product, result in
switch result {
case .success(.success(let verification)):
await handleVerifiedTransaction(verification)
case .success(.userCancelled), .success(.pending):
break
case .failure(let error):
print("Purchase failed: \\(error)")
@unknown default:
break
}
}Path A covers most production use cases. If you need a custom-designed paywall — pixel-perfect to your brand, with bespoke A/B test variants, or running advanced flows like fallback paywalls and remote configuration — go to Path B, or use a paywall infrastructure like Adapty's Paywall Builder that combines StoreKit 2 with no-code paywall design.
Path B: custom integration with StoreKit 2
For full control, you'll work directly with StoreKit 2's Product, Transaction, and Product.purchase() APIs. The rest of this tutorial walks through building a complete custom store from scratch — useful both as a reference implementation and as background for what StoreKit views do under the hood.
Download the starter project from our GitHub repository. It includes pre-built UI components for a sample store with all four IAP types.
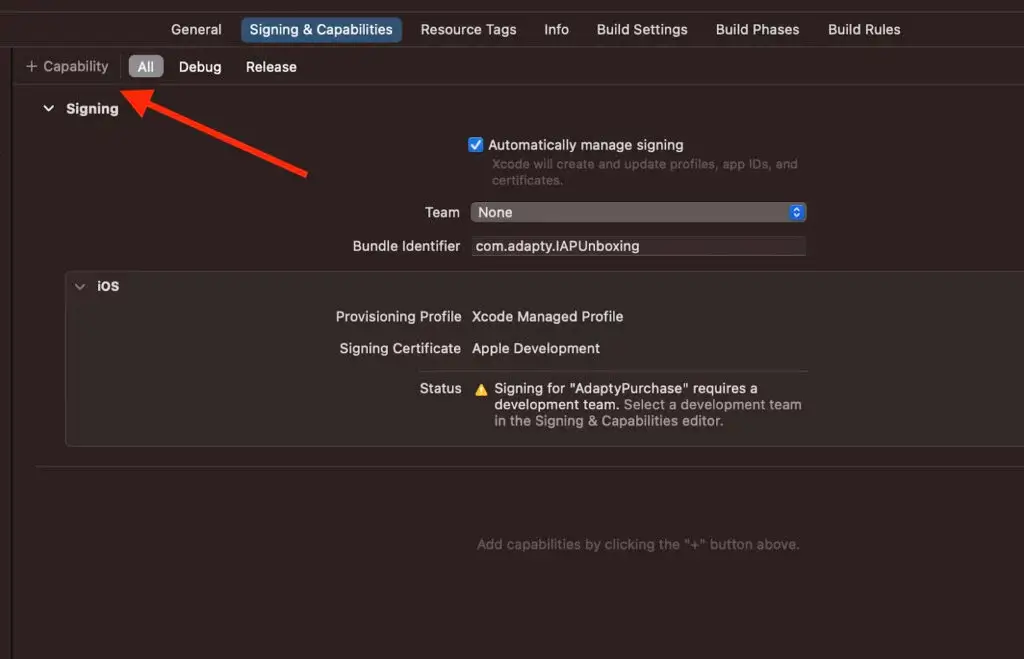
Step 1. Configure your Xcode project
- Sign in to App Store Connect through Xcode's account preferences.
- Open the project, select the target, and switch to "Signing & Capabilities".
- Pick your development team and set a unique bundle identifier.
- Click "+ Capability" and add "In-App Purchase".
This wires your app to Apple's IAP services in both development and production.
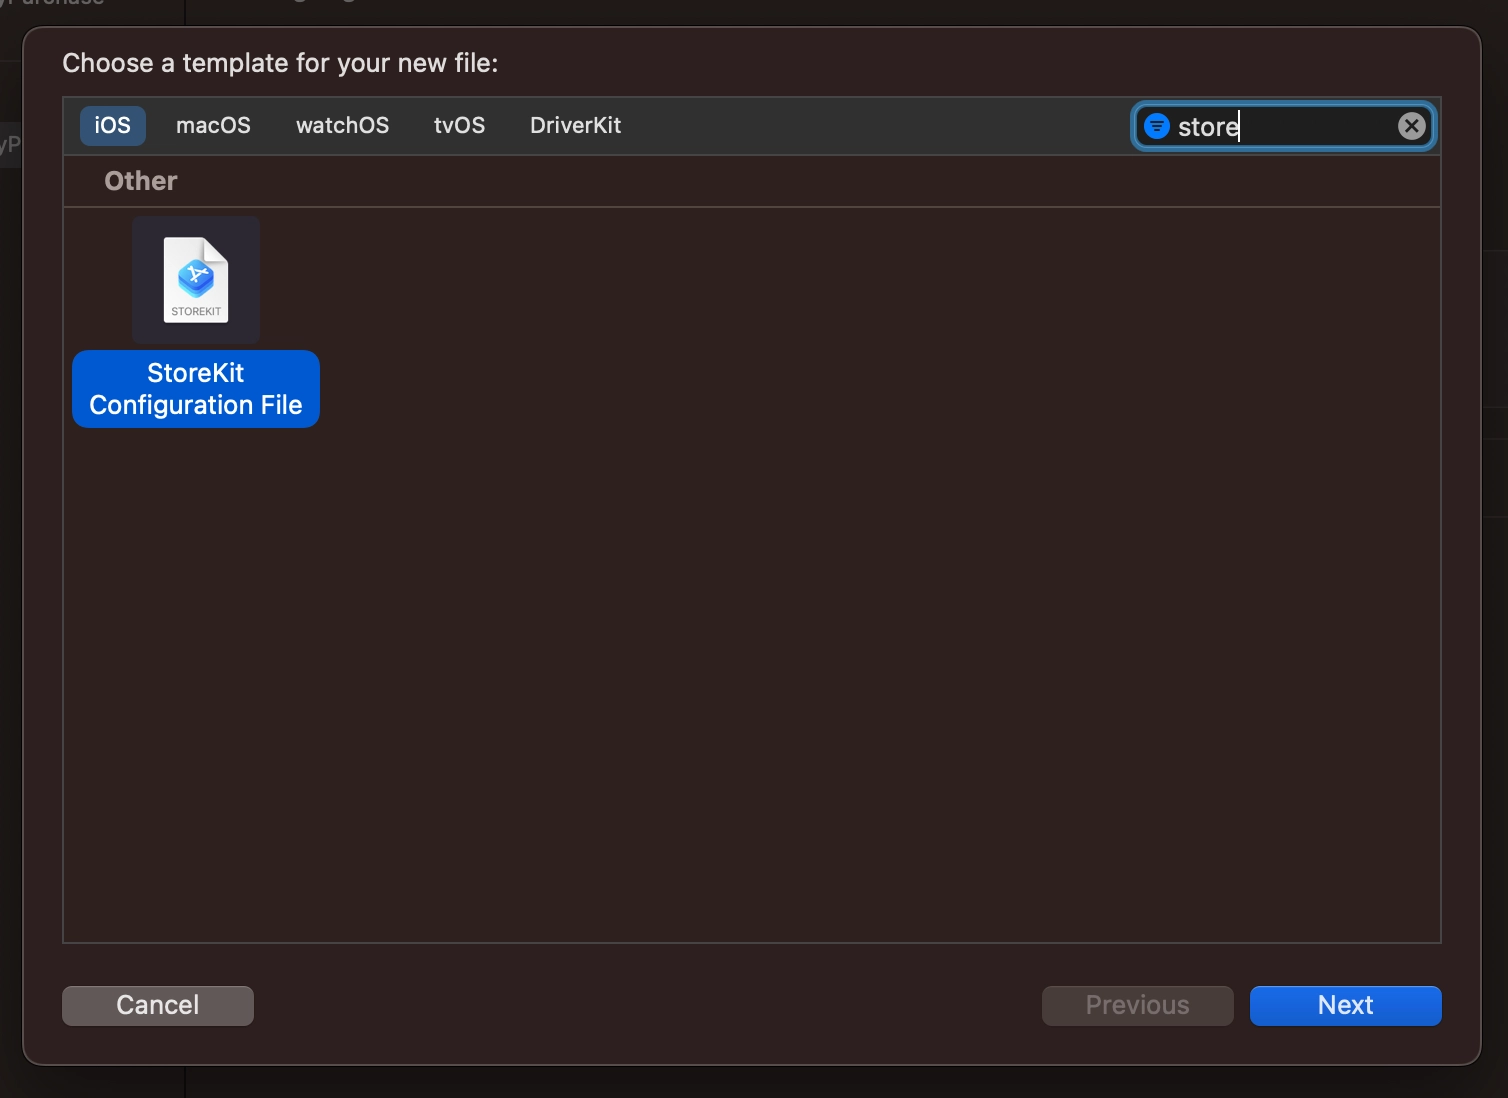
Step 2. Create a local .storekit configuration file
A .storekit file lets you define products locally and test without ever touching App Store Connect. It runs offline, and Xcode treats it as the data source for IAPs at runtime when selected in the run scheme.
- In Xcode: File → New → File from Template (⌘N), search for "StoreKit Configuration File".
- Name it
Productsand leave "Sync this file with an app in App Store Connect" unchecked for now. - Open the file, click "+", and add a non-consumable. Set the reference name to "Stone", product ID to "stone", price to $0.99, and the display name in localization to "Indestructible Stone".
To activate the file at runtime, click the scheme name in the toolbar, choose "Edit Scheme", and on the "Options" tab of the "Run" action select Products.storekit for the StoreKit Configuration field.
Step 3. Fetch and display products
Open Store.swift and write the product loader:
import StoreKit

@MainActor
final class Store: ObservableObject {
private let productIDs = ["stone"]

@Published var products = [Product]()

init() {
Task { await requestProducts() }
}

func requestProducts() async {
do {
products = try await Product.products(for: productIDs)
} catch {
print("Failed to load products: \\(error)")
}
}
}A few notes on the structure. Product.products(for:) is async because in production it makes a network call to the App Store. Marking Store as @MainActor guarantees that @Published updates happen on the main thread, so SwiftUI re-renders correctly. The products call can throw an SKError for any of 21 reasons — see our guide on handling StoreKit error codes for production-ready error handling.
Now display the products in ContentView.swift:
Section(header: Text("To buy")) {
ForEach(store.products, id: \\.id) { product in
HStack {
Text(product.displayName)
Spacer()
Button(product.displayPrice) {
Task {
try? await store.purchase(product)
}
}
}
}
}Use displayName and displayPrice for anything user-facing — they're already localized to the user's storefront. The raw price property is a Decimal for calculations only.
Step 4. Implement the purchase flow
Add the purchase method to Store:
@Published var purchasedNonConsumables = Set<Product>()

func purchase(_ product: Product) async throws -> Transaction? {
let result = try await product.purchase()

switch result {
case .success(let verification):
let transaction = try checkVerified(verification)
await handle(transaction: transaction)
await transaction.finish()
return transaction
case .userCancelled, .pending:
return nil
@unknown default:
return nil
}
}

private func checkVerified<T>(_ result: VerificationResult<T>) throws -> T {
switch result {
case .verified(let value):
return value
case .unverified(_, let error):
throw error
}
}StoreKit 2 verifies transactions automatically using JWS signatures from Apple — that's what VerificationResult represents. Always call finish() after delivering content. For consumables especially, an unfinished transaction will be redelivered on every app launch.
iOS 18.2+: purchase methods with UI context
Starting with iOS 18.2, Product.purchase() has overloads that accept a UI context (a UIViewController on iOS, an NSWindow on macOS) so the system can place the payment sheet in the correct scene on multitasking devices like iPad and Vision Pro:
let result = try await product.purchase(
confirmIn: presentingViewController
)From a SwiftUI view, read the purchase environment value and use the PurchaseAction instance — the system handles UI context for you.
Step 5. Listen for transaction updates
You'll see a Xcode warning if you skip transaction observation. Transactions can arrive outside your purchase call — Ask to Buy approvals, Family Sharing changes, refunds, and subscription renewals all dispatch through Transaction.updates. Listen continuously:
private var transactionListener: Task<Void, Error>?

init() {
transactionListener = listenForTransactions()
Task {
await requestProducts()
await updateCurrentEntitlements()
}
}

private func listenForTransactions() -> Task<Void, Error> {
Task.detached { [weak self] in
for await result in Transaction.updates {
guard let self else { return }
do {
let transaction = try await self.checkVerified(result)
await self.handle(transaction: transaction)
await transaction.finish()
} catch {
print("Transaction failed verification: \\(error)")
}
}
}
}

private func updateCurrentEntitlements() async {
for await result in Transaction.currentEntitlements {
if case .verified(let transaction) = result {
await handle(transaction: transaction)
}
}
}

@MainActor
private func handle(transaction: Transaction) async {
guard !transaction.isUpgraded else { return }

guard let product = products.first(where: { $0.id == transaction.productID }) else {
return
}

switch product.type {
case .consumable:
// See iOS 18 update below
break
case .nonConsumable:
purchasedNonConsumables.insert(product)
case .autoRenewable:
purchasedSubscriptions.insert(product)
case .nonRenewable:
if let expiration = nonRenewableExpiration(for: transaction),
Date.now <= expiration {
purchasedNonRenewables.insert(product)
}
default:
break
}
}The guard !transaction.isUpgraded line is critical: when a user upgrades from Basic to Pro, both transactions appear in currentEntitlements, but the older one has isUpgraded == true. Filter it out so users see only their current tier.
Step 6. Persist consumables (with the iOS 18 update)
This used to be the trickiest part of StoreKit. Until iOS 18, finished consumable transactions were purged from Transaction.currentEntitlements and Transaction.all, so you had to mirror them to your own storage to restore counts after the user reinstalled or switched devices.
iOS 18 changed this. Add the following key to Info.plist:
<key>SKIncludeConsumableInAppPurchaseHistory</key>
<true/>With this flag set, finished consumable transactions are now retained in Transaction.all, and you can iterate them at launch:
private func loadConsumablesHistory() async {
var totalCount = 0
for await result in Transaction.all where result.unsafePayloadValue.productType == .consumable {
if case .verified = result {
totalCount += 1
}
}
self.consumableCount = totalCount
}For apps targeting iOS 17 or earlier, you still need the old approach — store a count in UserDefaults (or, better, on your server) and increment it on each verified consumable transaction. Server-side tracking is preferable for any app that handles real money: it's resistant to local storage tampering and works across devices automatically.
Step 7. Handle non-renewing subscriptions
Non-renewing subscriptions don't have an expiration date in StoreKit — Apple treats them as one-time purchases that you, the developer, are responsible for time-bounding. Track expiration in your own model, computed from transaction.purchaseDate plus your defined duration:
private func nonRenewableExpiration(for transaction: Transaction) -> Date? {
// For a 30-day pass:
Calendar.current.date(byAdding: .day, value: 30, to: transaction.purchaseDate)
}For anything more complex than a fixed duration, persist the entitlement on your server with the user's account.
Step 8. Handle auto-renewable subscriptions
Add a property for active subscriptions:
@Published var purchasedSubscriptions = Set<Product>()And insert into it in your handle(transaction:) for the .autoRenewable case (already shown above). The isUpgraded guard takes care of the upgrade scenario.
To know whether a subscription is in trial, in grace period, or in billing retry, use Product.SubscriptionInfo.RenewalState:
for await result in product.subscription?.statusTask ?? .init() {
switch result.state {
case .subscribed: // Active, paying
unlockPremium()
case .inGracePeriod: // Billing failed, grace period active
unlockPremium()
promptUpdatePaymentMethod()
case .inBillingRetryPeriod: // Failed renewal, no grace period
promptUpdatePaymentMethod()
case .expired, .revoked:
lockPremium()
@unknown default:
break
}
}Distinguishing grace periods from billing retry is the difference between keeping a paying customer and silently churning them.
Step 9. Configure products in App Store Connect
Local .storekit testing is great, but for TestFlight, sandbox, and production you need real products in App Store Connect. The dashboard layout was reorganized at WWDC 2024 — IAPs and subscriptions now live under Monetization in the app sidebar.
Create the app record
- Sign in to App Store Connect, accept any pending agreements.
- Click "+" on the My Apps page and choose "New App".
- Pick the iOS platform and the bundle ID you set in Xcode. Fill the rest of the metadata.
Register a consumable or non-consumable
- From Monetization → In-App Purchases, click "Create".
- Choose the type (Consumable or Non-Consumable), set the reference name and product ID, and click "Create".
- Configure availability (regions), set a price tier, add localization with display name and description, and save.
Register an auto-renewable subscription
Subscriptions live in groups. Users can be subscribed to only one product per group at a time, which is how upgrades and downgrades are handled.
- From Monetization → Subscriptions, click "+" next to "Subscription Groups" and create a group (e.g. "Membership").
- Inside the group, click "Create" and add subscription tiers. Set product IDs (
membership.basic,membership.pro), durations, prices, and localization. - Order the tiers in the group from highest service level to lowest, top to bottom. Apple uses this order for the upgrade/downgrade prorating logic.
For the full App Store Connect walkthrough, including tax categories, server URLs, and analytics, see our App Store Connect guide.
Step 10. Sync your .storekit file with App Store Connect
Once products exist in App Store Connect, create a synced .storekit file so Xcode pulls real metadata for testing:
- Create another StoreKit Configuration File, name it
SyncedProducts, and tick "Sync this file with an app in App Store Connect". - Pick your team and the app you just created.
- Switch the run scheme to use
SyncedProducts.storekit. - If you change products in App Store Connect, open the synced file in Xcode and tap the refresh icon in the bottom-left corner to re-sync.
Win-back offers: re-engage churned subscribers
Win-back offers (introduced at WWDC 2024, iOS 18) target users who previously subscribed and have since churned. They appear on the App Store's Subscriptions page, on your product page, and can be triggered programmatically inside your app. Apple handles the eligibility check entirely — you configure who qualifies.
Configure a win-back offer in App Store Connect
- Open your subscription product in App Store Connect.
- Scroll to "Win-Back Offers" and click "Create Offer".
- Choose pay-as-you-go, pay-up-front, or free trial, and set the duration and discount.
- Configure eligibility: how long the user must have been churned, whether they previously took an introductory offer, and minimum past spend.
- Optionally set an offer end date and an offer priority that affects how aggressively Apple promotes it.
Present a win-back offer in your app
Three ways to surface the offer:
1. Automatic via StoreKit Message API. Add a transaction observer for messages and StoreKit will display the offer sheet itself when the user is eligible — zero additional code:
.task {
for await message in Message.messages {
try? await message.display(in: scene)
}
}2. Via StoreKit views. SubscriptionStoreView automatically picks up eligible win-back offers and renders them. You can use preferredSubscriptionOffer on iOS 18.2+ to control which offer is shown when multiple are eligible.
3. Custom flow. Query eligible offers from Product.subscription, then pass the offer to purchase(options:):
guard let subscription = product.subscription,
let winBack = try await subscription.eligibleWinBackOffers().first else {
return
}

let result = try await product.purchase(options: [
.winBackOffer(winBack)
])Test win-back offers
The StoreKit Configuration file editor in Xcode 16+ supports win-back offers. Add the offer in your .storekit file, configure eligibility, and use the Transaction Manager to simulate cancellations and check eligibility states.
Streamlined Purchasing: completing purchases on the App Store
Streamlined Purchasing (iOS 18) lets users complete a subscription purchase directly on the App Store product page without opening your app — including for win-back offers and contingent pricing. It's enabled by default for every app.
You should keep it on unless you require something inside your app before purchase, such as account creation or sign-in. To turn it off, go to App Store Connect → your app → Subscriptions → Streamlined Purchasing. Apple requires your latest approved binary to include the PurchaseIntent API before you can disable Streamlined Purchasing.
Handle PurchaseIntent when Streamlined Purchasing is off
When disabled, the App Store sends the purchase to your app via PurchaseIntent. Listen for it on launch and surface your custom flow:
.task {
for await intent in PurchaseIntent.intents {
// Run your custom flow first (sign-in, eligibility check)
await ensureUserSignedIn()

// iOS 18+: PurchaseIntent now includes an optional offer
var options: Set<Product.PurchaseOption> = []
if let offer = intent.offer, offer.type == .winBack {
options.insert(.winBackOffer(offer))
}

try? await intent.product.purchase(options: options)
}
}The intent.offer property surfaces the offer the user tapped on the App Store, so you can apply the correct purchase option.
Promotional offers and offer codes
You have four offer mechanisms to combine:
- Introductory offers — first-time subscribers, configured per subscription. Pay-as-you-go, pay-up-front, or free trial.
- Promotional offers — for existing or lapsed subscribers, redeemed in-app via a signed JWS request.
- Offer codes — alphanumeric codes you generate in batches and distribute via email or marketing channels. As of iOS 18.4, offer codes work for consumables, non-consumables, and non-renewing subscriptions, not just auto-renewable subs.
- Win-back offers — covered above.
Sign promotional offers with the App Store Server Library (iOS 18.4+)
Apple introduced JWS-signed offers in iOS 18.4. Instead of constructing offer signatures manually with HMAC-SHA-256, generate a compact JWS string on your server using the App Store Server Library, then pass it to purchase:
let signedOffer = try await myBackend.signPromotionalOffer(
productID: product.id,
offerID: "winter-50-off",
accountToken: userUUID
)

let result = try await product.purchase(options: [
.promotionalOffer(compactJWS: signedOffer)
])For introductory offer eligibility, the new introductoryOfferEligibility purchase option lets your server explicitly mark a user as eligible (or not) — useful when you have richer customer data than Apple does.
Surface the offer code redemption sheet
Add a "Redeem Code" entry point in your settings or paywall:
@State private var isOfferCodeRedemptionPresented = false

Button("Redeem code") {
isOfferCodeRedemptionPresented = true
}
.offerCodeRedemption(isPresented: $isOfferCodeRedemptionPresented) { result in
if case .failure(let error) = result {
print("Redemption failed: \\(error)")
}
}Restore Purchases
StoreKit 2 keeps entitlements current automatically, but App Review Guideline 3.1.1 still requires a visible Restore Purchases button for any restorable IAPs.
@MainActor
func restore() async throws {
try await AppStore.sync()
}If you use SubscriptionStoreView, the Restore button is provided for you via storeButton(.visible, for: .restorePurchases). AppStore.sync() forces a fresh fetch from Apple, which is mostly useful when users suspect a sync issue.
Refunds and customer support
Subscription management screen
Surface Apple's native subscription management UI from your settings:
@State private var isManageSubscriptionsSheetPresented = false

Button("Manage subscription") {
isManageSubscriptionsSheetPresented = true
}
.manageSubscriptionsSheet(isPresented: $isManageSubscriptionsSheetPresented)Refund request flow
Apple lets users request refunds inside your app. Pick a transaction ID and present the refund sheet:
@State private var selectedTransactionID: UInt64?
@State private var isRefundRequestPresented = false

.refundRequestSheet(
for: selectedTransactionID ?? 0,
isPresented: $isRefundRequestPresented
) { result in
if case .success(.success) = result {
// Refund issued — revoke entitlement
}
}Consumption API
For consumable refund requests, Apple sends your server a CONSUMPTION_REQUEST notification. Respond within 12 hours via the App Store Server API's Send Consumption Information endpoint with details Apple uses to inform the refund decision: account tenure, lifetime spend, refund history, whether content was delivered, etc. Apps that respond with rich consumption data report meaningfully better refund denial rates.
Server-side architecture for production
For any app handling real revenue, server-side validation is non-negotiable. Three building blocks matter, all updated significantly across 2024 and 2025.
App Store Server API
Twelve REST endpoints replace the deprecated verifyReceipt:
- Get Transaction Info, Get All Subscription Statuses, Get Transaction History V2 — query subscription state and transaction details.
- Look Up Order ID — match a customer-provided order ID to the original transaction. Useful for support: ask the user for the Order ID from their Apple email receipt and confirm what they actually bought.
- Send Consumption Information — respond to consumable refund requests.
- Extend Subscription Renewal Date — gift extra time to users (great for service outages).
- Request a Test Notification — verify your notification endpoint is reachable.
All endpoints are authenticated with a JWT signed by an In-App Purchase Key generated in App Store Connect. Don't roll your own JWT handling — use the Server Library.
App Store Server Notifications V2
Configure a server URL for notifications and Apple will POST a JWS-signed event payload whenever something happens to a subscription or transaction: SUBSCRIBED, DID_RENEW, EXPIRED, GRACE_PERIOD_EXPIRED, REFUND, and the newer ONE_TIME_CHARGE for non-subscription purchases. This is how your server stays in sync with what's happening on the App Store side.
App Store Server Library
Apple maintains an open-source library that handles JWT signing, payload verification, and request marshaling for you in Java, Python, Node.js, and Swift. Use it instead of writing JWS handling yourself:
// Swift example
import AppStoreServerLibrary

let client = try AppStoreServerAPIClient(
signingKey: privateKeyPEM,
keyId: "YOUR_KEY_ID",
issuerId: "YOUR_ISSUER_ID",
bundleId: "com.example.app",
environment: .production
)

let info = try await client.getTransactionInfo(transactionId: "1234567890")For a deeper walkthrough of receipt validation and server-side flows, see our guide on implementing server-side Apple receipt validation.
New transaction fields you should know about (iOS 18.4)
Three iOS 18.4 additions are worth integrating right away:
appTransactionID
A globally unique identifier per Apple Account that downloads your app. Stable across reinstalls, distinct for each member of a Family Sharing group. Use it for accurate per-user analytics without server-to-server lookups. Back-deployed to iOS 15:
let result = try await AppTransaction.shared
if case .verified(let appTransaction) = result {
let id = appTransaction.appTransactionID
let originalPlatform = appTransaction.originalPlatform
// originalPlatform: .iOS, .macOS, .tvOS, .visionOS, etc.
}originalPlatform
The platform where the customer originally downloaded your app. Useful when you're rethinking entitlements per platform, or migrating a paid-app business to freemium and want to know who's grandfathered in.
currency and price on Transaction
iOS 18 added currency and price directly on the Transaction model, so you no longer need to look up the matching Product just to know what the user paid. Critical for revenue analytics across multiple storefronts.
Best practices for in-app purchases
A short, opinionated list:
- Let users experience your app before paywalling. Hard paywalls have their place but are usually outperformed by a soft paywall after the user sees the value.
- Use the system payment sheet, never replicate it. Reviewers reject apps that try to mimic Apple's sheet, and users distrust unfamiliar checkout UI.
- Always show the total billing price. "$9.99/month" is fine; "$0.33/day" alone isn't — App Review will flag it.
- Hide the store when payments are disallowed. Check
AppStore.canMakePaymentsand show an explanation instead of an inert price button. - Use server-side notifications and validation in production. Client-only entitlement tracking fails at scale: refunds, family sharing changes, billing retries, and grace periods are all easier to handle on the server.
- Keep paywalls remotely configurable. Hardcoding products and copy means a binary release for every price test. A subscription infrastructure layer (Apple's StoreKit views, or a third-party tool) decouples paywall logic from app releases.
- Plan for fallbacks. If your backend or paywall config is down, the user shouldn't see a blank screen. Cache the last known paywall and show it.
- Handle Family Sharing. Auto-renewable subscriptions and non-consumables can be shared across up to five family members. Toggle
familyShareableper product in App Store Connect.
Testing strategies
You have four testing surfaces, each with a purpose:
| Surface | When to use | Network required |
| .storekit file in Xcode | Daily development, unit tests, refund and renewal simulation | No |
| Sandbox | End-to-end App Store flow, server notifications, multi-device | Yes |
| TestFlight | Real users, beta testing, accelerated subscription renewals | Yes |
| Production | After App Review approval | Yes |
The Xcode StoreKit Configuration editor (Xcode 16 and later) lets you simulate billing failures, ask-to-buy scenarios, win-back offers, and purchase intents. The Transaction Manager pane is your friend — use it to send purchase intents into the app, simulate refunds, and toggle billing retry states.
For sandbox: subscription renewals are accelerated (a 1-month subscription renews every 5 minutes, capped at 6 renewals before auto-cancel). Manage sandbox accounts under App Store Connect → Users and Access → Sandbox Testers, and clear test purchase history per sandbox account when needed.
For deeper testing patterns, see our guide on testing iOS in-app purchases in Xcode and sandbox.
App Store commission rates in 2026
What Apple actually takes:
- Standard commission: 30% of the sale price for the first year of a subscription, dropping to 15% for renewals starting in year two (provided the user remains continuously subscribed within the same subscription group, with up to a 60-day Retention Grace Period allowed).
- Small Business Program: 15% from day one for developers with under $1M USD in annual proceeds. Cross above $1M and the standard 30% applies for the rest of that calendar year. Re-qualify the following year if proceeds drop back below $1M. We have a full breakdown of the App Store Small Business Program with eligibility, enrollment, and accounting details.
- EU alternative business terms (DMA): 13% standard commission, dropping to 10% for Small Business Program participants and for subscriptions after the first year. A separate Core Technology Fee may apply depending on installs.
- Japan: Apple is now designated as a Specified Platform Operator. From April 2025, a 10% Japanese Consumption Tax (JCT) is collected on transactions from non-Japan-based developers. Your proceeds are adjusted accordingly.
- South Korea: From February 2025, additional consent must be obtained from users for trials and offers on auto-renewing subscriptions, after the initial transaction.
Where Adapty fits in
StoreKit 2, StoreKit views, and the App Store Server Library cover a lot of ground. What they don't give you is paywall A/B testing, no-code paywall design, web-to-app subscription flows, predictive LTV modeling, or unified analytics across iOS, Android, web, and Stripe.
Adapty is the subscription infrastructure that wraps all of this — our iOS SDK sits on top of StoreKit 2, our Paywall Builder lets you design and ship paywalls without rebuilding the app, and our analytics and predictive models give you the visibility into LTV and churn that's missing from App Store Connect alone.
If you're building anything beyond a simple one-time purchase flow — recurring revenue, multiple paywall variants, cross-platform — book a demo and we'll walk you through the platform. It's free to start.
For up-to-date subscription performance benchmarks across categories, see our latest State of In-App Subscriptions report.
What's next
If you're working across platforms, our React Native in-app purchases tutorial covers the equivalent flow for cross-platform apps. For broader monetization strategy beyond just IAPs, see our overview of freemium app monetization strategies. And for a deeper dive into StoreKit 2 internals — verification, JWS, and entitlement caching — read our StoreKit 2 API tutorial.
For everything Apple announced in their most recent developer conference, see our WWDC 2025 recap.