How to implement in-app purchases into your Flutter app

Flutter is Google’s open-source framework for building cross-platform apps from a single codebase. Since Flutter apps run on both iOS and Android, any in-app purchases implementation needs to work with both Apple’s StoreKit and Google’s Play Billing Library.
In this guide, you’ll learn everything you need to implement Flutter in-app purchases — from understanding the types of in-app products to writing the code, testing, and optimizing your monetization strategy. We’ll cover both the native approach using Flutter’s official in_app_purchase plugin and a faster path using the Adapty SDK.
Whether you’re an indie developer adding your first paywall or a team scaling subscription revenue across platforms, this tutorial has you covered.
Types of in-app purchases
Before writing any code, it’s important to understand the three types of in-app purchases available on both iOS and Android. Each type serves a different monetization purpose, and your implementation will vary depending on which ones you use.
Consumable purchases
Consumable products can be purchased, used up, and bought again. They’re depleted after use, so users need to repurchase them for continued benefits.
Common examples include in-game currency (coins, gems, credits), extra lives or attempts in games, and temporary boosts or power-ups. Apps like Candy Crush Saga and Genshin Impact rely heavily on consumable IAP to drive engagement and repeat spending.
Non-consumable purchases
Non-consumable products are one-time purchases that permanently unlock features or content. Once bought, they remain available to the user indefinitely, even across device reinstalls.
Examples include removing ads permanently, unlocking a premium photo filter pack, and accessing additional levels, characters, or content. Non-consumables are especially popular in utility and productivity apps where users pay once for lasting value.
Subscriptions
Subscriptions give users access to premium content or features for a recurring period — weekly, monthly, or annually. They can auto-renew or expire based on the user’s preference.
Spotify’s premium streaming, Headspace’s meditation content, and Strava’s training analytics are all built on subscriptions. According to the State of in-app subscriptions 2026 report, subscriptions now account for over 60% of all in-app purchase revenue, making them the dominant monetization model for mobile apps.
Flutter in-app purchase plugins compared
There are several approaches to implementing IAP in Flutter. Here’s how the most popular options compare:
| Feature | in_app_purchase | flutter_inapp_purchase | Adapty SDK |
| Maintainer | Flutter team | dooboolab | Adapty |
| Server-side validation | You build it | You build it | Built-in |
| StoreKit 2 support | Yes (default) | Limited | Yes |
| Play Billing Library 8 | In progress | No | Yes |
| No-code paywall builder | No | No | Yes |
| A/B testing | No | No | Yes |
| Subscription analytics | No | No | Yes |
| Pricing | Free | Free | Free tier + paid |
| Promo offers support | Limited | Limited | Full |
Which approach should you choose?
Choose the official in_app_purchase plugin if you want full control over your implementation and are comfortable building your own backend for receipt validation, subscription tracking, and analytics. It’s the best option for learning and for apps with simple purchase flows.
Choose Adapty if you want to ship faster with server-side validation, no-code paywalls, paywall A/B testing, and cross-platform analytics out of the box. Adapty handles the complex infrastructure — renewals, refunds, grace periods, promo offers — so you can focus on your product.
The flutter_inapp_purchase plugin offers more methods than the official plugin but has fewer maintainers and lags behind on platform updates. Unless you need specific functionality it provides, the official plugin or a managed solution is a better choice in 2026.
Prerequisites
Before you start coding, you’ll need the following in place.
Developer accounts
You need active developer accounts on both platforms.
Apple Developer Program requires an annual fee of $99 USD. You’ll use App Store Connect to create in-app purchase products, manage sandbox testers, and configure server notifications.
Google Play Developer Console requires a one-time registration fee of $25 USD. You’ll use the Google Play Console to create in-app products and subscriptions, set up license testers, and configure real-time developer notifications.
Flutter environment
Make sure you have Flutter installed (version 3.22 or later is recommended for the latest IAP plugin features). You’ll also need Android Studio or VS Code with the Flutter and Dart plugins, and a physical device for testing (emulators have limited IAP support).
Implementing IAP with the in_app_purchase plugin
Let’s start with the native approach using Flutter’s official in_app_purchase plugin. This gives you full control over the purchase flow and helps you understand how IAP works under the hood.
Adding the dependency
Add the plugin to your pubspec.yaml:
dependencies:
  flutter:
    sdk: flutter
  in_app_purchase: ^3.2.0
  in_app_purchase_storekit: ^0.3.18
in_app_purchase_android: ^0.3.6Then run:
flutter pub getInitializing the billing client
Create a service class to manage all IAP logic. This singleton pattern keeps your purchase handling centralized:
import 'dart:async';
import 'dart:io';
import 'package:in_app_purchase/in_app_purchase.dart';
import 'package:in_app_purchase_storekit/in_app_purchase_storekit.dart';

class IAPService {
  IAPService._();
  static final IAPService instance = IAPService._();

  final InAppPurchase _iap = InAppPurchase.instance;
  late StreamSubscription<List<PurchaseDetails>> _purchaseSubscription;
  List<ProductDetails> products = [];

  Future<void> initialize() async {
    final available = await _iap.isAvailable();
    if (!available) return;

    if (Platform.isIOS) {
      final iosPlatformAddition = _iap
          .getPlatformAddition<InAppPurchaseStoreKitPlatformAddition>();
      await iosPlatformAddition.setDelegate(PaymentQueueDelegate());
    }

    _purchaseSubscription = _iap.purchaseStream.listen(
      _handlePurchaseUpdates,
      onError: (error) { /* Handle stream errors */ },
    );
  }

  void dispose() { _purchaseSubscription.cancel(); }
}Fetching products
Query the stores for available products using the product IDs you created:
const Set<String> _productIds = {
  'com.yourapp.premium_monthly',
  'com.yourapp.premium_yearly',
  'com.yourapp.coins_100',
};

Future<void> fetchProducts() async {
  final ProductDetailsResponse response =
      await _iap.queryProductDetails(_productIds);
  if (response.notFoundIDs.isNotEmpty) {
    debugPrint('Products not found: \\${response.notFoundIDs}');
  }
  products = response.productDetails;
}Making a purchase
Trigger the purchase flow based on the product type:
Future<void> buyProduct(ProductDetails product,
    {bool isConsumable = false}) async {
  final PurchaseParam purchaseParam = PurchaseParam(
    productDetails: product,
  );
  if (isConsumable) {
    await _iap.buyConsumable(purchaseParam: purchaseParam);
  } else {
    await _iap.buyNonConsumable(purchaseParam: purchaseParam);
  }
}Handling purchase updates
This is where you process the result of every purchase attempt. Always complete pending purchases to avoid issues:
void _handlePurchaseUpdates(List<PurchaseDetails> list) {
  for (final pd in list) {
    switch (pd.status) {
      case PurchaseStatus.pending:
        // Show loading indicator
        break;
      case PurchaseStatus.purchased:
      case PurchaseStatus.restored:
        _verifyAndDeliverPurchase(pd);
        break;
      case PurchaseStatus.error:
        _handlePurchaseError(pd);
        break;
      case PurchaseStatus.canceled:
        break;
    }
    if (pd.pendingCompletePurchase) {
      _iap.completePurchase(pd);
    }
  }
}Verifying purchases on the server
Client-side validation alone is not secure. Always verify purchases on your backend before granting access:
Future<void> _verifyAndDeliverPurchase(PurchaseDetails purchase) async {
  final isValid = await _yourBackendApi.verifyPurchase(
    platform: Platform.isIOS ? 'ios' : 'android',
    purchaseToken: purchase.verificationData.serverVerificationData,
    productId: purchase.productID,
  );
  if (isValid) {
    _deliverProduct(purchase);
  } else {
    _handleInvalidPurchase(purchase);
  }
}For iOS, your server validates the receipt with Apple’s App Store Server API. For Android, it verifies the purchase token with the Google Play Developer API. Building and maintaining this validation infrastructure is one of the biggest challenges of the native approach.
Restoring purchases
Apple requires all apps with in-app purchases to include a “Restore Purchases” option. Without it, your app will be rejected during App Store review:
Future<void> restorePurchases() async {
  await _iap.restorePurchases();
  // Restored purchases arrive via the purchaseStream
}Add a “Restore Purchases” button on your paywall or in your app’s settings screen.
Implementing Flutter IAP with Adapty
The native approach gives you full control, but it also means building and maintaining your own server infrastructure for receipt validation, subscription management, analytics, and more. Adapty’s Flutter SDK handles all of this out of the box, letting you focus on building your app.
Here’s what Adapty handles for you: server-side purchase validation, subscription lifecycle management (renewals, cancellations, grace periods, billing retry), cross-platform analytics, no-code paywall builder, paywall A/B testing, promo and introductory offers (including win-back offers), and refund management with Refund Saver.
Setting up your Adapty project
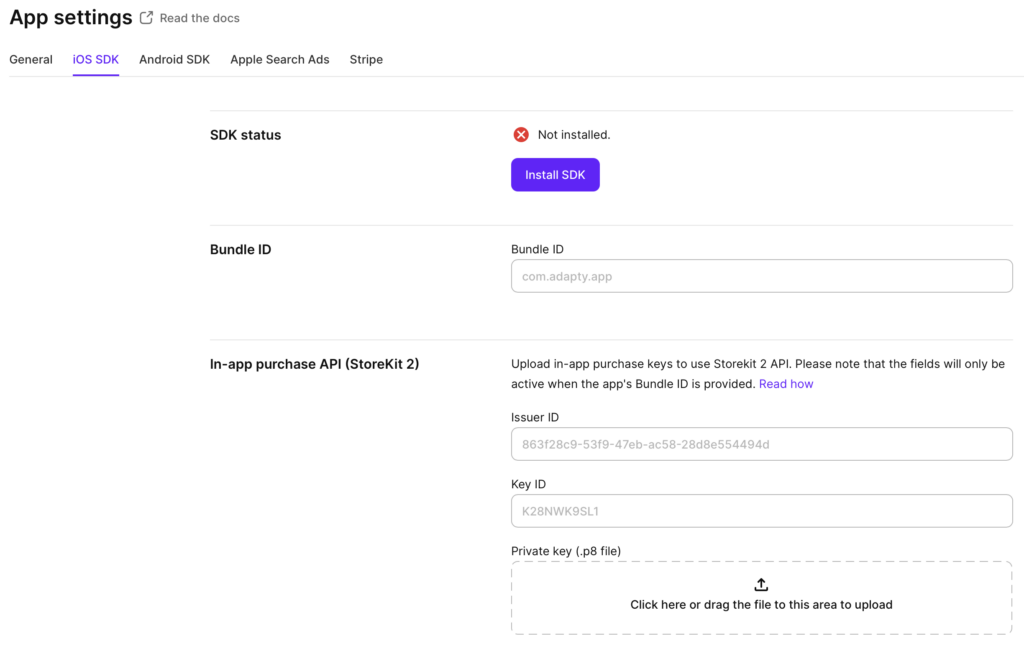
Sign into your Adapty dashboard and create a new app. Navigate to App Settings and configure both platforms.
For iOS, you'll need to provide your Bundle ID, upload an App Store Connect API key, configure the In-App Purchase API for StoreKit 2 with the Issuer ID, Key ID, and Private key from App Store Connect, and set up App Store Server Notifications.
For Android, provide your package name (found in /android/app/build.gradle under android.defaultConfig.applicationId), upload the Service Account Key File, and enable Real-Time Developer Notifications (RTDN) so Adapty receives instant updates on subscription events like renewals, cancellations, and billing issues.
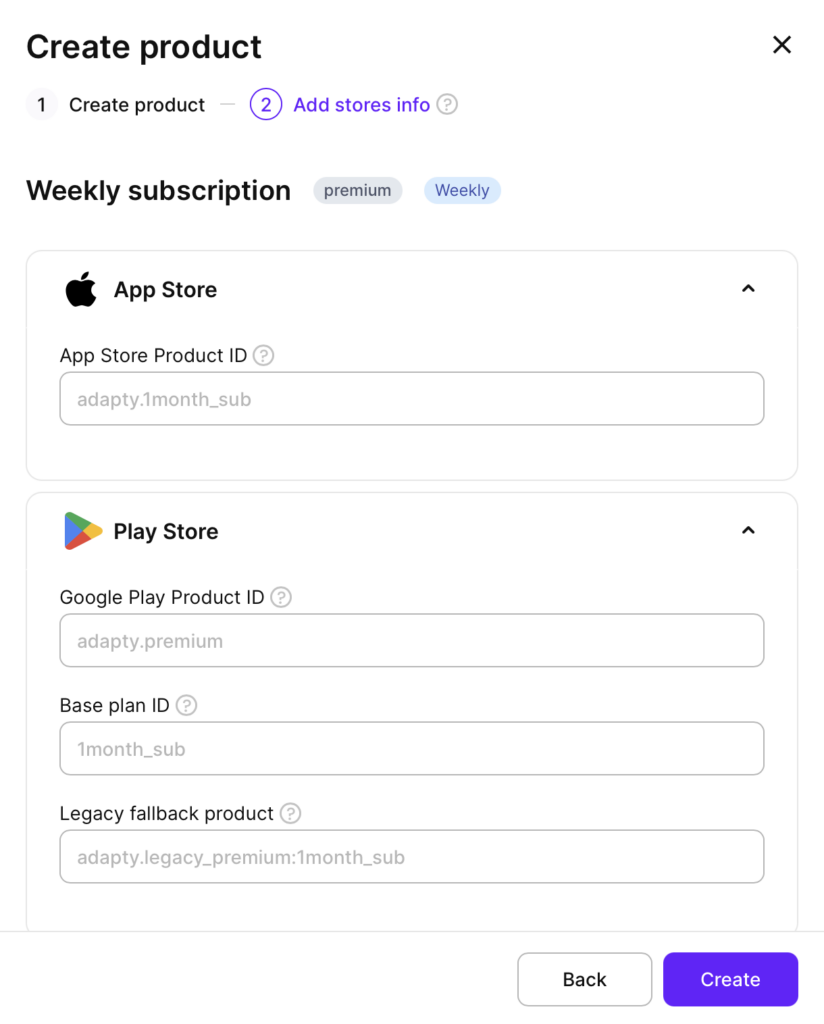
Configuring products and paywalls
In the Adapty dashboard, go to the Products section and create a new product. You have two options: link products that already exist in App Store Connect and Google Play Console by entering their IDs, or create new products directly in Adapty and push them to the stores. Either way, Adapty links platform-specific products into a single entity you can reference in code and analytics.
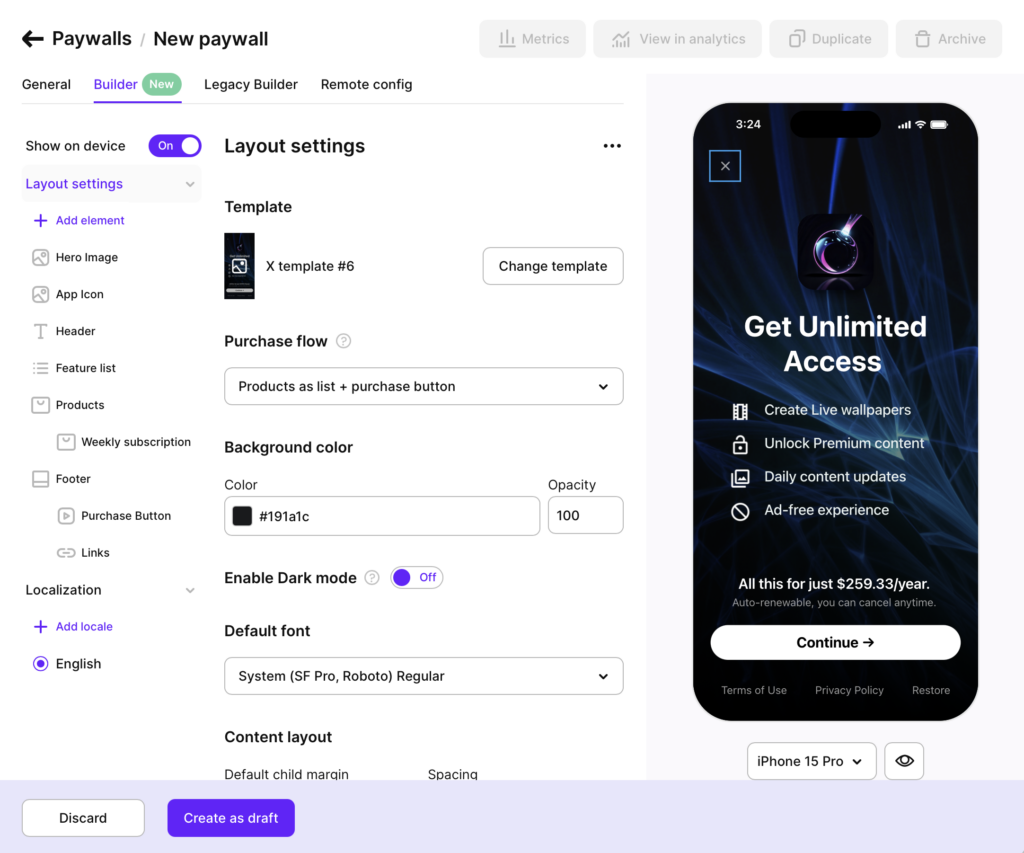
Designing paywalls with Paywall Builder
One of Adapty’s biggest advantages is the Paywall Builder — a visual editor that lets you create and modify paywalls without coding. You can build a native paywall with backgrounds, headlines, feature lists, subscription options, and call-to-action buttons in minutes.
The builder also includes AI-powered localization. Enter your English text, select target languages, and the system translates all your paywall strings automatically.
Integrating the Adapty Flutter SDK
Add the Adapty SDK to your pubspec.yaml:
dependencies:
adapty_flutter: ^3.15.0Run flutter pub get, then import the SDK:
import 'package:adapty_flutter/adapty_flutter.dart';Activating the SDK
Initialize Adapty when your app starts:
import 'package:adapty_flutter/adapty_flutter.dart';


void main() {
  runApp(MyApp());
}


class MyApp extends StatefulWidget {
  @override
  _MyAppState createState() => _MyAppState();
}


class _MyAppState extends State<MyApp> {
  @override
  void initState() {
    _initializeAdapty();


    super.initState();
  }


  Future<void> _initializeAdapty() async {
    try {
      await Adapty().activate(
        configuration: AdaptyConfiguration(apiKey: 'YOUR_PUBLIC_SDK_KEY')
		..withActivateUI(true),
      );
    } catch (e) {
      // handle the error
    }
  }


  Widget build(BuildContext context) {
    return Text("Hello");
  }
}If you have your own authentication system, pass the customer user ID during activation or separately via the identify method:
try {
  await Adapty().identify(customerUserId);
} on AdaptyError catch (adaptyError) {
  // handle the error
}Displaying a Paywall Builder paywall
The code below is for paywalls created with Adapty's Paywall Builder. These paywalls contain both the layout and the purchase logic, so you don't need to build the UI or handle transactions yourself — the SDK does it for you. Retrieve and display a Paywall Builder paywall with just a few lines:
try {
  final paywall = await Adapty().getPaywall(placementId: "YOUR_PLACEMENT_ID");
  final view = await AdaptyUI().createPaywallView(paywall: paywall);
  await view.present();
} on AdaptyError catch (e) {
  // handle the error
}If you're building a custom paywall UI instead of using Paywall Builder, you'll need to fetch products separately and handle the purchase flow manually. See the remote config paywall guide in the Adapty documentation.
Handling Paywall Builder events
Paywall Builder paywalls handle purchases automatically, but they generate events your app can respond to — like successful purchases, cancellations, and restore results. To listen to these events, implement the AdaptyUIPaywallsEventsObserver. For the full list of events and parameters, see the Flutter event handling documentation.
// Called when a purchase completes
void paywallViewDidFinishPurchase(
  AdaptyUIPaywallView view,
  AdaptyPaywallProduct product,
  AdaptyPurchaseResult purchaseResult,
) {
  switch (purchaseResult) {
    case AdaptyPurchaseResultSuccess(profile: final profile):
      // Successful purchase — check access level
      if (profile.accessLevels['premium']?.isActive ?? false) {
        // Grant access to premium features
      }
      break;
    case AdaptyPurchaseResultPending():
      // Purchase is pending (e.g., parental approval)
      break;
    case AdaptyPurchaseResultUserCancelled():
      // User canceled
      break;
  }
}Checking subscription status
You can check a user's access level anywhere in your app:
try {
  final profile = await Adapty().getProfile();
  if (profile?.accessLevels['premium']?.isActive ?? false) {
    // User has active premium access
  }
} on AdaptyError catch (adaptyError) {
  // handle the error
}To receive real-time updates when the subscription status changes:
Adapty().didUpdateProfileStream.listen((profile) {
  // React to subscription state changes
});Restoring purchases
Adapty makes restore straightforward:
try {
  final profile = await Adapty().restorePurchases();
  // Check profile.accessLevels for restored access
} on AdaptyError catch (e) {
  // handle the error
}Testing in-app purchases
Testing is essential before shipping. Both Apple and Google provide sandbox environments that simulate purchases without charging real money.
iOS sandbox testing
In App Store Connect, go to Users and Access and create Sandbox Tester accounts. On your test device, sign out of your regular Apple ID and sign in with the sandbox account. When you trigger a purchase in your app, the App Store will process it as a test transaction at no cost.
If you’re using Xcode 14 or later, you can also use a StoreKit Configuration file to test purchases directly in the simulator without any App Store Connect setup. This is the fastest way to iterate during development.
Key points: sandbox subscriptions auto-renew at an accelerated rate (monthly subscriptions renew every 5 minutes), always test on real devices for the most accurate behavior, and make sure your Paid Apps agreement is signed and active in App Store Connect.
Android license testing
In Google Play Console, go to Setup and then License Testing. Add the Gmail addresses of your test accounts. These accounts can make purchases without being charged.
You’ll need to upload at least an alpha or internal test build to Google Play before testing. In-app products must be set to Active in the Play Console, and your test account must be added to the test track.
Common testing pitfalls
Many launch-day issues come from insufficient testing. Watch out for: forgetting to call completePurchase() (causes purchases to refund after 3 days on Android), not testing restore purchases on a fresh install, missing the Paid Apps agreement on iOS, testing only on emulators, and not handling the pending purchase state.
What’s new in 2026?
The IAP landscape has changed significantly in the last two years. Here’s what you need to know.
StoreKit 2 is now the default in Flutter
Starting with in_app_purchase_storekit version 0.3.18, StoreKit 2 is the default for all iOS devices running iOS 15 and above. StoreKit 2 brings modern Swift-based async APIs, JWS-signed transactions for improved security, built-in transaction history and subscription status checking, and simplified receipt validation.
Google Play Billing Library 8
Google Play Billing Library 8 is the latest version, with version 7.0+ mandatory since August 2025. Key changes include automatic service reconnection, support for multiple purchase options for one-time products, non-expiring subscriptions, improved error handling, and removal of the ability to query expired subscriptions and consumed one-time products.
EU Digital Markets Act (DMA)
The EU’s Digital Markets Act, effective in 2026, requires offering alternative payment methods for users in the EU. Both Apple and Google have introduced mechanisms for this. If your app has EU users, you need to factor in DMA compliance when designing your purchase flow.
Error handling and troubleshooting
Here are the most common IAP errors developers encounter and how to resolve them:
| Error | Platform | Cause | Solution |
| Products not found | Both | Product IDs don’t match, products not approved, or agreements not signed | Double-check product IDs, ensure products are Active, verify Paid Apps agreement |
| Purchase canceled after 3 days | Android | completePurchase() was not called | Always call completePurchase() for every purchase |
| SERVICE_DISCONNECTED | Android | Play Billing service connection dropped | Use Billing Library 8’s enableAutoServiceReconnection() |
| SKError.paymentCancelled | iOS | User dismissed the purchase dialog | Handle gracefully — don’t show error messages for cancellations |
| Sandbox purchases not working | iOS | Not signed in with sandbox account | Check Settings → App Store → Sandbox Account |
| ITEM_ALREADY_OWNED | Android | Non-consumable already purchased or consumable not consumed | Check existing purchases before starting a new one |
| PigeonError with StoreKit 2 | iOS | Version mismatch or incompatible plugin | Update in_app_purchase_storekit to latest; test on real device |
Best practices for Flutter in-app purchases
Following these practices will help you avoid common mistakes and maximize your subscription revenue.
Always validate purchases server-side
Client-side validation alone is vulnerable to tampering. Whether you build your own validation server or use a managed solution like Adapty, never grant premium access based solely on client-side purchase status.
Handle the subscription lifecycle properly
Subscriptions aren’t just “active” or “inactive.” You need to handle grace periods (when a renewal payment fails but the subscription isn’t canceled yet), billing retry (the platform retries failed payments for a set period), and voluntary vs. involuntary churn. A managed solution handles these states for you.
Design your paywall for conversions
Your paywall is the most important screen in your app from a revenue perspective. Key tips: clearly communicate the value of premium features, offer multiple plan options (most top apps offer 2–3), show savings on longer plans, include a free trial when possible, and always include a Restore Purchases option.
Run A/B tests on your paywall
Don’t guess what converts best — test it. Paywall A/B testing can improve conversions by 25% or more. Test pricing, plan durations, trial lengths, messaging, and design. Tools like Adapty let you run these experiments without app updates.
Monitor key metrics
Track conversion rate, trial-to-paid rate, average revenue per user (ARPU), churn rate, and refund rate. Aim to keep your refund rate below 5%. Adapty’s built-in analytics dashboard provides all these metrics out of the box.
Wrapping up
Implementing in-app purchases in Flutter requires careful attention to platform differences, store guidelines, and subscription lifecycle management. The official in_app_purchase plugin gives you full control but requires significant backend work. A managed solution like Adapty lets you skip the infrastructure burden and go live faster with built-in validation, analytics, paywall building, and A/B testing.
Whichever approach you choose, remember to always validate purchases server-side, test thoroughly in sandbox environments, include restore purchases functionality, keep your SDK versions current with StoreKit 2 and Play Billing Library 8, and continuously optimize your paywall through experimentation.