跨平台应用(APP)开发框架无疑让开发人员的生活更轻松,因为他们可以同时为多个平台开发应用了。不过,也有一些缺点。例如,React Native没有现成的工具来实现应用内购买(in-app purchase)。因此,您将不可避免地转向第三方库。
实现应用内购买都有什么选择
React Native应用中流行的应用内订阅(in-app subscription)库是react-native-iap和expo-in-app-purchases。不过,我要讨论的是react-native-adapty,因为与其他库相比,它有很多好处:
- 与这些不同,它提供基于服务器的购买验证(purchase validation)。
- 它支持应用商店最近实现的所有功能,从 优惠推广(promo offer)到事先付款(pay-upfront)功能,应有尽有。它还能快速支持新特性。
- 代码最终变得更加清晰且直接。
- 您可以修改您的产品报价,添加或删除新的报价,而无需经过完整的发布周期。没有必要发布测试版并等待批准。
Adapty软件开发工具包(SDK)的功能远不止这些。您可以获得针对所有关键指标的内置分析工具:群组分析(cohort analysis)、基于服务器的购买验证、付费墙(paywall)的AB测试(AB testing)、具有灵活细分的促销活动、第三方分析工具集成等等。
在本文中
现在,让我们谈谈如何在React Native应用中设置应用内购买。这是我们今天要讲的内容:
- 为什么Expo不能用于React Native应用中的应用内购买功能?
- 创建开发人员账户。
- 配置Adapty:
配置苹果商店
配置安卓市场 - 添加订阅。
- 创建付费墙。
- 安装react-native-adapty。
- 示例应用程序与结果。
在本指南中,我们将尝试构建一个应用程序,向订阅用户显示猫的图片,并向其他人提示订阅优惠。
为什么Expo不能用于React Native应用中的应用内购买功能
长话短说:Expo的“管理型”不支持应用商店提供的本地(native)购买处理方法(也称为商店工具包)。您要么坚持使用纯RN,要么使用Expo裸工作流。
马上,我将不得不让那些想使用Expo的人失望了:这行不通。Expo是一个React Native框架,它让应用程序开发变得更容易。不过,他们的管理工作流与购买/订阅处理并不兼容。Expo在其方法和组件中都没有使用任何本地代码(两者都只针对JS),而这是商店工具包所必需的。我们无法在手机商店中使用JavaScript实现应用内购买,所以您只能“退出”。
创建开发人员账户
首先,您需要设置应用商店账户,以及创建和配置iOS和安卓的购买和订阅。这应该不会超过20分钟。
如果您还没有在App Store Connect和/或Google Play Console中配置您的开发者账户和产品,可以参阅以下指南:
配置Adapty
对于react-native-adapty,您首先需要配置您的Adapty指示板。这不会花费太多时间,但会让您获得上面列出的Adapty相对于硬编码的所有优势。
第三步,您将收到关于苹果应用商店和Google Play的配置提示。
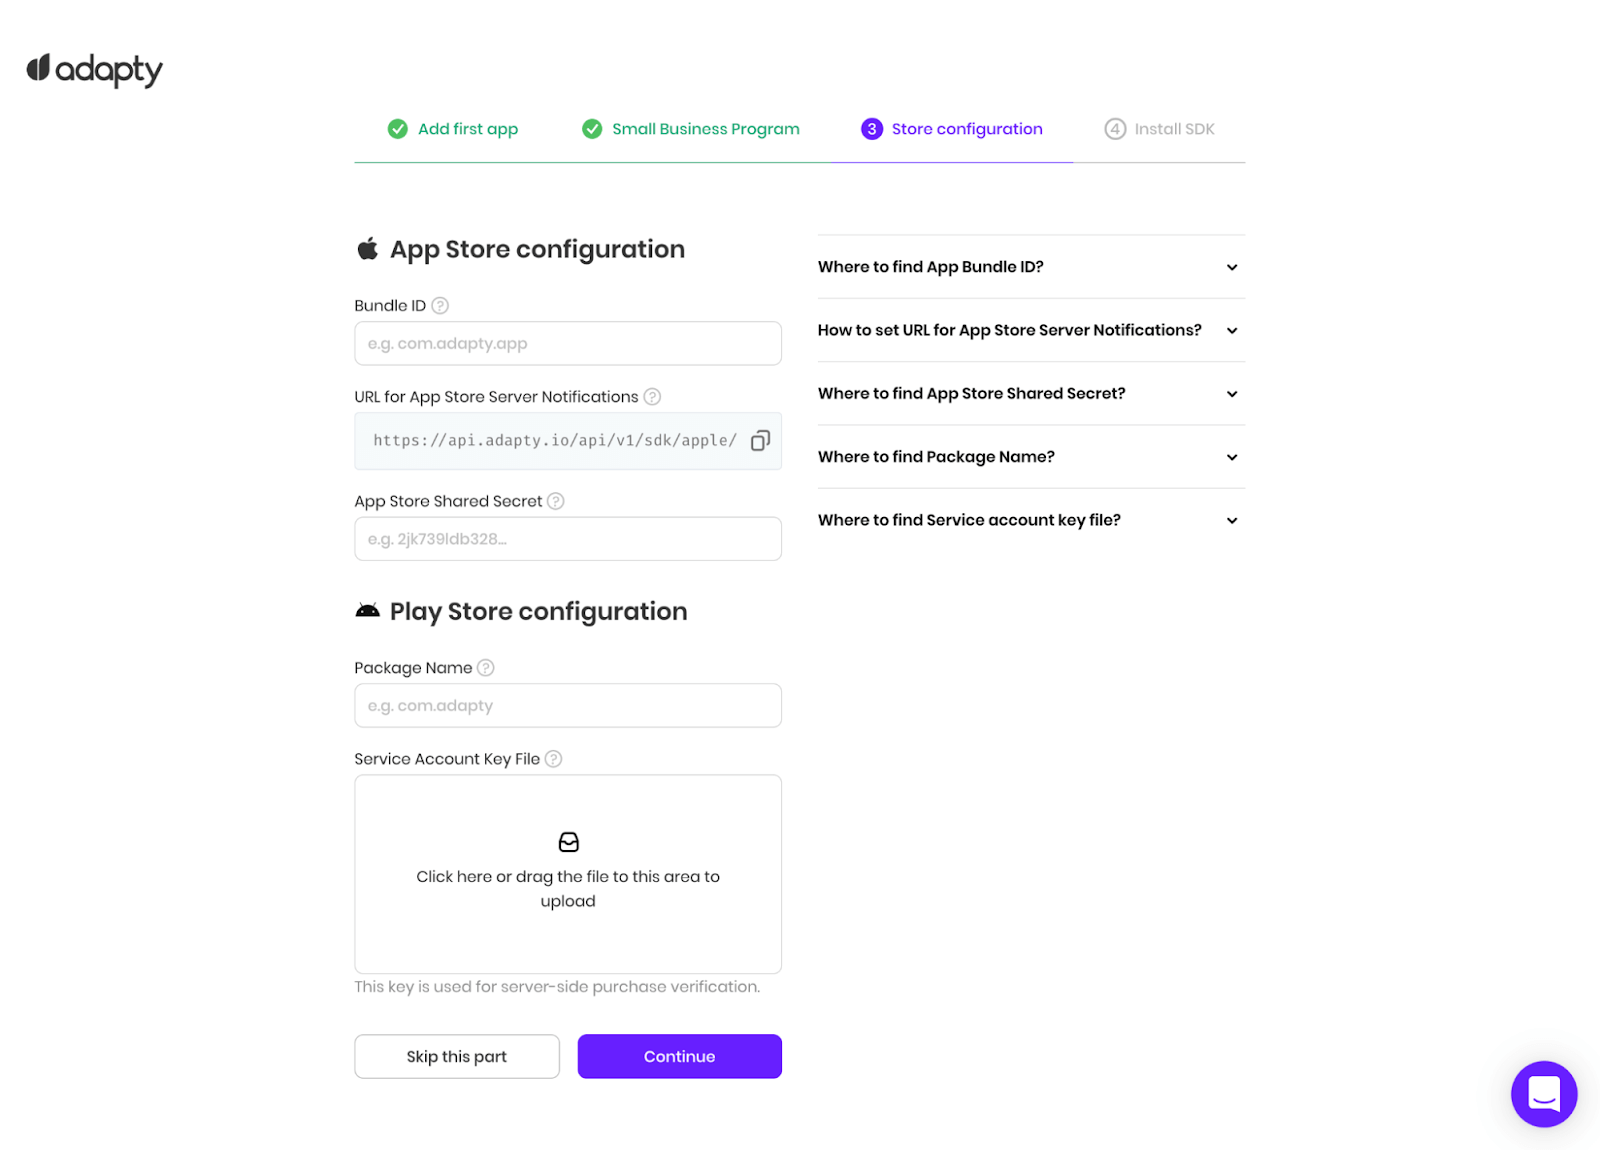
对于iOS,您需要:
- 明确Bundle ID;
- 设置苹果应用商店服务器通知(Server Notification);
- 明确App Store Connect共享密钥(shared secret)。
这些项是购买有效所必需的。
每一项都有一个“如何阅读”的提示,其中包含了一步一步的操作指南。如果您有任何问题,可以看看这些。
Bundle ID是应用的唯一ID。它必须匹配您在Targets > [App Name] > General的Xcode中所指定的:

对于Android,必需的项是包名和服务账户密钥文件。所有这些项也都有自己的“如何阅读”提示。包名在安卓中的作用就像Bundle ID在iOS中的作用一样。它必须匹配您在代码中所指定的,可以在android.defaultConfig.applicationId的/android/app/build.gradle文件中找到。
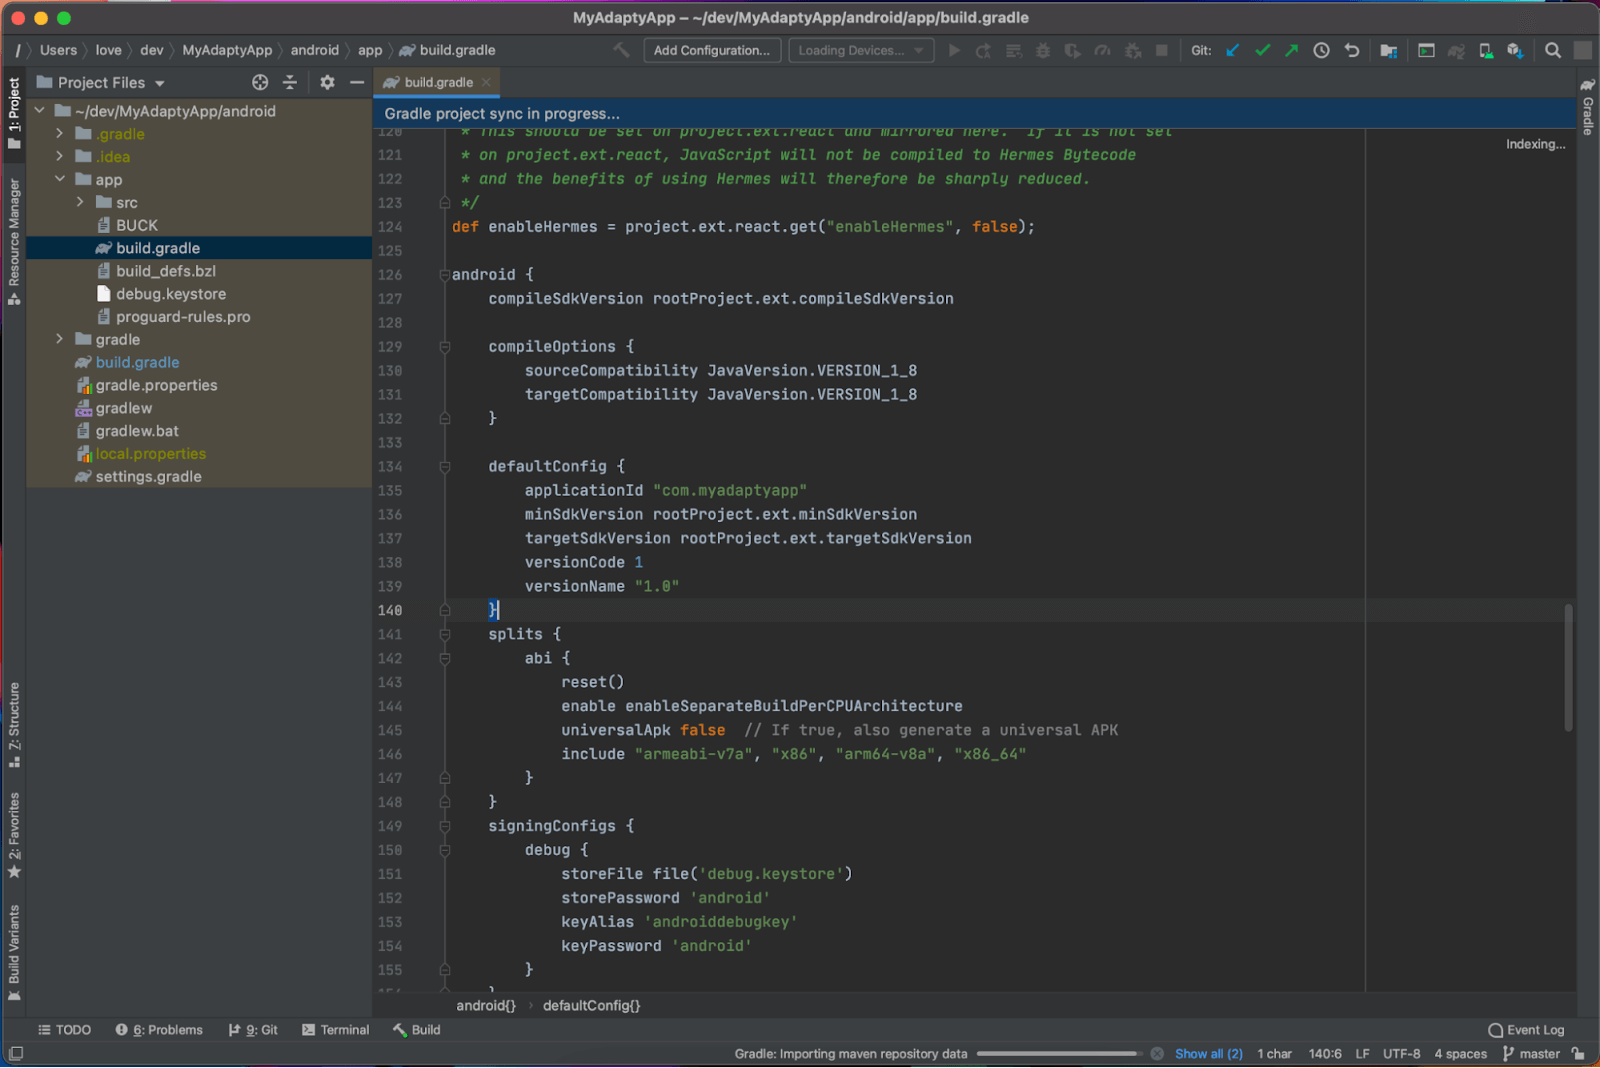
第四步,提示您将Adapty软件开发工具包连接到您的应用程序。不过,现在先跳过这一步——我们稍后会返回这一步。
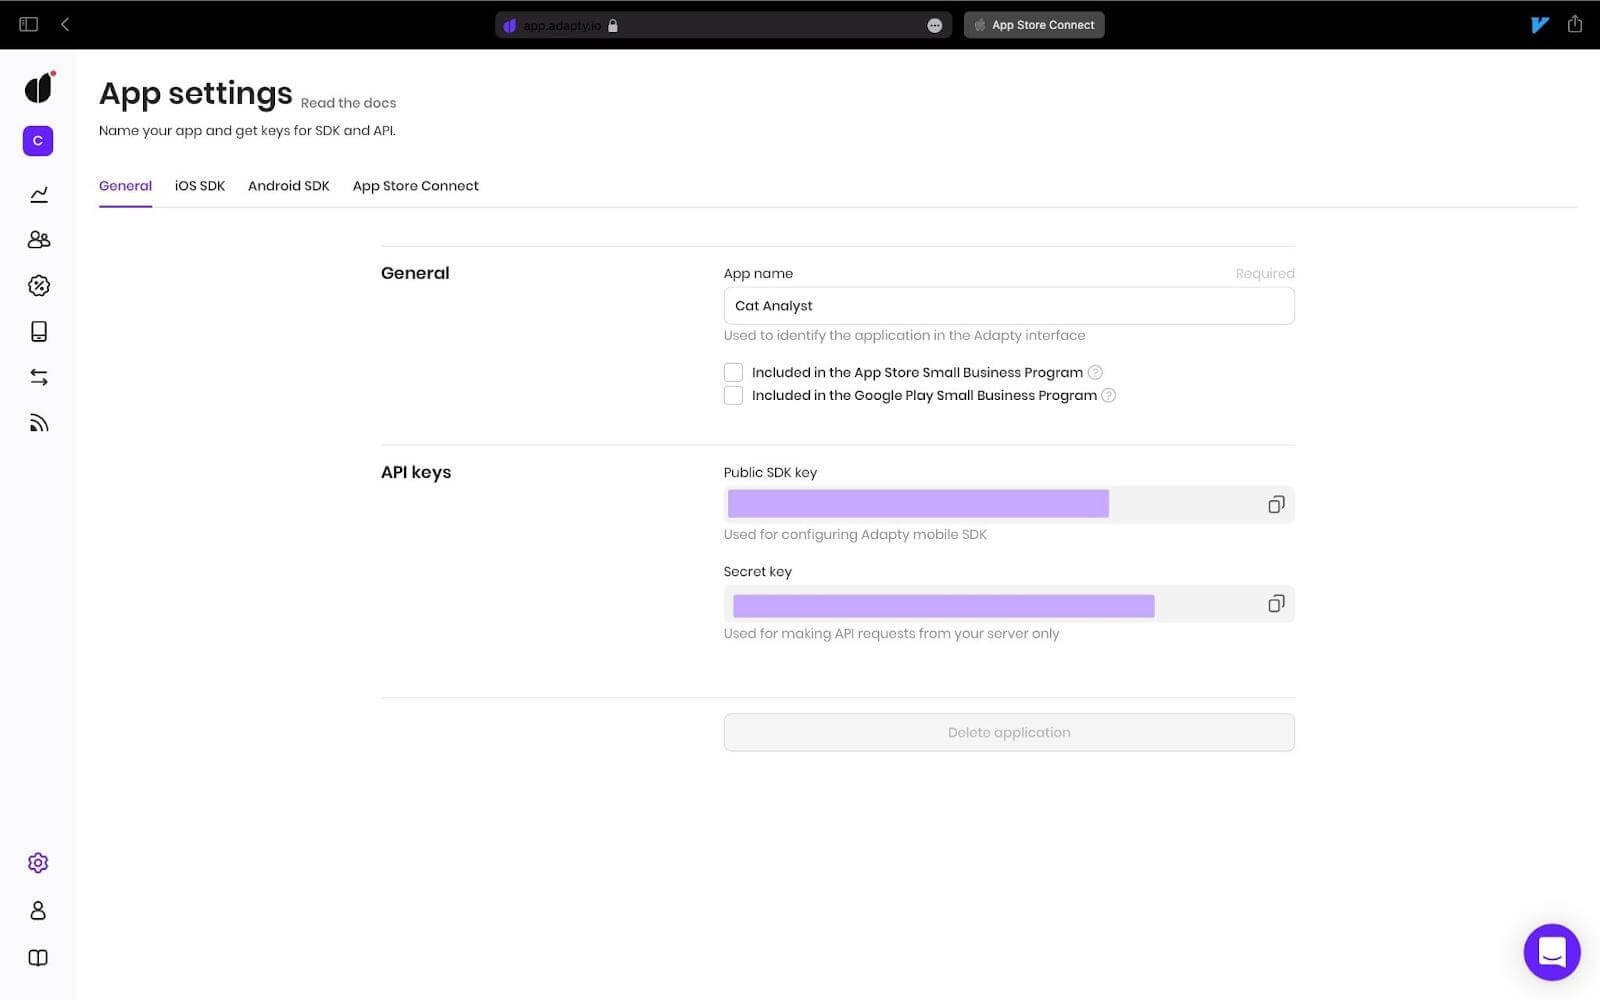
注册后,查看设置选项卡,并记住在这里可以找到公共软件开发工具包密钥。您以后会需要这个密钥。
添加订阅
Adapty使用适用于不同订阅的产品。您的猫的照片订阅可以是每周一次、每半年一次,或者每年一次。这些选项中的每一个都将是一个单独的Adapty产品。
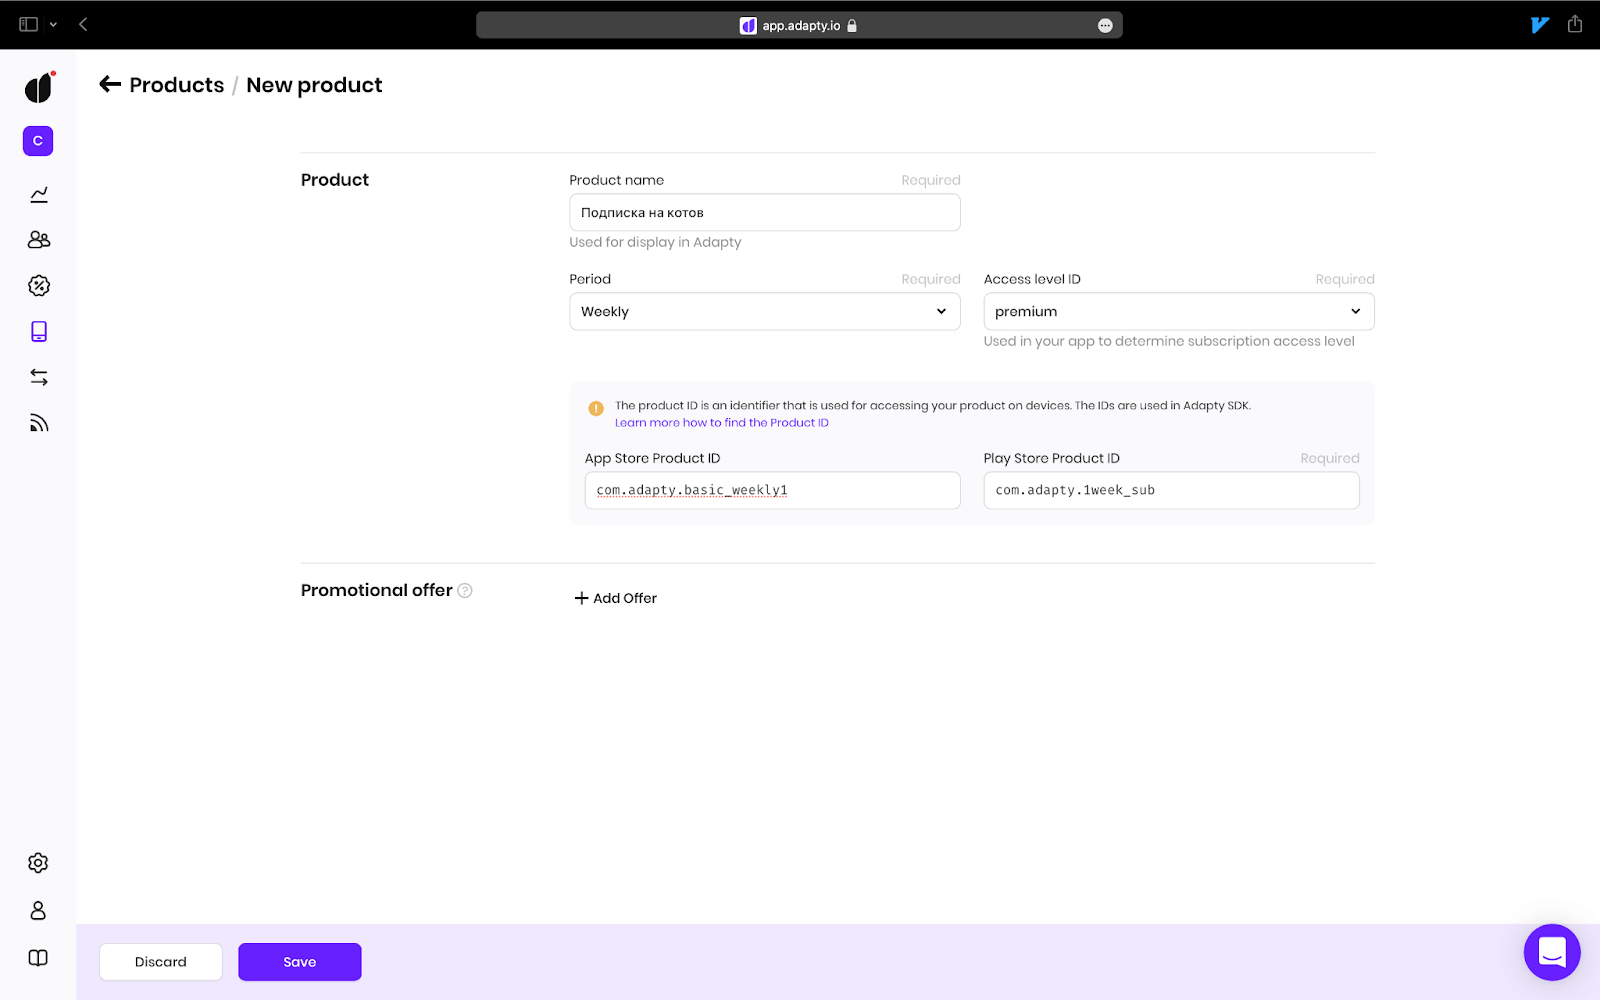
让我们在指示板中明确指出,我们有一个产品。为此,请转到“Products & A/B Tests → Products”,并点击“Create product”。
您在这里需要明确产品名称,即该订阅在Adapty指示板中显示的样子。
您还需要明确苹果应用商店产品ID和安卓市场产品ID。如果需要,可以明确用于分析的周期和名称。点击“Save”。
创建付费墙
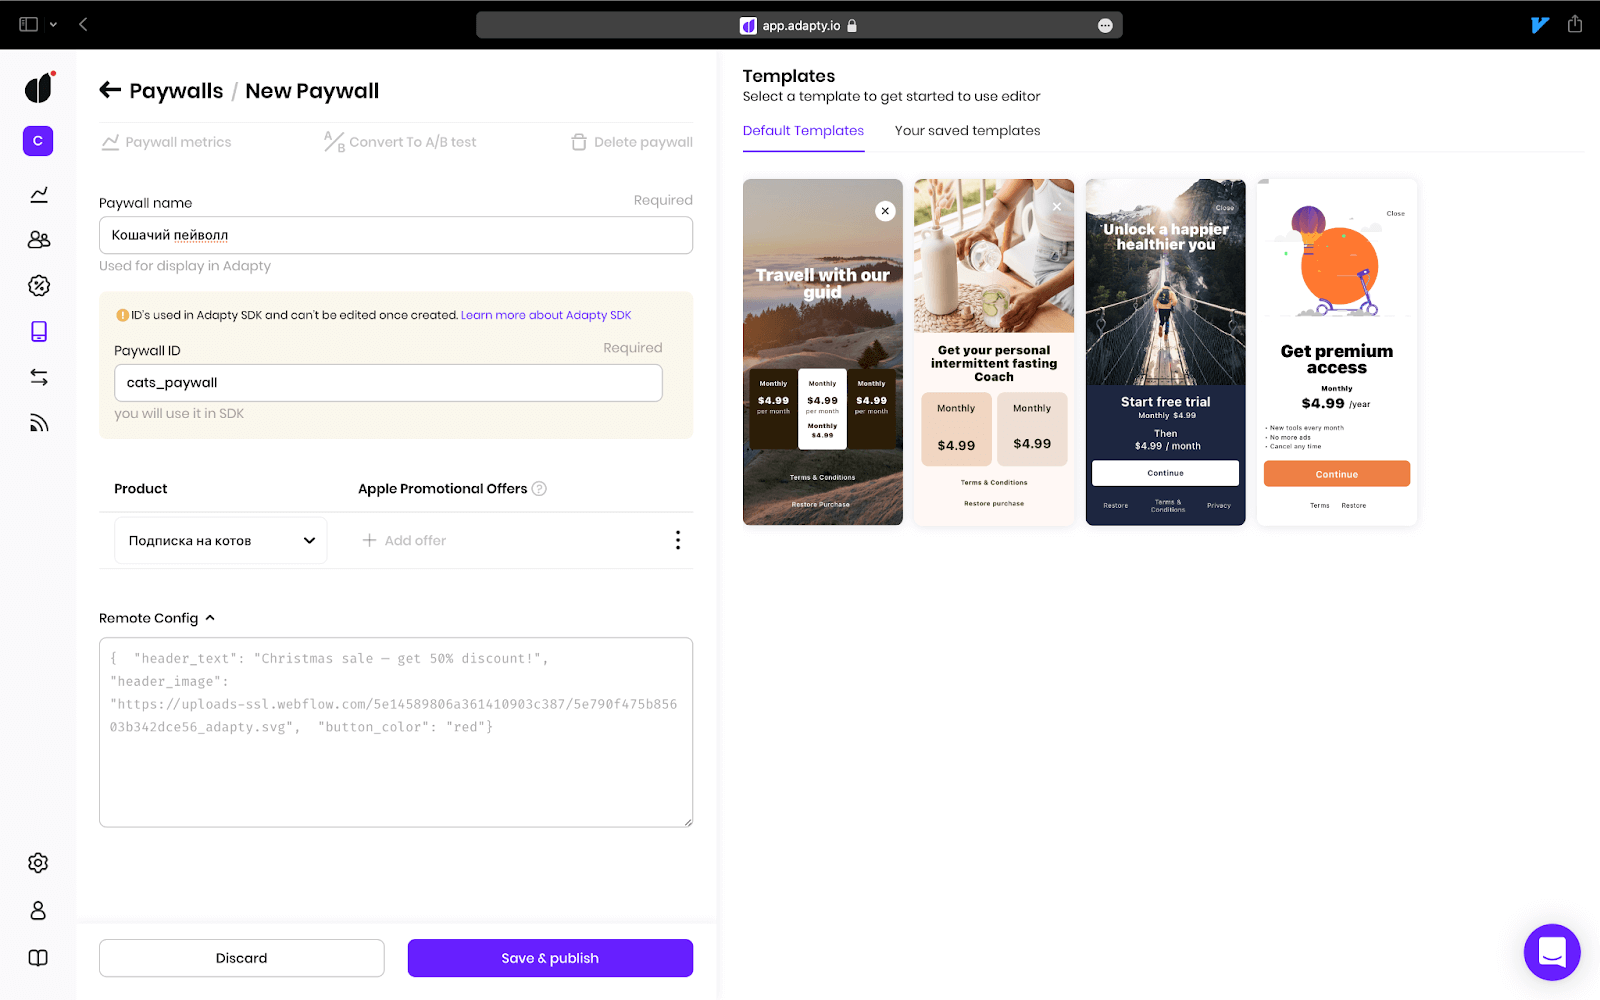
现在,您需要设计一个付费墙,这是个限制用户使用高级功能,并为他们提供订阅服务提示的过滤屏。您需要将您所创造的产品添加到付费墙中。为此,您需要点击同一部分中的“Create paywall”(Products & A/B Tests → Paywalls)。
- 您选择的付费墙名称应该是那种只要您和您的团队看一眼名称就能轻松推断出是哪个付费墙的名称。
- 在您的应用程序中将使用付费墙ID显示此付费墙。我们将使用“cats_paywall”作为我们的示例应用程序。
- 在“Product”下拉菜单中,选择您的订阅。
点击“Save & publish”。
关于配置大概就是这样。现在,我们将添加依赖项并编写代码。
安装react-native-adapty
1. 首先,添加依赖项:
yarn add react-native-adapty2.安装iOS POD。如果您还没有CLI POD,我强烈建议您下载。在iOS开发中,肯定会经常用到。
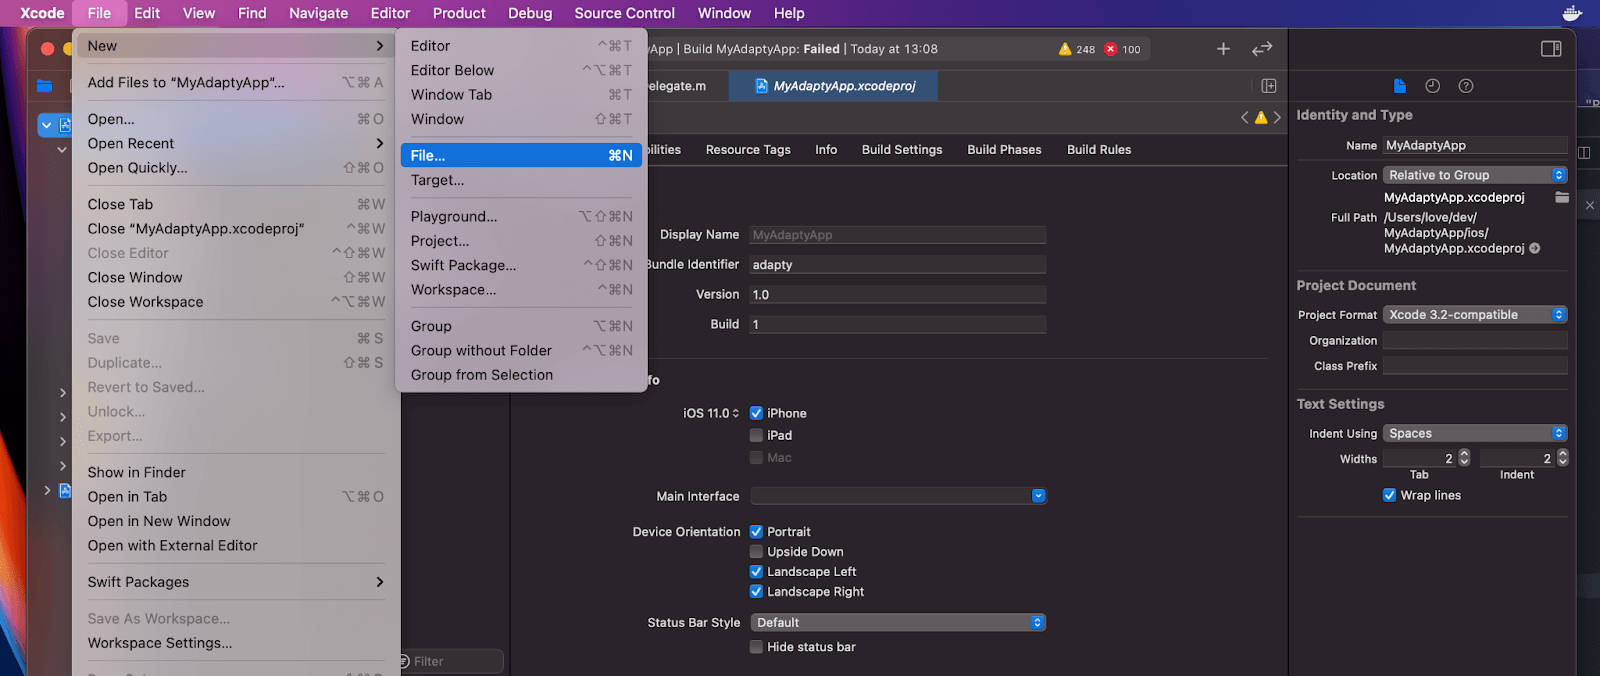
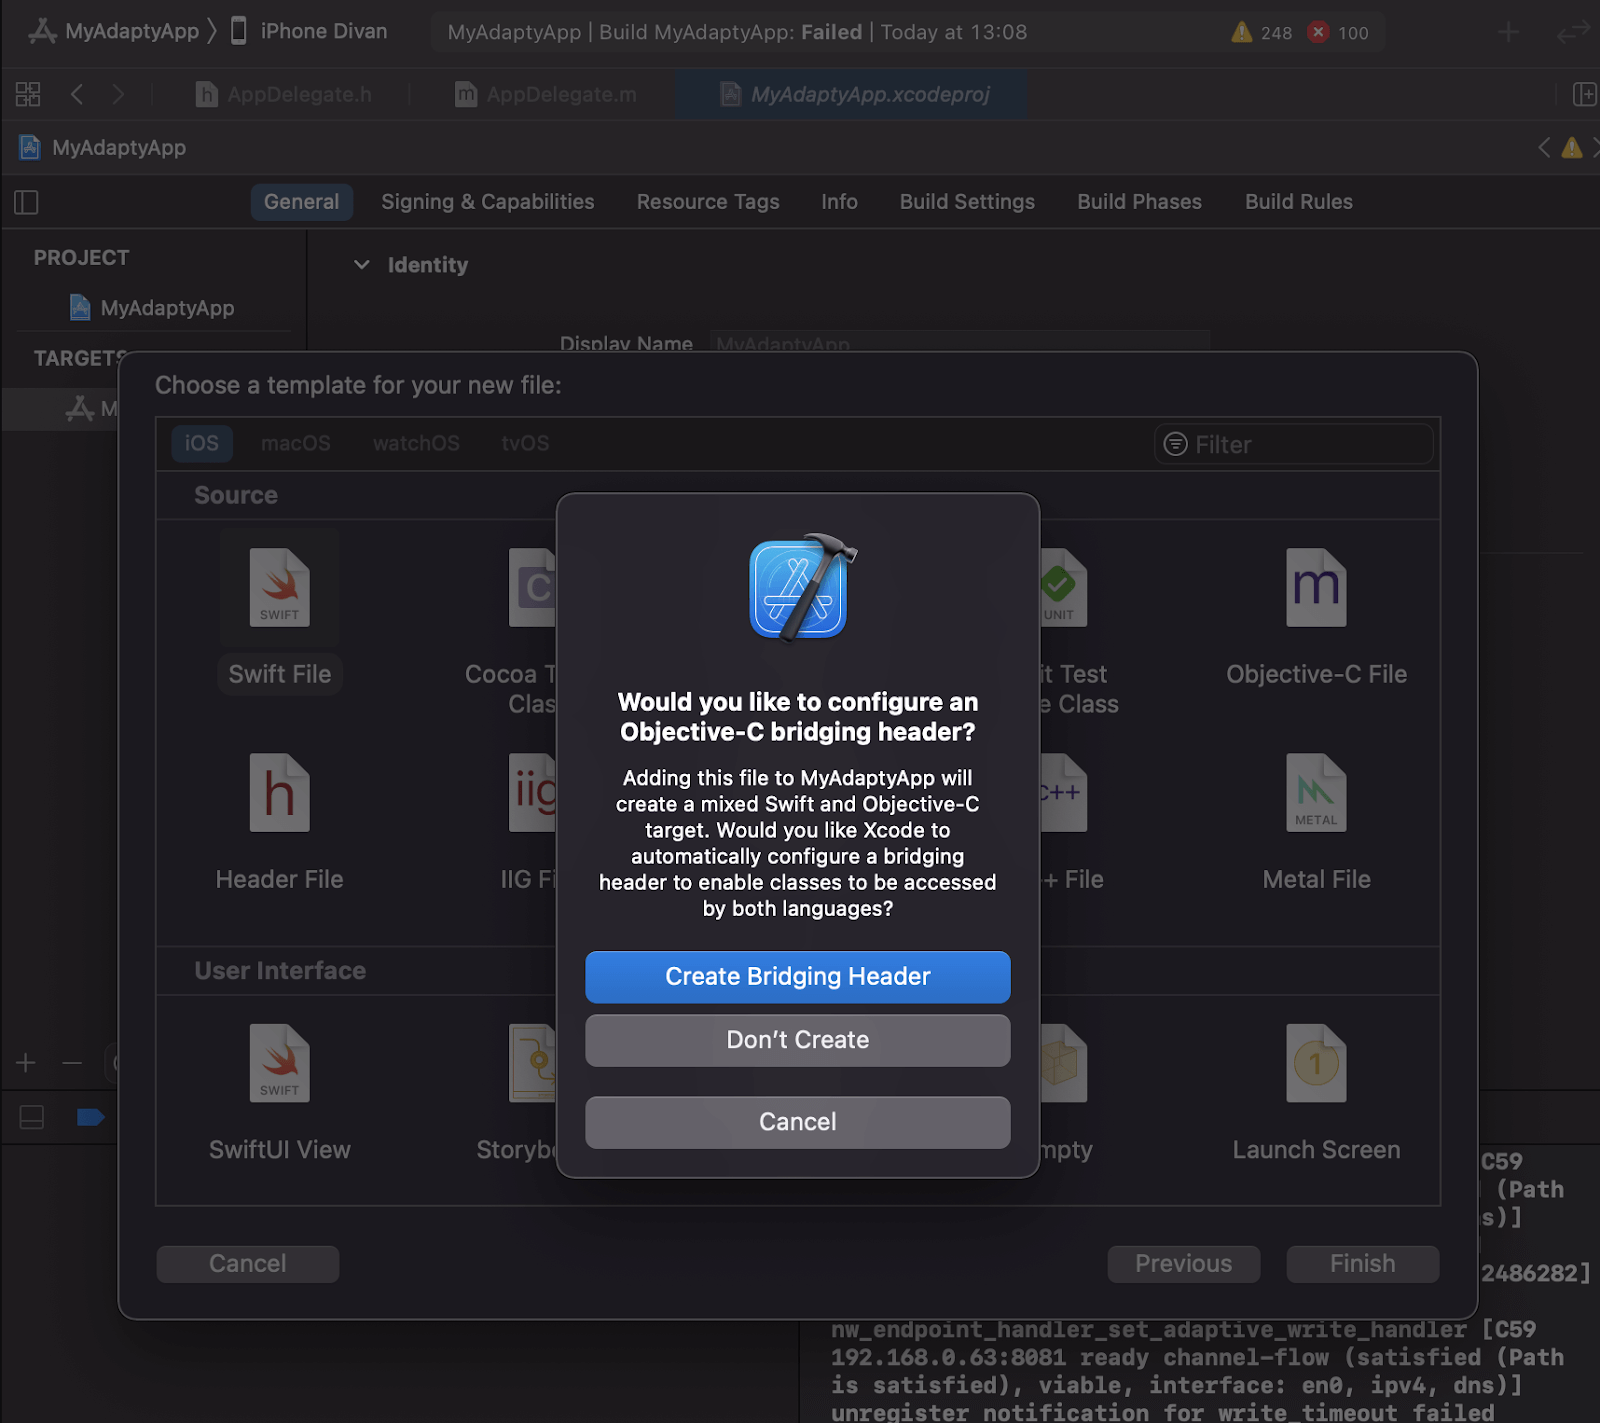
#pods get installed into the native iOS project, which, by default, is the /ios folderpod install --project-directory=ios3.因为iOS React Native项目是用Obj-C编写的,所以您需要创建一个Swift Bridging Header,以便Obj-C读取Swift库。为此,只需打开您的Xcode项目并创建一个新的Swift文件即可。Xcode会询问您是否想要创建一个Bridging Header,而这正是您想要的。点击“Create”。
4.对于安卓,请确保默认/android/build.gradle项目使用的是1.4.0或更高版本的kotlin-gradle-plugin:
... buildscript { ... dependencies { ... classpath "org.jetbrains.kotlin:kotlin-gradle-plugin:1.4.0" } } ...5.对于安卓,您需要启用multiDex,您可以在应用程序的配置文件(默认/android/app/build.gradle)中找到。
... android { ... defaultConfig { ... multiDexEnabled true } }瞧,您都准备好了,可以开始编写代码了!
在应用程序中检索产品列表
在“react-native-adapty”下,发生了大量有用的事。您肯定迟早会需要这些,这就是为什么您应该在流的最开始就把库初始化。在您的应用程序代码中尽可能地向上滚动代码(您也可以在app.tsx中这样做),并开始初始化:
// import the method import { activateAdapty } from 'react-native-adapty'; // We’ve had this App component in our app’s root const App: React.FC = () => { ... // we’re invoking it once in a root component on mount useEffect(() => { activateAdapty({ sdkKey: 'MY_PUBLIC_KEY' }); },[]); ... }在这里,用指示板设置中找到的公共软件开发工具包密钥替换MY_PUBLIC_KEY。实际上,activateAdapty()方法可以在多个地方被多次调用,但我们将坚持现在这种设计。
现在,我们可以检索在Adapty指示板中添加的产品:
import { adapty } from 'react-native-adapty'; async function getProducts() { const {paywalls, products} = await adapty.paywalls.getPaywalls(); return products; }现在,让我们开始练习吧:我们会尝试建立一个小的应用程序,在这个应用里,我们可以从我们的付费墙浏览产品并购买。
示例应用程序
从现在起,我会尽量精简,以避免让基本逻辑过于复杂。我也会用TypeScript编写代码,告诉您在哪里使用了哪种类型。为了进行测试,我会使用我的老款苹果8。请记住,从iOS 14开始,苹果应用商店就禁止在模拟器中使用商店工具包——您只能使用实际设备进行测试。
App.tsx根组件
1.首先,让我们创建一个App.tsx根组件,它会有一个付费墙显示按钮。我们已经通过react-native-navigation配置了导航——我们相信它比官方文档中推荐的react-navigation要好得多。
发行
import React, { useEffect, useState } from "react"; import { Button, StyleSheet, View } from "react-native"; import { adapty, activateAdapty, AdaptyPaywall } from "react-native-adapty"; export const App: React.FC = () => { const [paywalls, setPaywalls] = useState<AdaptyPaywall[]>([]); useEffect(() => { async function fetchPaywalls(): Promise<void> { await activateAdapty({ sdkKey: "MY_PUBLIC_KEY" }); const result = await adapty.paywalls.getPaywalls(); setPaywalls(result.paywalls); } fetchPaywalls(); }, []); return ( <View style={styles.container}> <Button title="Show the paywall" onPress={() => { const paywall = paywalls.find( (paywall) => paywall.developerId === "cats_paywall" ); if (!paywall) { return alert("There is no such paywall"); } // Switching to a paywall... }} /> </View> ); }; const styles = StyleSheet.create({ container: { flex: 1, alignItems: "center", justifyContent: "center" }, });这是怎么回事?在挂载时,调用fetchPaywalls()函数。它激活了软件开发工具包并保存了付费墙状态,这样用户就不必在点击按钮后还苦苦等待获取了。在视图中只有一个按钮,这将把用户带到我们之前在指示板中设计的付费墙。
实际上,我们可以在这里获取付费墙,无需将其保存到状态中。默认情况下,adapty.paywalls.getPaywalls()将从缓存存储中获取它们(在启动时缓存它们之后),这意味着您不必等待该方法与服务器对话。
结果如下:

付费墙组件
2.让我们在同一个文件中编写一个付费墙组件。
// there are more imports here import React, { useEffect, useState } from "react"; import { Button, SafeAreaView, StyleSheet, Text, View, PlatformColor, } from "react-native"; import { adapty, activateAdapty, AdaptyPaywall, AdaptyProduct, } from "react-native-adapty"; import { Navigation } from "react-native-navigation"; // ... interface PaywallProps { paywall: AdaptyPaywall; onRequestBuy: (product: AdaptyProduct) => void | Promise<void>; } export const Paywall: React.FC<PaywallProps> = ({ paywall, onRequestBuy }) => { const [isLoading, setIsLoading] = useState<boolean>(false); return ( <SafeAreaView style={styles.container}> {paywall.products.map((product) => ( <View key={product.vendorProductId}> <Text>{product.localizedTitle}</Text> <Button title={`Buy for за ${product.localizedPrice}`} disabled={isLoading} onPress={async () => { try { setIsLoading(true); await onRequestBuy(product); } catch (error) { alert("Error occured :("); } finally { setIsLoading(false); } }} /> </View> ))} </SafeAreaView> ); }; // A new key const styles = StyleSheet.create({ container: { flex: 1, alignItems: "center", justifyContent: "center" }, paywallContainer: { flex: 1, alignItems: "center", justifyContent: "space-evenly", backgroundColor: PlatformColor("secondarySystemBackground"), }, });在这里,我们将从付费墙绘制产品地图,并在每个产品旁显示一个购买按钮。
注册过滤屏
3.为了看看它的样子,让我们在react-native-navigation中注册这个过滤屏。如果您正在使用其他导航,请跳过此步骤。我的根index.js文件看起来是这样的:
import "react-native-gesture-handler"; import { Navigation } from "react-native-navigation"; import { App, Paywall } from "./App"; Navigation.registerComponent("Home", () => App); Navigation.registerComponent("Paywall", () => Paywall); Navigation.events().registerAppLaunchedListener(() => { Navigation.setRoot({ root: { stack: { children: [{ component: { name: "Home" } }] } }, }); });“显示付费墙”按钮
4.现在,我们只需要给“显示付费墙”按钮分配一个动作即可。在我们这个例子里,会通过“Navigation”提示一个模态。
Navigation.showModal<PaywallProps>({ component: { name: "Paywall", passProps: { paywall, onRequestBuy: async (product) => { const purchase = await adapty.purchases.makePurchase(product); // Doing everything we need console.log("purchase", purchase); }, }, }, });整个App.tsx文件:
import React, { useEffect, useState } from "react"; import { Button, SafeAreaView, StyleSheet, Text, View, PlatformColor, } from "react-native"; import { adapty, activateAdapty, AdaptyPaywall, AdaptyProduct, } from "react-native-adapty"; import { Navigation } from "react-native-navigation"; export const App: React.FC = () => { const [paywalls, setPaywalls] = useState<AdaptyPaywall[]>([]); useEffect(() => { async function fetchPaywalls(): Promise<void> { await activateAdapty({ sdkKey: "MY_PUBLIC_KEY", }); const result = await adapty.paywalls.getPaywalls(); setPaywalls(result.paywalls); } fetchPaywalls(); }, []); return ( <View style={styles.container}> <Button title="Show paywall" onPress={() => { const paywall = paywalls.find( (paywall) => paywall.developerId === "cats_paywall" ); if (!paywall) { return alert("There is no such paywall"); } Navigation.showModal<PaywallProps>({ component: { name: "Paywall", passProps: { paywall, onRequestBuy: async (product) => { const purchase = await adapty.purchases.makePurchase(product); // Doing everything we need console.log("purchase", purchase); }, }, }, }); }} /> </View> ); }; interface PaywallProps { paywall: AdaptyPaywall; onRequestBuy: (product: AdaptyProduct) => void | Promise<void>; } export const Paywall: React.FC<PaywallProps> = ({ paywall, onRequestBuy }) => { const [isLoading, setIsLoading] = useState<boolean>(false); return ( <SafeAreaView style={styles.paywallContainer}> {paywall.products.map((product) => ( <View key={product.vendorProductId}> <Text>{product.localizedTitle}</Text> <Button title={`Buy for ${product.localizedPrice}`} disabled={isLoading} onPress={async () => { try { setIsLoading(true); await onRequestBuy(product); } catch (error) { alert("Error occured :("); } finally { setIsLoading(false); } }} /> </View> ))} </SafeAreaView> ); }; const styles = StyleSheet.create({ container: { flex: 1, alignItems: "center", justifyContent: "center" }, paywallContainer: { flex: 1, alignItems: "center", justifyContent: "space-evenly", backgroundColor: PlatformColor("secondarySystemBackground"), }, });
就是这样!现在,您可以向您的用户展示这些付费墙啦。
如果您想在沙盒(sandbox)中测试您的iOS订阅,您需要创建自己的沙盒测试员账户。请记住,沙盒订阅很快就会失效,从而使测试更容易。对于安卓,您不需要任何额外的账户——您甚至可以在模拟器中运行测试。
检查用户是否有任何活跃订阅
我们仍然需要决定在何处存储活跃订阅数据,以授予终端用户访问其优质内容的权限。Adapty也会在这方面帮助我们,因为它保存了与用户相关的所有购买。让我们这样做吧:如果用户没有订阅,他们会收到一个付费墙按钮提示。如果有,我们就给他们看猫的照片。
由于活跃订阅数据是从服务器或缓存存储中检索的,因此需要一个加载器。为了简单起见,我们会添加isLoading和isPremium状态。
// ... export const App: React.FC = () => { const [isLoading, setIsLoading] = useState<boolean>(true); const [isPremium, setIsPremium] = useState<boolean>(false); const [paywalls, setPaywalls] = useState<AdaptyPaywall[]>([]); useEffect(() => { async function fetchPaywalls(): Promise<void> { try { await activateAdapty({ sdkKey: "MY_PUBLIC_KEY", }); const profile = await adapty.purchases.getInfo(); const isSubscribed = profile.accessLevels.premium.isActive; setIsPremium(isSubscribed); if (!isSubscribed) { const result = await adapty.paywalls.getPaywalls(); setPaywalls(result.paywalls); } } finally { setIsLoading(false); } } fetchPaywalls(); }, []); // ... } // ...改变的地方是:我们在状态中添加了两个标志。fetchPaywalls()的整个内容现在都被包装在了一个try-catch块中,以便代码在任何可能的场景中都能到达setIsLoading(false)。为了检查用户是否有活跃订阅,我们会检索用户的配置文件(其中包含他们所有的订阅数据),并查看profile.accessLevels.premium.isActive的值。您可以根据自己的想法使用任意数量的访问级别(accessLevels)——基本上就是黄金或高级订阅等订阅级别——但是现在暂时我们还是保持默认值。Adapty会自动创建高级访问级别,对于大多数应用程序来说,这就够了。当有一个具有此访问级别的活跃订阅时,isActive会保持为true
从这里开始,一切看起来就都很简单了。如果用户具有高级订阅状态,则不需要获取付费墙——只需禁用加载器并显示内容即可。
export const App: React.FC = () => { // ... const renderContent = (): React.ReactNode => { if (isLoading) { return <Text>Loading...</Text>; } if (isPremium) { return ( <Image source={{ url: "https://25.media.tumblr.com/tumblr_lugj06ZSgX1r4xjo2o1_500.gif", width: Dimensions.get("window").width * 0.8, height: Dimensions.get("window").height * 0.8, }} /> ); } return ( <Button title="Show paywall" onPress={() => { const paywall = paywalls.find( (paywall) => paywall.developerId === "cats_paywall" ); if (!paywall) { return alert("There is no such paywall"); } Navigation.showModal<PaywallProps>({ component: { name: "Paywall", passProps: { paywall, onRequestBuy: async (product) => { const purchase = await adapty.purchases.makePurchase(product); const isSubscribed = purchase.purchaserInfo.accessLevels?.premium.isActive; setIsPremium(isSubscribed); Navigation.dismissAllModals(); }, }, }, }); }} /> ); }; return <View style={styles.container}>{renderContent()}</View>; };在这里,我们添加了一个函数来呈现onRequestBuy的内容和一些逻辑:即更新isPremium的状态和关闭模态。
这就是最终结果:
整个文件:
import React, { useEffect, useState } from "react"; import { Button, SafeAreaView, StyleSheet, Text, View, PlatformColor, Image, Dimensions, } from "react-native"; import { adapty, activateAdapty, AdaptyPaywall, AdaptyProduct, } from "react-native-adapty"; import { Navigation } from "react-native-navigation"; export const App: React.FC = () => { const [isLoading, setIsLoading] = useState<boolean>(true); const [isPremium, setIsPremium] = useState<boolean>(false); const [paywalls, setPaywalls] = useState<AdaptyPaywall[]>([]); useEffect(() => { async function fetchPaywalls(): Promise<void> { try { await activateAdapty({ sdkKey: "MY_PUBLIC_KEY", }); const profile = await adapty.purchases.getInfo(); const isSubscribed = profile.accessLevels.premium.isActive; setIsPremium(isSubscribed); if (!isSubscribed) { const result = await adapty.paywalls.getPaywalls(); setPaywalls(result.paywalls); } } finally { setIsLoading(false); } } fetchPaywalls(); }, []); const renderContent = (): React.ReactNode => { if (isLoading) { return <Text>Loading...</Text>; } if (isPremium) { return ( <Image source={{ uri: "https://25.media.tumblr.com/tumblr_lugj06ZSgX1r4xjo2o1_500.gif", width: Dimensions.get("window").width * 0.8, height: Dimensions.get("window").height * 0.8, }} /> ); } return ( <Button title="Show a paywall" onPress={() => { const paywall = paywalls.find( (paywall) => paywall.developerId === "cats_paywall" ); if (!paywall) { return alert("There is no such a paywall"); } Navigation.showModal<PaywallProps>({ component: { name: "Paywall", passProps: { paywall, onRequestBuy: async (product) => { const purchase = await adapty.purchases.makePurchase(product); const isSubscribed = purchase.purchaserInfo.accessLevels?.premium.isActive; setIsPremium(isSubscribed); Navigation.dismissAllModals(); }, }, }, }); }} /> ); }; return <View style={styles.container}>{renderContent()}</View>; }; interface PaywallProps { paywall: AdaptyPaywall; onRequestBuy: (product: AdaptyProduct) => void | Promise<void>; } export const Paywall: React.FC<PaywallProps> = ({ paywall, onRequestBuy }) => { const [isLoading, setIsLoading] = useState<boolean>(false); return ( <SafeAreaView style={styles.paywallContainer}> {paywall.products.map((product) => ( <View key={product.vendorProductId}> <Text>{product.localizedTitle}</Text> <Button title={`Buy for ${product.localizedPrice}`} disabled={isLoading} onPress={async () => { try { setIsLoading(true); await onRequestBuy(product); } catch (error) { alert("An error occured :("); } finally { setIsLoading(false); } }} /> </View> ))} </SafeAreaView> ); }; const styles = StyleSheet.create({ container: { flex: 1, alignItems: "center", justifyContent: "center" }, paywallContainer: { flex: 1, alignItems: "center", justifyContent: "space-evenly", backgroundColor: PlatformColor("secondarySystemBackground"), }, });总结一下
我们最终创建了一个既美观又非常有用的订阅应用程序。付费的人会看到猫,而其他人则会看到付费墙。本指南应该教您在应用中实现应用内购买所需的所有内容。想要更深入地研究商店工具包?不要走开,敬请期待。感谢您的支持!
