---
title: "Cấu hình tích hợp App Store"
description: "Cấu hình kết nối App Store của bạn để theo dõi gói đăng ký liền mạch."
---
Phần này mô tả cách thiết lập kết nối giữa App Store và Adapty cho ứng dụng iOS của bạn. Đây là yêu cầu bắt buộc để chúng tôi có thể hiển thị số liệu phân tích gói đăng ký và xác thực các giao dịch mua. Bạn có thể hoàn tất tích hợp trong quá trình onboarding ban đầu hoặc sau này trong **App Settings** trên Adapty Dashboard.
Mặc dù bạn có thể đã cấu hình tích hợp giữa ứng dụng và Adapty trong quá trình onboarding, bạn vẫn có thể chỉnh sửa các cài đặt này sau trong **App settings**.
:::danger
Các thay đổi cấu hình có thể được thực hiện an toàn trong giai đoạn Sandbox, trước khi ứng dụng của bạn ra mắt với SDK Adapty được cài đặt. Các thay đổi sau khi phát hành có thể làm gián đoạn luồng mua hàng trong ứng dụng của bạn.
:::
## Bước 1. Cung cấp Bundle ID và Apple app ID \{#step-1-provide-bundle-id-and-apple-app-id\}
Cả **Bundle ID** và **Apple app ID** đều bắt buộc. **Bundle ID** là mã định danh duy nhất của ứng dụng trong App Store, cho phép các chức năng cốt lõi của Adapty hoạt động, chẳng hạn như xử lý gói đăng ký. **Apple app ID** cũng cần thiết để [tạo sản phẩm mới và đẩy lên cửa hàng](create-product#create-product-and-push-to-store) từ trang **Products**.
:::note
Nếu không có **Apple app ID**, tùy chọn **Create a new product and push to stores** trên trang **Products** sẽ bị vô hiệu hóa mà dashboard không hiển thị lý do.
:::
---
no_index: true
---
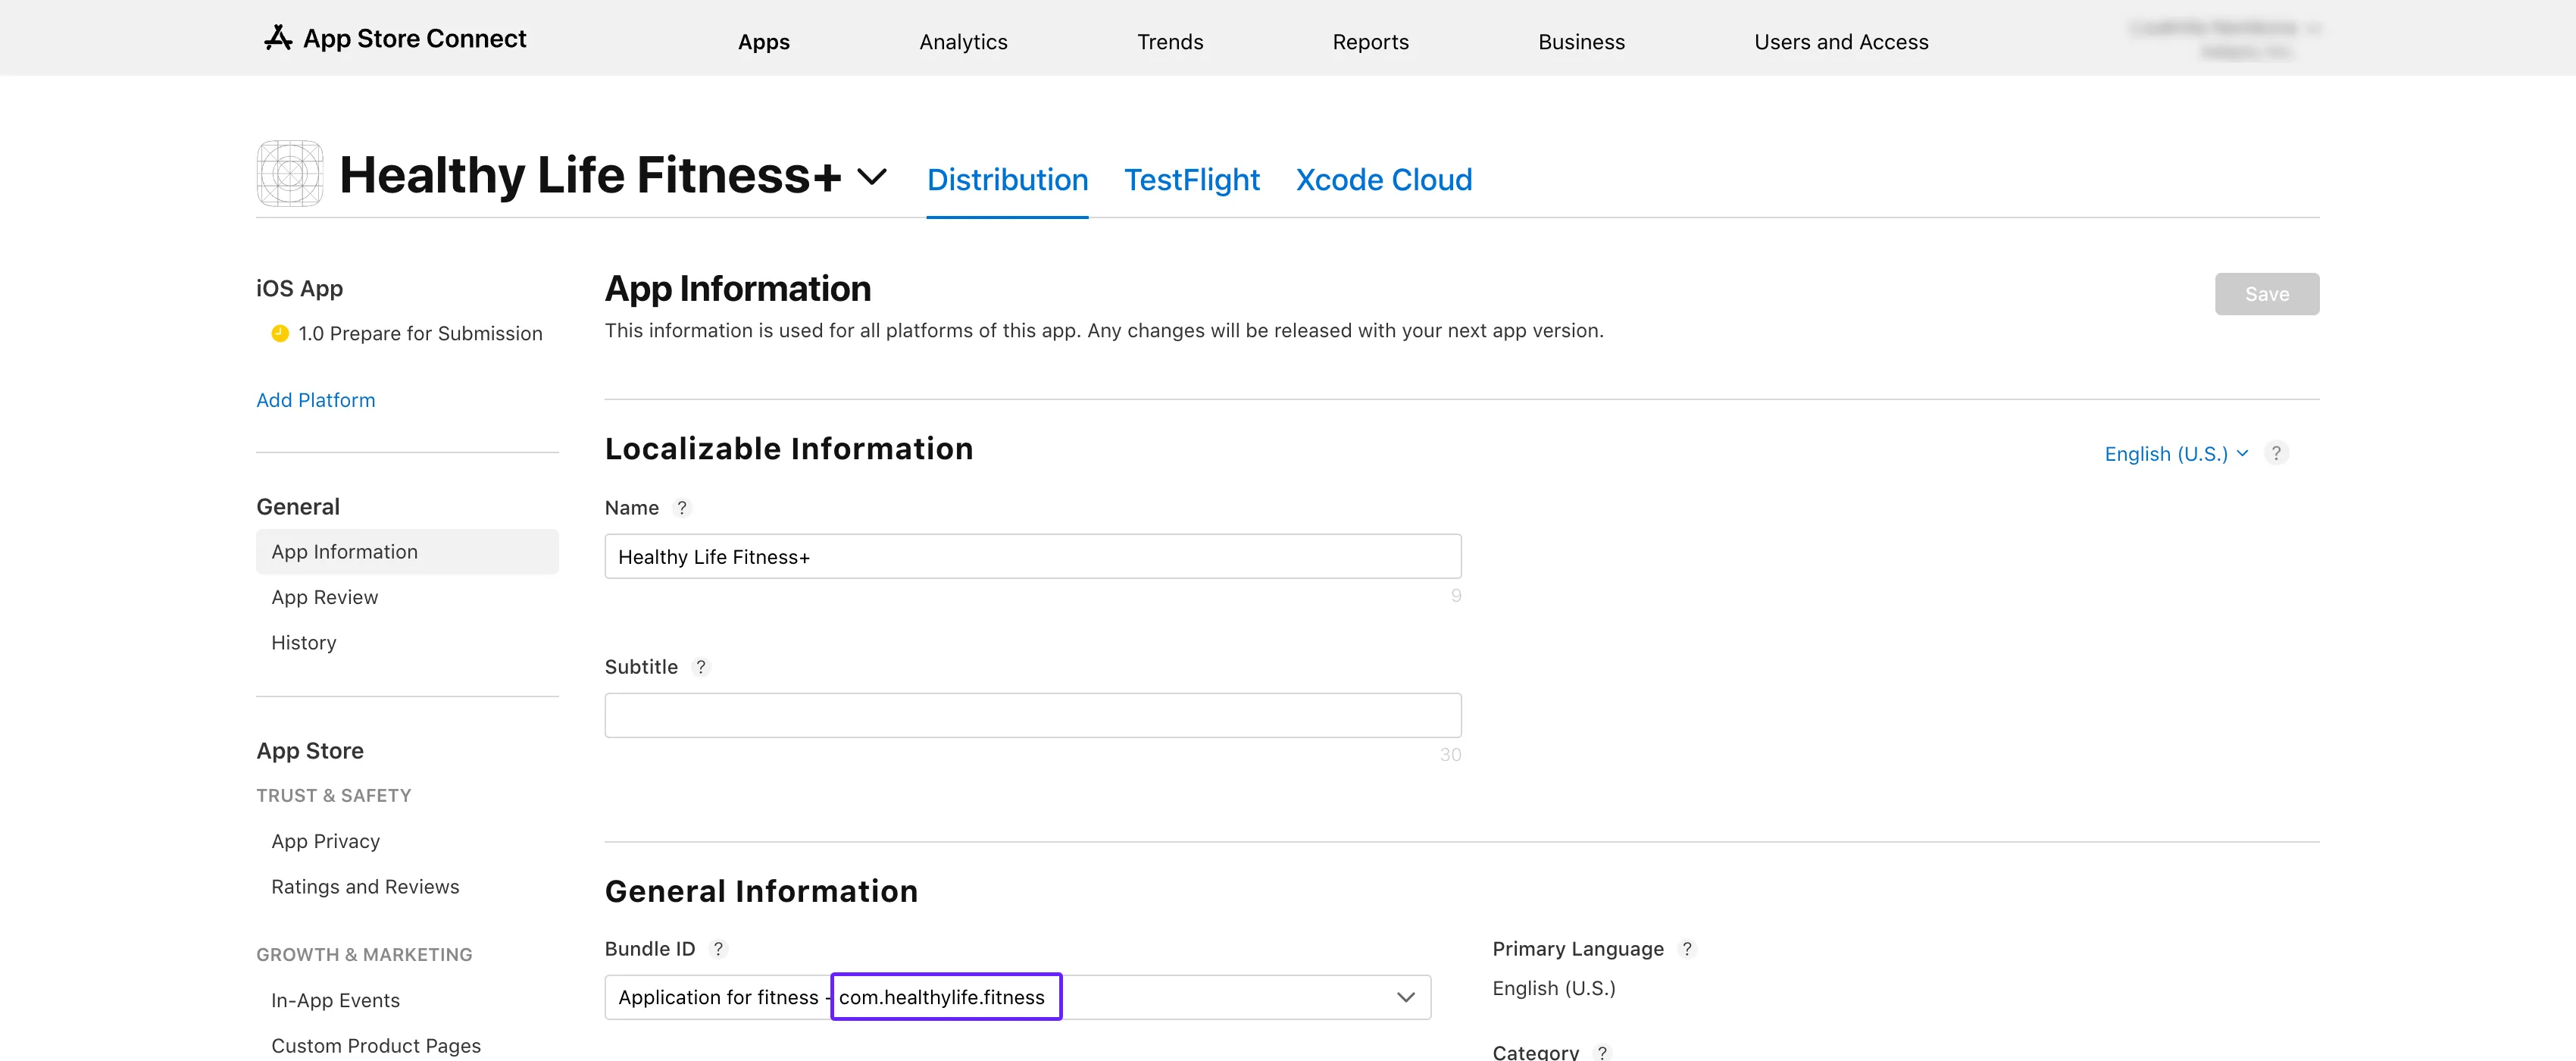
1. Mở [App Store Connect](https://appstoreconnect.apple.com/apps). Chọn ứng dụng của bạn và điều hướng đến phần **General** → **App Information**.
2. Sao chép **Bundle ID** trong mục **General Information**.
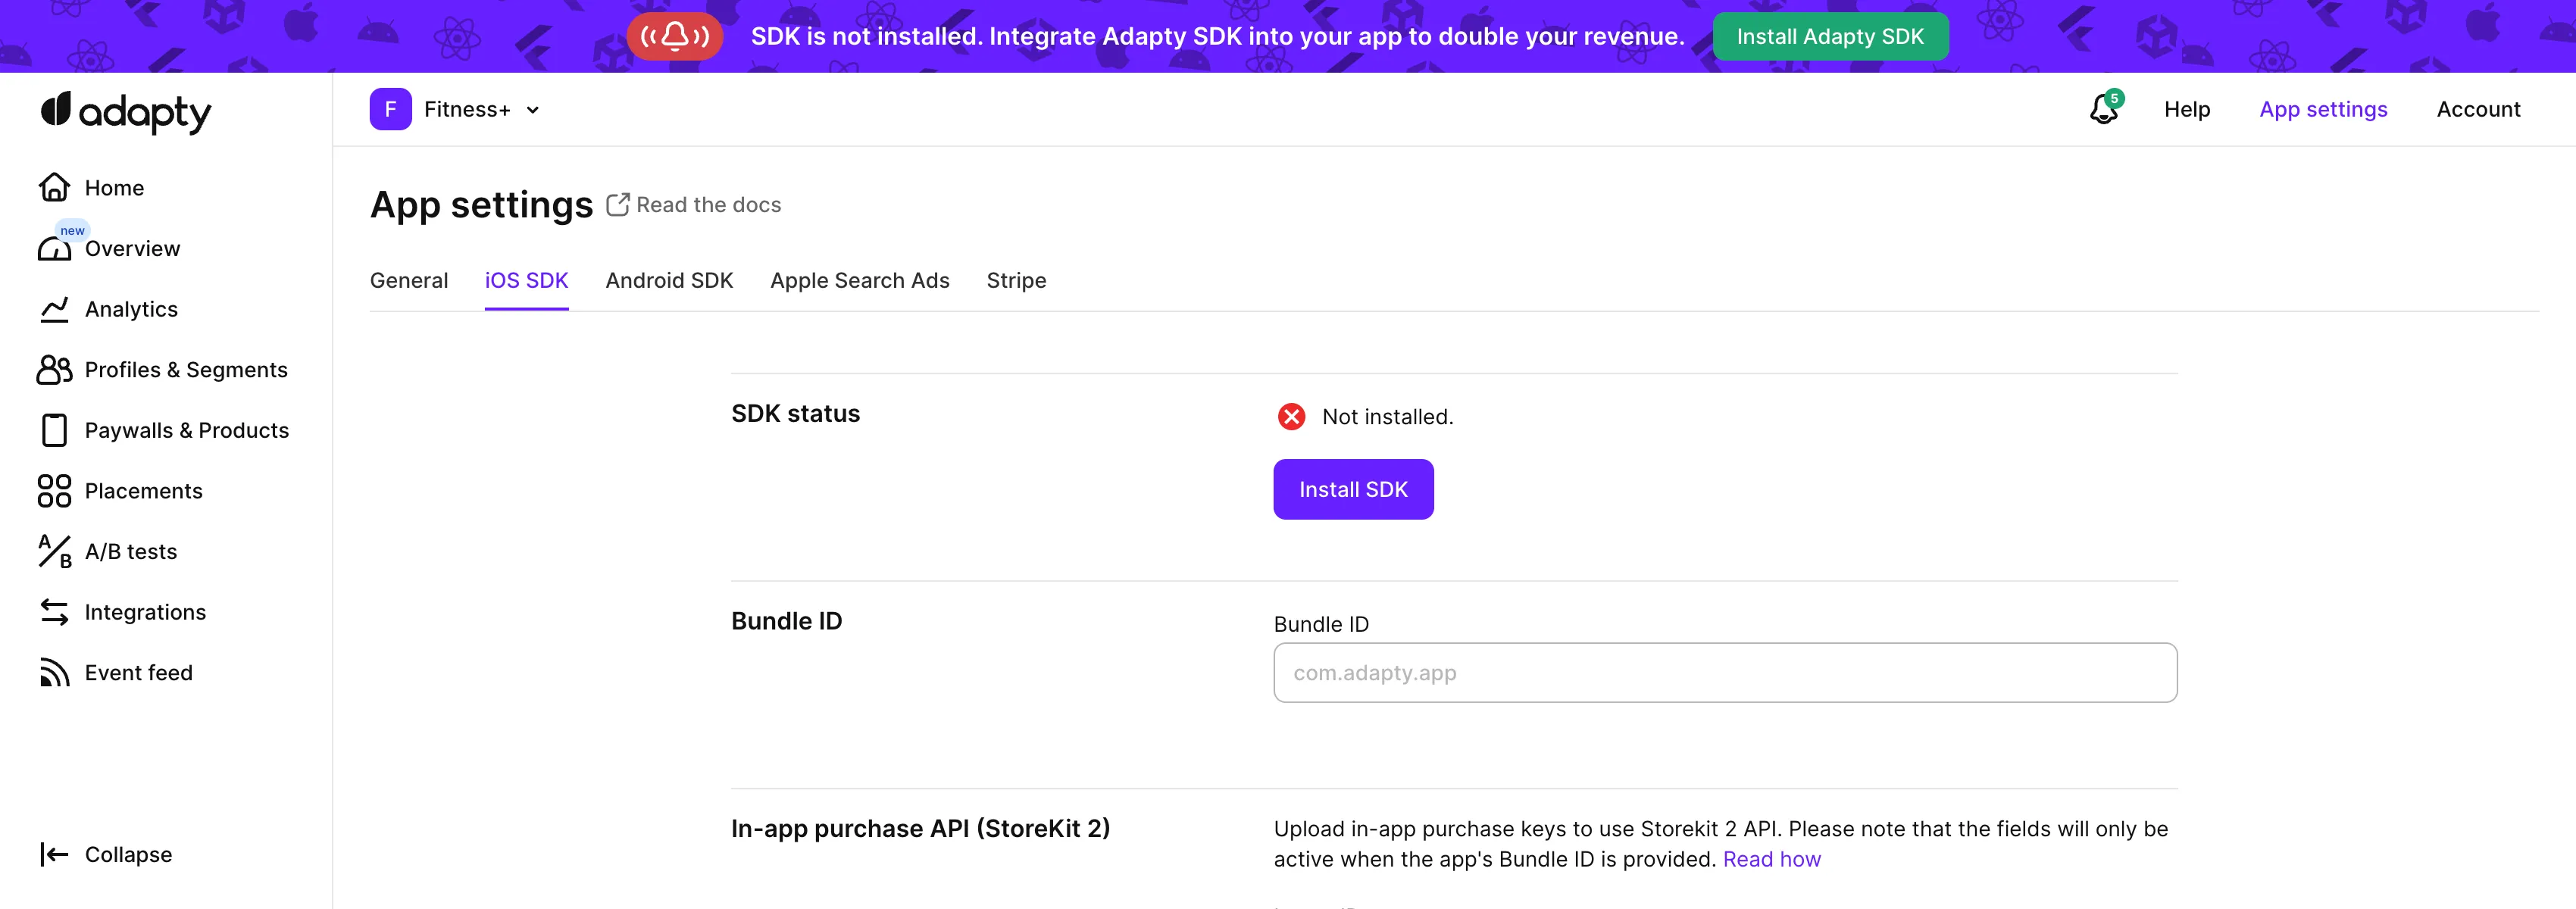
3. Mở tab [**App settings** -> **iOS SDK**](https://app.adapty.io/settings/ios-sdk) từ menu trên cùng của Adapty và dán giá trị vừa sao chép vào trường **Bundle ID**.
4. Quay lại trang **App information** trong App Store Connect và sao chép **Apple ID** tại đó.
5. Trên trang [**App settings** -> **iOS SDK**](https://app.adapty.io/settings/ios-sdk) trong Adapty dashboard, dán ID vào trường **Apple app ID**.
## Bước 2. Cung cấp Issuer ID và Key ID \{#step-2-provide-issuer-id-and-key-id\}
**In-app purchase Issuer ID** (được gọi là **Issuer ID** trong App Store Connect) là một ID đặc biệt dùng để xác định tổ chức phát hành đã tạo token xác thực. **In-App Purchase Key ID** (được gọi là **Key ID** trong App Store Connect) là mã định danh duy nhất gắn với khóa mã hóa bạn đã tạo trong phần [Tạo In-App Purchase Key trong App Store Connect](generate-in-app-purchase-key).
1. Mở **App Store Connect**. Điều hướng đến mục [**Users and Access** → **Integrations** → **In-App Purchase**](https://appstoreconnect.apple.com/access/integrations/api/subs).
2. Trong danh sách **Active**, tìm khóa bạn đã tạo ở phần [Tạo In-App Purchase Key trong App Store Connect](generate-in-app-purchase-key).
3. Sao chép **Issuer ID** và dán vào trường **In-app purchase Issuer ID** trên Adapty Dashboard.
4. Sao chép **Key ID** và dán vào trường **In-app purchase Key ID** trên Adapty Dashboard.
## Bước 3. Tải lên file In-App Purchase Key \{#step-3-upload-in-app-purchase-key-file\}
Tải lên file **In-App Purchase Key** bạn đã tải xuống ở phần [Tạo In-App Purchase Key trong App Store Connect](generate-in-app-purchase-key)
vào trường **Private key (.p8 file)** trên Adapty Dashboard.
## Bước 4. Đối với trial và ưu đãi đặc biệt – thiết lập promotional offers \{#step-4-for-trials-and-special-offers--set-up-promotional-offers\}
:::important
Bước này bắt buộc nếu ứng dụng của bạn có [trial hoặc các ưu đãi khác](offers).
:::
1. Sao chép key ID bạn đã dùng ở [Bước 2](#step-2-provide-issuer-id-and-key-id) vào trường **Subscription key ID** trong mục **App Store promotional offers**.
2. Tải lên file **In-App Purchase Key** bạn đã dùng ở [Bước 3](#step-3-upload-in-app-purchase-key-file) vào khu vực **Subscription key (.p8 file)** trong mục **App Store promotional offers**.
## Bước 5. Nhập App Store shared secret \{#step-5-enter-app-store-shared-secret\}
**App Store shared secret** (còn được gọi là App Store Connect Shared Secret) là một chuỗi thập lục phân 32 ký tự dùng để xác thực in-app purchase và receipt của gói đăng ký.
1. Mở [App Store Connect](https://appstoreconnect.apple.com/apps). Chọn ứng dụng của bạn và điều hướng đến mục **General** → **App Information**.
2. Cuộn xuống phần **App-Specific Shared Secret**.
:::info
Nếu không thấy phần **App-Specific Shared Secret**, hãy đảm bảo bạn có vai trò Account Holder hoặc Admin. Nếu bạn có vai trò Admin nhưng vẫn không thấy phần này, hãy yêu cầu Account Holder của ứng dụng (người đã tạo ứng dụng trong App Store Connect) tạo App Store shared secret. Sau đó, phần này sẽ hiển thị với các Admin khác.
:::
3. Nhấp vào nút **Manage**.
4. Trong cửa sổ **App-Specific Shared Secret** vừa mở, sao chép **Shared Secret**. Nếu chưa thấy shared secret, hãy nhấp vào nút **Manage** hoặc **Generate** (tùy nút nào đang hiển thị), sau đó sao chép **Shared Secret**.
5. Dán **Shared Secret** vừa sao chép vào trường **App Store shared secret** trên Adapty Dashboard.
6. Nhấp vào nút **Save** trên Adapty Dashboard để xác nhận các thay đổi.
## Bước 6. Thêm App Store Connect API key \{#step-6-add-app-store-connect-api-key\}
Tạo App Store Connect API key và thêm vào Adapty để có thể [quản lý sản phẩm trên App Store từ Adapty dashboard](create-product#create-product-and-push-to-store):
1. Trong App Store Connect, đi tới [**Users and Access > Integrations > Team keys**](https://appstoreconnect.apple.com/access/integrations/api) và nhấp **+**.
2. Trong cửa sổ **Generate API key**, nhập tên cho khóa và cấp quyền truy cập **Admin**.
3. Nhấp **Download** bên cạnh khóa của bạn. Lưu ý rằng bạn chỉ có thể tải xuống một lần.
4. Trên Adapty dashboard, đi tới [**App settings > iOS SDK**](https://app.adapty.io/settings/ios-sdk) và nhấp **Connect API key**.
5. Điền vào các trường trong cửa sổ:
- **Issuer ID**: Sao chép từ [**Users and Access > Integrations > Team keys**](https://appstoreconnect.apple.com/access/integrations/api). Nó nằm phía trên bảng **API keys**.
- **Key ID**: Sao chép từ [**Users and Access > Integrations > Team keys**](https://appstoreconnect.apple.com/access/integrations/api). Nó nằm trong bảng **API keys** bên cạnh khóa của bạn.
- **API key**: Tải lên file API key bạn đã tải xuống từ App Store Connect.
6. Nhấp **Connect**.
**Bước tiếp theo**
- [Bật thông báo máy chủ App Store](enable-app-store-server-notifications)
 3. Sao chép **Issuer ID** và dán vào trường **In-app purchase Issuer ID** trên Adapty Dashboard.
 4. Sao chép **Key ID** và dán vào trường **In-app purchase Key ID** trên Adapty Dashboard.
## Bước 3. Tải lên file In-App Purchase Key \{#step-3-upload-in-app-purchase-key-file\}
Tải lên file **In-App Purchase Key** bạn đã tải xuống ở phần [Tạo In-App Purchase Key trong App Store Connect](generate-in-app-purchase-key)
4. Sao chép **Key ID** và dán vào trường **In-app purchase Key ID** trên Adapty Dashboard.
## Bước 3. Tải lên file In-App Purchase Key \{#step-3-upload-in-app-purchase-key-file\}
Tải lên file **In-App Purchase Key** bạn đã tải xuống ở phần [Tạo In-App Purchase Key trong App Store Connect](generate-in-app-purchase-key)
 vào trường **Private key (.p8 file)** trên Adapty Dashboard.
 ## Bước 4. Đối với trial và ưu đãi đặc biệt – thiết lập promotional offers \{#step-4-for-trials-and-special-offers--set-up-promotional-offers\}
:::important
Bước này bắt buộc nếu ứng dụng của bạn có [trial hoặc các ưu đãi khác](offers).
:::
1. Sao chép key ID bạn đã dùng ở [Bước 2](#step-2-provide-issuer-id-and-key-id) vào trường **Subscription key ID** trong mục **App Store promotional offers**.
2. Tải lên file **In-App Purchase Key** bạn đã dùng ở [Bước 3](#step-3-upload-in-app-purchase-key-file) vào khu vực **Subscription key (.p8 file)** trong mục **App Store promotional offers**.
## Bước 4. Đối với trial và ưu đãi đặc biệt – thiết lập promotional offers \{#step-4-for-trials-and-special-offers--set-up-promotional-offers\}
:::important
Bước này bắt buộc nếu ứng dụng của bạn có [trial hoặc các ưu đãi khác](offers).
:::
1. Sao chép key ID bạn đã dùng ở [Bước 2](#step-2-provide-issuer-id-and-key-id) vào trường **Subscription key ID** trong mục **App Store promotional offers**.
2. Tải lên file **In-App Purchase Key** bạn đã dùng ở [Bước 3](#step-3-upload-in-app-purchase-key-file) vào khu vực **Subscription key (.p8 file)** trong mục **App Store promotional offers**.
 ## Bước 5. Nhập App Store shared secret \{#step-5-enter-app-store-shared-secret\}
**App Store shared secret** (còn được gọi là App Store Connect Shared Secret) là một chuỗi thập lục phân 32 ký tự dùng để xác thực in-app purchase và receipt của gói đăng ký.
1. Mở [App Store Connect](https://appstoreconnect.apple.com/apps). Chọn ứng dụng của bạn và điều hướng đến mục **General** → **App Information**.
2. Cuộn xuống phần **App-Specific Shared Secret**.
## Bước 5. Nhập App Store shared secret \{#step-5-enter-app-store-shared-secret\}
**App Store shared secret** (còn được gọi là App Store Connect Shared Secret) là một chuỗi thập lục phân 32 ký tự dùng để xác thực in-app purchase và receipt của gói đăng ký.
1. Mở [App Store Connect](https://appstoreconnect.apple.com/apps). Chọn ứng dụng của bạn và điều hướng đến mục **General** → **App Information**.
2. Cuộn xuống phần **App-Specific Shared Secret**.
 :::info
Nếu không thấy phần **App-Specific Shared Secret**, hãy đảm bảo bạn có vai trò Account Holder hoặc Admin. Nếu bạn có vai trò Admin nhưng vẫn không thấy phần này, hãy yêu cầu Account Holder của ứng dụng (người đã tạo ứng dụng trong App Store Connect) tạo App Store shared secret. Sau đó, phần này sẽ hiển thị với các Admin khác.
:::
3. Nhấp vào nút **Manage**.
:::info
Nếu không thấy phần **App-Specific Shared Secret**, hãy đảm bảo bạn có vai trò Account Holder hoặc Admin. Nếu bạn có vai trò Admin nhưng vẫn không thấy phần này, hãy yêu cầu Account Holder của ứng dụng (người đã tạo ứng dụng trong App Store Connect) tạo App Store shared secret. Sau đó, phần này sẽ hiển thị với các Admin khác.
:::
3. Nhấp vào nút **Manage**.
 4. Trong cửa sổ **App-Specific Shared Secret** vừa mở, sao chép **Shared Secret**. Nếu chưa thấy shared secret, hãy nhấp vào nút **Manage** hoặc **Generate** (tùy nút nào đang hiển thị), sau đó sao chép **Shared Secret**.
5. Dán **Shared Secret** vừa sao chép vào trường **App Store shared secret** trên Adapty Dashboard.
4. Trong cửa sổ **App-Specific Shared Secret** vừa mở, sao chép **Shared Secret**. Nếu chưa thấy shared secret, hãy nhấp vào nút **Manage** hoặc **Generate** (tùy nút nào đang hiển thị), sau đó sao chép **Shared Secret**.
5. Dán **Shared Secret** vừa sao chép vào trường **App Store shared secret** trên Adapty Dashboard.
 6. Nhấp vào nút **Save** trên Adapty Dashboard để xác nhận các thay đổi.
## Bước 6. Thêm App Store Connect API key \{#step-6-add-app-store-connect-api-key\}
Tạo App Store Connect API key và thêm vào Adapty để có thể [quản lý sản phẩm trên App Store từ Adapty dashboard](create-product#create-product-and-push-to-store):
1. Trong App Store Connect, đi tới [**Users and Access > Integrations > Team keys**](https://appstoreconnect.apple.com/access/integrations/api) và nhấp **+**.
6. Nhấp vào nút **Save** trên Adapty Dashboard để xác nhận các thay đổi.
## Bước 6. Thêm App Store Connect API key \{#step-6-add-app-store-connect-api-key\}
Tạo App Store Connect API key và thêm vào Adapty để có thể [quản lý sản phẩm trên App Store từ Adapty dashboard](create-product#create-product-and-push-to-store):
1. Trong App Store Connect, đi tới [**Users and Access > Integrations > Team keys**](https://appstoreconnect.apple.com/access/integrations/api) và nhấp **+**.
 2. Trong cửa sổ **Generate API key**, nhập tên cho khóa và cấp quyền truy cập **Admin**.
 3. Nhấp **Download** bên cạnh khóa của bạn. Lưu ý rằng bạn chỉ có thể tải xuống một lần.
 4. Trên Adapty dashboard, đi tới [**App settings > iOS SDK**](https://app.adapty.io/settings/ios-sdk) và nhấp **Connect API key**.
 5. Điền vào các trường trong cửa sổ:
- **Issuer ID**: Sao chép từ [**Users and Access > Integrations > Team keys**](https://appstoreconnect.apple.com/access/integrations/api). Nó nằm phía trên bảng **API keys**.
5. Điền vào các trường trong cửa sổ:
- **Issuer ID**: Sao chép từ [**Users and Access > Integrations > Team keys**](https://appstoreconnect.apple.com/access/integrations/api). Nó nằm phía trên bảng **API keys**.
 - **Key ID**: Sao chép từ [**Users and Access > Integrations > Team keys**](https://appstoreconnect.apple.com/access/integrations/api). Nó nằm trong bảng **API keys** bên cạnh khóa của bạn.
 - **API key**: Tải lên file API key bạn đã tải xuống từ App Store Connect.
 6. Nhấp **Connect**.
**Bước tiếp theo**
- [Bật thông báo máy chủ App Store](enable-app-store-server-notifications)
6. Nhấp **Connect**.
**Bước tiếp theo**
- [Bật thông báo máy chủ App Store](enable-app-store-server-notifications)