---
title: "React Native SDK'da Code-1000 noProductIDsFound Hatasının Çözümü"
description: "Adapty'de abonelikleri yönetirken geçersiz ürün tanımlayıcısı hatalarını çözün."
---
1000 kodlu `noProductIDsFound` hatası, paywallda talep ettiğiniz ürünlerin App Store'da listelenmiş olmalarına rağmen satın alma için mevcut olmadığını gösterir. Bu hata bazen `InvalidProductIdentifiers` uyarısıyla birlikte gelebilir. Uyarı hatasız tek başına görünüyorsa, güvenle yoksayabilirsiniz.
`noProductIDsFound` hatasıyla karşılaşıyorsanız, çözmek için şu adımları izleyin:
## Adım 1. Bundle ID'yi kontrol edin \{#step-2-check-bundle-id\}
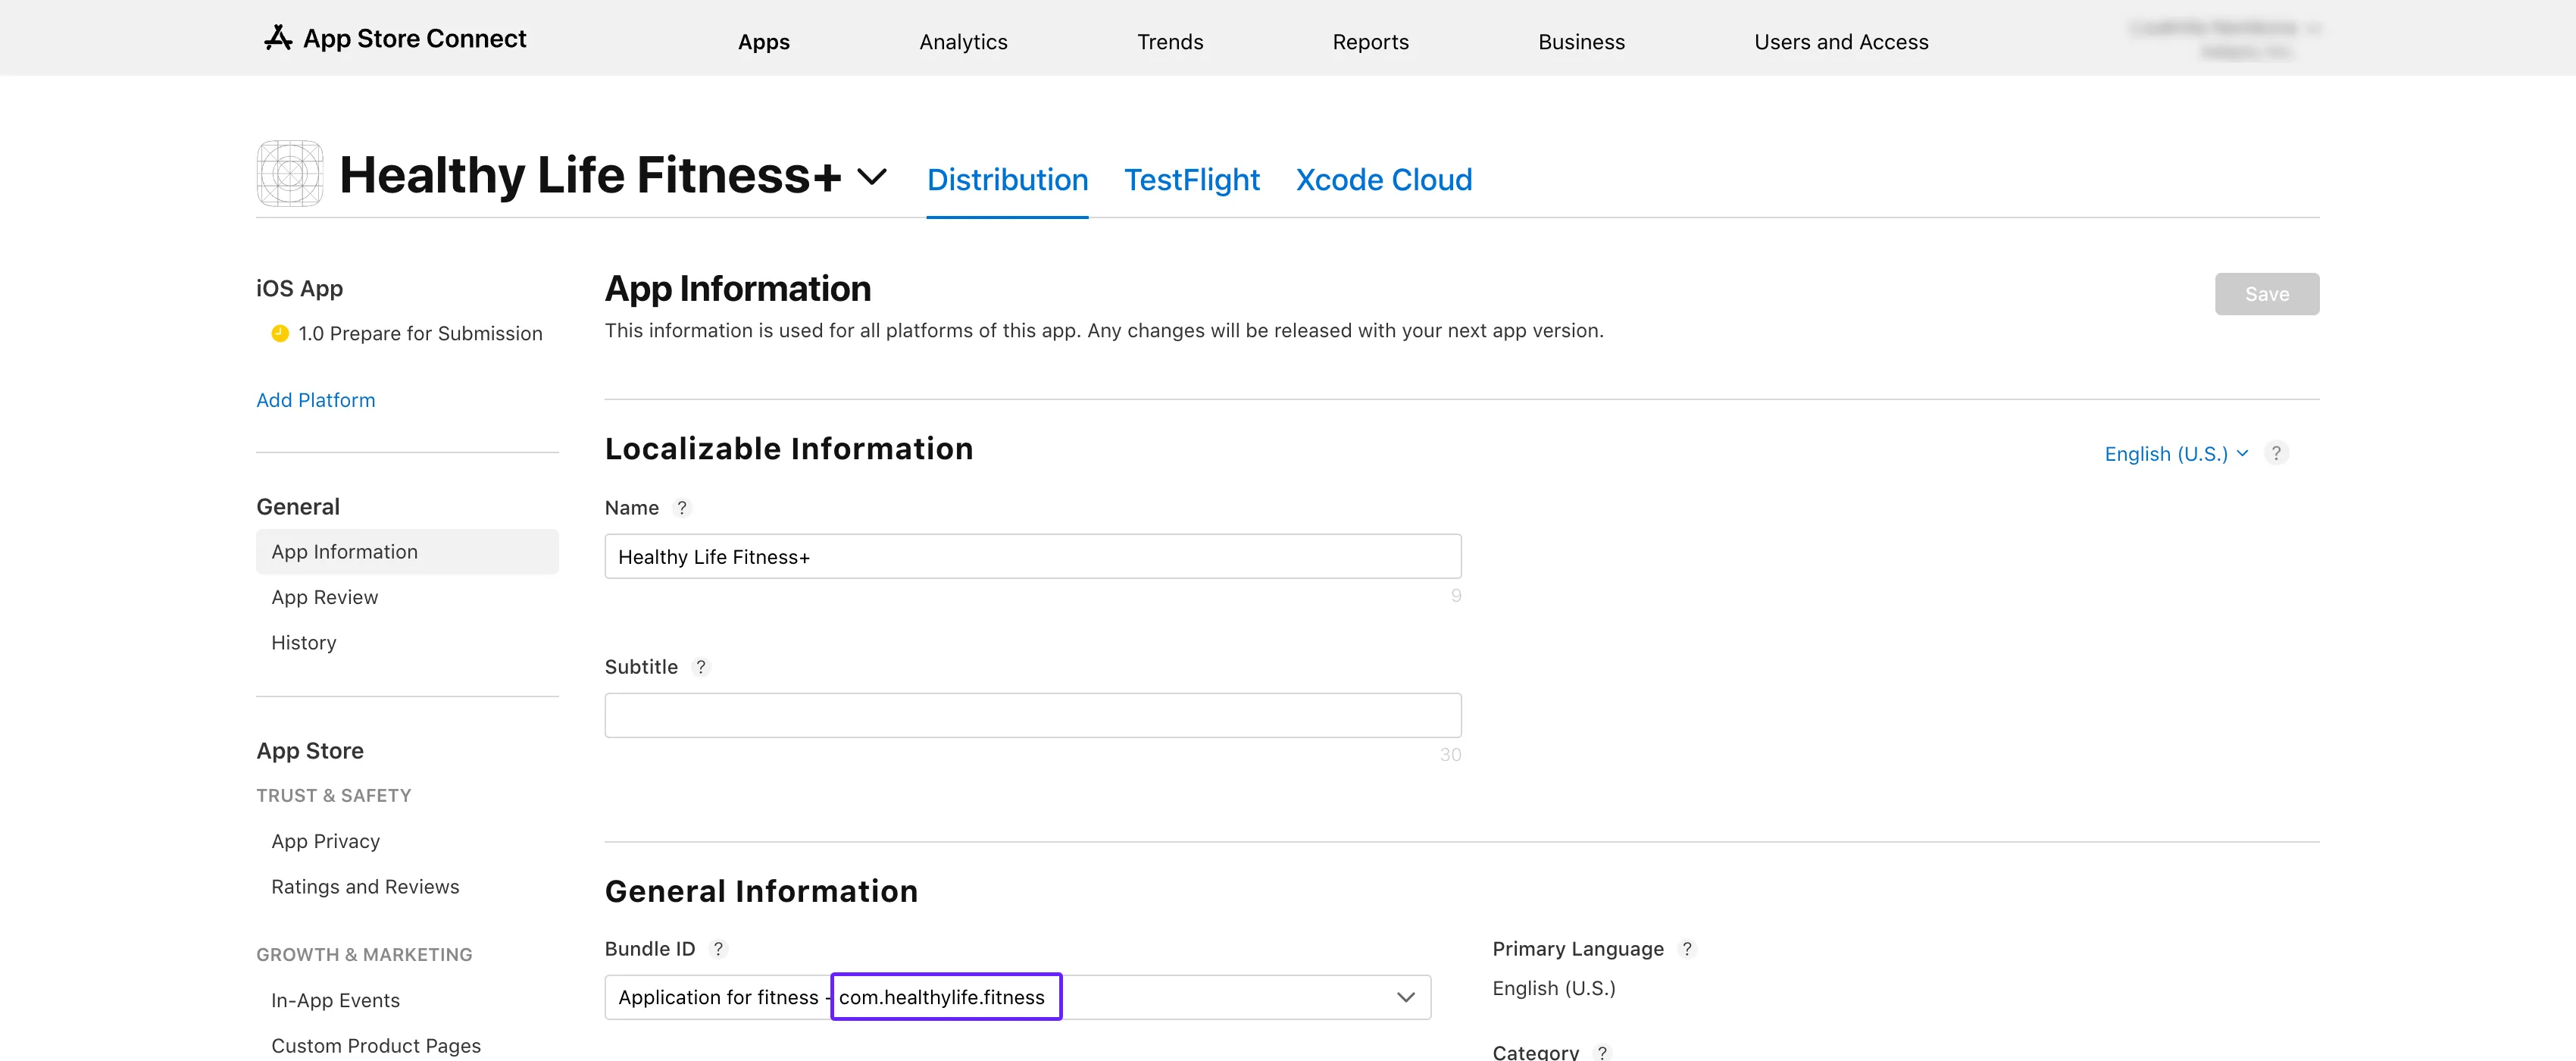
1. [App Store Connect](https://appstoreconnect.apple.com/apps)'i açın. Uygulamanızı seçin ve **General** → **App Information** bölümüne gidin.
2. **General Information** alt bölümündeki **Bundle ID**'yi kopyalayın.
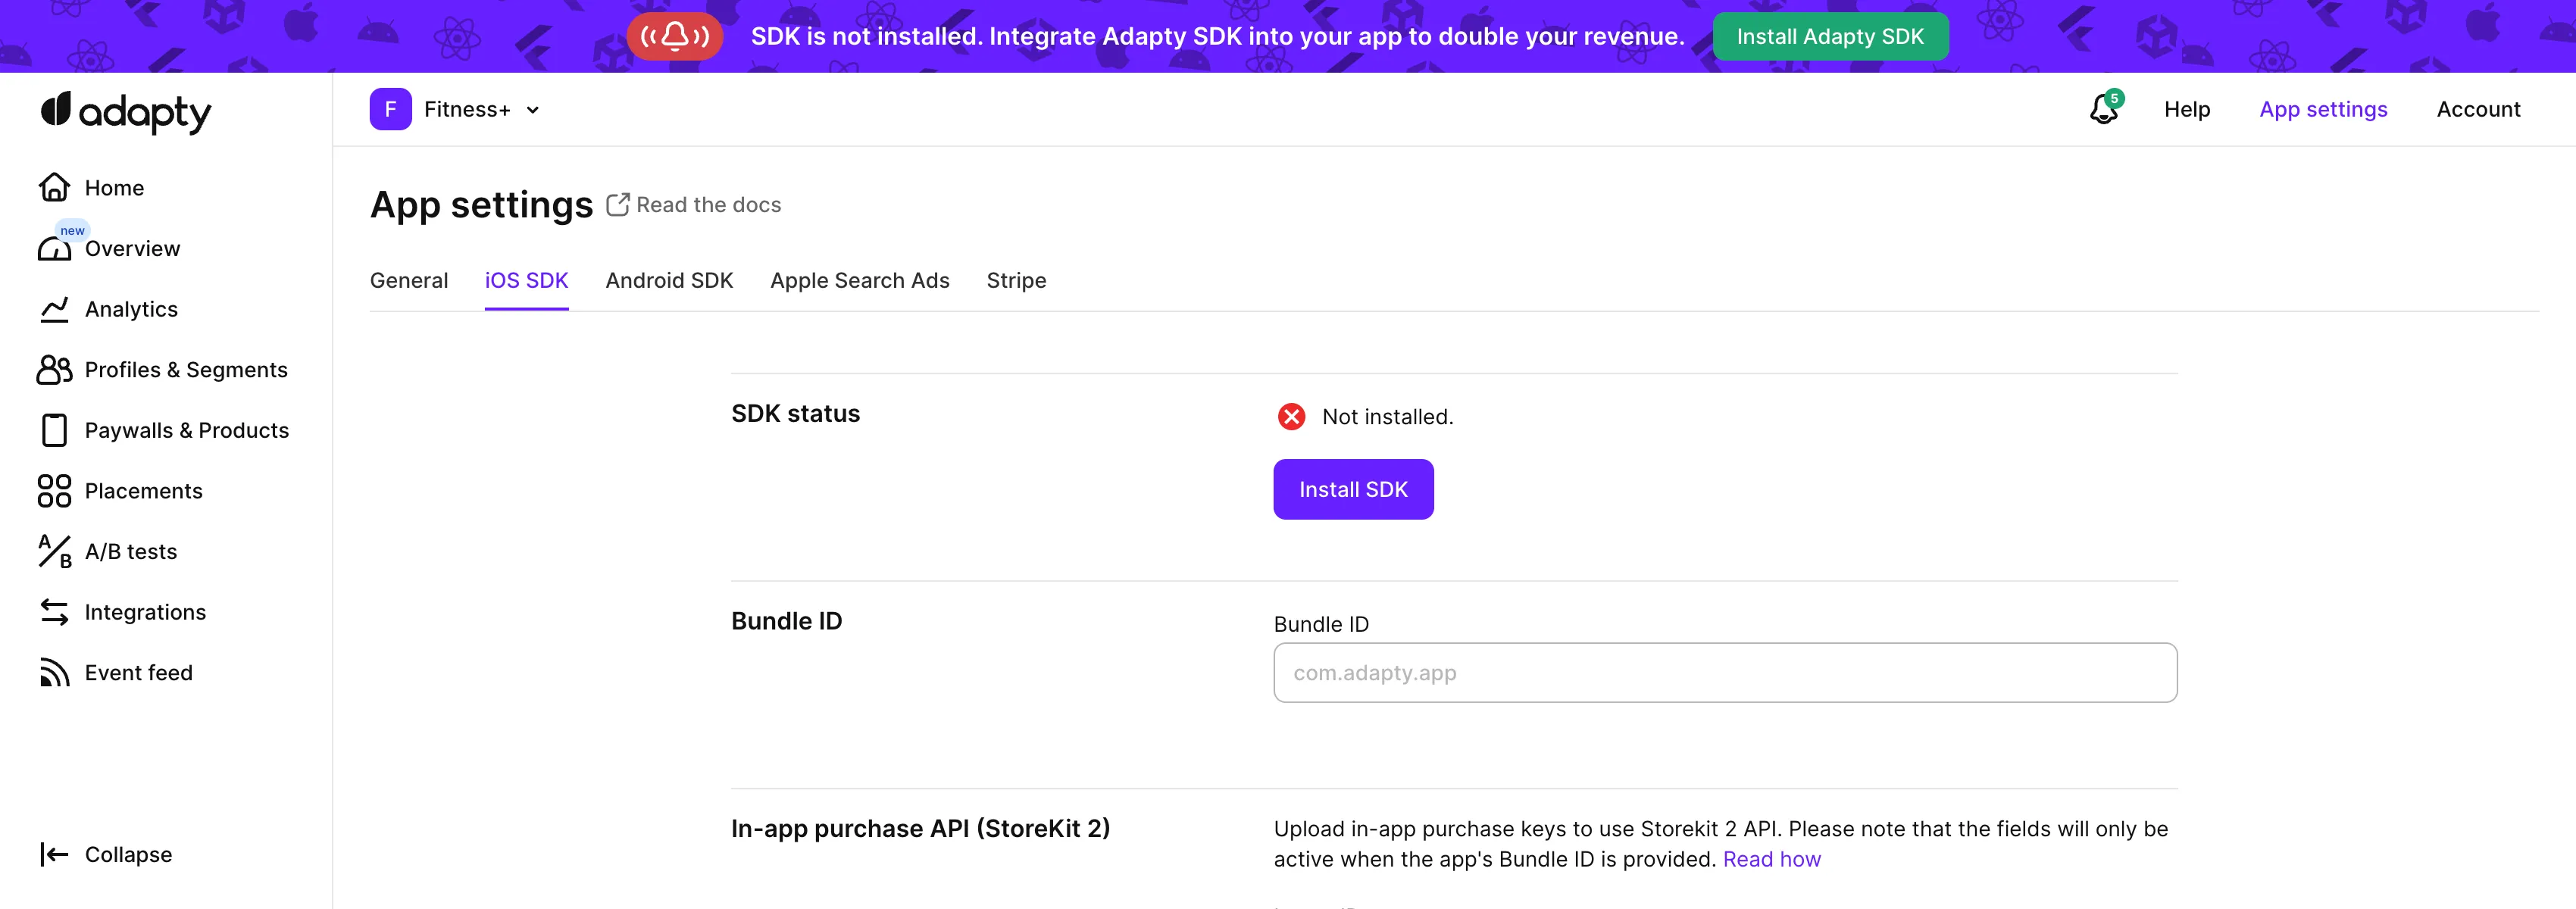
 3. Adapty üst menüsünden [**App settings** -> **iOS SDK** sekmesini](https://app.adapty.io/settings/ios-sdk) açın ve kopyaladığınız değeri **Bundle ID** alanına yapıştırın.
 4. App Store Connect'teki **App information** sayfasına geri dönün ve oradan **Apple ID**'yi kopyalayın.
5. Adapty kontrol panelindeki [**App settings** -> **iOS SDK**](https://app.adapty.io/settings/ios-sdk) sayfasında, ID'yi **Apple app ID** alanına yapıştırın.
## Adım 2. Ürünleri kontrol edin \{#step-3-check-products\}
1. **App Store Connect**'e gidin ve sol menüden [**Monetization** → **Subscriptions**](https://appstoreconnect.apple.com/apps/6477523342/distribution/subscriptions) bölümüne geçin.
4. App Store Connect'teki **App information** sayfasına geri dönün ve oradan **Apple ID**'yi kopyalayın.
5. Adapty kontrol panelindeki [**App settings** -> **iOS SDK**](https://app.adapty.io/settings/ios-sdk) sayfasında, ID'yi **Apple app ID** alanına yapıştırın.
## Adım 2. Ürünleri kontrol edin \{#step-3-check-products\}
1. **App Store Connect**'e gidin ve sol menüden [**Monetization** → **Subscriptions**](https://appstoreconnect.apple.com/apps/6477523342/distribution/subscriptions) bölümüne geçin.
 2. Abonelik grubu adına tıklayın. Ürünlerinizi **Subscriptions** bölümü altında göreceksiniz.
3. Test ettiğiniz ürünün **Ready to Submit** olarak işaretlendiğinden emin olun.
2. Abonelik grubu adına tıklayın. Ürünlerinizi **Subscriptions** bölümü altında göreceksiniz.
3. Test ettiğiniz ürünün **Ready to Submit** olarak işaretlendiğinden emin olun.
 4. Tablodaki ürün ID'sini Adapty Kontrol Paneli'ndeki [**Products**](https://app.adapty.io/products) sekmesindekiyle karşılaştırın. ID'ler eşleşmiyorsa, tablodaki ürün ID'sini kopyalayın ve Adapty Kontrol Paneli'nde bununla bir [ürün oluşturun](create-product).
 ## Adım 3. Ürün kullanılabilirliğini kontrol edin \{#step-4-check-product-availability\}
1. **App Store Connect**'e geri dönün ve aynı **Subscriptions** bölümünü açın.
2. Ürünlerinizi görüntülemek için abonelik grubu adına tıklayın.
3. Test ettiğiniz ürünü seçin.
## Adım 3. Ürün kullanılabilirliğini kontrol edin \{#step-4-check-product-availability\}
1. **App Store Connect**'e geri dönün ve aynı **Subscriptions** bölümünü açın.
2. Ürünlerinizi görüntülemek için abonelik grubu adına tıklayın.
3. Test ettiğiniz ürünü seçin.
 4. **Availability** bölümüne kaydırın ve gerekli tüm ülke ve bölgelerin listelendiğini kontrol edin.
 ## Adım 4. Ürün fiyatlarını kontrol edin \{#step-5-check-product-prices\}
1. **App Store Connect**'te tekrar **Monetization** → **Subscriptions** bölümüne gidin.
2. Abonelik grubu adına tıklayın.
3. Test ettiğiniz ürünü seçin.
4. **Subscription Pricing** bölümüne kaydırın ve **Current Pricing for New Subscribers** bölümünü genişletin.
## Adım 4. Ürün fiyatlarını kontrol edin \{#step-5-check-product-prices\}
1. **App Store Connect**'te tekrar **Monetization** → **Subscriptions** bölümüne gidin.
2. Abonelik grubu adına tıklayın.
3. Test ettiğiniz ürünü seçin.
4. **Subscription Pricing** bölümüne kaydırın ve **Current Pricing for New Subscribers** bölümünü genişletin.
 5. Gerekli tüm fiyatların listelendiğinden emin olun.
 ## Adım 5. Uygulamanın ücretli durumunu, banka hesabını ve vergi formlarının aktif olduğunu kontrol edin \{#step-5-check-app-paid-status-bank-account-and-tax-forms-are-active\}
1. [**App Store Connect**](https://appstoreconnect.apple.com/) ana sayfasında **Business**'a tıklayın.
## Adım 5. Uygulamanın ücretli durumunu, banka hesabını ve vergi formlarının aktif olduğunu kontrol edin \{#step-5-check-app-paid-status-bank-account-and-tax-forms-are-active\}
1. [**App Store Connect**](https://appstoreconnect.apple.com/) ana sayfasında **Business**'a tıklayın.
 2. Şirket adınızı seçin.
 3. Aşağı kaydırın ve **Paid Apps Agreement**, **Bank Account** ile **Tax forms** girişlerinin tümünün **Active** olarak göründüğünü doğrulayın.
 Bu adımları izleyerek `InvalidProductIdentifiers` uyarısını çözebilir ve ürünlerinizi mağazada yayına alabilirsiniz.