 ### During login/signup
If you're identifying users after the app launch (for example, after they log into your app or sign up), use the `identify` method to set their customer user ID.
- If you **haven't used this customer user ID before**, Adapty will automatically link it to the current profile.
- If you **have used this customer user ID to identify the user before**, Adapty will switch to working with the profile associated with this customer user ID.
:::important
Customer user IDs must be unique for each user. If you hardcode the parameter value, all users will be considered as one.
:::
```kotlin showLineNumbers
Adapty.identify("YOUR_USER_ID") // Unique for each user
.onSuccess {
// successful identify
}
.onError { error ->
// handle the error
}
```
### During the SDK activation
If you already know a customer user ID when you activate the SDK, you can send it in the `activate` method instead of calling `identify` separately.
If you know a customer user ID but set it only after the activation, that will mean that, upon activation, Adapty will create a new anonymous profile and switch to the existing one only after you call `identify`.
You can pass either an existing customer user ID (the one you have used before) or a new one. If you pass a new one, a new profile created upon activation will be automatically linked to the customer user ID.
:::note
By default, creating anonymous profiles does not affect analytics dashboards, because installs are counted based on device IDs.
A device ID represents a single installation of the app from the store on a device and is regenerated only after the app is reinstalled.
It does not depend on whether this is a first or repeated installation, or whether an existing customer user ID is used.
Creating a profile (on SDK activation or logout), logging in, or upgrading the app without reinstalling the app does not generate additional install events.
If you want to count installs based on unique users rather than devices, go to **App settings** and configure [**Installs definition for analytics**](general#4-installs-definition-for-analytics).
:::
```kotlin showLineNumbers
AdaptyConfig.Builder("PUBLIC_SDK_KEY")
.withCustomerUserId("user123") // Customer user IDs must be unique for each user. If you hardcode the parameter value, all users will be considered as one.
.build()
```
### Log users out
If you have a button for logging users out, use the `logout` method.
:::important
Logging users out creates a new anonymous profile for the user.
:::
```kotlin showLineNumbers
Adapty.logout()
.onSuccess {
// successful logout
}
.onError { error ->
// handle the error
}
```
:::info
To log users back into the app, use the `identify` method.
:::
### Allow purchases without login
If your users can make purchases both before and after they log into your app, you need to ensure that they will keep access after they log in:
1. When a logged-out user makes a purchase, Adapty ties it to their anonymous profile ID.
2. When the user logs into their account, Adapty switches to working with their identified profile.
- If it is a new customer user ID (e.g., the purchase has been made before registration), Adapty assigns the customer user ID to the current profile, so all the purchase history is maintained.
- If it is an existing customer user ID (the customer user ID is already linked to a profile), you need to get the actual access level after the profile switch. You can either call [`getProfile`](kmp-check-subscription-status.md) right after the identification, or [listen for profile updates](kmp-check-subscription-status.md) so the data syncs automatically.
## Next steps
Congratulations! You have implemented in-app payment logic in your app! We wish you all the best with your app monetization!
To get even more from Adapty, you can explore these topics:
- [**Testing**](troubleshooting-test-purchases.md): Ensure that everything works as expected
- [**Integrations**](configuration.md): Integrate with marketing attribution and analytics services in just one line of code
- [**Set custom profile attributes**](kmp-setting-user-attributes.md): Add custom attributes to user profiles and create segments, so you can launch A/B tests or show different paywalls to different users
---
# File: adapty-cursor-kmp
---
---
title: "Integrate Adapty into your Kotlin Multiplatform app with AI assistance"
description: "A step-by-step guide to integrating Adapty into your Kotlin Multiplatform app using Cursor, Context7, ChatGPT, Claude, or other AI tools."
---
This guide helps you integrate Adapty into your Kotlin Multiplatform app with the help of an LLM. You'll start by preparing your Adapty dashboard, then work through each implementation stage by sending focused doc links to your LLM. At the end, you'll find best practices for setting up your AI tools with Adapty documentation.
:::tip
Copy this entire page as Markdown and paste it into your LLM to get started — click **Copy for LLM** at the top of the page or open [the .md version](https://adapty.io/docs/adapty-cursor-kmp.md). The LLM will use the guide links and checkpoints to walk you through each stage.
:::
## Before you start: dashboard checklist
Adapty requires dashboard configuration before you write any SDK code. Your LLM cannot look up dashboard values for you — you'll need to provide them.
### Required before coding
1. **Connect your app stores**: In the Adapty Dashboard, go to **App settings → General**. Connect both App Store and Google Play if your KMP app targets both platforms. This is required for purchases to work.
[Connect app stores](integrate-payments.md)
2. **Copy your Public SDK key**: In the Adapty Dashboard, go to **App settings → General**, then find the **API keys** section. In code, this is the string you pass to the Adapty configuration builder.
3. **Create at least one product**: In the Adapty Dashboard, go to the **Products** page. You don't reference products directly in code — Adapty delivers them through paywalls.
[Add products](quickstart-products.md)
4. **Create a paywall and a placement**: In the Adapty Dashboard, create a paywall on the **Paywalls** page, then assign it to a placement on the **Placements** page. In code, the placement ID is the string you pass to `Adapty.getPaywall("YOUR_PLACEMENT_ID")`.
[Create paywall](quickstart-paywalls.md)
5. **Set up access levels**: In the Adapty Dashboard, configure per product on the **Products** page. In code, the string checked in `profile.accessLevels["premium"]?.isActive`. The default `premium` access level works for most apps. If paying users get access to different features depending on the product (for example, a `basic` plan vs. a `pro` plan), [create additional access levels](assigning-access-level-to-a-product.md) before you start coding.
:::tip
Once you have all five, you're ready to write code. Tell your LLM: "My Public SDK key is X, my placement ID is Y" so it can generate correct initialization and paywall-fetching code.
:::
### Set up when ready
These are not required to start coding, but you'll want them as your integration matures:
- **A/B tests**: Configure on the **Placements** page. No code change needed.
[A/B tests](ab-tests.md)
- **Additional paywalls and placements**: Add more `getPaywall` calls with different placement IDs.
- **Analytics integrations**: Configure on the **Integrations** page. Setup varies by integration. See [analytics integrations](analytics-integration.md) and [attribution integrations](attribution-integration.md).
## Feed Adapty docs to your LLM
### Use Context7 (recommended)
[Context7](https://context7.com) is an MCP server that gives your LLM direct access to up-to-date Adapty documentation. Your LLM fetches the right docs automatically based on what you ask — no manual URL pasting needed.
Context7 works with **Cursor**, **Claude Code**, **Windsurf**, and other MCP-compatible tools. To set it up, run:
```
npx ctx7 setup
```
This detects your editor and configures the Context7 server. For manual setup, see the [Context7 GitHub repository](https://github.com/upstash/context7).
Once configured, reference the Adapty library in your prompts:
```
Use the adaptyteam/adapty-docs library to look up how to install the Kotlin Multiplatform SDK
```
:::warning
Even though Context7 removes the need to paste doc links manually, the implementation order matters. Follow the [implementation walkthrough](#implementation-walkthrough) below step by step to make sure everything works.
:::
### Use plain text docs
You can access any Adapty doc as plain text Markdown. Add `.md` to the end of its URL, or click **Copy for LLM** under the article title. For example: [adapty-cursor-kmp.md](https://adapty.io/docs/adapty-cursor-kmp.md).
Each stage in the [implementation walkthrough](#implementation-walkthrough) below includes a "Send this to your LLM" block with `.md` links to paste.
For more documentation at once, see [index files and platform-specific subsets](#plain-text-doc-index-files) below.
## Implementation walkthrough
The rest of this guide walks through Adapty integration in implementation order. Each stage includes the docs to send to your LLM, what you should see when done, and common issues.
### Plan your integration
Before jumping into code, ask your LLM to analyze your project and create an implementation plan. If your AI tool supports a planning mode (like Cursor's or Claude Code's plan mode), use it so the LLM can read both your project structure and the Adapty docs before writing any code.
Tell your LLM which approach you use for purchases — this affects the guides it should follow:
- [**Adapty Paywall Builder**](adapty-paywall-builder.md): You create paywalls in Adapty's no-code builder, and the SDK renders them automatically.
- [**Manually created paywalls**](kmp-making-purchases.md): You build your own paywall UI in code but still use Adapty to fetch products and handle purchases.
- [**Observer mode**](observer-vs-full-mode.md): You keep your existing purchase infrastructure and use Adapty only for analytics and integrations.
Not sure which one to pick? Read the [comparison table in the quickstart](kmp-quickstart-paywalls.md).
### Install and configure the SDK
Add the Adapty SDK dependency via Gradle and activate it with your Public SDK key. This is the foundation — nothing else works without it.
**Guide:** [Install & configure Adapty SDK](sdk-installation-kotlin-multiplatform.md)
Send this to your LLM:
```
Read these Adapty docs before writing code:
- https://adapty.io/docs/sdk-installation-kotlin-multiplatform.md
```
:::tip[Checkpoint]
- **Expected:** App builds and runs. Logcat (Android) or Xcode console (iOS) shows Adapty activation log.
- **Gotcha:** "Public API key is missing" → check you replaced the placeholder with your real key from App settings.
:::
### Show paywalls and handle purchases
Fetch a paywall by placement ID, display it, and handle purchase events. The guides you need depend on how you handle purchases.
Test each purchase in the sandbox as you go — don't wait until the end. See [Test purchases in sandbox](test-purchases-in-sandbox.md) for setup instructions.
### During login/signup
If you're identifying users after the app launch (for example, after they log into your app or sign up), use the `identify` method to set their customer user ID.
- If you **haven't used this customer user ID before**, Adapty will automatically link it to the current profile.
- If you **have used this customer user ID to identify the user before**, Adapty will switch to working with the profile associated with this customer user ID.
:::important
Customer user IDs must be unique for each user. If you hardcode the parameter value, all users will be considered as one.
:::
```kotlin showLineNumbers
Adapty.identify("YOUR_USER_ID") // Unique for each user
.onSuccess {
// successful identify
}
.onError { error ->
// handle the error
}
```
### During the SDK activation
If you already know a customer user ID when you activate the SDK, you can send it in the `activate` method instead of calling `identify` separately.
If you know a customer user ID but set it only after the activation, that will mean that, upon activation, Adapty will create a new anonymous profile and switch to the existing one only after you call `identify`.
You can pass either an existing customer user ID (the one you have used before) or a new one. If you pass a new one, a new profile created upon activation will be automatically linked to the customer user ID.
:::note
By default, creating anonymous profiles does not affect analytics dashboards, because installs are counted based on device IDs.
A device ID represents a single installation of the app from the store on a device and is regenerated only after the app is reinstalled.
It does not depend on whether this is a first or repeated installation, or whether an existing customer user ID is used.
Creating a profile (on SDK activation or logout), logging in, or upgrading the app without reinstalling the app does not generate additional install events.
If you want to count installs based on unique users rather than devices, go to **App settings** and configure [**Installs definition for analytics**](general#4-installs-definition-for-analytics).
:::
```kotlin showLineNumbers
AdaptyConfig.Builder("PUBLIC_SDK_KEY")
.withCustomerUserId("user123") // Customer user IDs must be unique for each user. If you hardcode the parameter value, all users will be considered as one.
.build()
```
### Log users out
If you have a button for logging users out, use the `logout` method.
:::important
Logging users out creates a new anonymous profile for the user.
:::
```kotlin showLineNumbers
Adapty.logout()
.onSuccess {
// successful logout
}
.onError { error ->
// handle the error
}
```
:::info
To log users back into the app, use the `identify` method.
:::
### Allow purchases without login
If your users can make purchases both before and after they log into your app, you need to ensure that they will keep access after they log in:
1. When a logged-out user makes a purchase, Adapty ties it to their anonymous profile ID.
2. When the user logs into their account, Adapty switches to working with their identified profile.
- If it is a new customer user ID (e.g., the purchase has been made before registration), Adapty assigns the customer user ID to the current profile, so all the purchase history is maintained.
- If it is an existing customer user ID (the customer user ID is already linked to a profile), you need to get the actual access level after the profile switch. You can either call [`getProfile`](kmp-check-subscription-status.md) right after the identification, or [listen for profile updates](kmp-check-subscription-status.md) so the data syncs automatically.
## Next steps
Congratulations! You have implemented in-app payment logic in your app! We wish you all the best with your app monetization!
To get even more from Adapty, you can explore these topics:
- [**Testing**](troubleshooting-test-purchases.md): Ensure that everything works as expected
- [**Integrations**](configuration.md): Integrate with marketing attribution and analytics services in just one line of code
- [**Set custom profile attributes**](kmp-setting-user-attributes.md): Add custom attributes to user profiles and create segments, so you can launch A/B tests or show different paywalls to different users
---
# File: adapty-cursor-kmp
---
---
title: "Integrate Adapty into your Kotlin Multiplatform app with AI assistance"
description: "A step-by-step guide to integrating Adapty into your Kotlin Multiplatform app using Cursor, Context7, ChatGPT, Claude, or other AI tools."
---
This guide helps you integrate Adapty into your Kotlin Multiplatform app with the help of an LLM. You'll start by preparing your Adapty dashboard, then work through each implementation stage by sending focused doc links to your LLM. At the end, you'll find best practices for setting up your AI tools with Adapty documentation.
:::tip
Copy this entire page as Markdown and paste it into your LLM to get started — click **Copy for LLM** at the top of the page or open [the .md version](https://adapty.io/docs/adapty-cursor-kmp.md). The LLM will use the guide links and checkpoints to walk you through each stage.
:::
## Before you start: dashboard checklist
Adapty requires dashboard configuration before you write any SDK code. Your LLM cannot look up dashboard values for you — you'll need to provide them.
### Required before coding
1. **Connect your app stores**: In the Adapty Dashboard, go to **App settings → General**. Connect both App Store and Google Play if your KMP app targets both platforms. This is required for purchases to work.
[Connect app stores](integrate-payments.md)
2. **Copy your Public SDK key**: In the Adapty Dashboard, go to **App settings → General**, then find the **API keys** section. In code, this is the string you pass to the Adapty configuration builder.
3. **Create at least one product**: In the Adapty Dashboard, go to the **Products** page. You don't reference products directly in code — Adapty delivers them through paywalls.
[Add products](quickstart-products.md)
4. **Create a paywall and a placement**: In the Adapty Dashboard, create a paywall on the **Paywalls** page, then assign it to a placement on the **Placements** page. In code, the placement ID is the string you pass to `Adapty.getPaywall("YOUR_PLACEMENT_ID")`.
[Create paywall](quickstart-paywalls.md)
5. **Set up access levels**: In the Adapty Dashboard, configure per product on the **Products** page. In code, the string checked in `profile.accessLevels["premium"]?.isActive`. The default `premium` access level works for most apps. If paying users get access to different features depending on the product (for example, a `basic` plan vs. a `pro` plan), [create additional access levels](assigning-access-level-to-a-product.md) before you start coding.
:::tip
Once you have all five, you're ready to write code. Tell your LLM: "My Public SDK key is X, my placement ID is Y" so it can generate correct initialization and paywall-fetching code.
:::
### Set up when ready
These are not required to start coding, but you'll want them as your integration matures:
- **A/B tests**: Configure on the **Placements** page. No code change needed.
[A/B tests](ab-tests.md)
- **Additional paywalls and placements**: Add more `getPaywall` calls with different placement IDs.
- **Analytics integrations**: Configure on the **Integrations** page. Setup varies by integration. See [analytics integrations](analytics-integration.md) and [attribution integrations](attribution-integration.md).
## Feed Adapty docs to your LLM
### Use Context7 (recommended)
[Context7](https://context7.com) is an MCP server that gives your LLM direct access to up-to-date Adapty documentation. Your LLM fetches the right docs automatically based on what you ask — no manual URL pasting needed.
Context7 works with **Cursor**, **Claude Code**, **Windsurf**, and other MCP-compatible tools. To set it up, run:
```
npx ctx7 setup
```
This detects your editor and configures the Context7 server. For manual setup, see the [Context7 GitHub repository](https://github.com/upstash/context7).
Once configured, reference the Adapty library in your prompts:
```
Use the adaptyteam/adapty-docs library to look up how to install the Kotlin Multiplatform SDK
```
:::warning
Even though Context7 removes the need to paste doc links manually, the implementation order matters. Follow the [implementation walkthrough](#implementation-walkthrough) below step by step to make sure everything works.
:::
### Use plain text docs
You can access any Adapty doc as plain text Markdown. Add `.md` to the end of its URL, or click **Copy for LLM** under the article title. For example: [adapty-cursor-kmp.md](https://adapty.io/docs/adapty-cursor-kmp.md).
Each stage in the [implementation walkthrough](#implementation-walkthrough) below includes a "Send this to your LLM" block with `.md` links to paste.
For more documentation at once, see [index files and platform-specific subsets](#plain-text-doc-index-files) below.
## Implementation walkthrough
The rest of this guide walks through Adapty integration in implementation order. Each stage includes the docs to send to your LLM, what you should see when done, and common issues.
### Plan your integration
Before jumping into code, ask your LLM to analyze your project and create an implementation plan. If your AI tool supports a planning mode (like Cursor's or Claude Code's plan mode), use it so the LLM can read both your project structure and the Adapty docs before writing any code.
Tell your LLM which approach you use for purchases — this affects the guides it should follow:
- [**Adapty Paywall Builder**](adapty-paywall-builder.md): You create paywalls in Adapty's no-code builder, and the SDK renders them automatically.
- [**Manually created paywalls**](kmp-making-purchases.md): You build your own paywall UI in code but still use Adapty to fetch products and handle purchases.
- [**Observer mode**](observer-vs-full-mode.md): You keep your existing purchase infrastructure and use Adapty only for analytics and integrations.
Not sure which one to pick? Read the [comparison table in the quickstart](kmp-quickstart-paywalls.md).
### Install and configure the SDK
Add the Adapty SDK dependency via Gradle and activate it with your Public SDK key. This is the foundation — nothing else works without it.
**Guide:** [Install & configure Adapty SDK](sdk-installation-kotlin-multiplatform.md)
Send this to your LLM:
```
Read these Adapty docs before writing code:
- https://adapty.io/docs/sdk-installation-kotlin-multiplatform.md
```
:::tip[Checkpoint]
- **Expected:** App builds and runs. Logcat (Android) or Xcode console (iOS) shows Adapty activation log.
- **Gotcha:** "Public API key is missing" → check you replaced the placeholder with your real key from App settings.
:::
### Show paywalls and handle purchases
Fetch a paywall by placement ID, display it, and handle purchase events. The guides you need depend on how you handle purchases.
Test each purchase in the sandbox as you go — don't wait until the end. See [Test purchases in sandbox](test-purchases-in-sandbox.md) for setup instructions.
Before you start displaying paywalls in your mobile app (click to expand)
1. [Create your products](create-product) in the Adapty Dashboard. 2. [Create a paywall and incorporate the products into it](create-paywall) in the Adapty Dashboard. 3. [Create placements and incorporate your paywall into it](create-placement) in the Adapty Dashboard. 4. Install [Adapty SDK](sdk-installation-kotlin-multiplatform) in your mobile app.optional
default: `en`
|The identifier of the [paywall localization](add-paywall-locale-in-adapty-paywall-builder). This parameter is expected to be a language code composed of one or two subtags separated by the minus (**-**) character. The first subtag is for the language, the second one is for the region.
Example: `en` means English, `pt-br` represents the Brazilian Portuguese language.
See [Localizations and locale codes](localizations-and-locale-codes) for more information on locale codes and how we recommend using them.
| | **fetchPolicy** | default: `AdaptyPaywallFetchPolicy.Default` |By default, SDK will try to load data from the server and will return cached data in case of failure. We recommend this variant because it ensures your users always get the most up-to-date data.
However, if you believe your users deal with unstable internet, consider using `AdaptyPaywallFetchPolicy.ReturnCacheDataElseLoad` to return cached data if it exists. In this scenario, users might not get the absolute latest data, but they'll experience faster loading times, no matter how patchy their internet connection is. The cache is updated regularly, so it's safe to use it during the session to avoid network requests.
Note that the cache remains intact upon restarting the app and is only cleared when the app is reinstalled or through manual cleanup.
Adapty SDK stores paywalls locally in two layers: regularly updated cache described above and [fallback paywalls](fallback-paywalls). We also use CDN to fetch paywalls faster and a stand-alone fallback server in case the CDN is unreachable. This system is designed to make sure you always get the latest version of your paywalls while ensuring reliability even in cases where internet connection is scarce.
| | **loadTimeout** | default: 5 sec |This value limits the timeout for this method. If the timeout is reached, cached data or local fallback will be returned.
Note that in rare cases this method can timeout slightly later than specified in `loadTimeout`, since the operation may consist of different requests under the hood.
For Kotlin Multiplatform: You can create `TimeInterval` with extension functions (like `5.seconds`, where `.seconds` is from `import com.adapty.utils.seconds`), or `TimeInterval.seconds(5)`. To set no limitation, use `TimeInterval.INFINITE`.
| Response parameters: | Parameter | Description | | :-------- |:----------------------------------------------------------------------------------------------------------------------------------------------------------------| | Paywall | An [`AdaptyPaywall`](https://kmp.adapty.io///adapty/com.adapty.kmp.models/-adapty-paywall/) object with a list of product IDs, the paywall identifier, remote config, and several other properties. | ## Fetch the view configuration of paywall designed using Paywall Builder :::important Make sure to enable the **Show on device** toggle in the paywall builder. If this option isn't turned on, the view configuration won't be available to retrieve. ::: After fetching the paywall, check if it includes a `ViewConfiguration`, which indicates that it was created using Paywall Builder. This will guide you on how to display the paywall. If the `ViewConfiguration` is present, treat it as a Paywall Builder paywall; if not, [handle it as a remote config paywall](present-remote-config-paywalls-kmp). Use the `createPaywallView` method to load the view configuration. ```kotlin showLineNumbers if (paywall.hasViewConfiguration) { AdaptyUI.createPaywallView( paywall = paywall, loadTimeout = 5.seconds, preloadProducts = true ).onSuccess { paywallView -> // use paywallView }.onError { error -> // handle the error } } else { // use your custom logic } ``` | Parameter | Presence | Description | | :--------------------------- | :------------- | :----------------------------------------------------------- | | **paywall** | required | An `AdaptyPaywall` object to obtain a controller for the desired paywall. | | **loadTimeout** | optional | This value limits the timeout for this method. If the timeout is reached, cached data or local fallback will be returned. Note that in rare cases this method can timeout slightly later than specified in `loadTimeout`, since the operation may consist of different requests under the hood. You can use extension functions like `5.seconds` from `kotlin.time.Duration.Companion`. | | **preloadProducts** | optional | Set to `true` to preload products for better performance. When enabled, products are loaded in advance, reducing the time needed to display the paywall. | | **productPurchaseParams** | optional | A map of [`AdaptyProductIdentifier`](https://kmp.adapty.io/adapty/com.adapty.kmp.models/-adapty-product-identifier/) to [`AdaptyPurchaseParameters`](https://kmp.adapty.io/adapty/com.adapty.kmp.models/-adapty-purchase-parameters/). Use this to configure purchase-specific parameters like personalized offers or subscription update parameters for individual products in the paywall. | :::note If you are using multiple languages, learn how to add a [Paywall Builder localization](add-paywall-locale-in-adapty-paywall-builder). ::: Once loaded, [present the paywall](kmp-present-paywalls). ## Get a paywall for a default audience to fetch it faster Typically, paywalls are fetched almost instantly, so you don't need to worry about speeding up this process. However, in cases where you have numerous audiences and paywalls, and your users have a weak internet connection, fetching a paywall may take longer than you'd like. In such situations, you might want to display a default paywall to ensure a smooth user experience rather than showing no paywall at all. To address this, you can use the `getPaywallForDefaultAudience` method, which fetches the paywall of the specified placement for the **All Users** audience. However, it's crucial to understand that the recommended approach is to fetch the paywall by the `getPaywall` method, as detailed in the [Fetch Paywall Information](#fetch-paywall-designed-with-paywall-builder) section above. :::warning Why we recommend using `getPaywall` The `getPaywallForDefaultAudience` method comes with a few significant drawbacks: - **Potential backward compatibility issues**: If you need to show different paywalls for different app versions (current and future), you may face challenges. You'll either have to design paywalls that support the current (legacy) version or accept that users with the current (legacy) version might encounter issues with non-rendered paywalls. - **Loss of targeting**: All users will see the same paywall designed for the **All Users** audience, which means you lose personalized targeting (including based on countries, marketing attribution or your own custom attributes). If you're willing to accept these drawbacks to benefit from faster paywall fetching, use the `getPaywallForDefaultAudience` method as follows. Otherwise stick to `getPaywall` described [above](#fetch-paywall-designed-with-paywall-builder). ::: ```kotlin showLineNumbers Adapty.getPaywallForDefaultAudience( placementId = "YOUR_PLACEMENT_ID", locale = "en", fetchPolicy = AdaptyPaywallFetchPolicy.Default, ).onSuccess { paywall -> // the requested paywall }.onError { error -> // handle the error } ``` | Parameter | Presence | Description | |---------|--------|-----------| | **placementId** | required | The identifier of the [Placement](placements). This is the value you specified when creating a placement in your Adapty Dashboard. | | **locale** |optional
default: `en`
|The identifier of the [paywall localization](add-remote-config-locale). This parameter is expected to be a language code composed of one or more subtags separated by the minus (**-**) character. The first subtag is for the language, the second one is for the region.
Example: `en` means English, `pt-br` represents the Brazilian Portuguese language.
See [Localizations and locale codes](localizations-and-locale-codes) for more information on locale codes and how we recommend using them.
| | **fetchPolicy** | default: `AdaptyPaywallFetchPolicy.Default` |By default, SDK will try to load data from the server and will return cached data in case of failure. We recommend this variant because it ensures your users always get the most up-to-date data.
However, if you believe your users deal with unstable internet, consider using `AdaptyPaywallFetchPolicy.ReturnCacheDataElseLoad` to return cached data if it exists. In this scenario, users might not get the absolute latest data, but they'll experience faster loading times, no matter how patchy their internet connection is. The cache is updated regularly, so it's safe to use it during the session to avoid network requests.
Note that the cache remains intact upon restarting the app and is only cleared when the app is reinstalled or through manual cleanup.
| ## Customize assets To customize images and videos in your paywall, implement the custom assets. Hero images and videos have predefined IDs: `hero_image` and `hero_video`. In a custom asset bundle, you target these elements by their IDs and customize their behavior. For other images and videos, you need to [set a custom ID](https://adapty.io/docs/custom-media) in the Adapty dashboard. For example, you can: - Show a different image or video to some users. - Show a local preview image while a remote main image is loading. - Show a preview image before running a video. :::important To use this feature, update the Adapty SDK to version 3.7.0 or higher. ::: Here's an example of how you can provide custom assets via a map: :::info The Kotlin Multiplatform SDK supports local assets only. For remote content, you should download and cache assets locally before using them in custom assets. ::: ```kotlin showLineNumbers // Import generated Res class for accessing resources viewModelScope.launch { // Get URIs for bundled resources using Res.getUri() val heroImagePath = Res.getUri("files/images/hero_image.png") val demoVideoPath = Res.getUri("files/videos/demo_video.mp4") // Or read image as byte data val imageByteData = Res.readBytes("files/images/avatar.png") // Create custom assets map val customAssets: MapEvent examples (Click to expand)
```javascript // Paywall appeared { // No additional data } // Paywall disappeared { // No additional data } ```Event example (Click to expand)
```javascript { "productId": "premium_monthly" } ```Event example (Click to expand)
```javascript { "product": { "vendorProductId": "premium_monthly", "localizedTitle": "Premium Monthly", "localizedDescription": "Premium subscription for 1 month", "localizedPrice": "$9.99", "price": 9.99, "currencyCode": "USD" } } ```Event examples (Click to expand)
```javascript // Successful purchase { "product": { "vendorProductId": "premium_monthly", "localizedTitle": "Premium Monthly", "localizedDescription": "Premium subscription for 1 month", "localizedPrice": "$9.99", "price": 9.99, "currencyCode": "USD" }, "purchaseResult": { "type": "Success", "profile": { "accessLevels": { "premium": { "id": "premium", "isActive": true, "expiresAt": "2024-02-15T10:30:00Z" } } } } } // Pending purchase { "product": { "vendorProductId": "premium_monthly", "localizedTitle": "Premium Monthly", "localizedDescription": "Premium subscription for 1 month", "localizedPrice": "$9.99", "price": 9.99, "currencyCode": "USD" }, "purchaseResult": { "type": "Pending" } } // User canceled purchase { "product": { "vendorProductId": "premium_monthly", "localizedTitle": "Premium Monthly", "localizedDescription": "Premium subscription for 1 month", "localizedPrice": "$9.99", "price": 9.99, "currencyCode": "USD" }, "purchaseResult": { "type": "UserCanceled" } } ```Event example (Click to expand)
```javascript { "product": { "vendorProductId": "premium_monthly", "localizedTitle": "Premium Monthly", "localizedDescription": "Premium subscription for 1 month", "localizedPrice": "$9.99", "price": 9.99, "currencyCode": "USD" }, "error": { "code": "purchase_failed", "message": "Purchase failed due to insufficient funds", "details": { "underlyingError": "Insufficient funds in account" } } } ```Event example (Click to expand)
```javascript { "profile": { "accessLevels": { "premium": { "id": "premium", "isActive": true, "expiresAt": "2024-02-15T10:30:00Z" } }, "subscriptions": [ { "vendorProductId": "premium_monthly", "isActive": true, "expiresAt": "2024-02-15T10:30:00Z" } ] } } ```Event example (Click to expand)
```javascript { "error": { "code": "restore_failed", "message": "Purchase restoration failed", "details": { "underlyingError": "No previous purchases found" } } } ```Event examples (Click to expand)
```javascript // Successful web payment navigation { "product": { "vendorProductId": "premium_monthly", "localizedTitle": "Premium Monthly", "localizedDescription": "Premium subscription for 1 month", "localizedPrice": "$9.99", "price": 9.99, "currencyCode": "USD" }, "error": null } // Failed web payment navigation { "product": null, "error": { "code": "web_payment_failed", "message": "Web payment navigation failed", "details": { "underlyingError": "Network connection error" } } } ```Event example (Click to expand)
```javascript { "error": { "code": "products_loading_failed", "message": "Failed to load products from the server", "details": { "underlyingError": "Network timeout" } } } ```Event example (Click to expand)
```javascript { "error": { "code": "rendering_failed", "message": "Failed to render paywall interface", "details": { "underlyingError": "Invalid paywall configuration" } } } ```Fallback configuration file path, relative to the `assets` directory (Android). | :::tip Want to see a real-world example of how Adapty SDK is integrated into a mobile app? Check out our [sample apps](sample-apps), which demonstrate the full setup, including displaying paywalls, making purchases, and other basic functionality. ::: --- # File: kmp-web-paywalls --- --- title: "Implement web paywalls in Kotlin Multiplatform SDK" description: "Set up a web paywall to get paid without the store fees and audits." --- :::important Before you begin, make sure you have [configured your web paywall in the dashboard](web-paywall.md) and installed Adapty SDK version 3.15 or later. ::: ## Open web paywalls If you are working with a paywall you developed yourself, you need to handle web paywalls using the SDK method. The `openWebPaywall` method: 1. Generates a unique URL allowing Adapty to link a specific paywall shown to a particular user to the web page they are redirected to. 2. Tracks when your users return to the app and then requests `getProfile` at short intervals to determine whether the profile access rights have been updated. This way, if the payment has been successful and access rights have been updated, the subscription activates in the app almost immediately. :::note After users return to the app, refresh the UI to reflect the profile updates. Adapty will receive and process profile update events. ::: ```kotlin showLineNumbers viewModelScope.launch { Adapty.openWebPaywall(product = product).onSuccess { // the web paywall was opened successfully }.onError { error -> // handle the error } } ``` :::note There are two versions of the `openWebPaywall` method: 1. `openWebPaywall(product = product)` that generates URLs by paywall and adds the product data to URLs as well. 2. `openWebPaywall(paywall = paywall)` that generates URLs by paywall without adding the product data to URLs. Use it when your products in the Adapty paywall differ from those in the web paywall. ::: ## Open web paywalls in an in-app browser By default, web paywalls open in the external browser. To provide a seamless user experience, you can open web paywalls in an in-app browser. This displays the web purchase page within your application, allowing users to complete transactions without switching apps. To enable this, set the `openIn` parameter to `AdaptyWebPresentation.IN_APP_BROWSER`: ```kotlin showLineNumbers viewModelScope.launch { Adapty.openWebPaywall( product = product, openIn = AdaptyWebPresentation.IN_APP_BROWSER // default – EXTERNAL_BROWSER ).onSuccess { // the web paywall was opened successfully }.onError { error -> // handle the error } } ``` --- # File: kmp-troubleshoot-paywall-builder --- --- title: "Troubleshoot Paywall Builder in Kotlin Multiplatform SDK" description: "Troubleshoot Paywall Builder in Kotlin Multiplatform SDK" --- This guide helps you resolve common issues when using paywalls designed in the Adapty Paywall Builder in the Kotlin Multiplatform SDK. ## Getting a paywall configuration fails **Issue**: The `createPaywallView` method fails to create a paywall view, or the paywall doesn't have a view configuration. **Reason**: The paywall is not enabled for device display in the Paywall Builder. **Solution**: Enable the **Show on device** toggle in the Paywall Builder. You can also check if a paywall has view configuration by using the `hasViewConfiguration` property on the `AdaptyPaywall` object.
 ## The paywall view number is too big
**Issue**: The paywall view count is showing double the expected number.
**Reason**: You may be calling `logShowPaywall` in your code, which duplicates the view count if you're using the Paywall builder. For paywalls designed with the Paywall Builder, analytics are tracked automatically, so you don't need to use this method.
**Solution**: Ensure you are not calling `logShowPaywall` in your code if you're using the Paywall builder.
---
# File: kmp-implement-paywalls-manually
---
---
title: "Implement paywalls manually in Kotlin Multiplatform SDK"
description: "Learn how to implement paywalls manually in your Kotlin Multiplatform app with Adapty SDK."
---
## Accept purchases
If you are working with paywalls you've implemented yourself, you can delegate handling purchases to Adapty, using the `makePurchase` method. This way, we will handle all the user scenarios, and you will only need to handle the purchase results.
:::important
`makePurchase` works with products created in the Adapty dashboard. Make sure you configure products and ways to retrieve them in the dashboard by following the [quickstart guide](quickstart).
:::
## The paywall view number is too big
**Issue**: The paywall view count is showing double the expected number.
**Reason**: You may be calling `logShowPaywall` in your code, which duplicates the view count if you're using the Paywall builder. For paywalls designed with the Paywall Builder, analytics are tracked automatically, so you don't need to use this method.
**Solution**: Ensure you are not calling `logShowPaywall` in your code if you're using the Paywall builder.
---
# File: kmp-implement-paywalls-manually
---
---
title: "Implement paywalls manually in Kotlin Multiplatform SDK"
description: "Learn how to implement paywalls manually in your Kotlin Multiplatform app with Adapty SDK."
---
## Accept purchases
If you are working with paywalls you've implemented yourself, you can delegate handling purchases to Adapty, using the `makePurchase` method. This way, we will handle all the user scenarios, and you will only need to handle the purchase results.
:::important
`makePurchase` works with products created in the Adapty dashboard. Make sure you configure products and ways to retrieve them in the dashboard by following the [quickstart guide](quickstart).
:::
Before you start fetching paywalls and products in your mobile app (click to expand)
1. [Create your products](create-product) in the Adapty Dashboard. 2. [Create a paywall and incorporate the products into your paywall](create-paywall) in the Adapty Dashboard. 3. [Create placements and incorporate your paywall into the placement](create-placement) in the Adapty Dashboard. 4. [Install Adapty SDK](sdk-installation-kotlin-multiplatform.md) in your mobile app.optional
default: `en`
|The identifier of the [paywall localization](add-remote-config-locale). This parameter is expected to be a language code composed of one or more subtags separated by the minus (**-**) character. The first subtag is for the language, the second one is for the region.
Example: `en` means English, `pt-br` represents the Brazilian Portuguese language.
| | **fetchPolicy** | default: `AdaptyPaywallFetchPolicy.Default` |By default, SDK will try to load data from the server and will return cached data in case of failure. We recommend this variant because it ensures your users always get the most up-to-date data.
However, if you believe your users deal with unstable internet, consider using `AdaptyPaywallFetchPolicy.ReturnCacheDataElseLoad` to return cached data if it exists. In this scenario, users might not get the absolute latest data, but they'll experience faster loading times, no matter how patchy their internet connection is. The cache is updated regularly, so it's safe to use it during the session to avoid network requests.
Note that the cache remains intact upon restarting the app and is only cleared when the app is reinstalled or through manual cleanup.
Adapty SDK stores paywalls in two layers: regularly updated cache described above and [fallback paywalls](kmp-use-fallback-paywalls) . We also use CDN to fetch paywalls faster and a stand-alone fallback server in case the CDN is unreachable. This system is designed to make sure you always get the latest version of your paywalls while ensuring reliability even in cases where internet connection is scarce.
| | **loadTimeout** | default: 5 sec |This value limits the timeout for this method. If the timeout is reached, cached data or local fallback will be returned.
Note that in rare cases this method can timeout slightly later than specified in `loadTimeout`, since the operation may consist of different requests under the hood.
| Don't hardcode product IDs! Since paywalls are configured remotely, the available products, the number of products, and special offers (such as free trials) can change over time. Make sure your code handles these scenarios. For example, if you initially retrieve 2 products, your app should display those 2 products. However, if you later retrieve 3 products, your app should display all 3 without requiring any code changes. The only thing you have to hardcode is placement ID. Response parameters: | Parameter | Description | | :-------- | :----------------------------------------------------------------------------------------------------------------------------------------------------------- | | Paywall | An [`AdaptyPaywall`](https://kmp.adapty.io///adapty/com.adapty.kmp.models/-adapty-paywall/) object with: a list of product IDs, the paywall identifier, remote config, and several other properties. | ## Fetch products Once you have the paywall, you can query the product array that corresponds to it: ```kotlin showLineNumbers Adapty.getPaywallProducts(paywall).onSuccess { products -> // the requested products }.onError { error -> // handle the error } ``` Response parameters: | Parameter | Description | | :-------- |:--------------------------------------------------------------------------------------------------------------------------------------------------------------------------------------------------------------------------------------| | Products | List of [`AdaptyPaywallProduct`](https://kmp.adapty.io///adapty/com.adapty.kmp.models/-adapty-paywall-product/) objects with: product identifier, product name, price, currency, subscription length, and several other properties. | When implementing your own paywall design, you will likely need access to these properties from the [`AdaptyPaywallProduct`](https://kmp.adapty.io///adapty/com.adapty.kmp.models/-adapty-paywall-product/) object. Illustrated below are the most commonly used properties, but refer to the linked document for full details on all available properties. | Property | Description | |-------------------------|----------------------------------------------------------------------------------------------------------------------------------------------------------------------------------------------------------------------------------------------------------------------------------------------------------------------------------------------------------------------------------------------------------------------------------------------------------------------------------------------------------------------------------------------------------------------------------------------------------------------------------------------------------------------------------------------------------------------------------------------------------------------------------------------------------------------------------------------------------| | **Title** | To display the title of the product, use `product.localizedTitle`. Note that the localization is based on the users' selected store country rather than the locale of the device itself. | | **Price** | To display a localized version of the price, use `product.price.localizedString`. This localization is based on the locale info of the device. You can also access the price as a number using `product.price.amount`. The value will be provided in the local currency. To get the associated currency symbol, use `product.price.currencySymbol`. | | **Subscription Period** | To display the period (e.g. week, month, year, etc.), use `product.subscriptionDetails?.localizedSubscriptionPeriod`. This localization is based on the locale of the device. To fetch the subscription period programmatically, use `product.subscriptionDetails?.subscriptionPeriod`. From there you can access the `unit` enum to get the length (i.e. DAY, WEEK, MONTH, YEAR, or UNKNOWN). The `numberOfUnits` value will get you the number of period units. For example, for a quarterly subscription, you'd see `MONTH` in the unit property, and `3` in the numberOfUnits property. | | **Introductory Offer** | To display a badge or other indicator that a subscription contains an introductory offer, check out the `product.subscriptionDetails?.introductoryOfferPhases` property. This is a list that can contain up to two discount phases: the free trial phase and the introductory price phase. Within each phase object are the following helpful properties:• `paymentMode`: an enum with values `FREE_TRIAL`, `PAY_AS_YOU_GO`, `PAY_UPFRONT`, and `UNKNOWN`. Free trials will be the `FREE_TRIAL` type.
• `price`: The discounted price as a number. For free trials, look for `0` here.
• `localizedNumberOfPeriods`: a string localized using the device's locale describing the length of the offer. For example, a three day trial offer shows `3 days` in this field.
• `subscriptionPeriod`: Alternatively, you can get the individual details of the offer period with this property. It works in the same manner for offers as the previous section describes.
• `localizedSubscriptionPeriod`: A formatted subscription period of the discount for the user's locale. | ## Speed up paywall fetching with default audience paywall Typically, paywalls are fetched almost instantly, so you don't need to worry about speeding up this process. However, in cases where you have numerous audiences and paywalls, and your users have a weak internet connection, fetching a paywall may take longer than you'd like. In such situations, you might want to display a default paywall to ensure a smooth user experience rather than showing no paywall at all. To address this, you can use the `getPaywallForDefaultAudience` method, which fetches the paywall of the specified placement for the **All Users** audience. However, it's crucial to understand that the recommended approach is to fetch the paywall by the `getPaywall` method, as detailed in the [Fetch Paywall Information](fetch-paywalls-and-products-kmp#fetch-paywall-information) section above. :::warning Why we recommend using `getPaywall` The `getPaywallForDefaultAudience` method comes with a few significant drawbacks: - **Potential backward compatibility issues**: If you need to show different paywalls for different app versions (current and future), you may face challenges. You'll either have to design paywalls that support the current (legacy) version or accept that users with the current (legacy) version might encounter issues with non-rendered paywalls. - **Loss of targeting**: All users will see the same paywall designed for the **All Users** audience, which means you lose personalized targeting (including based on countries, marketing attribution or your own custom attributes). If you're willing to accept these drawbacks to benefit from faster paywall fetching, use the `getPaywallForDefaultAudience` method as follows. Otherwise, stick to the `getPaywall` described [above](fetch-paywalls-and-products-kmp#fetch-paywall-information). ::: ```kotlin showLineNumbers Adapty.getPaywallForDefaultAudience( placementId = "YOUR_PLACEMENT_ID", locale = "en", fetchPolicy = AdaptyPaywallFetchPolicy.Default ).onSuccess { paywall -> // the requested paywall }.onError { error -> // handle the error } ``` | Parameter | Presence | Description | |---------|--------|-----------| | **placementId** | required | The identifier of the [Placement](placements). This is the value you specified when creating a placement in your Adapty Dashboard. | | **locale** |
optional
default: `en`
|The identifier of the [paywall localization](add-remote-config-locale). This parameter is expected to be a language code composed of one or more subtags separated by the minus (**-**) character. The first subtag is for the language, the second one is for the region.
Example: `en` means English, `pt-br` represents the Brazilian Portuguese language.
| | **fetchPolicy** | default: `AdaptyPaywallFetchPolicy.Default` |By default, SDK will try to load data from the server and will return cached data in case of failure. We recommend this variant because it ensures your users always get the most up-to-date data.
However, if you believe your users deal with unstable internet, consider using `AdaptyPaywallFetchPolicy.ReturnCacheDataElseLoad` to return cached data if it exists. In this scenario, users might not get the absolute latest data, but they'll experience faster loading times, no matter how patchy their internet connection is. The cache is updated regularly, so it's safe to use it during the session to avoid network requests.
Note that the cache remains intact upon restarting the app and is only cleared when the app is reinstalled or through manual cleanup.
| --- # File: present-remote-config-paywalls-kmp --- --- title: "Render paywall designed by remote config in Kotlin Multiplatform SDK" description: "Discover how to present remote config paywalls in Adapty Kotlin Multiplatform SDK to personalize user experience." --- If you've customized a paywall using remote config, you'll need to implement rendering in your mobile app's code to display it to users. Since remote config offers flexibility tailored to your needs, you're in control of what's included and how your paywall view appears. We provide a method for fetching the remote configuration, giving you the autonomy to showcase your custom paywall configured via remote config. ## Get paywall remote config and present it To get a remote config of a paywall, access the `remoteConfig` property and extract the needed values. ```kotlin showLineNumbers Adapty.getPaywall( placementId = "YOUR_PLACEMENT_ID", locale = "en", fetchPolicy = AdaptyPaywallFetchPolicy.Default, loadTimeout = 5.seconds ).onSuccess { paywall -> val headerText = paywall.remoteConfig?.dataMap?.get("header_text") as? String // use the remote config values }.onError { error -> // handle the error } ``` At this point, once you've received all the necessary values, it's time to render and assemble them into a visually appealing page. Ensure that the design accommodates various mobile phone screens and orientations, providing a seamless and user-friendly experience across different devices. :::warning Make sure to [record the paywall view event](present-remote-config-paywalls-kmp#track-paywall-view-events) as described below, allowing Adapty analytics to capture information for funnels and A/B tests. ::: After you've done with displaying the paywall, continue with setting up a purchase flow. When the user makes a purchase, simply call `.makePurchase()` with the product from your paywall. For details on the`.makePurchase()` method, read [Making purchases](kmp-making-purchases). We recommend [creating a backup paywall called a fallback paywall](kmp-use-fallback-paywalls). This backup will display to the user when there's no internet connection or cache available, ensuring a smooth experience even in these situations. ## Track paywall view events Adapty assists you in measuring the performance of your paywalls. While we gather data on purchases automatically, logging paywall views needs your input because only you know when a customer sees a paywall. To log a paywall view event, simply call `.logShowPaywall(paywall)`, and it will be reflected in your paywall metrics in funnels and A/B tests. :::important Calling `.logShowPaywall(paywall)` is not needed if you are displaying paywalls created in the [paywall builder](adapty-paywall-builder.md). ::: ```kotlin showLineNumbers Adapty.logShowPaywall(paywall = paywall) .onSuccess { // paywall view logged successfully } .onError { error -> // handle the error } ``` Request parameters: | Parameter | Presence | Description | | :---------- | :------- |:-------------------------------------------------------------------------------------------------------| | **paywall** | required | An [`AdaptyPaywall`](https://kmp.adapty.io//////adapty/com.adapty.kmp.models/-adapty-paywall/) object. | --- # File: kmp-making-purchases --- --- title: "Make purchases in mobile app in Kotlin Multiplatform SDK" description: "Guide on handling in-app purchases and subscriptions using Adapty." --- Displaying paywalls within your mobile app is an essential step in offering users access to premium content or services. However, simply presenting these paywalls is enough to support purchases only if you use [Paywall Builder](adapty-paywall-builder) to customize your paywalls. If you don't use the Paywall Builder, you must use a separate method called `.makePurchase()` to complete a purchase and unlock the desired content. This method serves as the gateway for users to engage with the paywalls and proceed with their desired transactions. If your paywall has an active promotional offer for the product a user is trying to buy, Adapty will automatically apply it at the time of purchase. :::warning Keep in mind that the introductory offer will be applied automatically only if you use the paywalls set up using the Paywall Builder. In other cases, you'll need to [verify the user's eligibility for an introductory offer on iOS](fetch-paywalls-and-products-kmp#check-intro-offer-eligibility-on-ios). Skipping this step may result in your app being rejected during release. Moreover, it could lead to charging the full price to users who are eligible for an introductory offer. ::: Make sure you've [done the initial configuration](quickstart) without skipping a single step. Without it, we can't validate purchases. ## Make purchase :::note **Using [Paywall Builder](adapty-paywall-builder)?** Purchases are processed automatically—you can skip this step. **Looking for step-by-step guidance?** Check out the [quickstart guide](kmp-implement-paywalls-manually) for end-to-end implementation instructions with full context. ::: ```kotlin showLineNumbers Adapty.makePurchase(product = product).onSuccess { purchaseResult -> when (purchaseResult) { is AdaptyPurchaseResult.Success -> { val profile = purchaseResult.profile if (profile.accessLevels["YOUR_ACCESS_LEVEL"]?.isActive == true) { // Grant access to the paid features } } is AdaptyPurchaseResult.UserCanceled -> { // Handle the case where the user canceled the purchase } is AdaptyPurchaseResult.Pending -> { // Handle deferred purchases (e.g., the user will pay offline with cash) } } }.onError { error -> // Handle the error } ``` Request parameters: | Parameter | Presence | Description | | :---------- | :------- |:----------------------------------------------------------------------------------------------------------------------------------------------| | **Product** | required | An [`AdaptyPaywallProduct`](https://kmp.adapty.io///adapty/com.adapty.kmp.models/-adapty-paywall-product/) object retrieved from the paywall. | Response parameters: | Parameter | Description | |---------|----------------------------------------------------------------------------------------------------------------------------------------------------------------------------------------------------------------------------------------------------------------------------------------------------------------------------------------------------------------------------------------------------------------------| | **Profile** |If the request has been successful, the response contains this object. An [AdaptyProfile](khttps://kmp.adapty.io///adapty/com.adapty.kmp.models/-adapty-profile/) object provides comprehensive information about a user's access levels, subscriptions, and non-subscription purchases within the app.
Check the access level status to ascertain whether the user has the required access to the app.
| :::warning **Note:** if you're still on Apple's StoreKit version lower than v2.0 and Adapty SDK version lowers than v.2.9.0, you need to provide [Apple App Store shared secret](app-store-connection-configuration#step-4-enter-app-store-shared-secret) instead. This method is currently deprecated by Apple. ::: ## Change subscription when making a purchase When a user opts for a new subscription instead of renewing the current one, the way it works depends on the app store. For Google Play, the subscription isn't automatically updated. You'll need to manage the switch in your mobile app code as described below. To replace the subscription with another one in Android, call `.makePurchase()` method with the additional parameter: ```kotlin showLineNumbers val subscriptionUpdateParams = AdaptyAndroidSubscriptionUpdateParameters( oldSubVendorProductId = "old_subscription_product_id", replacementMode = AdaptyAndroidSubscriptionUpdateReplacementMode.CHARGE_FULL_PRICE ) val purchaseParams = AdaptyPurchaseParameters.Builder() .setSubscriptionUpdateParams(subscriptionUpdateParams) .build() Adapty.makePurchase( product = product, parameters = purchaseParams ).onSuccess { purchaseResult -> when (purchaseResult) { is AdaptyPurchaseResult.Success -> { val profile = purchaseResult.profile // successful cross-grade } is AdaptyPurchaseResult.UserCanceled -> { // user canceled the purchase flow } is AdaptyPurchaseResult.Pending -> { // the purchase has not been finished yet, e.g. user will pay offline by cash } } }.onError { error -> // Handle the error } ``` Additional request parameter: | Parameter | Presence | Description | |:---------------|:---------|:----------------------------------------------------------------------------------------------------------------------------------------------------------------------------------------------------------------------------------------------------------------------------------------------| | **parameters** | optional | an [`AdaptyAndroidSubscriptionUpdateParameters`](https://kmp.adapty.io/////adapty/com.adapty.kmp.models/-adapty-android-subscription-update-parameters/) object passed through [`AdaptyPurchaseParameters`](https://kmp.adapty.io/adapty/com.adapty.kmp.models/-adapty-purchase-parameters/). | You can read more about subscriptions and replacement modes in the Google Developer documentation: - [About replacement modes](https://developer.android.com/google/play/billing/subscriptions#replacement-modes) - [Recommendations from Google for replacement modes](https://developer.android.com/google/play/billing/subscriptions#replacement-recommendations) - Replacement mode [`CHARGE_PRORATED_PRICE`](https://developer.android.com/reference/com/android/billingclient/api/BillingFlowParams.SubscriptionUpdateParams.ReplacementMode#CHARGE_PRORATED_PRICE()). Note: this method is available only for subscription upgrades. Downgrades are not supported. - Replacement mode [`DEFERRED`](https://developer.android.com/reference/com/android/billingclient/api/BillingFlowParams.SubscriptionUpdateParams.ReplacementMode#DEFERRED()). Note: A real subscription change will occur only when the current subscription billing period ends. ## Redeem Offer Code in iOS Since iOS 14.0, your users can redeem Offer Codes. Code redemption means using a special code, like a promotional or gift card code, to get free access to content or features in an app or on the App Store. To enable users to redeem offer codes, you can display the offer code redemption sheet by using the appropriate SDK method: ```kotlin showLineNumbers Adapty.presentCodeRedemptionSheet() .onSuccess { // code redemption sheet presented successfully } .onError { error -> // handle the error } ``` :::danger Based on our observations, the Offer Code Redemption sheet in some apps may not work reliably. We recommend redirecting the user directly to the App Store. In order to do this, you need to open the url of the following format: `https://apps.apple.com/redeem?ctx=offercodes&id={apple_app_id}&code={code}` ::: ## Manage prepaid plans (Android) If your app users can purchase [prepaid plans](https://developer.android.com/google/play/billing/subscriptions#prepaid-plans) (e.g., buy a non-renewable subscription for several months), you can enable [pending transactions](https://developer.android.com/google/play/billing/subscriptions#pending) for prepaid plans. ```kotlin showLineNumbers Adapty.activate( AdaptyConfig.Builder("PUBLIC_SDK_KEY") .withGoogleEnablePendingPrepaidPlans(true) .build() ).onSuccess { // successful activation }.onError { error -> // handle the error } ``` --- # File: kmp-restore-purchase --- --- title: "Restore purchases in mobile app in Kotlin Multiplatform SDK" description: "Learn how to restore purchases in Adapty to ensure seamless user experience." --- Restoring Purchases is a feature that allows users to regain access to previously purchased content, such as subscriptions or in-app purchases, without being charged again. This feature is especially useful for users who may have uninstalled and reinstalled the app or switched to a new device and want to access their previously purchased content without paying again. :::note In paywalls built with [Paywall Builder](adapty-paywall-builder), purchases are restored automatically without additional code from you. If that's your case — you can skip this step. ::: To restore a purchase if you do not use the [Paywall Builder](adapty-paywall-builder) to customize the paywall, call `.restorePurchases()` method: ```kotlin showLineNumbers Adapty.restorePurchases().onSuccess { profile -> if (profile.accessLevels["YOUR_ACCESS_LEVEL"]?.isActive == true) { // successful access restore } }.onError { error -> // handle the error } ``` Response parameters: | Parameter | Description | |---------|-------------------------------------------------------------------------------------------------------------------------------------------------------------------------------------------------------------------------------------------------------------| | **Profile** |An [`AdaptyProfile`](https://kmp.adapty.io//////adapty/com.adapty.kmp.models/-adapty-profile/) object. This model contains info about access levels, subscriptions, and non-subscription purchases.
Сheck the **access level status** to determine whether the user has access to the app.
| :::tip Want to see a real-world example of how Adapty SDK is integrated into a mobile app? Check out our [sample apps](sample-apps), which demonstrate the full setup, including displaying paywalls, making purchases, and other basic functionality. ::: --- # File: implement-observer-mode-kmp --- --- title: "Implement Observer mode in Kotlin Multiplatform SDK" description: "Implement observer mode in Adapty to track user subscription events in Kotlin Multiplatform SDK." --- If you already have your own purchase infrastructure and aren't ready to fully switch to Adapty, you can explore [Observer mode](observer-vs-full-mode). In its basic form, Observer Mode offers advanced analytics and seamless integration with attribution and analytics systems. If this meets your needs, you only need to: 1. Turn it on when configuring the Adapty SDK by setting the `observerMode` parameter to `true`. Follow the setup instructions for [Kotlin Multiplatform](sdk-installation-kotlin-multiplatform.md). 2. [Report transactions](report-transactions-observer-mode-kmp) from your existing purchase infrastructure to Adapty. ## Observer mode setup Turn on the Observer mode if you handle purchases and subscription status yourself and use Adapty for sending subscription events and analytics. :::important When running in Observer mode, Adapty SDK won't close any transactions, so make sure you're handling it. ::: ```kotlin showLineNumbers val config = AdaptyConfig .Builder("PUBLIC_SDK_KEY") .withObserverMode(true) // default false .build() Adapty.activate(configuration = config) .onSuccess { Log.d("Adapty", "SDK initialised in observer mode") } .onError { error -> Log.e("Adapty", "Adapty init error: ${error.message}") } ``` Parameters: | Parameter | Description | | --------------------------- | ------------------------------------------------------------ | | observerMode | A boolean value that controls [Observer mode](observer-vs-full-mode). The default value is `false`. | ## Using Adapty paywalls in Observer Mode If you also want to use Adapty's paywalls and A/B testing features, you can — but it requires some extra setup in Observer mode. Here's what you'll need to do in addition to the steps above: 1. Display paywalls as usual for [remote config paywalls](present-remote-config-paywalls-kmp.md). 3. [Associate paywalls](report-transactions-observer-mode-kmp) with purchase transactions. --- # File: report-transactions-observer-mode-kmp --- --- title: "Report transactions in Observer Mode in Kotlin Multiplatform SDK" description: "Report purchase transactions in Adapty Observer Mode for user insights and revenue tracking in Kotlin Multiplatform SDK." --- In Observer mode, the Adapty SDK can't track purchases made through your existing purchase system on its own. You need to report transactions from your app store. It's crucial to set this up **before** releasing your app to avoid errors in analytics. Use `reportTransaction` to explicitly report each transaction for Adapty to recognize it. :::warning **Don't skip transaction reporting!** If you don't call `reportTransaction`, Adapty won't recognize the transaction, it won't appear in analytics, and it won't be sent to integrations. ::: If you use Adapty paywalls, include the `variationId` when reporting a transaction. This links the purchase to the paywall that triggered it, ensuring accurate paywall analytics. ```kotlin showLineNumbers Adapty.reportTransaction( transactionId = "your_transaction_id", variationId = paywall.variationId ).onSuccess { profile -> // Transaction reported successfully // profile contains updated user data }.onError { error -> // handle the error } ``` Parameters: | Parameter | Presence | Description | | --------------- | -------- |----------------------------------------------------------------------------------------------------------------------------------------------------------------------------------------------| | transactionId | required | The transaction ID from your app store purchase. This is typically the purchase token or transaction identifier returned by the store. | | variationId | optional | The string identifier of the variation. You can get it using `variationId` property of the [AdaptyPaywall](https://kmp.adapty.io//////adapty/com.adapty.kmp.models/-adapty-paywall/) object. | --- # File: kmp-troubleshoot-purchases --- --- title: "Troubleshoot purchases in Kotlin Multiplatform SDK" description: "Troubleshoot purchases in Kotlin Multiplatform SDK" --- This guide helps you resolve common issues when implementing purchases manually in the Kotlin Multiplatform SDK. ## makePurchase is called successfully, but the profile is not being updated **Issue**: The `makePurchase` method completes successfully, but the user's profile and subscription status are not updated in Adapty. **Reason**: This usually indicates incomplete Google Play Store setup or configuration issues. **Solution**: Ensure you've completed all the [Google Play setup steps](https://adapty.io/docs/initial-android). ## makePurchase is invoked twice **Issue**: The `makePurchase` method is being called multiple times for the same purchase. **Reason**: This typically happens when the purchase flow is triggered multiple times due to UI state management issues or rapid user interactions. **Solution**: Ensure you've completed all the [Google Play setup steps](https://adapty.io/docs/initial-android). ## AdaptyError.cantMakePayments in observer mode **Issue**: You're getting `AdaptyError.cantMakePayments` when using `makePurchase` in observer mode. **Reason**: In observer mode, you should handle purchases on your side, not use Adapty's `makePurchase` method. **Solution**: If you use `makePurchase` for purchases, turn off the observer mode. You need either to use `makePurchase` or handle purchases on your side in the observer mode. See [Implement Observer mode](implement-observer-mode-kmp) for more details. ## Adapty error: (code: 103, message: Play Market request failed on purchases updated: responseCode=3, debugMessage=Billing Unavailable, detail: null) **Issue**: You're receiving a billing unavailable error from Google Play Store. **Reason**: This error is not related to Adapty. It's a Google Play Billing Library error indicating that billing is not available on the device. **Solution**: This error is not related to Adapty. You can check and find out more about it in the Play Store documentation: [Handle BillingResult response codes](https://developer.android.com/google/play/billing/errors#billing_unavailable_error_code_3) | Play Billing | Android Developers. ## Not found makePurchasesCompletionHandlers **Issue**: You're encountering issues with `makePurchasesCompletionHandlers` not being found. **Reason**: This is typically related to sandbox testing issues. **Solution**: Create a new sandbox user and try again. This often resolves sandbox-related purchase completion handler issues. --- # File: kmp-user --- --- title: "Users & access in Kotlin Multiplatform SDK" description: "Learn how to work with users and access levels in your Kotlin Multiplatform app with Adapty SDK." --- This page contains all guides for working with users and access levels in your Kotlin Multiplatform app. Choose the topic you need: - **[Identify users](kmp-identifying-users)** - Learn how to identify users in your app - **[Update user data](kmp-setting-user-attributes)** - Set user attributes and profile data - **[Listen for subscription status changes](kmp-listen-subscription-changes)** - Monitor subscription changes in real-time - **[Kids Mode](kids-mode-kmp)** - Implement Kids Mode for your app --- # File: kmp-identifying-users --- --- title: "Identify users in Kotlin Multiplatform SDK" description: "Identify users in Adapty to improve personalized subscription experiences." --- Adapty creates an internal profile ID for every user. However, if you have your own authentication system, you should set your own Customer User ID. You can find users by their Customer User ID in the [Profiles](profiles-crm) section and use it in the [server-side API](getting-started-with-server-side-api), which will be sent to all integrations. ### Setting customer user ID on configuration If you have a user ID during configuration, just pass it as `customerUserId` parameter to `.activate()` method: ```kotlin showLineNumbers Adapty.activate( AdaptyConfig.Builder("PUBLIC_SDK_KEY") .withCustomerUserId("YOUR_USER_ID") .build() ).onSuccess { // successful activation }.onError { error -> // handle the error } } ``` :::tip Want to see a real-world example of how Adapty SDK is integrated into a mobile app? Check out our [sample apps](sample-apps), which demonstrate the full setup, including displaying paywalls, making purchases, and other basic functionality. ::: ### Setting customer user ID after configuration If you don't have a user ID in the SDK configuration, you can set it later at any time with the `.identify()` method. The most common cases for using this method are after registration or authorization, when the user switches from being an anonymous user to an authenticated user. ```kotlin showLineNumbers Adapty.identify("YOUR_USER_ID").onSuccess { // successful identify }.onError { error -> // handle the error } ``` Request parameters: - **Customer User ID** (required): a string user identifier. :::warning Resubmitting of significant user data In some cases, such as when a user logs into their account again, Adapty's servers already have information about that user. In these scenarios, the Adapty SDK will automatically switch to work with the new user. If you passed any data to the anonymous user, such as custom attributes or attributions from third-party networks, you should resubmit that data for the identified user. It's also important to note that you should re-request all paywalls and products after identifying the user, as the new user's data may be different. ::: ### Logging out and logging in You can log the user out anytime by calling `.logout()` method: ```kotlin showLineNumbers Adapty.logout().onSuccess { // successful logout }.onError { error -> // handle the error } ``` You can then login the user using `.identify()` method. ## Assign `appAccountToken` (iOS) [`iosAppAccountToken`](https://developer.apple.com/documentation/storekit/product/purchaseoption/appaccounttoken(_:)) is a **UUID** that lets you link App Store transactions to your internal user identity. StoreKit associates this token with every transaction, so your backend can match App Store data to your users. Use a stable UUID generated per user and reuse it for the same account across devices. This ensures that purchases and App Store notifications stay correctly linked. You can set the token in two ways – during the SDK activation or when identifying the user. :::important You must always pass `iosAppAccountToken` together with `customerUserId`. If you pass only the token, it will not be included in the transaction. ::: ```kotlin showLineNumbers // During configuration: Adapty.activate( AdaptyConfig.Builder("PUBLIC_SDK_KEY") .withCustomerUserId( id = "YOUR_USER_ID", iosAppAccountToken = "YOUR_IOS_APP_ACCOUNT_TOKEN" ) .build() ).onSuccess { // successful activation }.onError { error -> // handle the error } // Or when identifying users Adapty.identify( customerUserId = "YOUR_USER_ID", iosAppAccountToken = "YOUR_IOS_APP_ACCOUNT_TOKEN" ).onSuccess { // successful identify }.onError { error -> // handle the error } ``` ## Set obfuscated account IDs (Android) Google Play requires obfuscated account IDs for certain use cases to enhance user privacy and security. These IDs help Google Play identify purchases while keeping user information anonymous, which is particularly important for fraud prevention and analytics. You may need to set these IDs if your app handles sensitive user data or if you're required to comply with specific privacy regulations. The obfuscated IDs allow Google Play to track purchases without exposing actual user identifiers. :::important You must always pass `androidObfuscatedAccountId` together with `customerUserId`. If you pass only the obfuscated account ID, it will not be included in the transaction. ::: ```kotlin showLineNumbers // During configuration: Adapty.activate( AdaptyConfig.Builder("PUBLIC_SDK_KEY") .withCustomerUserId( id = "YOUR_USER_ID", androidObfuscatedAccountId = "YOUR_OBFUSCATED_ACCOUNT_ID" ) .build() ).onSuccess { // successful activation }.onError { error -> // handle the error } // Or when identifying users Adapty.identify( customerUserId = "YOUR_USER_ID", androidObfuscatedAccountId = "YOUR_OBFUSCATED_ACCOUNT_ID" ).onSuccess { // successful identify }.onError { error -> // handle the error } ``` --- # File: kmp-setting-user-attributes --- --- title: "Set user attributes in Kotlin Multiplatform SDK" description: "Learn how to set user attributes in Adapty to enable better audience segmentation." --- You can set optional attributes such as email, phone number, etc, to the user of your app. You can then use attributes to create user [segments](segments) or just view them in CRM. ### Setting user attributes To set user attributes, call `.updateProfile()` method: ```kotlin showLineNumbers val builder = AdaptyProfileParameters.Builder() .withEmail("email@email.com") .withPhoneNumber("+18888888888") .withFirstName("John") .withLastName("Appleseed") .withGender(AdaptyProfile.Gender.FEMALE) .withBirthday(AdaptyProfile.Date(1970, 1, 3)) Adapty.updateProfile(builder.build()) .onSuccess { // profile updated successfully } .onError { error -> // handle the error } ``` Please note that the attributes that you've previously set with the `updateProfile` method won't be reset. :::tip Want to see a real-world example of how Adapty SDK is integrated into a mobile app? Check out our [sample apps](sample-apps), which demonstrate the full setup, including displaying paywalls, making purchases, and other basic functionality. ::: ### The allowed keys list The allowed keys `phoneNumber
firstName
lastName
| String | | gender | Enum, allowed values are: `AdaptyProfile.Gender.FEMALE`, `AdaptyProfile.Gender.MALE`, `AdaptyProfile.Gender.OTHER` | | birthday | Date | ### Custom user attributes You can set your own custom attributes. These are usually related to your app usage. For example, for fitness applications, they might be the number of exercises per week, for language learning app user's knowledge level, and so on. You can use them in segments to create targeted paywalls and offers, and you can also use them in analytics to figure out which product metrics affect the revenue most. ```kotlin showLineNumbers val builder = AdaptyProfileParameters.Builder() builder.withCustomAttribute("key1", "value1") ``` To remove existing key, use `.withRemovedCustomAttribute()` method: ```kotlin showLineNumbers val builder = AdaptyProfileParameters.Builder() builder.withRemovedCustomAttribute("key2") ``` Sometimes you need to figure out what custom attributes have already been installed before. To do this, use the `customAttributes` field of the `AdaptyProfile` object. :::warning Keep in mind that the value of `customAttributes` may be out of date since the user attributes can be sent from different devices at any time so the attributes on the server might have been changed after the last sync. ::: ### Limits - Up to 30 custom attributes per user - Key names are up to 30 characters long. The key name can include alphanumeric characters and any of the following: `_` `-` `.` - Value can be a string or float with no more than 50 characters. --- # File: kmp-listen-subscription-changes --- --- title: "Check subscription status in Kotlin Multiplatform SDK" description: "Track and manage user subscription status in Adapty for improved customer retention in your Kotlin Multiplatform app." --- With Adapty, keeping track of subscription status is made easy. You don't have to manually insert product IDs into your code. Instead, you can effortlessly confirm a user's subscription status by checking for an active [access level](access-level). Before you start checking subscription status, set up [Real-time Developer Notifications (RTDN)](enable-real-time-developer-notifications-rtdn). ## Access level and the AdaptyProfile object Access levels are properties of the [AdaptyProfile](https://kmp.adapty.io///adapty/com.adapty.kmp.models/-adapty-profile/) object. We recommend retrieving the profile when your app starts, such as when you [identify a user](android-identifying-users#setting-customer-user-id-on-configuration) , and then updating it whenever changes occur. This way, you can use the profile object without repeatedly requesting it. To be notified of profile updates, listen for profile changes as described in the [Listening for profile updates, including access levels](android-listen-subscription-changes.md) section below. :::tip Want to see a real-world example of how Adapty SDK is integrated into a mobile app? Check out our [sample apps](sample-apps), which demonstrate the full setup, including displaying paywalls, making purchases, and other basic functionality. ::: ## Retrieving the access level from the server To get the access level from the server, use the `.getProfile()` method: ```kotlin showLineNumbers Adapty.getProfile().onSuccess { profile -> // check the access }.onError { error -> // handle the error } ``` Response parameters: | Parameter | Description | | --------- |-----------------------------------------------------------------------------------------------------------------------------------------------------------------------------------------------------------------------------------------------------------------------------------------------------------------------------------------------------------------------------------------------------------------------------------------------------------------------------------------------------------------------------------------------------------------------------------------------------------------------------------------------------------------------| | Profile |An [AdaptyProfile](https://kmp.adapty.io///adapty/com.adapty.kmp.models/-adapty-profile/) object. Generally, you have to check only the access level status of the profile to determine whether the user has premium access to the app.
The `.getProfile` method provides the most up-to-date result as it always tries to query the API. If for some reason (e.g. no internet connection), the Adapty SDK fails to retrieve information from the server, the data from the cache will be returned. It is also important to note that the Adapty SDK updates `AdaptyProfile` cache regularly, to keep this information as up-to-date as possible.
| The `.getProfile()` method provides you with the user profile from which you can get the access level status. You can have multiple access levels per app. For example, if you have a newspaper app and sell subscriptions to different topics independently, you can create access levels "sports" and "science". But most of the time, you will only need one access level, in that case, you can just use the default "premium" access level. Here is an example for checking for the default "premium" access level: ```kotlin showLineNumbers Adapty.getProfile().onSuccess { profile -> if (profile.accessLevels["premium"]?.isActive == true) { // grant access to premium features } }.onError { error -> // handle the error } ``` ### Listening for subscription status updates Whenever the user's subscription changes, Adapty fires an event. To receive messages from Adapty, you need to make some additional configuration: ```kotlin showLineNumbers Adapty.setOnProfileUpdatedListener { profile -> // handle any changes to subscription state } ``` Adapty also fires an event at the start of the application. In this case, the cached subscription status will be passed. ### Subscription status cache The cache implemented in the Adapty SDK stores the subscription status of the profile. This means that even if the server is unavailable, the cached data can be accessed to provide information about the profile's subscription status. However, it's important to note that direct data requests from the cache are not possible. The SDK periodically queries the server every minute to check for any updates or changes related to the profile. If there are any modifications, such as new transactions or other updates, they will be sent to the cached data in order to keep it synchronized with the server. --- # File: kmp-deal-with-att --- --- title: "Deal with ATT in Kotlin Multiplatform SDK" description: "Get started with Adapty on Kotlin Multiplatform to streamline subscription setup and management." --- If your application uses AppTrackingTransparency framework and presents an app-tracking authorization request to the user, then you should send the [authorization status](https://developer.apple.com/documentation/apptrackingtransparency/attrackingmanager/authorizationstatus/) to Adapty. ```kotlin showLineNumbers val profileParameters = AdaptyProfileParameters.Builder() .withAttStatus(3) // 3 = ATTrackingManagerAuthorizationStatusAuthorized .build() Adapty.updateProfile(profileParameters) .onSuccess { // ATT status updated successfully } .onError { error -> // handle AdaptyError } ``` :::warning We strongly recommend that you send this value as early as possible when it changes, only in that case the data will be sent in a timely manner to the integrations you have configured. ::: --- # File: kids-mode-kmp --- --- title: "Kids Mode in Kotlin Multiplatform SDK" description: "Easily enable Kids Mode to comply with Google policies. No GAID or ad data collected in Kotlin Multiplatform SDK." --- If your Kotlin Multiplatform application is intended for kids, you must follow the policies of [Google](https://support.google.com/googleplay/android-developer/answer/9893335). If you're using the Adapty SDK, a few simple steps will help you configure it to meet these policies and pass app store reviews. ## What's required? You need to configure the Adapty SDK to disable the collection of: - [IDFA (Identifier for Advertisers)](https://en.wikipedia.org/wiki/Identifier_for_Advertisers) (iOS) - [Android Advertising ID (AAID/GAID)](https://support.google.com/googleplay/android-developer/answer/6048248) (Android) - [IP address](https://www.ftc.gov/system/files/ftc_gov/pdf/p235402_coppa_application.pdf) In addition, we recommend using customer user ID carefully. User ID in format `optional
default: `en`
| The identifier of the onboarding localization. This parameter is expected to be a language code composed of one or two subtags separated by the minus (**-**) character. The first subtag is for the language, the second one is for the region.Example: `en` means English, `pt-br` represents the Brazilian Portuguese language.
| | **fetchPolicy** | default: `.reloadRevalidatingCacheData` |By default, SDK will try to load data from the server and will return cached data in case of failure. We recommend this option because it ensures your users always get the most up-to-date data.
However, if you believe your users deal with unstable internet, consider using `.returnCacheDataElseLoad` to return cached data if it exists. In this scenario, users might not get the absolute latest data, but they'll experience faster loading times, no matter how patchy their internet connection is. The cache is updated regularly, so it's safe to use it during the session to avoid network requests.
Note that the cache remains intact upon restarting the app and is only cleared when the app is reinstalled or through manual cleanup.
Adapty SDK stores onboardings locally in two layers: regularly updated cache described above and fallback onboardings. We also use CDN to fetch onboardings faster and a stand-alone fallback server in case the CDN is unreachable. This system is designed to make sure you always get the latest version of your onboardings while ensuring reliability even in cases where internet connection is scarce.
| | **loadTimeout** | default: 5 sec |This value limits the timeout for this method. If the timeout is reached, cached data or local fallback will be returned.
Note that in rare cases this method can timeout slightly later than specified in `loadTimeout`, since the operation may consist of different requests under the hood.
| Response parameters: | Parameter | Description | |:----------|:---------------------------------------------------------------------------------------------------------------------------------------------------------------------------------------------------------| | Onboarding | An [`AdaptyOnboarding`](https://kmp.adapty.io///adapty/com.adapty.kmp.models/-adapty-onboarding/) object with: the onboarding identifier and configuration, remote config, and several other properties. | ## Speed up onboarding fetching with default audience onboarding Typically, onboardings are fetched almost instantly, so you don't need to worry about speeding up this process. However, in cases where you have numerous audiences and onboardings, and your users have a weak internet connection, fetching a onboarding may take longer than you'd like. In such situations, you might want to display a default onboarding to ensure a smooth user experience rather than showing no onboarding at all. To address this, you can use the `getOnboardingForDefaultAudience` method, which fetches the onboarding of the specified placement for the **All Users** audience. However, it's crucial to understand that the recommended approach is to fetch the onboarding by the `getOnboarding` method, as detailed in the [Fetch Onboarding](#fetch-onboarding) section above. :::warning Consider using `getOnboarding` instead of `getOnboardingForDefaultAudience`, as the latter has important limitations: - **Compatibility issues**: May create problems when supporting multiple app versions, requiring either backward-compatible designs or accepting that older versions might display incorrectly. - **No personalization**: Only shows content for the "All Users" audience, removing targeting based on country, attribution, or custom attributes. If faster fetching outweighs these drawbacks for your use case, use `getOnboardingForDefaultAudience` as shown below. Otherwise, use `getOnboarding` as described [above](#fetch-onboarding). ::: ```kotlin showLineNumbers Adapty.getOnboardingForDefaultAudience( placementId = "YOUR_PLACEMENT_ID", locale = "en", fetchPolicy = AdaptyPaywallFetchPolicy.Default, ).onSuccess { paywall -> // the requested paywall }.onError { error -> // handle the error } ``` Parameters: | Parameter | Presence | Description | |---------|--------|------------------------------------------------------------------------------------------------------------------------------------------------------------------------------------------------------------------------------------------------------------------------------------------------------------------------------------------------------------------------------------------------------------------------------------------------------------------------------------------------------------------------------------------------------------------------------------------------------------------------------------------------------------------------------------------------------------------------------------------------------------------------------------------------------------------------------------------------------------------------------------------------------------------------------------------------------------------------------------------------------------------------------------------------------------------------------------------------------------------------------------------------------------------------------------------------------------------------| | **placementId** | required | The identifier of the desired [Placement](placements). This is the value you specified when creating a placement in the Adapty Dashboard. | | **locale** |optional
default: `en`
| The identifier of the onboarding localization. This parameter is expected to be a language code composed of one or two subtags separated by the minus (**-**) character. The first subtag is for the language, the second one is for the region.Example: `en` means English, `pt-br` represents the Brazilian Portuguese language. | | **fetchPolicy** | default: `.reloadRevalidatingCacheData` |
By default, SDK will try to load data from the server and will return cached data in case of failure. We recommend this option because it ensures your users always get the most up-to-date data.
However, if you believe your users deal with unstable internet, consider using `.returnCacheDataElseLoad` to return cached data if it exists. In this scenario, users might not get the absolute latest data, but they'll experience faster loading times, no matter how patchy their internet connection is. The cache is updated regularly, so it's safe to use it during the session to avoid network requests.
Note that the cache remains intact upon restarting the app and is only cleared when the app is reinstalled or through manual cleanup.
Adapty SDK stores onboardings locally in two layers: regularly updated cache described above and fallback onboardings. We also use CDN to fetch onboardings faster and a stand-alone fallback server in case the CDN is unreachable. This system is designed to make sure you always get the latest version of your onboardings while ensuring reliability even in cases where internet connection is scarce.
| --- # File: kmp-present-onboardings --- --- title: "Present onboardings in Kotlin Multiplatform SDK" description: "Learn how to present onboardings effectively to drive more conversions." --- If you've customized an onboarding using the builder, you don't need to worry about rendering it in your Kotlin Multiplatform app code to display it to the user. Such an onboarding contains both what should be shown within the onboarding and how it should be shown. Before you start, ensure that: 1. You have installed [Adapty Kotlin Multiplatform SDK](sdk-installation-kotlin-multiplatform.md) 3.15.0 or later. 2. You have [created an onboarding](create-onboarding.md). 3. You have added the onboarding to a [placement](placements.md). To display an onboarding, use the `view.present()` method on the `view` created by the `createOnboardingView` method. Each `view` can only be used once. If you need to display the onboarding again, call `createPaywallView` one more to create a new `view` instance. :::warning Reusing the same `view` without recreating it may result in an error. ::: ```kotlin showLineNumbers title="Kotlin Multiplatform" viewModelScope.launch { AdaptyUI.createOnboardingView(onboarding = onboarding).onSuccess { view -> view.present() }.onError { error -> // handle the error } } ``` ## Configure iOS presentation style Configure how the onboarding is presented on iOS by passing the `iosPresentationStyle` parameter to the `present()` method. The parameter accepts `AdaptyUIIOSPresentationStyle.FULLSCREEN` (default) or `AdaptyUIIOSPresentationStyle.PAGESHEET` values. ```kotlin showLineNumbers viewModelScope.launch { val view = AdaptyUI.createOnboardingView(onboarding = onboarding).getOrNull() view?.present(iosPresentationStyle = AdaptyUIIOSPresentationStyle.PAGESHEET) } ``` ## Customize how links open in onboardings By default, links in onboardings open in an in-app browser. This provides a seamless user experience by displaying web pages within your application, allowing users to view them without switching apps. If you prefer to open links in an external browser instead, you can customize this behavior by setting the `externalUrlsPresentation` parameter to `AdaptyWebPresentation.EXTERNAL_BROWSER`: ```kotlin showLineNumbers viewModelScope.launch { AdaptyUI.createOnboardingView( onboarding = onboarding, externalUrlsPresentation = AdaptyWebPresentation.EXTERNAL_BROWSER // default – IN_APP_BROWSER ).onSuccess { view -> view.present() }.onError { error -> // handle the error } } ``` --- # File: kmp-handling-onboarding-events --- --- title: "Handle onboarding events in Kotlin Multiplatform SDK" description: "Handle onboarding-related events in Kotlin Multiplatform using Adapty." --- Before you start, ensure that: 1. You have installed [Adapty Kotlin Multiplatform SDK](sdk-installation-kotlin-multiplatform.md) 3.15.0 or later. 2. You have [created an onboarding](create-onboarding.md). 3. You have added the onboarding to a [placement](placements.md). Onboardings configured with the builder generate events your app can respond to. Learn how to respond to these events below. ## Set up the onboarding event observer To handle onboarding events, you need to implement the `AdaptyUIOnboardingsEventsObserver` interface and set it up with `AdaptyUI.setOnboardingsEventsObserver()`. This should be done early in your app's lifecycle, typically in your main activity or app initialization. ```kotlin // In your app initialization AdaptyUI.setOnboardingsEventsObserver(MyAdaptyUIOnboardingsEventsObserver()) ``` ## Custom actions In the builder, you can add a **custom** action to a button and assign it an ID. Then, you can use this ID in your code and handle it as a custom action..default}) For example, if a user taps a custom button, like **Login** or **Allow notifications**, the delegate method `onCustomAction` will be triggered with the action ID from the builder. You can create your own IDs, like "allowNotifications".
```kotlin
class MyAdaptyUIOnboardingsEventsObserver : AdaptyUIOnboardingsEventsObserver {
override fun onboardingViewOnCustomAction(
view: AdaptyUIOnboardingView,
meta: AdaptyUIOnboardingMeta,
actionId: String
) {
when (actionId) {
"openPaywall" -> {
// Display paywall from onboarding
// You would typically fetch and present a new paywall here
mainUiScope.launch {
// Example: Get paywall by placement ID
// val paywallResult = Adapty.getPaywall("your_placement_id")
// paywallResult.onSuccess { paywall ->
// val paywallViewResult = AdaptyUI.createPaywallView(paywall)
// paywallViewResult.onSuccess { paywallView ->
// paywallView.present()
// }
// }
}
}
"allowNotifications" -> {
// Handle notification permissions
}
else -> {
// Handle other custom actions
}
}
}
}
// Set up the observer
AdaptyUI.setOnboardingsEventsObserver(MyAdaptyUIOnboardingsEventsObserver())
```
For example, if a user taps a custom button, like **Login** or **Allow notifications**, the delegate method `onCustomAction` will be triggered with the action ID from the builder. You can create your own IDs, like "allowNotifications".
```kotlin
class MyAdaptyUIOnboardingsEventsObserver : AdaptyUIOnboardingsEventsObserver {
override fun onboardingViewOnCustomAction(
view: AdaptyUIOnboardingView,
meta: AdaptyUIOnboardingMeta,
actionId: String
) {
when (actionId) {
"openPaywall" -> {
// Display paywall from onboarding
// You would typically fetch and present a new paywall here
mainUiScope.launch {
// Example: Get paywall by placement ID
// val paywallResult = Adapty.getPaywall("your_placement_id")
// paywallResult.onSuccess { paywall ->
// val paywallViewResult = AdaptyUI.createPaywallView(paywall)
// paywallViewResult.onSuccess { paywallView ->
// paywallView.present()
// }
// }
}
}
"allowNotifications" -> {
// Handle notification permissions
}
else -> {
// Handle other custom actions
}
}
}
}
// Set up the observer
AdaptyUI.setOnboardingsEventsObserver(MyAdaptyUIOnboardingsEventsObserver())
```
Event example (Click to expand)
```json { "actionId": "allowNotifications", "meta": { "onboardingId": "onboarding_123", "screenClientId": "profile_screen", "screenIndex": 0, "screensTotal": 3 } } ```Event example (Click to expand)
```json { "action_id": "close_button", "meta": { "onboarding_id": "onboarding_123", "screen_cid": "final_screen", "screen_index": 3, "total_screens": 4 } } ```Event example (Click to expand)
```json { "action_id": "premium_offer_1", "meta": { "onboarding_id": "onboarding_123", "screen_cid": "pricing_screen", "screen_index": 2, "total_screens": 4 } } ```Event example (Click to expand)
```json { "meta": { "onboarding_id": "onboarding_123", "screen_cid": "welcome_screen", "screen_index": 0, "total_screens": 4 } } ```Event examples (Click to expand)
```javascript // OnboardingStarted { "meta": { "onboardingId": "onboarding_123", "screenClientId": "welcome_screen", "screenIndex": 0, "screensTotal": 4 } } // ScreenPresented { "meta": { "onboardingId": "onboarding_123", "screenClientId": "interests_screen", "screenIndex": 2, "screensTotal": 4 } } // ScreenCompleted { "meta": { "onboardingId": "onboarding_123", "screenClientId": "profile_screen", "screenIndex": 1, "screensTotal": 4 }, "elementId": "profile_form", "reply": "success" } // SecondScreenPresented { "meta": { "onboardingId": "onboarding_123", "screenClientId": "profile_screen", "screenIndex": 1, "screensTotal": 4 } } // UserEmailCollected { "meta": { "onboardingId": "onboarding_123", "screenClientId": "profile_screen", "screenIndex": 1, "screensTotal": 4 } } // OnboardingCompleted { "meta": { "onboardingId": "onboarding_123", "screenClientId": "final_screen", "screenIndex": 3, "screensTotal": 4 } } ```Saved data examples (the format may differ in your implementation)
```javascript // Example of a saved select action { "id": "onboarding_on_state_updated_action", "view": { /* AdaptyUI.OnboardingView object */ }, "meta": { "onboarding_id": "onboarding_123", "screen_cid": "preferences_screen", "screen_index": 1, "total_screens": 3 }, "action": { "element_id": "preference_selector", "element_type": "select", "value": { "id": "option_1", "value": "premium", "label": "Premium Plan" } } } // Example of a saved multi-select action { "id": "onboarding_on_state_updated_action", "view": { /* AdaptyUI.OnboardingView object */ }, "meta": { "onboarding_id": "onboarding_123", "screen_cid": "interests_screen", "screen_index": 2, "total_screens": 3 }, "action": { "element_id": "interests_selector", "element_type": "multi_select", "value": [ { "id": "interest_1", "value": "sports", "label": "Sports" }, { "id": "interest_2", "value": "music", "label": "Music" } ] } } // Example of a saved input action { "id": "onboarding_on_state_updated_action", "view": { /* AdaptyUI.OnboardingView object */ }, "meta": { "onboarding_id": "onboarding_123", "screen_cid": "profile_screen", "screen_index": 0, "total_screens": 3 }, "action": { "element_id": "name_input", "element_type": "input", "value": { "type": "text", "value": "John Doe" } } } // Example of a saved date picker action { "id": "onboarding_on_state_updated_action", "view": { /* AdaptyUI.OnboardingView object */ }, "meta": { "onboarding_id": "onboarding_123", "screen_cid": "profile_screen", "screen_index": 0, "total_screens": 3 }, "action": { "element_id": "birthday_picker", "element_type": "date_picker", "value": { "day": 15, "month": 6, "year": 1990 } } } ```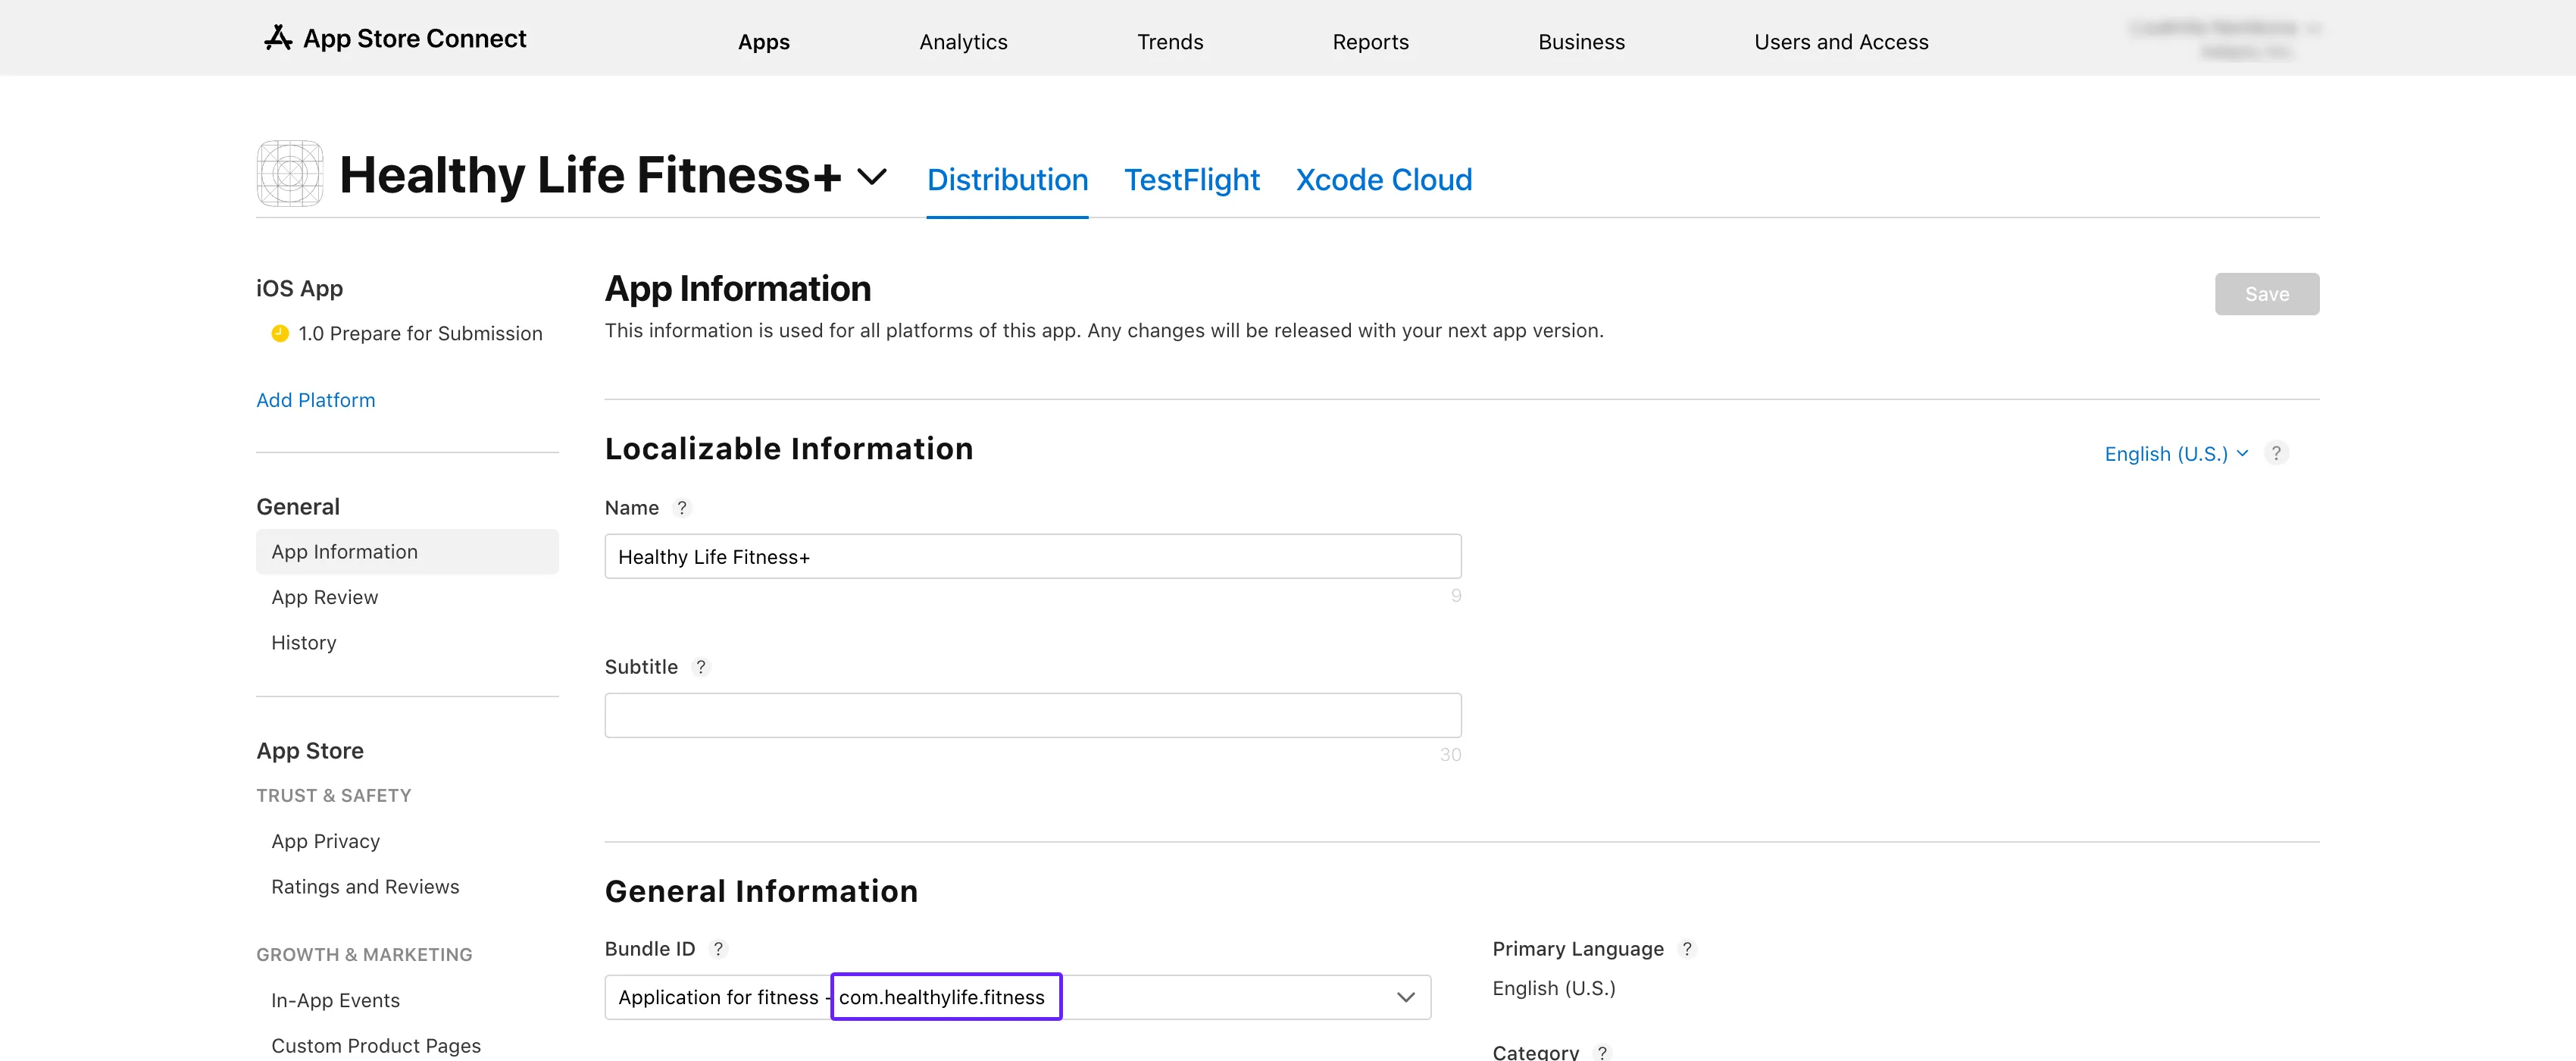
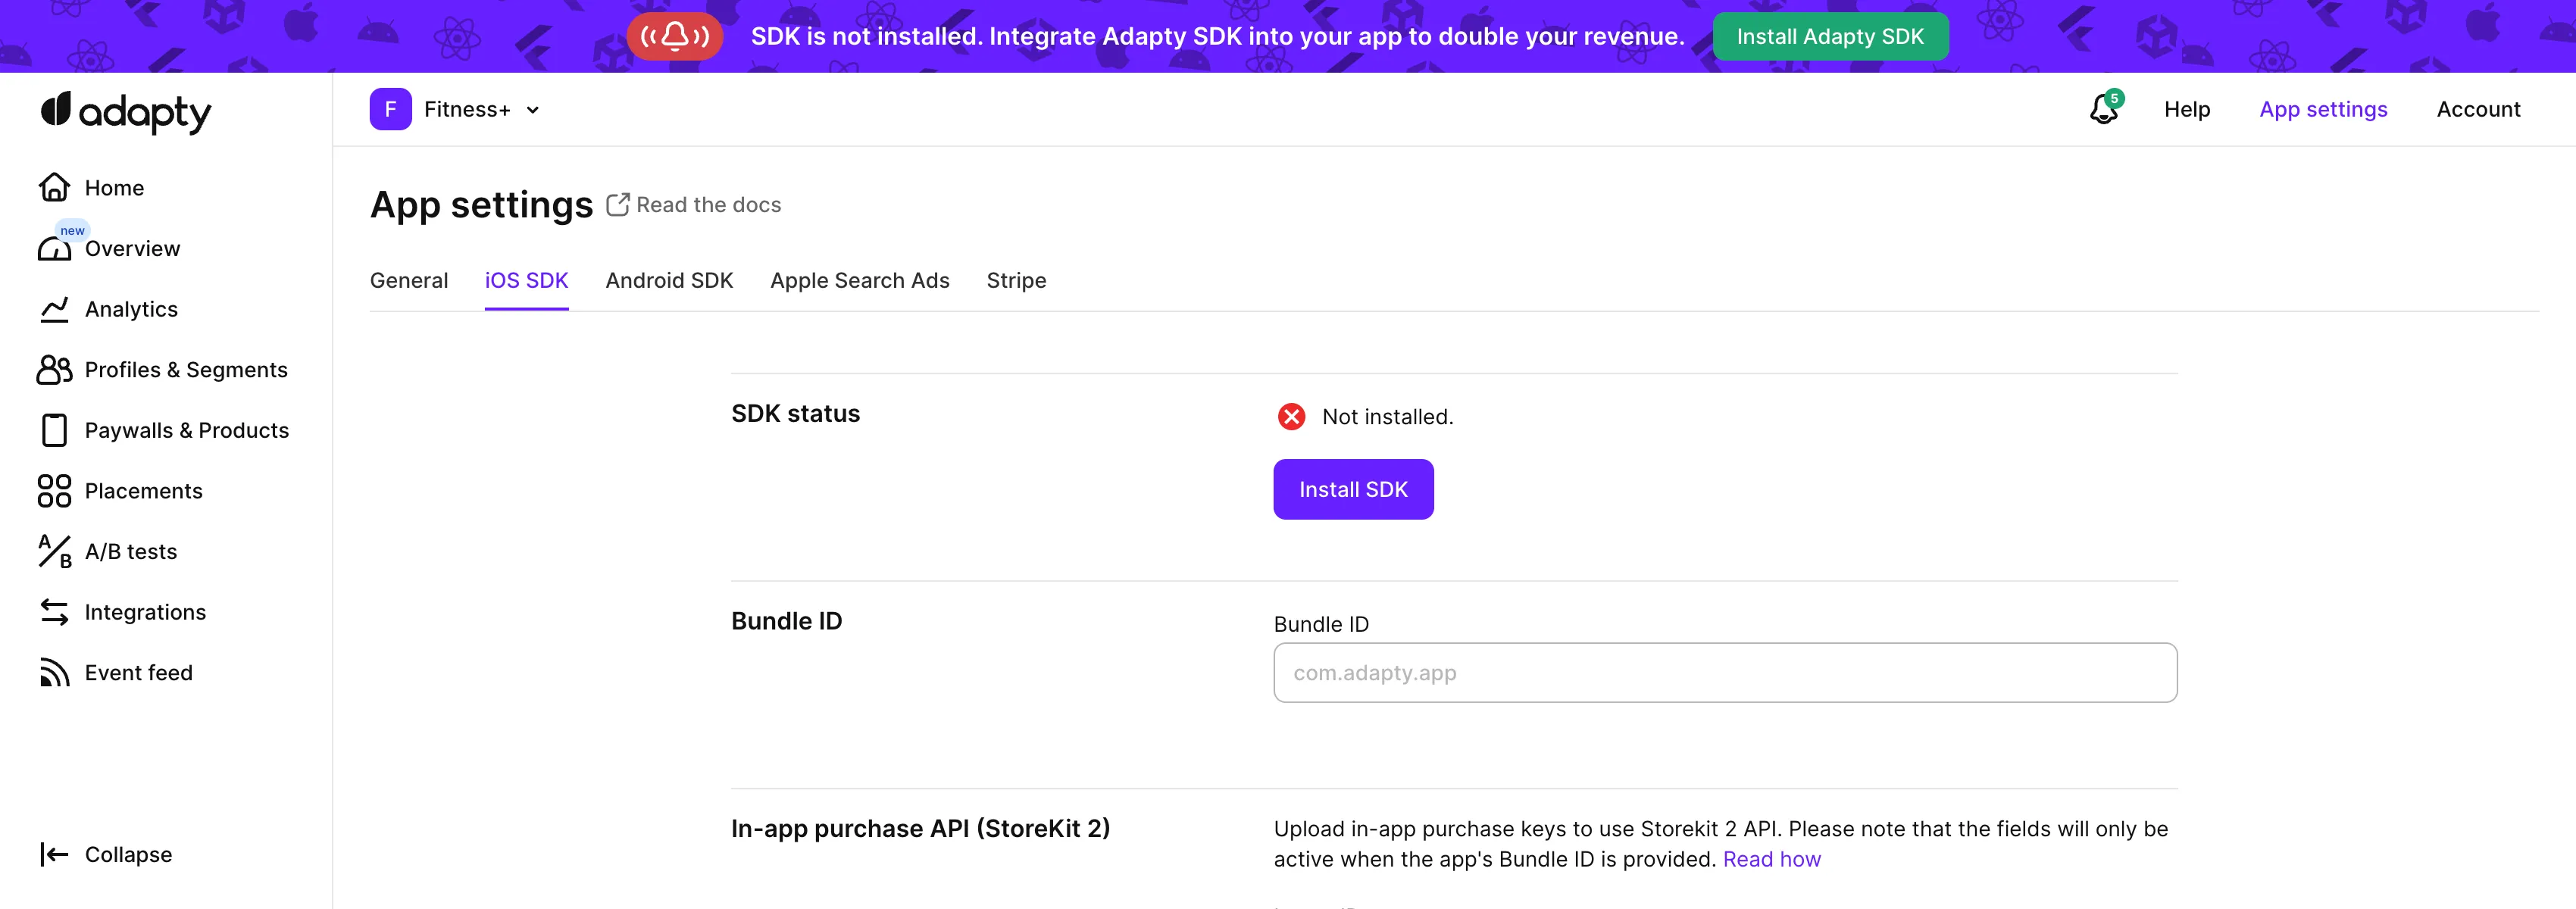
 2. Click on the subscription group name. You'll see your products listed under the **Subscriptions** section.
3. Ensure the product you're testing is marked **Ready to Submit**. If not, follow the instructions on the [Product in App Store](app-store-products) page.
2. Click on the subscription group name. You'll see your products listed under the **Subscriptions** section.
3. Ensure the product you're testing is marked **Ready to Submit**. If not, follow the instructions on the [Product in App Store](app-store-products) page.
 4. Compare the product ID from the table with the one in the [**Products**](https://app.adapty.io/products) tab in the Adapty Dashboard. If the IDs don't match, copy the product ID from the table and [create a product](create-product) with it in the Adapty Dashboard.
 ## Step 3. Check product availability \{#step-4-check-product-availability\}
1. Go back to **App Store Connect** and open the same **Subscriptions** section.
2. Click the subscription group name to view your products.
3. Select the product you're testing.
## Step 3. Check product availability \{#step-4-check-product-availability\}
1. Go back to **App Store Connect** and open the same **Subscriptions** section.
2. Click the subscription group name to view your products.
3. Select the product you're testing.
 4. Scroll to the **Availability** section and check that all the required countries and regions are listed.
 ## Step 4. Check product prices \{#step-5-check-product-prices\}
1. Again, head to the **Monetization** → **Subscriptions** section in **App Store Connect**.
2. Click the subscription group name.
3. Select the product you're testing.
4. Scroll down to **Subscription Pricing** and expand the **Current Pricing for New Subscribers** section.
## Step 4. Check product prices \{#step-5-check-product-prices\}
1. Again, head to the **Monetization** → **Subscriptions** section in **App Store Connect**.
2. Click the subscription group name.
3. Select the product you're testing.
4. Scroll down to **Subscription Pricing** and expand the **Current Pricing for New Subscribers** section.
 5. Ensure that all required prices are listed.
 ## Step 5. Check app paid status, bank account, and tax forms are active
1. In **App Store Connect**](https://appstoreconnect.apple.com/) homepage, click **Business**.
## Step 5. Check app paid status, bank account, and tax forms are active
1. In **App Store Connect**](https://appstoreconnect.apple.com/) homepage, click **Business**.
 2. Select your company name.
 3. Scroll down and check that your **Paid Apps Agreement**, **Bank Account**, and **Tax forms** all show as **Active**.
 By following these steps, you should be able to resolve the `InvalidProductIdentifiers` warning and get your products live in the store
---
# File: cantMakePayments-kmp
---
---
title: "Fix for Code-1003 cantMakePayment error in Kotlin Multiplatform SDK"
description: "Resolve making payments error when managing subscriptions in Adapty."
---
The 1003 error, `cantMakePayments`, indicates that in-app purchases can't be made on this device.
If you’re encountering the `cantMakePayments` error, this is usually due to one of the reasons:
- Device restrictions: The error is not related to Adapty. See the ways to fix the issue below.
- Observer mode configuration: The `makePurchase` method and the observer mode can't be used at the same time. See the section below.
## Issue: Device restrictions
| Issue | Solution |
|---------------------------|---------------------------------------------------------|
| Screen Time restrictions | Disable In-App Purchase restrictions in [Screen Time](https://support.apple.com/en-us/102470) |
| Account suspended | Contact Apple Support to resolve account issues |
| Regional restrictions | Use App Store account from supported region |
## Issue: Using both Observer mode and makePurchase
If you are using `makePurchases` to handle purchases, you don't need to use Observer mode. [Observer mode](https://adapty.io/docs/observer-vs-full-mode) is only needed if you implement the purchase logic yourself.
So, if you're using `makePurchase`, you can safely remove enabling Observer mode from the SDK activation code.
---
# File: kmp-sdk-migration-guides
---
---
title: "Kotlin Multiplatform SDK Migration Guides"
description: "Migration guides for Adapty Kotlin Multiplatform SDK versions."
---
This page contains all migration guides for Adapty Kotlin Multiplatform SDK. Choose the version you want to migrate to for detailed instructions:
- **[Migrate to v. 3.15](migration-to-kmp-315)**
---
# File: migration-to-kmp-315
---
---
title: "Migration guide to Adapty Kotlin Multiplatform SDK 3.15.0"
description: "Migration steps for Adapty Kotlin Multiplatform SDK 3.15.0"
---
Adapty Kotlin Multiplatform SDK 3.15.0 is a major release that brings new features and improvements which, however, may require some migration steps from you.
1. Update the observer class and method names.
2. Update the fallback paywalls method name.
3. Update the view class name in event handling methods.
## Update observer class and method names
The observer class and its registration method have been renamed:
```diff
- import com.adapty.kmp.AdaptyUIObserver
+ import com.adapty.kmp.AdaptyUIPaywallsEventsObserver
- import com.adapty.kmp.models.AdaptyUIView
+ import com.adapty.kmp.models.AdaptyUIPaywallView
- class MyAdaptyUIObserver : AdaptyUIObserver {
- override fun paywallViewDidPerformAction(view: AdaptyUIView, action: AdaptyUIAction) {
+ class MyAdaptyUIPaywallsEventsObserver : AdaptyUIPaywallsEventsObserver {
+ override fun paywallViewDidPerformAction(view: AdaptyUIPaywallView, action: AdaptyUIAction) {
// handle actions
}
}
// Set up the observer
- AdaptyUI.setObserver(MyAdaptyUIObserver())
+ AdaptyUI.setPaywallsEventsObserver(MyAdaptyUIPaywallsEventsObserver())
```
## Update fallback paywalls method name
The method name for setting fallback paywalls has been changed:
```diff showLineNumbers
- Adapty.setFallbackPaywalls(assetId = "fallback.json")
+ Adapty.setFallback(assetId = "fallback.json")
.onSuccess {
// Fallback paywalls loaded successfully
}
.onError { error ->
// Handle the error
}
```
## Update view class name in event handling methods
All event handling methods now use the new `AdaptyUIPaywallView` class instead of `AdaptyUIView`:
```diff
- override fun paywallViewDidAppear(view: AdaptyUIView) {
+ override fun paywallViewDidAppear(view: AdaptyUIPaywallView) {
// Handle paywall appearance
}
- override fun paywallViewDidDisappear(view: AdaptyUIView) {
+ override fun paywallViewDidDisappear(view: AdaptyUIPaywallView) {
// Handle paywall disappearance
}
- override fun paywallViewDidSelectProduct(view: AdaptyUIPaywallView, productId: String) {
+ override fun paywallViewDidSelectProduct(view: AdaptyUIView, productId: String) {
// Handle product selection
}
- override fun paywallViewDidStartPurchase(view: AdaptyUIView, product: AdaptyPaywallProduct) {
+ override fun paywallViewDidStartPurchase(view: AdaptyUIPaywallView, product: AdaptyPaywallProduct) {
// Handle purchase start
}
- override fun paywallViewDidFinishPurchase(view: AdaptyUIView, product: AdaptyPaywallProduct, purchaseResult: AdaptyPurchaseResult) {
+ override fun paywallViewDidFinishPurchase(view: AdaptyUIPaywallView, product: AdaptyPaywallProduct, purchaseResult: AdaptyPurchaseResult) {
// Handle purchase result
}
- override fun paywallViewDidFailPurchase(view: AdaptyUIView, product: AdaptyPaywallProduct, error: AdaptyError) {
+ override fun paywallViewDidFailPurchase(view: AdaptyUIPaywallView, product: AdaptyPaywallProduct, error: AdaptyError) {
// Add your purchase failure handling logic here
}
- override fun paywallViewDidFinishRestore(view: AdaptyUIView, profile: AdaptyProfile) {
+ override fun paywallViewDidFinishRestore(view: AdaptyUIPaywallView, profile: AdaptyProfile) {
// Add your successful restore handling logic here
}
- override fun paywallViewDidFailRestore(view: AdaptyUIView, error: AdaptyError) {
+ override fun paywallViewDidFailRestore(view: AdaptyUIPaywallView, error: AdaptyError) {
// Add your restore failure handling logic here
}
- override fun paywallViewDidFinishWebPaymentNavigation(view: AdaptyUIView, product: AdaptyPaywallProduct?, error: AdaptyError?) {
+ override fun paywallViewDidFinishWebPaymentNavigation(view: AdaptyUIPaywallView, product: AdaptyPaywallProduct?, error: AdaptyError?) {
// Handle web payment navigation result
}
- override fun paywallViewDidFailLoadingProducts(view: AdaptyUIView, error: AdaptyError) {
+ override fun paywallViewDidFailLoadingProducts(view: AdaptyUIPaywallView, error: AdaptyError) {
// Add your product loading failure handling logic here
}
- override fun paywallViewDidFailRendering(view: AdaptyUIView, error: AdaptyError) {
+ override fun paywallViewDidFailRendering(view: AdaptyUIPaywallView, error: AdaptyError) {
// Handle rendering error
}
```
---
# End of Documentation
_Generated on: 2026-02-28T11:30:00.553Z_
_Successfully processed: 41/41 files_
By following these steps, you should be able to resolve the `InvalidProductIdentifiers` warning and get your products live in the store
---
# File: cantMakePayments-kmp
---
---
title: "Fix for Code-1003 cantMakePayment error in Kotlin Multiplatform SDK"
description: "Resolve making payments error when managing subscriptions in Adapty."
---
The 1003 error, `cantMakePayments`, indicates that in-app purchases can't be made on this device.
If you’re encountering the `cantMakePayments` error, this is usually due to one of the reasons:
- Device restrictions: The error is not related to Adapty. See the ways to fix the issue below.
- Observer mode configuration: The `makePurchase` method and the observer mode can't be used at the same time. See the section below.
## Issue: Device restrictions
| Issue | Solution |
|---------------------------|---------------------------------------------------------|
| Screen Time restrictions | Disable In-App Purchase restrictions in [Screen Time](https://support.apple.com/en-us/102470) |
| Account suspended | Contact Apple Support to resolve account issues |
| Regional restrictions | Use App Store account from supported region |
## Issue: Using both Observer mode and makePurchase
If you are using `makePurchases` to handle purchases, you don't need to use Observer mode. [Observer mode](https://adapty.io/docs/observer-vs-full-mode) is only needed if you implement the purchase logic yourself.
So, if you're using `makePurchase`, you can safely remove enabling Observer mode from the SDK activation code.
---
# File: kmp-sdk-migration-guides
---
---
title: "Kotlin Multiplatform SDK Migration Guides"
description: "Migration guides for Adapty Kotlin Multiplatform SDK versions."
---
This page contains all migration guides for Adapty Kotlin Multiplatform SDK. Choose the version you want to migrate to for detailed instructions:
- **[Migrate to v. 3.15](migration-to-kmp-315)**
---
# File: migration-to-kmp-315
---
---
title: "Migration guide to Adapty Kotlin Multiplatform SDK 3.15.0"
description: "Migration steps for Adapty Kotlin Multiplatform SDK 3.15.0"
---
Adapty Kotlin Multiplatform SDK 3.15.0 is a major release that brings new features and improvements which, however, may require some migration steps from you.
1. Update the observer class and method names.
2. Update the fallback paywalls method name.
3. Update the view class name in event handling methods.
## Update observer class and method names
The observer class and its registration method have been renamed:
```diff
- import com.adapty.kmp.AdaptyUIObserver
+ import com.adapty.kmp.AdaptyUIPaywallsEventsObserver
- import com.adapty.kmp.models.AdaptyUIView
+ import com.adapty.kmp.models.AdaptyUIPaywallView
- class MyAdaptyUIObserver : AdaptyUIObserver {
- override fun paywallViewDidPerformAction(view: AdaptyUIView, action: AdaptyUIAction) {
+ class MyAdaptyUIPaywallsEventsObserver : AdaptyUIPaywallsEventsObserver {
+ override fun paywallViewDidPerformAction(view: AdaptyUIPaywallView, action: AdaptyUIAction) {
// handle actions
}
}
// Set up the observer
- AdaptyUI.setObserver(MyAdaptyUIObserver())
+ AdaptyUI.setPaywallsEventsObserver(MyAdaptyUIPaywallsEventsObserver())
```
## Update fallback paywalls method name
The method name for setting fallback paywalls has been changed:
```diff showLineNumbers
- Adapty.setFallbackPaywalls(assetId = "fallback.json")
+ Adapty.setFallback(assetId = "fallback.json")
.onSuccess {
// Fallback paywalls loaded successfully
}
.onError { error ->
// Handle the error
}
```
## Update view class name in event handling methods
All event handling methods now use the new `AdaptyUIPaywallView` class instead of `AdaptyUIView`:
```diff
- override fun paywallViewDidAppear(view: AdaptyUIView) {
+ override fun paywallViewDidAppear(view: AdaptyUIPaywallView) {
// Handle paywall appearance
}
- override fun paywallViewDidDisappear(view: AdaptyUIView) {
+ override fun paywallViewDidDisappear(view: AdaptyUIPaywallView) {
// Handle paywall disappearance
}
- override fun paywallViewDidSelectProduct(view: AdaptyUIPaywallView, productId: String) {
+ override fun paywallViewDidSelectProduct(view: AdaptyUIView, productId: String) {
// Handle product selection
}
- override fun paywallViewDidStartPurchase(view: AdaptyUIView, product: AdaptyPaywallProduct) {
+ override fun paywallViewDidStartPurchase(view: AdaptyUIPaywallView, product: AdaptyPaywallProduct) {
// Handle purchase start
}
- override fun paywallViewDidFinishPurchase(view: AdaptyUIView, product: AdaptyPaywallProduct, purchaseResult: AdaptyPurchaseResult) {
+ override fun paywallViewDidFinishPurchase(view: AdaptyUIPaywallView, product: AdaptyPaywallProduct, purchaseResult: AdaptyPurchaseResult) {
// Handle purchase result
}
- override fun paywallViewDidFailPurchase(view: AdaptyUIView, product: AdaptyPaywallProduct, error: AdaptyError) {
+ override fun paywallViewDidFailPurchase(view: AdaptyUIPaywallView, product: AdaptyPaywallProduct, error: AdaptyError) {
// Add your purchase failure handling logic here
}
- override fun paywallViewDidFinishRestore(view: AdaptyUIView, profile: AdaptyProfile) {
+ override fun paywallViewDidFinishRestore(view: AdaptyUIPaywallView, profile: AdaptyProfile) {
// Add your successful restore handling logic here
}
- override fun paywallViewDidFailRestore(view: AdaptyUIView, error: AdaptyError) {
+ override fun paywallViewDidFailRestore(view: AdaptyUIPaywallView, error: AdaptyError) {
// Add your restore failure handling logic here
}
- override fun paywallViewDidFinishWebPaymentNavigation(view: AdaptyUIView, product: AdaptyPaywallProduct?, error: AdaptyError?) {
+ override fun paywallViewDidFinishWebPaymentNavigation(view: AdaptyUIPaywallView, product: AdaptyPaywallProduct?, error: AdaptyError?) {
// Handle web payment navigation result
}
- override fun paywallViewDidFailLoadingProducts(view: AdaptyUIView, error: AdaptyError) {
+ override fun paywallViewDidFailLoadingProducts(view: AdaptyUIPaywallView, error: AdaptyError) {
// Add your product loading failure handling logic here
}
- override fun paywallViewDidFailRendering(view: AdaptyUIView, error: AdaptyError) {
+ override fun paywallViewDidFailRendering(view: AdaptyUIPaywallView, error: AdaptyError) {
// Handle rendering error
}
```
---
# End of Documentation
_Generated on: 2026-02-28T11:30:00.553Z_
_Successfully processed: 41/41 files_