React Native in-app purchases implementation tutorial

Updated: May 12, 2025

Hey there! I’m Ben, a Developer Advocate at Adapty. When I first jumped from web apps to mobile development, I thought React Native would be a piece of cake. I mean, it looks just like React, right? Well… not exactly. Especially when you start messing with in-app purchases in React Native.
Let me be honest – out of everything I’ve built, my React Native IAP flow was by far the messiest part of my code. It wasn’t scalable, wasn’t clean, and was definitely a nightmare to maintain. Every time I found a bug or needed to add a feature to my React Native in-app purchase system, it felt like I was starting from scratch.
If you’ve been there (or you’re just getting started with React Native IAP), I want to walk you through how I would’ve done things differently. Hopefully, I can save you from the headaches I went through.
This isn’t just another React Native in-app purchases tutorial full of code snippets for you to blindly copy-paste. My goal is to help you understand how to build IAP logic that’s easier to maintain, faster to debug, and just plain better overall.
Yeah, this guide is on the longer side. But I’ve tried to explain all those things that often get skipped in other React-Native-IAP tutorials. Take your time if you need to. Trust me – understanding how this stuff actually works is totally worth it.
What you’ll need before we begin
Before we dive in, let’s cover some prerequisites. I’m assuming you already have developer accounts set up on the appropriate platforms and that you’ve configured products in the applicable store for one-time or subscription purchases.
I’m also assuming you know how to sign your app binaries and distribute them through the right channels. If not, no worries – there are tons of guides online to help you get those things set up.
Since I don’t know your current experience level with React-Native-IAP, here are some concepts that might be new to you:
- Paywall — that screen that blocks users from accessing content until they buy a subscription or product.
- Consumable — a non-subscription product that users can purchase.
- Xcode — Apple’s IDE for iOS development. Super helpful for React Native work, though it’s only available on macOS.
- Expo — a toolkit that makes React Native development way more high-level. It comes pre-configured with native modules and services baked in.
- Expo Go — Expo’s app for debugging your Expo code on the fly.
In and out: a 20-minute adventure
Sooner or later in your mobile dev journey, you’ll want to monetize your app with React Native in-app purchases or subscriptions. I’m not gonna sugarcoat it – this part of app development can be really tough
You might spend weeks writing React Native IAP logic, debugging it, shipping to app stores, debugging again, adding features you forgot… So many moving parts need attention: Is the user still subscribed? Have they canceled? How many subscribers do you have now? It can quickly turn into a massive time sink.
And that’s not even mentioning other challenges like localizing prices, figuring out which products sell better, finding the right way to promote your React-Native-IAP products in-app, and so on.
While most React Native purchase SDKs help, they still leave you with plenty of headaches to solve yourself when implementing in-app purchases in React Native.
I’ve tested pretty much all of them, and I’ve found Adapty to be the most flexible and easiest to implement for React Native IAP. I genuinely believe it’ll minimize the work you need to do.
Full disclosure – I’m currently part of the Adapty team. Feel free to take my recommendations with a grain of salt, but I think this article covers a lot beyond just installing our SDK.
If you’ve already got your developer accounts set up, you’re only a few hours away from some serious power-ups for your React Native in-app purchase flow:
- A straightforward purchases API for handling purchases and restores. You can apply all kinds of promo offers from your Adapty dashboard without writing any additional code.
- User profiles that track each user’s purchase history and active subscriptions. No need to build your own backend.
- Paywalls with A/B testing to compare conversion strategies and see what works.
- Analytics that give you deeper insights into your users, paywalls, and products.
Configuring Adapty
Let’s walk through what Adapty actually is before jumping into the setup. At its core, Adapty provides a Dashboard where you can configure your paywalls and products, run A/B tests, check analytics, and track user subscription status.
It’s essentially a toolkit that combines backend infrastructure for purchases with client-side libraries to integrate into your app. This saves you from building all that subscription logic yourself, which is what I initially tried to do and regretted.
The Adapty React Native SDK makes implementing React Native in-app purchases much simpler than trying to build everything from scratch. If you’re interested in learning more after this tutorial, the documentation has additional information. But for now, let’s focus on getting everything set up for our implementation.
→ Or schedule a free demo call with us!
Signing up & configuration
First things first – you’ll need an account. Head over to the Adapty homepage to sign up. You can skip the last step about installing the SDK – we’ll get into that later. Once you’re looking at the Adapty Dashboard, you’re ready for the next step.
Creating products
Pro tip: Check out this docs page to help you create products in your Adapty account that match what you’ve set up in the stores.
- Go to the Products page, click the Products tab, and hit Create product.

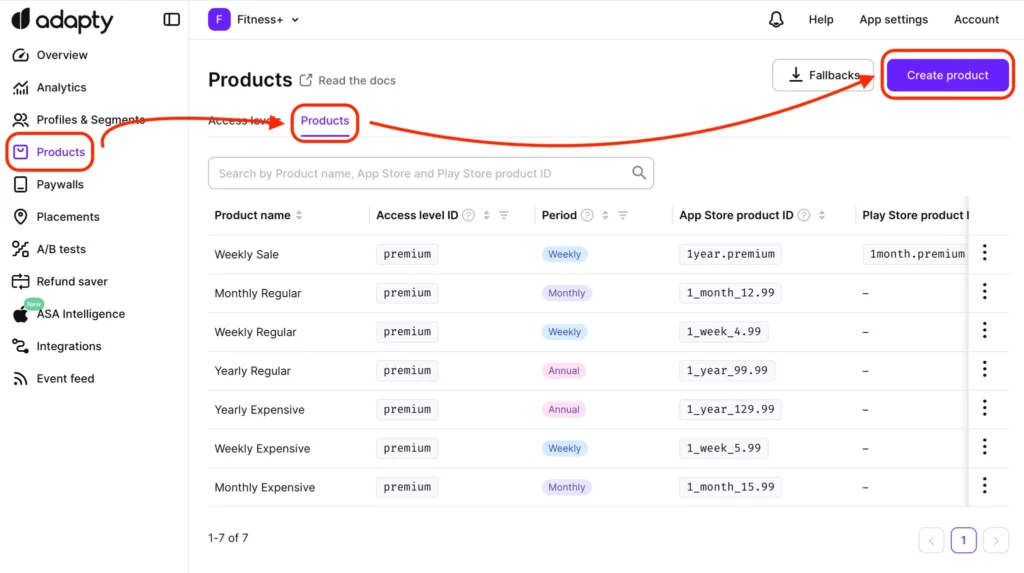
- Create a product with a name, access level, and appropriate period. This info should match the App Store and Google Play products you set up earlier.

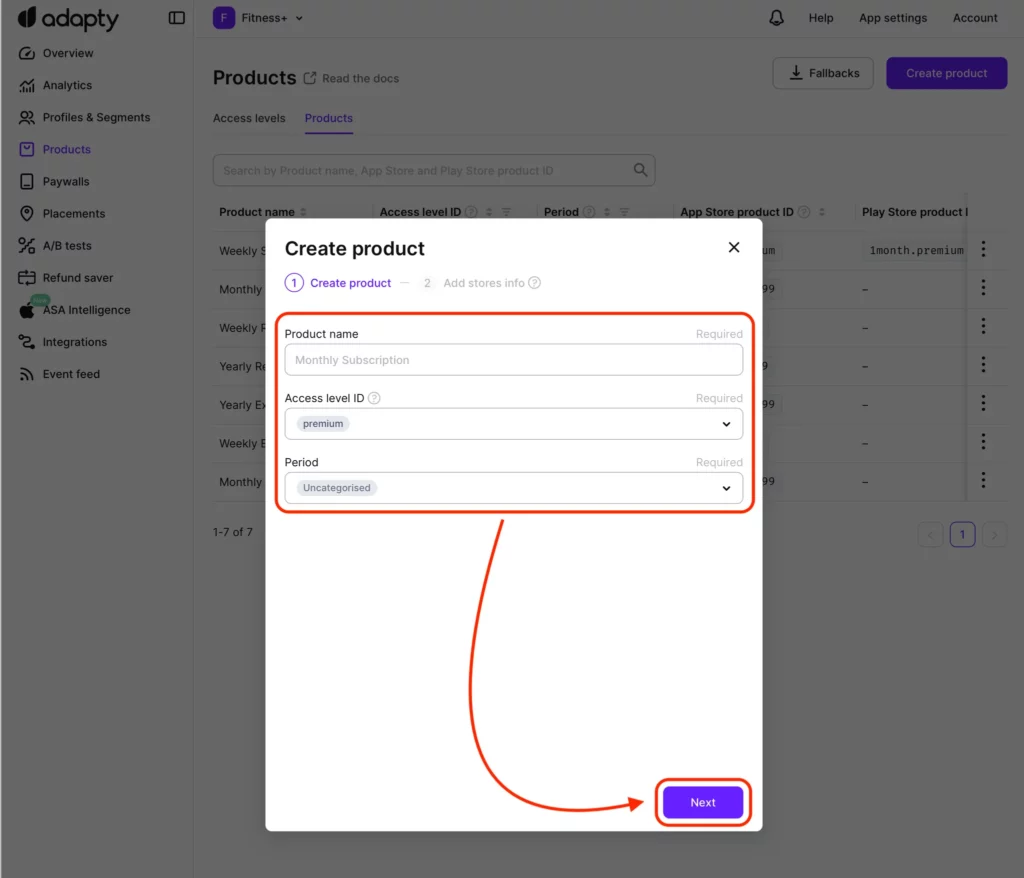
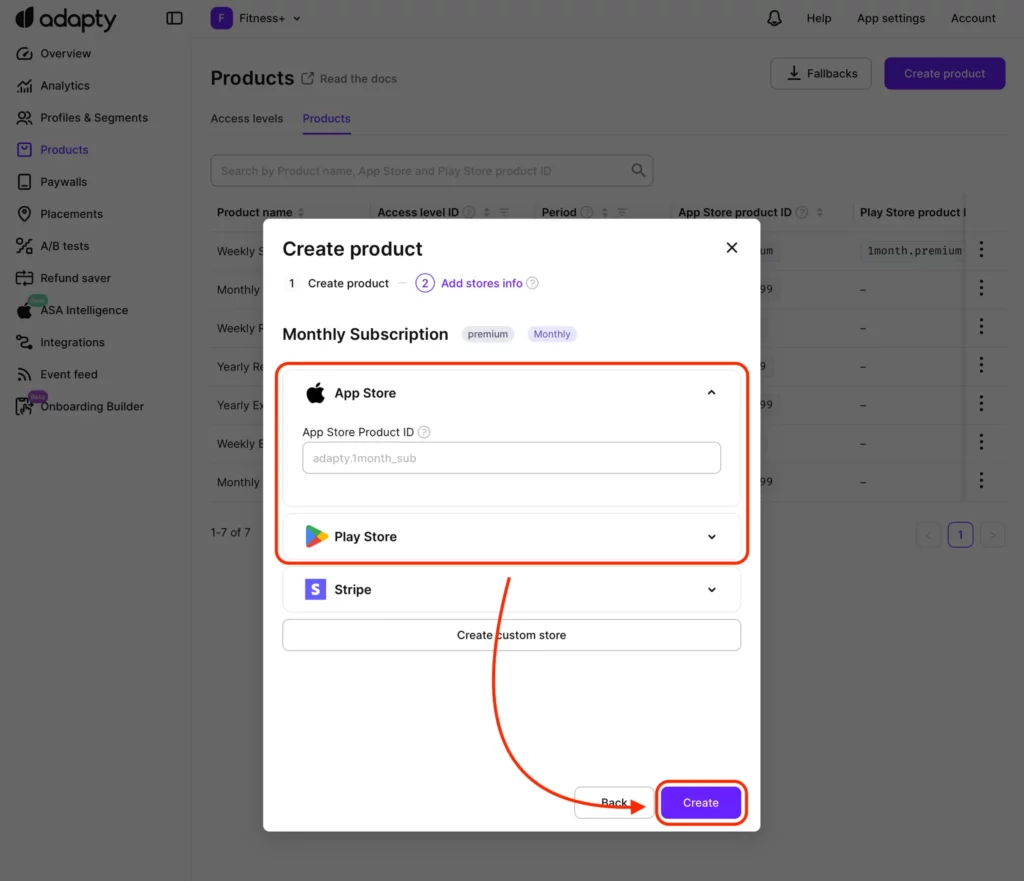
- Enter the App Store and/or Google Play IDs as you created them in the stores. This is how Adapty maps store products to the product you’re creating. It also lets you treat an App Store product and a Play Store product as the same thing.

Repeat for all the products you plan to use in your app.
Creating a paywall
- Go to the Paywalls page and click Create paywall.

- Give your paywall a name, add the products you want to offer, then save it as a draft.

- For our case, one paywall is plenty. You can always tweak your flow later.
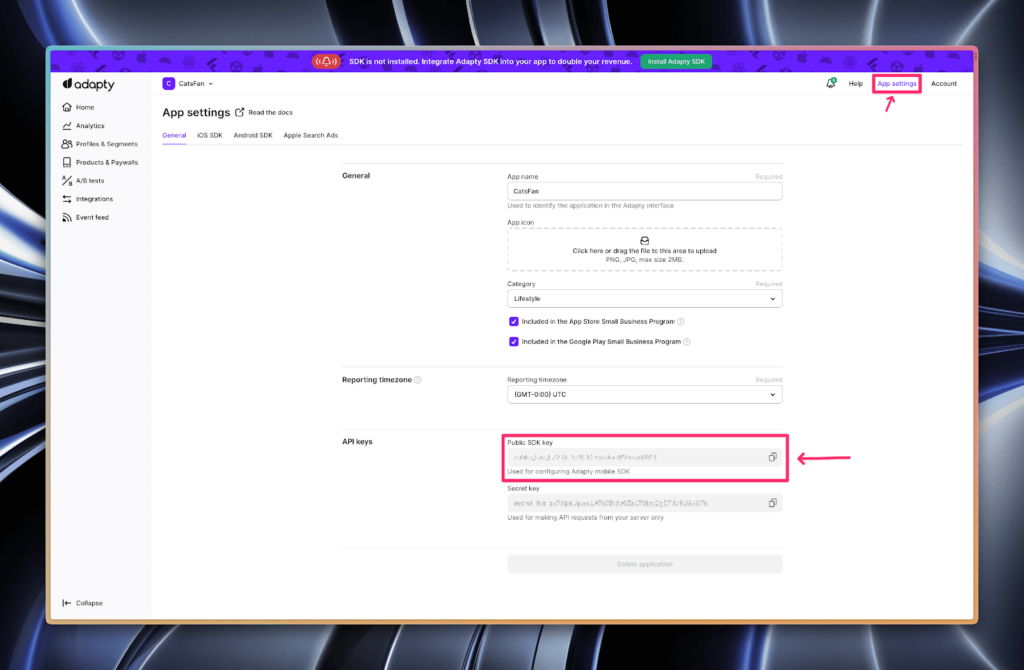
Getting your SDK key
In your App Settings, copy the public SDK key and keep it somewhere safe. We’ll need it shortly.

That’s all we need for our app setup.
Installation
The process for pure React Native is pretty straightforward, but Expo requires a few extra considerations. Since Expo is popular with beginners working on React-Native-IAP, I’ll break down each step to help you understand how to work with Expo Builds.
React Native
1. Add the Adapty dependency to your React Native in-app purchases project:
yarn add react-native-adapty
2. For iOS, install the Adapty pod. These guys are like npm modules for iOS development (if you don’t have pod CLI, install from React Native docs):
# in your project root
pod install --project-directory=ios
3. For iOS, create a Swift Bridging Header. It allows your React Native iOS projects (written in Obj-C) to use Swift libraries like the Adapty pod you’ve fetched.
3.1. Open your Xcode project:
# you can open Xcode via terminal with xed CLI
# in your project root:
xed -b ./ios
3.2. Create a new Swift file with any name.
3.3. When Xcode asks if you want to create a bridging header, click “Create Bridging Header”
3.4. You can safely delete the file you just created. We only made it to prompt Xcode to automatically create that Swift Bridging Header.

4. For Android, add or update kotlin-gradle-plugin
to version 1.6.21 or higher in src/android/build.gradle
under buildscript.dependencies
. This adds Kotlin support to your React Native IAP project.
// src/android/build.gradle
...
buildscript {
...
dependencies {
...
сlasspath "org.jetbrains.kotlin:kotlin-gradle-plugin:1.6.21" // ← Add this
}
}
5. For Android, set multiDexEnabled: true
in src/android/app/build.gradle
under android.defaultConfig
.
// src/android/app/build.gradle
...
android {
...
defaultConfig {
...
multiDexEnabled true // ← Add this
}
}
6. Congrats, you’re now ready to start coding your in-app purchases in React Native implementation!
Expo
Before installation, let’s understand how Expo works:
- To debug your app, you download the Expo Go app.
- It connects to your development server.
- The server passes updated JavaScript to the connected Expo Go app.
- Expo Go re-evaluates the JavaScript while trying to keep your state intact.
- For release, you build your own version of Expo Go without all the debugging features.
By design, Expo lets you focus on JavaScript-only development. It does this by mapping certain Expo native code to JavaScript functions. Then all the Expo libraries you use rely on that exposed API.
That’s both the beauty and the challenge of Expo. JavaScript is an interpreted language, meaning it runs at runtime. Native code works differently – you have to compile, bundle, and deploy to get runnable code on your device. This creates a debug cycle: change code, compile, install, debug, change code, compile, install, debug… you get the picture.
The in-app purchase process for React Native apps needs additional native code. Luckily, Expo has a way to work with native code through something called EAS (Expo Application Services) Build.
EAS Build introduction
You can add native code to Expo-managed projects using the EAS Build service. Here’s how it works compared to the traditional Expo flow:
- Start a development server
- Edit JS code.
- Debug in Expo Go
EAS Build flow:
- Build your app for the target platform using the Build service (when your native code changes)
- Start a development server with special arguments to work with your custom app.
- Edit JS code.
- Debug in your app.
The key phrase is “build when your native code changes.” When exactly does that happen? Do you need a new build after adding every library? Every time a file changes? Without experience, it’s hard to tell. Since EAS Build takes time, I’d rather not build unless necessary.
Here’s a rule of thumb: if the library docs don’t mention running an EAS build, you can probably skip it. If the new library isn’t working properly, then it’s worth trying a new EAS build.
Expo installation process
1. Install EAS CLI globally:
npm install -g eas-cli
2. Add expo-dev-client
to your project. This lets your debug server work with your app:
expo install expo-dev-client
3. Add the Adapty dependency:
expo install react-native-adapty
4. Build for your preferred platform. These commands will build your app on Expo’s servers and give you a download link:
4.1. You can actually build for both platforms at once! If you’re struggling with the prompts, check out the current EAS dev build documentation:
eas build --profile development --platform all
# ----- or ----- #
eas build --profile development --platform ios
# ----- or ----- #
eas build --profile development --platform android
4.2. Install your app on your test device using the QR code or URL that EAS generated in the previous step.
4.3. Launch a development server with the --dev-client
flag:
yarn start --dev-client
4.4 Open your app and connect to the dev server. It’s common to launch Expo Go at this point, but THAT WON’T WORK. For all future development sessions, you’ll need to start a server with the --dev-client
flag and debug through your custom app, not Expo Go.
Designing the app
I’m not going to give you “copy-paste to production” code. You can easily find those snippets in the official documentation. Instead, I want to suggest better design approaches that fit your app’s needs. Then we’ll apply what we’ve learned.
Let’s look at the full purchase flow. It’s actually pretty simple:
- Activate the SDK so it can work its magic.
- Check if the user has an active subscription.
- If they try to access premium content:
- Without a subscription: fetch the paywall we created and show it.
- With a subscription: display the premium content.
- If they purchase access, go back to Step 2.
To build this model, we need a global check like isSubscribed
or hasAccess
, plus a paywall to restrict access for non-subscribers.
Activating Adapty SDK
Adapty’s SDK does a lot behind the scenes for your React Native IAP implementation. One key feature is listening for subscription status changes. If a subscription activates through a purchase or expires, Adapty sends an event with the updated profile.
All of this requires an active SDK, which is why you should activate it as soon as your React-Native-IAP app launches.
adapty.activate('MY_SDK_KEY');
Activating outside of React components
Calling code outside of components for your React Native in-app purchases happens during module evaluation, which can be much earlier than calling inside a component’s useEffect
.
Important note: a module only gets evaluated when it’s imported in the current scope. For us, this means it’s best to have the activation call inside App.tsx
or import a file with the activation directly into App.tsx
.
I’ll call the activate
function just outside the App
component.
You can put this instruction in any JS file, as long as you import it to a core component. Notice that I’m using the lockMethodsUntilReady
flag to prevent other Adapty calls until activation finishes:
// /App.tsx
import React from 'react';
import {adapty} from 'react-native-adapty'
// ...
// Replace MY_SDK_KEY with your public SDK key
// You can find it in your Adapty Dashboard
// App settings > API keys > Public SDK key
adapty.activate('MY_SDK_KEY', {
lockMethodsUntilReady: true,
});
function App(): JSX.Element {
// ...
}
This is a simplified way to handle activation. For production code, I’d recommend creating a function that calls activate
inside a try-catch block.
Alternative: activating from React Native hook
Sometimes you need certain data before activating the Adapty SDK. Other times, it makes more sense to integrate SDK activation inside a component’s useEffect
along with other service initializations.
The problem with this approach is concurrency. There’s no guarantee that activation will happen before other Adapty calls. This is called a race condition and can cause bugs if not handled properly.
Here’s how it plays out:
- In one component, you activate the Adapty SDK in a
useEffect
hook. - In another component, you fetch products from the SDK in a
useEffect
hook. - In the third component, you fetch the user’s profile in a
useEffect
hook.
I’d avoid this design. Putting activation outside of React is still the easiest, fastest, and safest approach. If needed, you can use something like AsyncStorage
to pass Adapty static values, such as a custom userID from previous sessions. This saves an extra network call without creating risks.
How can you be sure the first component’s useEffect
runs before the second or third? Unfortunately, you can’t.
import AsyncStorage from '@react-native-async-storage/async-storage';
import {adapty} from 'react-native-adapty';
async function activateAdapty() {
const userId = await AsyncStorage.getItem('MY_USER_ID');
// Replace MY_SDK_KEY with your public SDK key
// You can find it in your Adapty Dashboard
// App settings > API keys > Public SDK key
await adapty.activate('MY_SDK_KEY', {
lockMethodsUntilReady: true,
customerUserId: userId,
});
}
activateAdapty();
That said, there is a way to safely implement activation inside an effect.
Locking threads until the SDK activates in a concurrent environment
Activating Adapty in a useEffect
hook creates a race condition. The good news is we can solve this with proper synchronization.
JavaScript gives us await
, which lets us force-synchronize calls. This tells the interpreter: “wait until the SDK is activated, then continue.”
The cool thing is that Adapty’s SDK uses memoization on the activate
method. If you call it again with the same arguments, it just resolves immediately without overhead.
This means you can safely call activate
multiple times. It will either start the activation process or simply wait until the SDK is already activated (because of lockMethodsUntilReady
: true).
I’d abstract the activate
call into a function and use it everywhere to activate Adapty only when needed or wait until it’s activated:
import {adapty} from 'react-native-adapty';
export async function activateAdaptyOrWait() {
// Replace MY_SDK_KEY with your public SDK key
// You can find it in your Adapty Dashboard
// App settings > API keys > Public SDK key
await adapty.activate('MY_SDK_KEY', {
lockMethodsUntilReady: true,
});
}
Then, in any function where you need the SDK, start with activateAdaptyOrWait
:
import React from 'react';
import {adapty} from 'react-native-adapty';
function Paywall(): JSX.Element {
// ...
useEffect(() => {
async function fetch() {
await activateAdaptyOrWait();
const paywall = await adapty.getPaywall("yearly");
// ...
}
fetch();
}, []);
// ...
}
function Profile(): JSX.Element {
// ...
useEffect(() => {
async function fetch() {
await activateAdaptyOrWait();
const profile = await adapty.getProfile();
// ...
}
fetch();
}, []);
// ...
}
The key is using await
with this function to pause execution until the promise resolves.
Generally, calling activate outside React components is better, but this design can reduce Adapty activation overhead and minimize network calls. This benefits your app’s startup time, battery usage, and network consumption – important considerations when designing an app that’s respectful of your users’ devices.
Checking the user’s subscription status
The user’s Adapty profile contains their subscription status and purchased products, and you can also get alerts about changes to other profile data like expiration dates and attribute updates.
There are many ways to design a user profile state – it mostly comes down to preference. Consider whether you need to track state changes or if you can just store the data.
For most cases, you don’t need a React state to access profiles outside of components, but you should decide what works best for your app. The API is straightforward – you typically fetch profile data with adapty.getProfile
and check purchased consumables or active subscriptions.
const profile = await adapty.getProfile();
// premium can be replaced with your access level
const isActive = profile.accessLevels["premium"]?.isActive
You can also use an event listener to handle profile updates (purchases or expirations):
adapty.addEventListener('onLatestProfileLoad', profile => {
const isActive = profile.accessLevels["premium"]?.isActive
// ...
});
That’s all there is to it! Let’s see how we can work with these approaches.
Fetching to state when needed
The most obvious way to check subscription status is by creating a state in the component where you need to check:
import React, {useState, useEffect} from 'react';
import {adapty} from 'react-native-adapty';
const App = () => {
const [isSubscribed, setIsSubscribed] = useState(undefined);
const [isLoading, setIsLoading] = useState(true);
useEffect(() => {
async function fetch() {
setIsLoading(true);
const profile = await adapty.getProfile();
setIsSubscribed(profile.accessLevels["premium"]?.isActive);
setIsLoading(false);
}
fetch();
},[]);
// ...
};
While this flow is clear, it might cause unwanted re-renders.
Listening to profile updates
You can also listen for profile updates. Events fire when a new purchase completes or a subscription expires.
One event will fire right after app startup (and Adapty activation):
import React, {useState, useEffect} from 'react';
import {adapty} from 'react-native-adapty';
function App(): JSX.Element {
const [isSubscribed, setIsSubscribed] = useState(undefined);
const [isLoading, setIsLoading] = useState(true);
useEffect(() => {
async function fetch() {
setIsLoading(true);
const profile = await adapty.getProfile();
setIsSubscribed(profile.accessLevels["premium"]?.isActive);
setIsLoading(false);
}
fetch();
adapty.addEventListener('onLatestProfileLoad', profile => {
setIsSubscribed(profile.accessLevels["premium"]?.isActive);
});
return () => {
adapty.removeAllListeners();
}
},[]);
// ...
};
Alternative: memoizing network calls
Most apps don’t need to fetch profiles this frequently. Users will likely close the app or restart it before their subscription expires.
To keep data fresh, you can use an event listener to update a cached value:
// /profile.ts
import {adapty, AdaptyProfile} from 'react-native-adapty';
// do not expose
let _profile: AdaptyProfile | undefined = undefined;
export async function getProfile(): AdaptyProfile {
if (!_profile) {
// consider wrapping in try-catch
const profile = await adapty.getProfile();
_profile = profile;
}
return _profile;
}
// For event
export function setProfile(profile: AdaptyProfile) {
_profile = profile;
}
Make sure to subscribe to profile updates in App.tsx
:
// /App.tsx
import {adapty} from 'react-native-adapty';
import {setProfile, getProfile} from './profile';
// ...
function App(): JSX.Element {
// ...
useEffect(() => {
adapty.addEventListener('onLatestProfileLoad', setProfile);
return () => {
adapty.removeAllListeners();
}
}, []);
// ...
}
This gives you fresh profile data without constant network calls, and lets you use profiles outside of components too.
Paywall
Great visuals should come with great UX. We don’t want to show users a loading spinner when they’re ready to support your product.
There are three key methods we need: getPaywall
, logShowPaywall
, and getPaywallProducts
:
const paywall = await adapty.getPaywall('paywall_id');
await adapty.logShowPaywall(paywall);
const products = await adapty.getPaywallProducts(paywall);
getPaywall
fetches a paywall by ID.logShowPaywall
logs that the user opened a paywall (visible in your Dashboard).getPaywallProducts
fetches the product list for that paywall.
Fetching to state when needed
This is a good starting point for paywall design:
import React, {useEffect, useState} from 'react';
import {adapty, AdaptyProduct, AdaptyPaywall} from 'react-native-adapty';
interface PaywallProps {
paywallId: stirng | undefined;
}
export function Paywall(props: PaywallProps): JSX.Element {
const [paywall, setPaywall] = useState<AdaptyPaywall | undefined>();
const [products, setProducts] = useState<AdaptyProduct[]>([]);
const [isLoading, setIsLoading] = useState(true);
useEffect(() => {
async function fetch() {
if (!props.paywallId) {
return;
}
setIsLoading(true);
// consider wrapping into try-catch for production use
const paywallResp = await adapty.getPaywall(props.paywallId);
const productsResp = await adapty.getPaywallProducts(paywallResp);
setPaywall(paywallResp);
setProducts(productsResp);
setIsLoading(false);
}
fetch();
}, [props.paywallId]);
// ...
}
This works, but forces users to wait when the paywall opens.
Alternative: pre-fetching paywalls and products
Pre-fetching paywall data creates a much smoother experience. Making users wait for paywalls to load just increases the chance they’ll leave. If done smartly, you can fetch data without hurting performance.
You probably know what paywall and products you want to show users before rendering the view. There are several design options, but I’ll create a custom hook. It’s a simple solution for handling cases where a paywall requests data while still loading:
import {useState, useEffect} from 'react';
import {
adapty,
AdaptyError,
AdaptyPaywall,
AdaptyProduct,
} from 'react-native-adapty';
interface PaywallState {
paywall: AdaptyPaywall | null;
products: AdaptyProduct[];
loading: boolean;
error: AdaptyError | null;
logShow: () => Promise<void>;
refetch: () => Promise<void>;
}
const PAYWALL_ID = "MY_PAYWALL_ID";
export function usePaywallData(): PaywallState {
const [paywall, setPaywall] = useState<PaywallState['paywall']>(null);
const [products, setProducts] = useState<PaywallState['products']>([]);
const [isLoading, setIsLoading] = useState(false);
const [error, setError] = useState<PaywallState['error']>(null);
const fetch = async (): Promise<void> => {
try {
setIsLoading(true);
setError(null);
const paywallResp = await adapty.getPaywall(PAYWALL_ID);
const productsResp = await adapty.getPaywallProducts(paywallResp);
setPaywall(paywallResp);
setProducts(productsResp);
} catch (error) {
console.error(error.message);
setError(error);
} finally {
setIsLoading(false);
}
}
const logShow = async (): Promise<void> => {
try {
if (!paywall) {
return console.error("Tried to log show empty paywall");
}
await adapty.logShowPaywall(paywall);
} catch (error) {
console.log(error.message);
}
}
useEffect(() => {
if (!paywall && !isLoading && !error) {
fetch();
}
}, []);
return {
paywall,
products,
loading: isLoading,
error,
logShow,
refetch: fetch,
};
}
Now pre-fetch paywall data in App.tsx
using this controller hook:
function App(): JSX.Element {
// fetches paywall data, not using here
usePaywallData();
// ...
}
Then use the pre-fetched data in your Paywall
component:
function Paywall(): JSX.Element {
const {paywall, products, loading, error} = usePaywallData();
// ...
}
Opting out of requests
This solution can eliminate visible loading, but introduces a small issue – even subscribed users will make unnecessary network calls. You might want to disable this.
Writing the app
I wanted to create an app that shows pictures of cats. It lets you swipe through three cats per day for free, then shows a paywall.
What we need:
- At least one platform developer account with products configured.
- An Adapty account with those products set up.
- At least one paywall designed in the Adapty Dashboard.
I’ll start with a pure React Native TypeScript template. These steps work with any project setup, including Expo.
If you don’t have a project yet, check the React Native documentation to create one:
npx react-native@latest init CatsFan
After running this command, I’ll install Adapty as described earlier and sign my app for development in Xcode.
Let’s delete most of the pre-created code for a clean slate. Your App.tsx
should look like this:
import React from 'react';
import {
SafeAreaView,
StatusBar,
StyleSheet,
useColorScheme,
} from 'react-native';
function App(): JSX.Element {
const isDarkMode = useColorScheme() === 'dark';
const styles = useMemo(() => getStyles(isDarkMode), [isDarkMode]);
return (
<SafeAreaView style={styles.app}>
<StatusBar
barStyle={isDarkMode ? 'light-content' : 'dark-content'}
backgroundColor={styles.app.backgroundColor}
/>
</SafeAreaView>
);
}
function getStyles(dark: boolean) {
return StyleSheet.create({
app: {
backgroundColor: dark ? 'rgb(44,44,46)' : '#fff',
width: '100%',
height: '100%',
},
container: {
marginTop: 32,
paddingHorizontal: 24,
fontWeight: '700',
},
});
}
export default App;
SDK Activation
Create a file called /credentials.ts
with constants like your SDK public key, paywall ID, etc. You can replace these with string values later.
Then create /adapty.ts
with the activateAdapty
function:
// /adapty.ts
import {adapty} from 'react-native-adapty';
import {MY_API_KEY} from './credentials';
export async function activateAdapty() {
try {
await adapty.activate(MY_API_KEY, {
lockMethodsUntilReady: true,
});
} catch (error) {
console.error('Failed to activate Adapty: ', error);
}
}
Call that function before the App
component so it runs as early as possible:
// /App.tsx
// ...
import {activateAdapty} from './adapty';
// ...
activateAdapty();
function App(): JSX.Element {
// ...
Visuals
Even though this is a demo app to showcase in-app purchases and the Adapty SDK, user experience matters. Let’s add some visual flair to make the UI pop.
The card
component
Our app has two card types: cat image cards and paywall cards. Here’s the basic Card
component we’ll use to create both.
I’ll use react-tinder-card
for this example:
npm install --save react-tinder-card
npm install --save @react-spring/[email protected]
Here’s our basic component:
// /Card.tsx
import React, {ForwardedRef, PropsWithChildren, useMemo} from 'react';
import {StyleSheet, View, useColorScheme} from 'react-native';
import TinderCard from 'react-tinder-card';
type CardProps = PropsWithChildren<{
onSwipeCompleted?: (direction: string) => void;
onLeftScreen?: (id: string) => void;
preventSwipe?: string[];
synthetic?: boolean;
}>;
export const CARD_RADIUS = 12;
export const Card = React.forwardRef<any, CardProps>(
(
{
children,
preventSwipe = ['up', 'down'],
onSwipeCompleted = () => undefined,
onLeftScreen = () => undefined,
synthetic = false,
}: CardProps,
ref: ForwardedRef<any>,
) => {
const isDarkMode = useColorScheme() === 'dark';
const styles = useMemo(() => getStyles(isDarkMode), [isDarkMode]);
// if synthetic, we don't want to use the tinder card,
// as it will cause issues with the pressables
if (synthetic) {
return (
<View style={{...styles.container, marginLeft: 12}}>{children}</View>
);
}
return (
<TinderCard
ref={ref}
onSwipe={onSwipeCompleted}
onCardLeftScreen={onLeftScreen}
preventSwipe={preventSwipe}>
<View style={styles.container}>{children}</View>
</TinderCard>
);
},
);
function getStyles(dark: boolean) {
return StyleSheet.create({
container: {
position: 'absolute',
backgroundColor: dark ? '#rgb(28,28,30)' : '#ddd',
width: '100%',
justifyContent: 'center',
alignItems: 'center',
height: 500,
shadowColor: '#000',
shadowOpacity: 0.05,
shadowRadius: CARD_RADIUS,
borderRadius: CARD_RADIUS,
resizeMode: 'cover',
},
});
}
About that synthetic
prop – during testing, I found that Pressables and Buttons don’t work inside TinderCard
. The wrapper doesn’t pass tap events through to the buttons we need in the paywall card.
The cardimage
component
For image cards, we’ll make a simple component:
import React from 'react';
import {Card} from './Card';
import {Image, StyleSheet} from 'react-native';
interface CardImageProps {
onSwipeCompleted?: (direction: string) => void;
url: string;
}
export function CardImage(props: CardImageProps): JSX.Element {
return (
<Card onSwipeCompleted={props.onSwipeCompleted}>
<Image style={styles.image} source={{uri: props.url}} />
</Card>
);
}
const styles = StyleSheet.create({
image: {width: '100%', height: 500, borderRadius: 12},
});
Data pool
You might be wondering where all these cat images will come from. Good news – there’s an API for that! The Cat API will give us all the cats we need.
The plan is to fetch 5 image URLs and load them into cards. Here’s the API controller:
// /images.ts
import {CATAPI_KEY} from './credentials';
const LIMIT = 5;
const getEndpoint = (page: number) =>
`https://api.thecatapi.com/v1/images/search?limit=${LIMIT}&page=${page}&api_key=${CATAPI_KEY}`;
export interface CatImage {
id: string;
url: string;
width: number;
height: number;
}
export async function fetchImages(page: number = 0): Promise<CatImage[]> {
const response = await fetch(getEndpoint(page));
const data = await response.json();
return data;
}
Now for a data controller – basically a queue (FIFO) of cards. They can be either paywall cards or image cards. When we’re running low on cards, we’ll request more.
For this first draft, let’s assume there’s no premium content:
// /data.ts
import {useRef, useState} from 'react';
import {AdaptyPaywall, AdaptyProduct} from 'react-native-adapty';
import {fetchImages} from './images';
type CardInfo =
| {type: 'image'; id: string; url: string}
| {
type: 'paywall';
id: string;
paywall: Promise<AdaptyPaywall>;
product: Promise<AdaptyProduct[]>;
};
interface CardsResult {
cards: CardInfo[];
fetchMore: (currentCard?: CardInfo) => Promise<void>;
removeCard: (card: CardInfo, index: number) => void;
init: () => Promise<void>;
}
// When to start fetching new data
export const TOLERANCE = 1;
export function useCards(): CardsResult {
const [cards, setCards] = useState<CardsResult['cards']>([]);
const page = useRef<number>(0);
const init = async () => {
await fetchMore();
};
const removeCard = async (card: CardInfo, index: number) => {
if (index === TOLERANCE) {
fetchMore(card);
}
};
const fetchMore = async (currentCard?: CardInfo) => {
const images = await fetchImages(page.current);
const result = images.map<CardInfo>(value => {
return {
type: 'image',
// // CatAPI returns duplicates, so we mark them with page number, so React keys are unique
id: page.current + '__' + value.id,
url: value.url,
};
});
const requestedAtIndex = cards.findIndex(v => v.id === currentCard?.id);
const newCards = [...result, ...cards.slice(0, requestedAtIndex)];
page.current += 1;
setCards(newCards);
};
return {
cards,
init,
fetchMore,
removeCard,
};
}
Testing the core feature
At this point, we should be able to swipe through cat images endlessly. Your App
component should look like this for testing:
// App.tsx
import React, {useEffect, useMemo} from 'react';
import {
SafeAreaView,
StatusBar,
StyleSheet,
Text,
View,
useColorScheme,
} from 'react-native';
import {activateAdapty} from './adapty';
import {useCards} from './data';
import {CardImage} from './CardImage';
activateAdapty();
function App(): JSX.Element {
const isDarkMode = useColorScheme() === 'dark';
const styles = useMemo(() => getStyles(isDarkMode), [isDarkMode]);
const {cards, fetchMore, removeCard, init} = useCards();
useEffect(() => {
init(); // fetch initial cards
}, []);
return (
<SafeAreaView style={styles.app}>
<StatusBar
barStyle={isDarkMode ? 'light-content' : 'dark-content'}
backgroundColor={styles.app.backgroundColor}
/>
<Text style={styles.headerText}>CatsFan</Text>
<View style={styles.cardsContainer}>
{cards.map((card, index) => {
switch (card.type) {
case 'paywall':
return null;
case 'image':
return (
<CardImage
key={card.id}
onSwipeCompleted={() => removeCard(card, index)}
url={card.url}
/>
);
}
})}
</View>
</SafeAreaView>
);
}
function getStyles(dark: boolean) {
return StyleSheet.create({
app: {
backgroundColor: dark ? 'rgb(44,44,46)' : '#fff',
width: '100%',
height: '100%',
},
headerText: {
fontWeight: '700',
fontSize: 32,
marginHorizontal: 24,
marginTop: 24,
marginBottom: 12,
color: dark ? '#fff' : '#000',
},
container: {
marginTop: 32,
paddingHorizontal: 24,
fontWeight: '700',
},
cardsContainer: {
width: '100%',
paddingHorizontal: 12,
height: 500,
},
});
}
export default App;
When running, your app should work like this:

Paywalling
We’ve made great progress! Now let’s limit how many cute cats users can see for free.
Displaying the paywall card
My plan is to show users up to three cat images. After that, they’ll see a paywall card that can’t be dismissed. Let’s modify our data controller in data.ts
using a few Adapty SDK calls:
// /data.ts
import {useRef, useState} from 'react';
import {AdaptyPaywall, AdaptyProduct} from 'react-native-adapty';
import {fetchImages} from './images';
+import {MY_PAYWALL_ID} from './credentials';
type CardInfo =
| {type: 'image'; id: string; url: string}
| {
type: 'paywall';
id: string;
paywall: Promise<AdaptyPaywall>;
product: Promise<AdaptyProduct[]>;
};
interface CardsResult {
cards: CardInfo[];
fetchMore: (currentCard?: CardInfo) => Promise<void>;
removeCard: (card: CardInfo, index: number) => void;
init: () => Promise<void>;
}
// When to start fetching new data
export const TOLERANCE = 2;
+// Where to insert a paywall
+export const PAYWALL_POSITION = 2;
export function useCards(): CardsResult {
const [cards, setCards] = useState<CardsResult['cards']>([]);
const page = useRef<number>(0);
+ const shouldPresentPaywall = useRef<boolean>(true);
const init = async () => {
await fetchMore();
};
const removeCard = async (card: CardInfo, index: number) => {
if (index === TOLERANCE) {
fetchMore(card);
}
};
const fetchMore = async (currentCard?: CardInfo) => {
const images = await fetchImages(page.current);
const result = images.map<CardInfo>(value => {
return {
type: 'image',
// // CatAPI returns duplicates, so we mark them with page number, so React keys are unique
id: page.current + '__' + value.id,
url: value.url,
};
});
const requestedAtIndex = cards.findIndex(v => v.id === currentCard?.id);
const newCards = [...result, ...cards.slice(0, requestedAtIndex)];
+ // insert a paywall at the third position, if user is not subscribed
+ if (shouldPresentPaywall) {
+ const paywallPromise = adapty.getPaywall(MY_PAYWALL_ID);
+ const productsPromise = paywallPromise.then(paywall =>
+ adapty.getPaywallProducts(paywall),
+ );
+
+ newCards.splice(2, 0, {
+ type: 'paywall',
+ id: 'paywall_' + page.current,
+ paywall: paywallPromise,
+ products: productsPromise,
+ });
+ }
+
page.current += 1;
setCards(newCards);
};
return {
cards,
init,
fetchMore,
removeCard,
};
}
These changes place a paywall card at the third position and pre-fetch the paywall and products three cards before it appears.
But users could just restart the app to see three more cats, over and over. Let’s prevent this by saving the state.
We can use AsyncStorage for this:
npm install @react-native-async-storage/async-storage
This requires some additional setup, depending on your configuration. Check the docs for details.
Now’s a good time to create helpers.ts
with utility functions for our data controller:
// /helpers.ts
import AsyncStorage from '@react-native-async-storage/async-storage';
// How many cards user have swiped
export const KEY_TODAY_VIEWS = '@views';
// When user last swiped a card (timestamp)
export const KEY_VIEWED_AT = '@viewed_at';
export async function getTodayViews(): Promise<number> {
const lastViewTs = await AsyncStorage.getItem(KEY_VIEWED_AT);
const now = Date.now();
if (!lastViewTs) {
return 0;
}
const diff = now - parseInt(lastViewTs, 10);
// If it's been more than a day since last view, reset views
if (diff > 24 * 60 * 60 * 1000) {
await AsyncStorage.setItem(KEY_TODAY_VIEWS, '0');
return 0;
}
const views = await AsyncStorage.getItem(KEY_TODAY_VIEWS);
if (views) {
return parseInt(views, 10);
}
return 0;
}
export async function getLastViewedAt(): Promise<number | null> {
const lastViewTs = await AsyncStorage.getItem(KEY_VIEWED_AT);
if (lastViewTs) {
return parseInt(lastViewTs, 10);
}
return null;
}
export async function recordView(viewsAmount: number): Promise<void> {
await AsyncStorage.setItem(KEY_VIEWED_AT, Date.now().toString());
await AsyncStorage.setItem(KEY_TODAY_VIEWS, viewsAmount.toString());
}
Let’s update our logic in data.ts
so users can’t exploit app reloads:
import {useRef, useState} from 'react';
import {AdaptyPaywall, AdaptyProduct, adapty} from 'react-native-adapty';
import {fetchImages} from './images';
import {MY_PAYWALL_ID} from './credentials';
+import {getLastViewedAt, getTodayViews, recordView} from './helpers';
type CardInfo =
| {type: 'image'; id: string; url: string}
| {
type: 'paywall';
id: string;
paywall: Promise<AdaptyPaywall>;
products: Promise<AdaptyProduct[]>;
};
interface CardsResult {
cards: CardInfo[];
fetchMore: (currentCard?: CardInfo) => Promise<void>;
removeCard: (card: CardInfo, index: number) => void;
init: () => Promise<void>;
}
// When to start fetching new data
export const TOLERANCE = 2;
// Where to insert a paywall
export const PAYWALL_POSITION = 2;
export function useCards(): CardsResult {
const [cards, setCards] = useState<CardsResult['cards']>([]);
const page = useRef<number>(0);
const shouldPresentPaywall = useRef<boolean>(true);
+ const sessionViews = useRef<number>(0);
+ const lastViewedAt = useRef<number | null>(null); // Date timestamp
const init = async () => {
+ sessionViews.current = await getTodayViews();
+ lastViewedAt.current = await getLastViewedAt();
await fetchMore();
};
const removeCard = async (card: CardInfo, index: number) => {
+ sessionViews.current += 1;
+ recordView(sessionViews.current);
if (index === TOLERANCE) {
fetchMore(card);
}
};
const fetchMore = async (currentCard?: CardInfo) => {
const images = await fetchImages(page.current);
const result = images.map<CardInfo>(value => {
return {
type: 'image',
// // CatAPI returns duplicates, so we mark them with page number, so React keys are unique
id: page.current + '__' + value.id,
url: value.url,
};
});
const requestedAtIndex = cards.findIndex(v => v.id === currentCard?.id);
const newCards = [...result, ...cards.slice(0, requestedAtIndex)];
// insert a paywall at the third position, if user is not subscribed
if (shouldPresentPaywall) {
const paywallPromise = adapty.getPaywall(MY_PAYWALL_ID);
const productsPromise = paywallPromise.then(paywall =>
adapty.getPaywallProducts(paywall),
);
+ // viewing is from the last to first
+ const index =
+ newCards.length - Math.max(PAYWALL_POSITION - sessionViews.current, 0);
- newCards.splice(2, 0, {
+ newCards.splice(index, 0, {
type: 'paywall',
id: 'paywall_' + page.current,
paywall: paywallPromise,
products: productsPromise,
});
}
page.current += 1;
setCards(newCards);
};
return {
cards,
init,
fetchMore,
removeCard,
};
}
That’s enough logic for now. Let’s create the paywall component.
The cardpaywall
component
Even though we’re pre-fetching the paywall and products, I’ll add a loader for edge cases – like when the paywall appears first (if the user already swiped three times today). I’ve decided not to lock the fetchMore
method, so we’ll need paywall and product promises.
The PaywallCard is fixed in place, and we use a passed reference to move it:
// /CardPaywall.tsx
import React, {useEffect, useRef, useState} from 'react';
import {StyleSheet, Text, TouchableOpacity, View} from 'react-native';
import {
AdaptyError,
AdaptyPaywall,
AdaptyProduct,
adapty,
} from 'react-native-adapty';
import {Card} from './Card';
interface CardPaywallProps {
onSwipeCompleted?: (direction: string) => void;
paywall: Promise<AdaptyPaywall>;
products: Promise<AdaptyProduct[]>;
}
export function CardPaywall(props: CardPaywallProps): JSX.Element {
const [isLoading, setIsLoading] = useState(true);
const [paywall, setPaywall] = useState<AdaptyPaywall>();
const [products, setProducts] = useState<AdaptyProduct[]>([]);
const [error, setError] = useState<AdaptyError | null>(null);
const [isLocked, setIsLocked] = useState(true);
const card = useRef<any>(null);
useEffect(() => {
async function fetch() {
try {
setError(null);
const paywallResult = await props.paywall;
const productsResult = await props.products;
// log paywall opened
adapty.logShowPaywall(paywallResult);
setPaywall(paywallResult);
setProducts(productsResult);
} catch (error) {
setError(error as AdaptyError);
} finally {
setIsLoading(false);
}
}
fetch();
}, []);
async function tryPurchase(product: AdaptyProduct) {
try {
await adapty.makePurchase(product);
setIsLocked(false);
// wait until card is unlocked :(
setTimeout(() => {
card.current.swipe('left');
}, 100);
} catch (error) {
setError(error as AdaptyError);
}
}
const renderContent = (): React.ReactNode => {
if (isLoading) {
return <Text style={styles.titleText}>Loading...</Text>;
}
if (error) {
return <Text style={styles.titleText}>{error.message}</Text>;
}
if (!paywall) {
return <Text style={styles.titleText}>Paywall not found</Text>;
}
return (
<View>
<Text style={styles.titleText}>{paywall?.name}</Text>
<Text style={styles.descriptionText}>
Join to get unlimited access to images of cats
</Text>
<View style={styles.productListContainer}>
{products.map(product => (
<TouchableOpacity
key={product.vendorProductId}
activeOpacity={0.5}
onPress={() => tryPurchase(product)}>
<View style={styles.productContainer}>
<Text style={styles.productTitleText}>
{product.localizedTitle}
</Text>
<Text style={styles.productPriceText}>
{product.localizedPrice}
</Text>
</View>
</TouchableOpacity>
))}
</View>
</View>
);
};
return (
<Card
onSwipeCompleted={props.onSwipeCompleted}
synthetic={isLocked}
preventSwipe={['up', 'left', 'down', 'right']}
ref={card}>
{renderContent()}
</Card>
);
}
const styles = StyleSheet.create({
titleText: {
color: 'white',
fontSize: 16,
paddingLeft: 10,
fontWeight: '500',
},
descriptionText: {
color: 'white',
marginTop: 8,
marginBottom: 8,
paddingLeft: 10,
maxWidth: 210,
},
productListContainer: {
marginTop: 8,
width: '100%',
},
productContainer: {
marginTop: 8,
width: '100%',
flexDirection: 'row',
paddingHorizontal: 10,
paddingVertical: 16,
borderRadius: 12,
backgroundColor: '#0A84FF',
},
productTitleText: {
color: 'white',
fontSize: 16,
fontWeight: '500',
flexGrow: 1,
marginRight: 32,
},
productPriceText: {
color: '#FF9F0A',
fontWeight: '500',
fontSize: 16,
},
});
Notice how simple the purchasing process is. We don’t even need to tell other components about successful purchases – they’ll find out soon enough. Now let’s add paywall cards to the stack.
Adding the paywall cards into the stack in app.tsx
Let’s integrate these changes into App.tsx. We just need to add CardPaywalls
to the render:
// /App.tsx
// ...
{cards.map((card, index) => {
switch (card.type) {
case 'paywall':
return null;
case 'image':
return (
<CardImage
key={card.id}
onSwipeCompleted={() => removeCard(card, index)}
url={card.url}
/>
);
}
}
)}
// ...
Feeling lost? Don’t worry! We’ll look at the complete App.tsx
code shortly.
User profile status check
We’ve got it working! Users can buy access and keep swiping.
But wait – in the next stack of 5 cards, they’ll hit the paywall again! And if they restart the app, they might briefly see the paywall.
We need to check if the user has purchased unlimited access.
Adapty has a simple function for this, but I don’t want to wait for a network request at startup. I’d rather store IS_SUBSCRIBED
directly in device memory.
The first card stack will only check IS_SUBSCRIBED
from the device, while this value gets updated in the background.
Let’s create a helper:
// /helpers.ts
// ...
// Does user have premium
export const IS_PREMIUM = '@is_premium';
export async function getIsPremium(): Promise<boolean> {
const isPremium = await AsyncStorage.getItem(IS_PREMIUM);
return isPremium === 'true';
}
export async function setIsPremium(isPremium: boolean): Promise<void> {
await AsyncStorage.setItem(IS_PREMIUM, isPremium.toString());
}
Now we just need to listen for profile updates in our data controller to know when to enable or disable the paywall:
// /data.ts
import {useEffect, useRef, useState} from 'react';
import {AdaptyPaywall, AdaptyProduct, adapty} from 'react-native-adapty';
import {fetchImages} from './images';
import {MY_PAYWALL_ID} from './credentials';
import {
+ getIsPremium,
getLastViewedAt,
getTodayViews,
recordView,
+ setIsPremium,
} from './helpers';
type CardInfo =
| {type: 'image'; id: string; url: string}
| {
type: 'paywall';
id: string;
paywall: Promise<AdaptyPaywall>;
products: Promise<AdaptyProduct[]>;
};
interface CardsResult {
cards: CardInfo[];
fetchMore: (currentCard?: CardInfo) => Promise<void>;
removeCard: (card: CardInfo, index: number) => void;
init: () => Promise<void>;
}
// When to start fetching new data
export const TOLERANCE = 2;
// Where to insert a paywall
export const PAYWALL_POSITION = 2;
export function useCards(): CardsResult {
const [cards, setCards] = useState<CardsResult['cards']>([]);
const page = useRef<number>(0);
const shouldPresentPaywall = useRef<boolean>(true);
const sessionViews = useRef<number>(0);
const lastViewedAt = useRef<number | null>(null); // Date timestamp
+ useEffect(() => {
+ adapty.addEventListener('onLatestProfileLoad', async profile => {
+ // premium is an access level, that you set in Dashboard -> Product
+ shouldPresentPaywall.current =
+ profile?.accessLevels?.premium?.isActive || false;
+
+ const isPremium = await getIsPremium();
+ if (isPremium !== shouldPresentPaywall.current) {
+ setIsPremium(shouldPresentPaywall.current);
+ }
+ });
+
+ return () => {
+ adapty.removeAllListeners();
+ };
+ }, []);
const init = async () => {
sessionViews.current = await getTodayViews();
lastViewedAt.current = await getLastViewedAt();
+ shouldPresentPaywall.current = !(await getIsPremium());
+ try {
+ // do not await, as it's not critical for the app to work
+ adapty.getProfile().then(profile => {
+ const isSubscribed = profile?.accessLevels?.premium?.isActive || false;
+ if (isSubscribed !== shouldPresentPaywall.current) {
+ setIsPremium(isSubscribed);
+ shouldPresentPaywall.current = isSubscribed;
+ }
+ });
+ } catch (error) {
+ console.error('failed to receive user profile', error);
+ }
+
await fetchMore();
};
const removeCard = async (card: CardInfo, index: number) => {
sessionViews.current += 1;
recordView(sessionViews.current);
if (index === TOLERANCE) {
fetchMore(card);
}
};
const fetchMore = async (currentCard?: CardInfo) => {
const images = await fetchImages(page.current);
const result = images.map<CardInfo>(value => {
return {
type: 'image',
// // CatAPI returns duplicates, so we mark them with page number, so React keys are unique
id: page.current + '__' + value.id,
url: value.url,
};
});
const requestedAtIndex = cards.findIndex(v => v.id === currentCard?.id);
const newCards = [...result, ...cards.slice(0, requestedAtIndex)];
// insert a paywall at the third position, if user is not subscribed
if (shouldPresentPaywall) {
const paywallPromise = adapty.getPaywall(MY_PAYWALL_ID);
const productsPromise = paywallPromise.then(paywall =>
adapty.getPaywallProducts(paywall),
);
// viewing is from the last to first
const index =
newCards.length - Math.max(PAYWALL_POSITION - sessionViews.current, 0);
newCards.splice(index, 0, {
type: 'paywall',
id: 'paywall_' + page.current,
paywall: paywallPromise,
products: productsPromise,
});
}
page.current += 1;
setCards(newCards);
};
return {
cards,
init,
fetchMore,
removeCard,
};
}
And that’s it! With relatively few changes, we’ve added powerful monetization to our app. This works so well because:
- Adapty offers simple, flexible APIs.
- We made design choices that complement our app’s needs.
As they say, teamwork makes the dream work. With a bit more polish, this could become a great user experience.
Final result
Here’s the complete App.tsx
:
import React, {useEffect, useMemo} from 'react';
import {
SafeAreaView,
StatusBar,
StyleSheet,
Text,
View,
useColorScheme,
} from 'react-native';
import {activateAdapty} from './adapty';
import {useCards} from './data';
import {CardImage} from './CardImage';
import {CardPaywall} from './CardPaywall';
activateAdapty();
function App(): JSX.Element {
const isDarkMode = useColorScheme() === 'dark';
const styles = useMemo(() => getStyles(isDarkMode), [isDarkMode]);
const {cards, init, removeCard} = useCards();
useEffect(() => {
init(); // fetch initial cards
}, []);
return (
<SafeAreaView style={styles.app}>
<StatusBar
barStyle={isDarkMode ? 'light-content' : 'dark-content'}
backgroundColor={styles.app.backgroundColor}
/>
<Text style={styles.headerText}>CatsFan</Text>
<View style={styles.cardsContainer}>
{cards.map((card, index) => {
switch (card.type) {
case 'paywall':
return (
<CardPaywall
key={card.id}
onSwipeCompleted={() => {}}
paywall={card.paywall}
products={card.products}
/>
);
case 'image':
return (
<CardImage
key={card.id}
onSwipeCompleted={() => removeCard(card, index)}
url={card.url}
/>
);
}
})}
</View>
</SafeAreaView>
);
}
function getStyles(dark: boolean) {
return StyleSheet.create({
app: {
backgroundColor: dark ? 'rgb(44,44,46)' : '#fff',
width: '100%',
height: '100%',
},
headerText: {
fontWeight: '700',
fontSize: 32,
marginHorizontal: 24,
marginTop: 24,
marginBottom: 12,
color: dark ? '#fff' : '#000',
},
container: {
marginTop: 32,
paddingHorizontal: 24,
fontWeight: '700',
},
cardsContainer: {
width: '100%',
paddingHorizontal: 12,
height: 500,
},
});
}
export default App;
And here’s how it runs:

Wrapping up
Just like that, we’ve got a working app with monetization built in! I think we’ve created a solid foundation that could grow into something much bigger. Adapty offers a truly flexible SDK that helps you build straightforward, maintainable code. To see how Adapty can optimize your monetization strategies, improve user experiences, and boost your revenue, schedule a free demo call with us.
I hope you picked up some useful tips from this tutorial. Good luck with your app development! Thanks for reading, and I’ll see you at the next challenge that inevitably comes along.
Recommended posts