

Get from zero Adapty setup to displaying a paywall and processing purchases in under 60 minutes.
Pre-requisites
Before you begin, make sure you have:
- A working iOS app built with SwiftUI
- Xcode 14 or later
- At least one in-app purchase product created in App Store Connect
- An Adapty account with your app added to the dashboard, including at least one product, paywall, and placement
Project files
To follow along with this tutorial, download the project files from Github. The starter branch contains the app without Adapty integration, while the main branch contains the finished project.
Install the Adapty SDK in your project
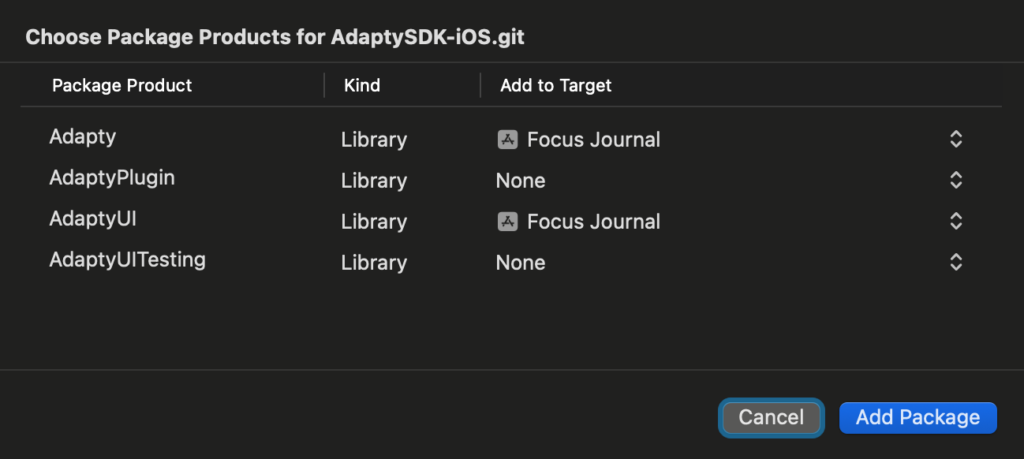
- In Xcode, go to File > Add Packages
- Enter the URL: https://github.com/adaptyteam/AdaptySDK-iOS.git
- Select the latest version and add both the Adapty and AdaptyUI packages to your app target
Initialize Adapty in your app
First, add these constants to your existing constants management system, or create a new file:
struct AppConstants {
  struct Adapty {
    static let apiKey = "API key goes here"
    static let accessLevelID = "premium"
    static let placementID = "on_tap_history"
  }
}🔐 Find your public SDK key: Adapty Dashboard > Settings > API Keys
Next, add an init() function to your SwiftUI @main struct:
import Adapty
import AdaptyUI

@main
struct Focus_JournalApp: App {
    init() {
        let configurationBuilder = AdaptyConfiguration.builder(withAPIKey: AppConstants.Adapty.apiKey)

        Task {
          do {
            try await Adapty.activate(with: configurationBuilder.build())
            try await AdaptyUI.activate()
          } catch {
            print("Failed to activate Adapty SDK: \(error)")
          }
        }
    }

    ...
}This code configures and activates both the Adapty SDK and AdaptyUI framework, enabling you to display remotely configured paywalls with Paywall Builder.
Check for purchases on launch
Keeping subscription status up-to-date is crucial. Adapty simplifies this with user profiles.
Import the Adapty framework in your ProfileManager class:
import AdaptyAnd add the following property:
var customerProfile: AdaptyProfile? {
    didSet {
        if let accessLevel = customerProfile?.accessLevels[AppConstants.Adapty.accessLevelID],
            accessLevel.isActive || accessLevel.isInGracePeriod || accessLevel.isLifetime {
         isPremium = true
        } else {
        isPremium = false
        }
    }
}Finally, add the following functions:
func refreshProfile() async throws {
    customerProfile = try await Adapty.getProfile()
}

func subscriptionPurchased(with updatedProfile: AdaptyProfile) {
    customerProfile = updatedProfile
}Each time the app launches you should check to see if there has been a change in subscription status since the last launch. To do so, add the following as a task in your app’s @main:
...
ContentView()
    .environment(profileManager)
    .task {
        do {
            try await profileManager.refreshProfile()
        } catch {
            print("Error refreshing profile on launch: \(error)")
        }
}The refreshProfile function gets an updated AdaptyProfile object from the SDK with the latest subscription and access level information. Upon setting the property, the didSet will check the access level and update the isPremium boolean flag automatically. You can use this within the app to determine whether to show premium content or functionality.
The Adapty SDK is now installed, configured, and activated, and a fresh user profile has been loaded, notifying the app of the user’s subscription status.
→ Learn more about the Adapty profile and access levels.
Configure Paywall Builder in Adapty
The next step is to present a paywall from Paywall Builder where applicable. In the sample app, we want the journal history view to be available only to paying users, so the button to show it will present either the history view or the paywall, depending on whether the user has subscribed.
In the HomeView, import the Adapty frameworks to get started:
import Adapty
import AdaptyUINext, create a state property to store the paywall configuration so it is ready to use when the user triggers the paywall view:
@State private var paywallConfig: AdaptyUI.PaywallConfiguration?Before we can show the Paywall Builder paywall, we need to fetch it and its configuration from Adapty’s servers. Add a task to the HomeView that will perform this fetching on load:
.task {
  do {
    if !profileManager.isPremium {
      let paywall = try await Adapty.getPaywall(placementId: AppConstants.Adapty.placementID)
      paywallConfig = try await AdaptyUI.getPaywallConfiguration(forPaywall: paywall)
    }
  } catch {
    print("Error fetching paywall or paywall config: \(error)")
  }
}The above code uses the SDK to fetch the paywall and its configuration based on the placement ID, and stores the configuration in our state property to use when we actually present the paywall.
From the sample project, remove the following sheet presentation, as it was just a placeholder for our real paywall:
.sheet(isPresented: $isShowingPaywall) {
  Button {
    profileManager.subscriptionPurchased()
    isShowingPaywall = false
  } label: {
    Text("Unlock Premium")
  }
  .buttonStyle(.borderedProminent)
}Now we’re ready to show the paywall. To do this, we’ll use a custom view modifier that unwraps the paywall configuration optional before adding the paywall modal view modifier so we don’t try to show a paywall without a valid configuration.
.iflet(paywallConfig, transform: { view, unwrappedPaywallConfig in
  view.paywall(
    isPresented: $isShowingPaywall,
    fullScreen: false,
    paywallConfiguration: paywallConfig,
    didFinishPurchase: { _, purchaseResult in
      switch purchaseResult {
        case .success(let profile, _):
          profileManager.subscriptionPurchased(with: profile)
        default:
          break
      }
      isShowingPaywall = false
    },
    didFailPurchase: { _, error in
      isShowingPaywall = false
      // TODO: Present error to user and offer alternative
    },
    didFinishRestore: { profile in
      profileManager.subscriptionPurchased(with: profile)
      isShowingPaywall = false
    },
    didFailRestore: { error in
      isShowingPaywall = false
      // TODO: Present error to user and offer alternative
    },
    didFailRendering: { error in
      isShowingPaywall = false
      // TODO: Present error to user and offer alternative
    })
})The above block contains everything we need to display and manage the purchase process for a paywall. The various closures are used when success and failure states are triggered. They are your opportunity to take over control of the user experience and respond according to the outcome. The most common outcome is didFinishPurchase which means the user successfully purchased a subscription product. In that case, we update the profile in our profile manager, and unlock premium content.
| ✅ Define and manage your Access Levels in the Adapty Dashboard > Monetization > Access Levels
Congrats!
At this point, your app:
- Loads a paywall from Adapty
- Lets users purchase a subscription
- Unlocks premium features based on access level