Product-releases
May 5, 2022

Updated: February 26, 2024
26 min read

Our backend system is built on AWS. Today I’m going to tell you how we had cut costs three times for the servers by using spot instances on the production environment. I’ll also walk you through configuring auto scaling. Firstly, you will see the overview of how it works and then I provide an instruction on how to launch it.
Amazon EC2 Spot instances are spare compute capacity in the AWS cloud available at steep discounts. Amazon says they can reach 90%, in our experience, it is ~3x, varies depending on the region, AZ or instance type. Their main difference from the regular ones is that they can be shut down at any time.
That’s why for a long time we thought it was okay to use them for DEV environments, or for calculating tasks with saving the intermediate result to S3 or database but not for PROD. There are third-party solutions that allow using spots for PROD, but we didn’t implement it due to numerous kludges to our case. The approach described in the article fully works within standard AWS capabilities, without additional scripts, crons, etc.
Next, I’m going to provide some screenshots which show spot instances pricing history.
m5.large in eu-west-1 region (Ireland). The price is predominantly stable within three months, cost-savings now are 2.9x.
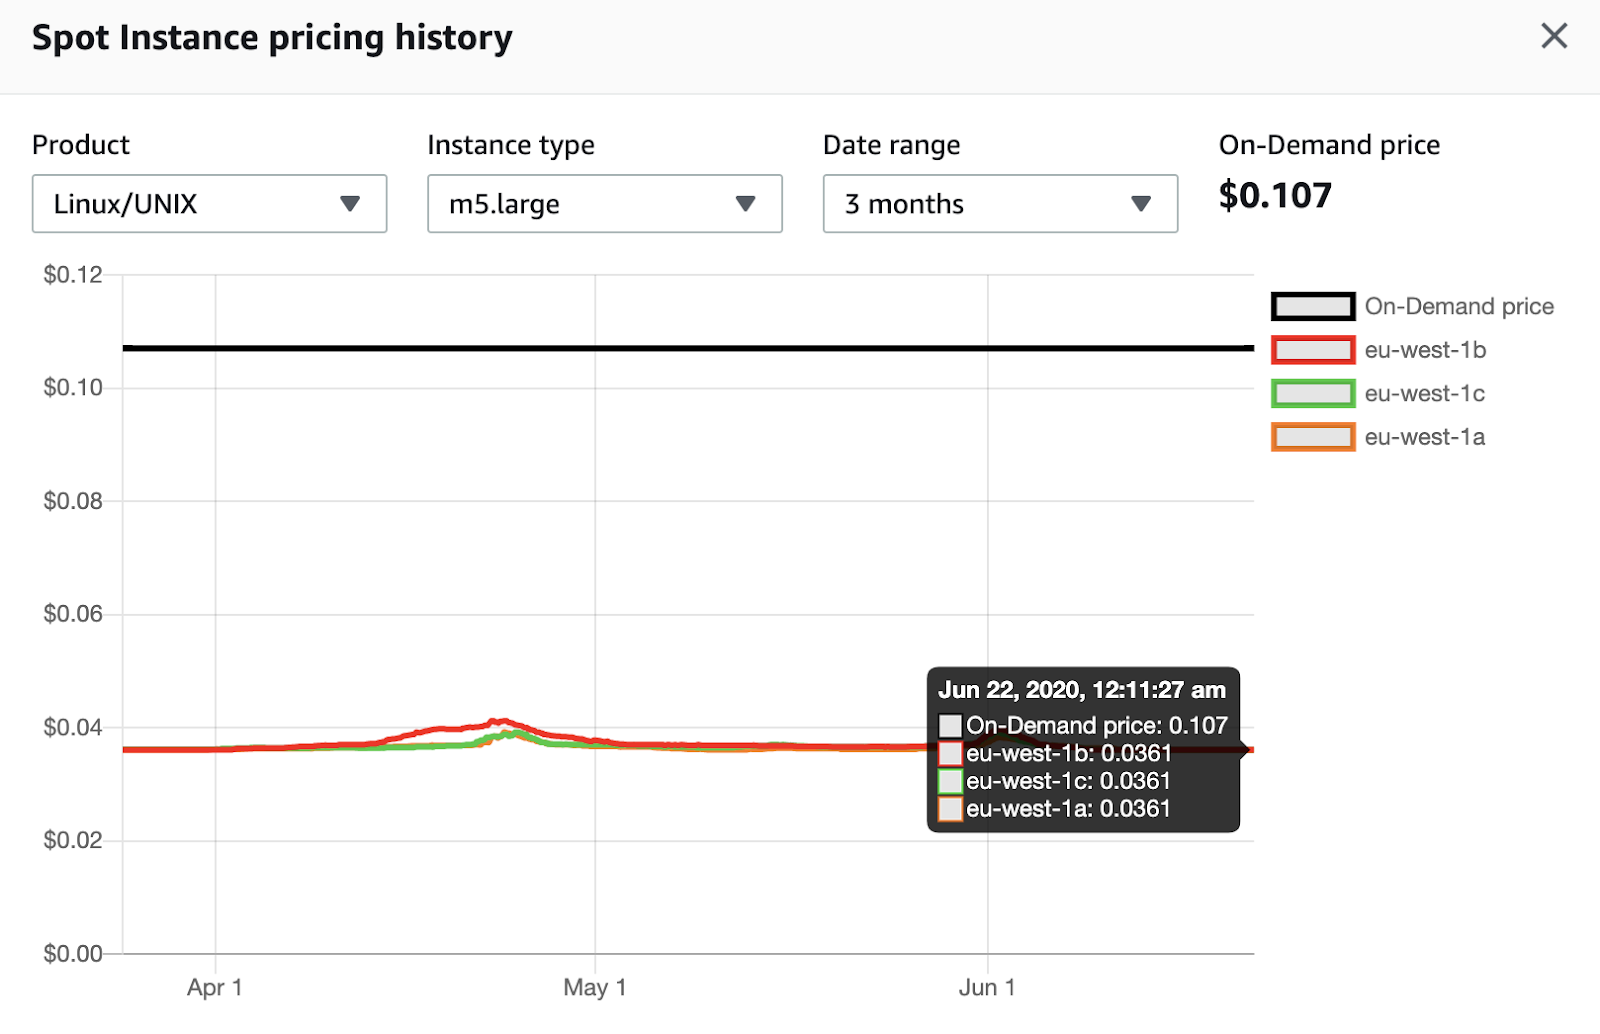
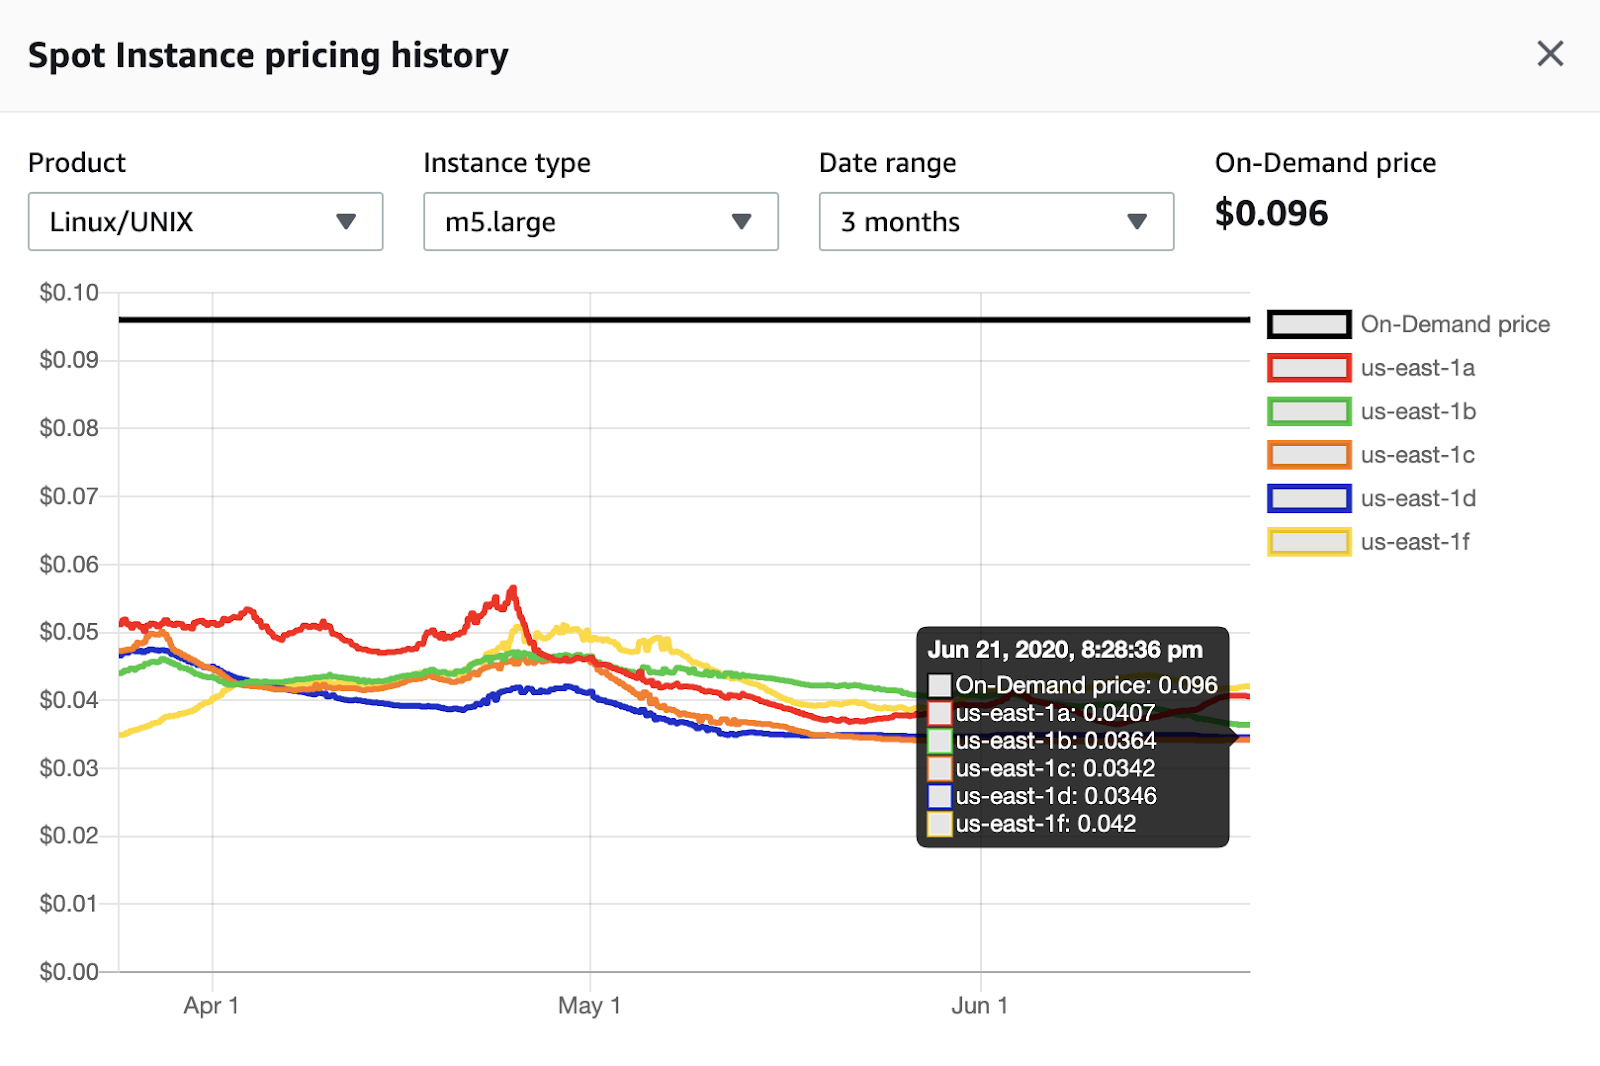
m5.large in us-east-1 region (N. Virginia). The price is constantly changing within three months, cost-savings now are from 2.3x to 2.8x depending on availability zone
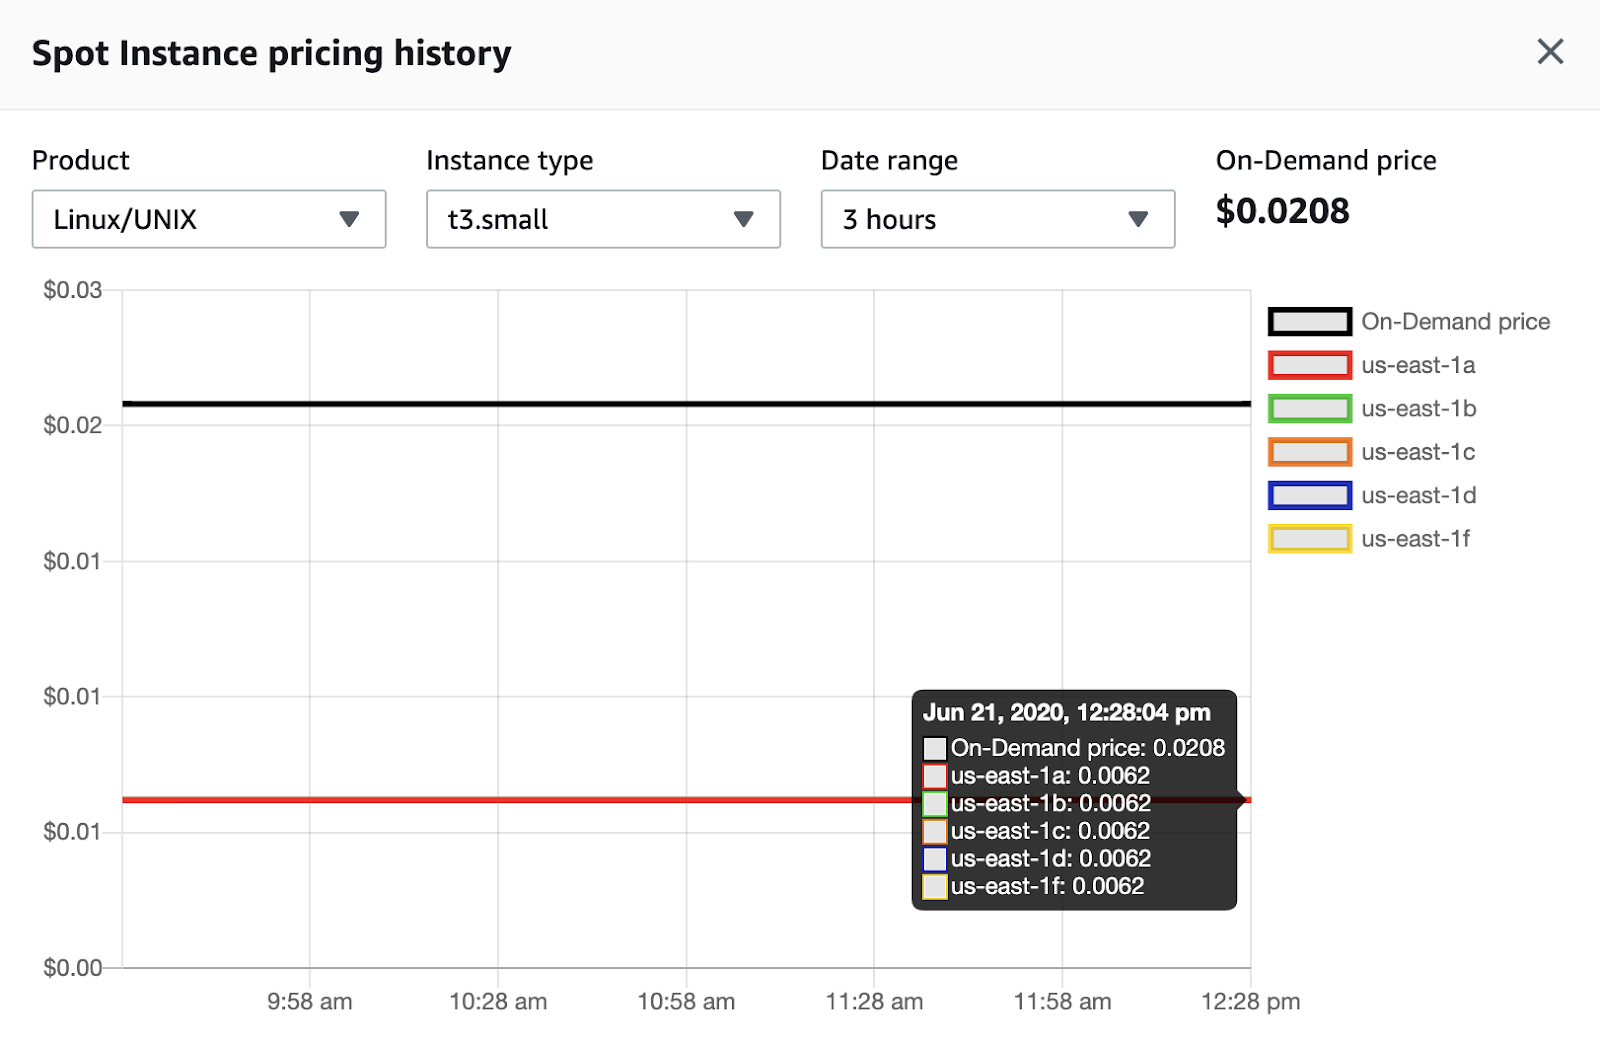
t3.small in us-east-1 region (N. Virginia). The price is stable within three months, cost-savings now are 3.4x.
The basic architecture of the service that will be discussed in this article is depicted in the diagram below.
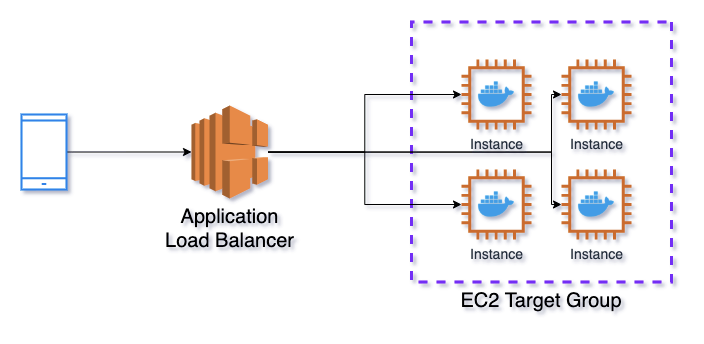
Application Load Balancer (ALB) is used as a balancer. It sends requests to EC2 Target Group (TG). TG is responsible for opening ports on the instances for ALB and connecting them to the container ports of Elastic Container Service (ECS). ECS is an analog of Kubernetes in AWS, which manages Docker containers.
One instance can have multiple functioning containers with the same ports that’s why we cannot assign them fixed. ECS reports to TG that it launches a new task (in Kubernetes terminology it is called “Pod”). It checks free ports on the instance and assigns one of them for the new launching task. Also, TG regularly checks if the instance and API are functioning with a health check. If it sees any problem, it stops sending requests there.
In the diagram above, the EC2 Auto Scaling Groups (ASG) service is not indicated. We can learn from the title that it is in charge of auto scaling. However, AWS didn’t have built-in capability to manage the number of running machines from ECS until recently. ECS allowed scaling the number of tasks, for example, based on CPU or RAM usage or the number of requests. But if the tasks took all the available instances, new machines were not launched automatically.
This changed with ECS Capacity Providers (ECS CP). Every service in ECS can now be linked with ASG. And, if the tasks don’t have enough running instances, more instances will be started (but within the established limits of ASG). It works the other way around as well. If ECS CP sees standing idle instances, without tasks, it will command ASG to shut them down. ECS CP can indicate the target capacity percent of instancesso that a certain number of machines would always be available for rapid task scaling. We’ll talk about it later.
Before describing the creation of the infrastructure, the last service I’m going to talk about is EC2 Launch Templates. It allows creating a template to launch all the machines to avoid repeating it every time from scratch. Here you can choose the type of the launching machine, security group, disk image, and lots of other parameters. It’s possible to indicate user data as well that will be uploaded to all the running instances. You can run scripts in the user data, for example, you can edit the content of ECS agent configuration file.
One of the most important configuration parameters in this article is ECS_ENABLE_SPOT_INSTANCE_DRAINING=true. If this parameter is turned on, then as soon as ECS receives a signal that the spot instance is being taken, it switches all its running tasks into Draining status. No new tasks will be assigned for this instance. If there are any tasks that are Pending on this instance, ECS cancels them. It no longer receives the requests from the balancer as well. You get the notification about deleting the instance two minutes before it happens. In this regard, if your service doesn’t execute the task for more than two minutes and doesn’t save anything to the disk, you can use spot instances without losing any data.
Talking about the disk, AWS has recently made it possible to use Elastic File System (EFS) with ECS. Even using the disk with this approach is not an obstacle, but we haven’t tested it, because we don’t need the disk to store the status. After receiving SIGINT by default (it is sent in the moment of task switch into Draining status) all the running tasks will be stopped in 30 sec, even if they haven’t completed. You can change this time with ECS_CONTAINER_STOP_TIMEOUT parameter. The main rule is not to set it for more than 2 minutes for spot machines.
Let’s proceed directly to create the described service. I’ll describe some useful features that were not mentioned above.
Generally, it’s a step-by-step instruction, but I won’t mention any basic or more specific cases. All the operations are made in AWS Management Console, but you can achieve the same results with CloudFormation or Terraform. We use Terraform in Adapty.
With this service, you can create a configuration of machines. You can manage the templates in EC2 → Instances → Launch templates.
Amazon machine image (AMI). Specify the disk image which will be used by instances. For ECS, in most cases, it’s better to use an optimized image from Amazon. It is regularly updated and contains everything necessary for ECS functioning. To find out the relevant image ID, go to Amazon ECS-optimized AMIs page, choose the region, and copy AMI ID for it. For example, for us-east-1 region, relevant image ID at the time of this writing — ami-00c7c1cf5bdc913ed. You need to paste this ID to Specify a custom value section.
Instance type. Specify an instance type. Choose the one that is best suited for your task.
Key pair (login). Specify the certificate for SSH connection.
Network settings. Specify network settings. The networking platform in most cases should be Virtual Private Cloud (VPC). Security groups serve to protect your instances. Since we’re going to use the balancer in front of the instances, I would recommend specifying the group which allows inbound connection only from the balancer. That means you will have two security groups: one for the balancer which allows inbound connections from anywhere via 80 (http) and 443 (https) ports, and the other one for the machines which allows inbound connections via any port from the balancer group. We have to open outbound connections in both the groups via TCP protocol to all the ports for all the addresses. We can limit the ports and addresses for the outbound connections, but in that case, it is necessary to constantly monitor that you’re not trying to address anywhere via the closed port.
Storage (volumes). Specify the disk parameters for the machines. Disk capacity can’t be less than the one specified in AMI, for ECS Optimized, it is 30 GiB.
Advanced details.
Purchasing option. It asks whether we want to buy spot instances. We do but don’t mark the checkbox here. We’ll configure it in Auto Scaling Group, it has more options there.
IAM instance profile. Specify the role for the the instances. The instances need access rights to operate within ECS. The access rights are usually defined in ecsInstanceRole. In some cases, the role is existing in your AWS account. If not then here is the instruction on how to do it. After its creation, specify it in the template.
Next, there are a lot of parameters, basically, you can leave the default, but each of them has a comprehensible description. I always turn on EBS-optimized instance and T2/T3 Unlimited parameters, if we use burstable instances.
User data. Specify user data. We will edit the file /etc/ecs/ecs.config which stores the ECS agent configuration.
Here is the example of how user data may look like:
#!/bin/bash
echo ECS_CLUSTER=DemoApiClusterProd >> /etc/ecs/ecs.config
echo ECS_ENABLE_SPOT_INSTANCE_DRAINING=true >> /etc/ecs/ecs.config
echo ECS_CONTAINER_STOP_TIMEOUT=1m >> /etc/ecs/ecs.config
echo ECS_ENGINE_AUTH_TYPE=docker >> /etc/ecs/ecs.config
echo “ECS_ENGINE_AUTH_DATA={\”registry.gitlab.com\”:{\”username\”:\”username\”,\”password\”:\”password\”}}” >> /etc/ecs/ecs.config
ECS_CLUSTER=DemoApiClusterProd — this parameter indicates that the instance belongs to a cluster with the given name which means this cluster will be able to place their tasks on this server. We still haven’t created a cluster, but we will use this name when creating it.
ECS_ENABLE_SPOT_INSTANCE_DRAINING=true — the parameter points that after receiving a spot instance turn off signal, all the tasks must be switched to Draining status.
ECS_CONTAINER_STOP_TIMEOUT=1m — the parameter indicates that after receiving the SIGINT signal, all the tasks have one minute before being killed.
ECS_ENGINE_AUTH_TYPE=docker — the parameter indicates that we use a docker-scheme as an authentication format.
ECS_ENGINE_AUTH_DATA=… — these are the parameters of the connection to a private container registry, where all your Docker images are stored. If they are public there is no need to specify anything else.
In this article I will use a public image from Docker Hub, there is no need to indicate ECS_ENGINE_AUTH_TYPE and ECS_ENGINE_AUTH_DATA parameters.
Good to know: they recommend updating AMI on a regular basis because new versions have up-to-date versions of Docker, Linux, ECS agent, etc. You can set up update notifications. You can get email notifications or update it manually, or you can program a Lambda-function which will automatically create a new version of Launch Template with updated AMI.
10 ideas
to increase
paywall conversion
Get an ebook with insights
and advice from top experts
Auto Scaling Group is in charge of instances’ launching and scaling. You can manage groups in EC2 → Auto Scaling → Auto Scaling Groups.
Launch template. Choose the earlier created template. Leave a default version
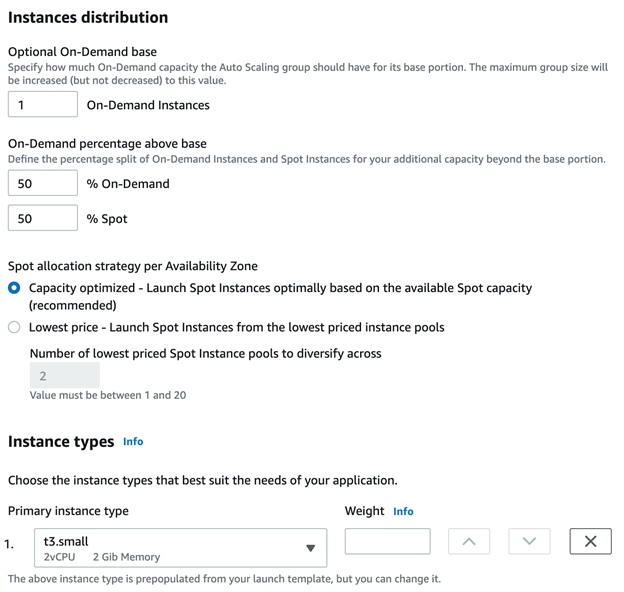
Purchase options and instance types. Specify instances’ types for a cluster. Adhere to launch template uses instance type from Launch Template. Combine purchase options and instance types allows setting flexible instance types. We will use the latter one.
Optional On-Demand base. It is a number of regular instances (not the spot ones) that will be always launched.On-Demand percentage above base is the percentage of regular and spot instances, 50-50 will be distributed equally, 20-80 for each regular instance four spot instances will be launched. Here I will choose 50-50, but in fact, we mostly choose 20-80, or sometimes even 0-100 (combined with an on-demand base greater than zero).
Instance types. Here you can specify advanced instance types that will be used in the cluster. We never used it because I don’t quite understand the point of i
Network. These are the network settings, choose VPC and subnetworks for the machines, in most cases, it’s better to choose all the available subnetworks.
Load balancing. These are the balancer settings, don’t do anything here. We’ll configure load balancer and health checks later.
Group size. Specify the limits for the number of machines in the cluster and the desirable number of machines at the start. The number of machines will never be less than the minimum or more than the maximum designated, even in case of scaling according to metrics.
Scaling policies. We will use scaling based on ECS running tasks, in this case, we’ll configure scaling later.
Instance scale-in protection. It is the protection of instances from deleting while downscaling. Turn it on so ASG won’t delete the machine which has running tasks. ECS Capacity Provider will turn the protection off for instances that don’t have any tasks.
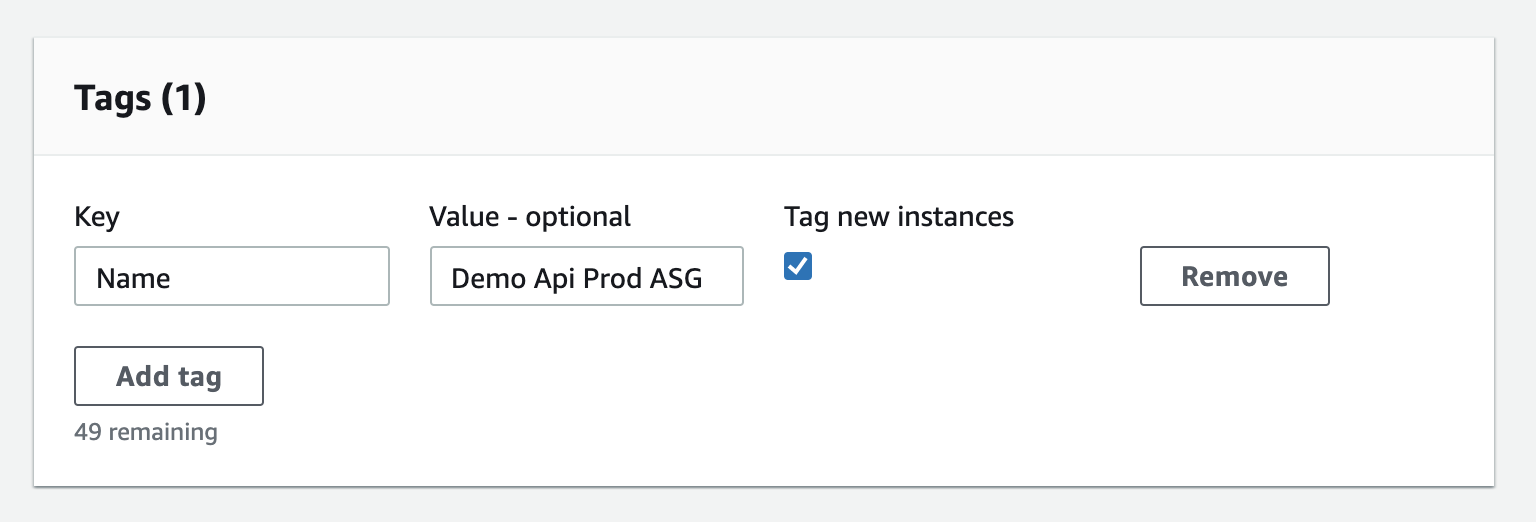
Add tags. You can add tags for instances (there has to be a mark in Tag new instances checkbox). I would recommend tagging Name, then all the instances launched from the group will have the same name, it’s easy to see them in the console.
After creating the group, open it and go to Advanced configurations. You don’t see all the options while designing the console.
Termination policies. These are the rules which are considered when deleting the instances. They are applied in order. We usually use such policies as indicated in the picture below. Firstly, they delete instances with the oldest Launch Template (for example, if we have updated AMI, we got the new version, but not all the instances had time to move there). Then they choose the instances which are the nearest to the next check-out according to billing. And then choose the oldest by launch date.

Good to know: to update all the machines in the cluster, it’s convenient to use Instance Refresh. If you combine it with Lambda-function from the previous step, you will have the fully automatized system to update instances. Before updating all the machines, you need to turn off instance scale-in protection for all the instances in the group. It is the protection that you have to turn off, not the setting in the group, you can do it in Instance management.
You can create a balancer in EC2 → Load Balancing → Load Balancers.
We will use the Application Load Balancer. You can read the comparison of the different type balancers on the serviсe webpage.
Listeners. It makes sense to choose 80 and 443 ports and make a redirect from 80 to 443 later with the balancer rules.
Availability Zones. In most cases, we choose all the availability zones.
Configure Security Settings. Here we specify SSL-certificate for the balancer, the most useful solution is to make a certificate in ACM. You can read about Security Policies here. You may leave the default ELBSecurityPolicy-2016-08. After creating the balancer, you will see its DNS name. You will need it to create CNAME for your domain. For example, this is how it looks like in Cloudflare.

Security Group. Create or choose a security group for the balancer (the instruction is above in EC2 Launch Template → Network settings).
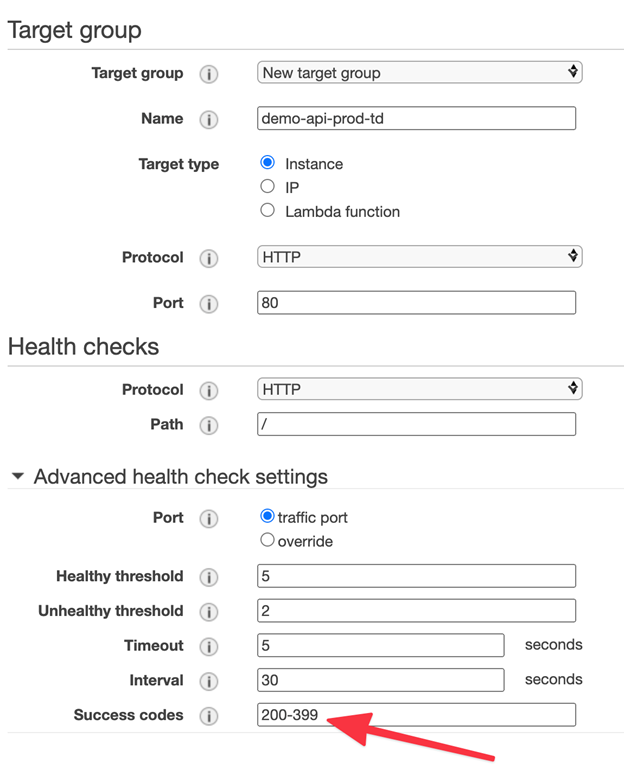
Target group. Create a group that is in charge of routing requests from the balancer to the machines and checking their availability to replace any of them in case of problems. Target type is Instance, you may choose any Protocol and Port, if you use HTTPS for interaction between balancer and instances, you will need to upload the certificate there. In this example we won’t do it, just leave port 80.
Health checks. These are the service health check parameters. In the real service it should be a separate request that implements important parts of the business logic. I will leave default settings in this example. Next, you can specify the request interval, timeout, success codes, etc. Here we will indicate Success codes 200-399, because Docker image that will be used, returns code 304.
Register Targets. Here you can choose the machines for the group, but in our case, ECS will do it, just skip this step.
Good to know: on the balancer’s level you can turn on the logs that will be saved in S3 using a certain format. You can export them to the 3rd party analytics, or make SQL-requests right from S3 data with the help of Athena. It is easy and works without any additional code. I would recommend configuring logs deletion from S3 bucket after a specified period.
On previous steps, we have created everything related to the service infrastructure. Now we go to the configuration of the container that we will launch. You can do it in ECS → Task Definitions.
Launch type compatibility. Choose EC2.
Task execution IAM role. Choose ecsTaskExecutionRole. It is used to write logs, give access to the secret variable, etc.
In Container Definitions click Add Container.
Image is the link to the image with project code, in this example, I will use the public image with Docker Hub bitnami/node:18.11.0.
Memory Limits are container memory limits.
Hard Limit. If the container will go beyond the specified value, then the docker kill command will be run, the container will die immediately.
Soft Limit. The container may go beyond the specified value, but while deploying the tasks on the machines they will consider this parameter. For example, if the machine has 4 GiB of RAM, and soft limit container is 2048 MiB, then this machine can have a maximum of 2 running tasks with this container. In practice 4 GiB of RAM is a little less than 4096 MiB. You can see it in ECS Instances section in the cluster. The soft limit cannot be more than the hard limit. It is important to understand that if one task has a number of containers then their limits are summarized.
Port mappings. In the Host port specify 0. It means the port will be assigned dynamically, the Target Group will monitor it. Container Port is a port on which your app is running. It is often being set in the command to execute or assigned in your app’s code, Dockerfile, etc. Let’s use 3000 for our example because it is indicated in Dockerfile of the image used.
Health check is container health check parameters, not to be confused with the one configured in Target Group.
Environment is environment settings. CPU units are like Memory limits. Each processor core contains 1024 units, so if the server has a dual-core processor and the container has a value of 512, then 4 tasks with this container can be run on one server. CPU units always correspond to the number of cores, they cannot be slightly less as in the case of memory.
Command is a command to launch the service inside the container. Specify all the parameters separating them with a comma. It may be gunicorn, npm, etc. If it is not specified, the value of the CMD directive will be used from the Dockerfile. Specify npm,start.
Environment variables are the container environment variables. It can be either just text data or secret variables from Secrets Manager or Parameter Store.
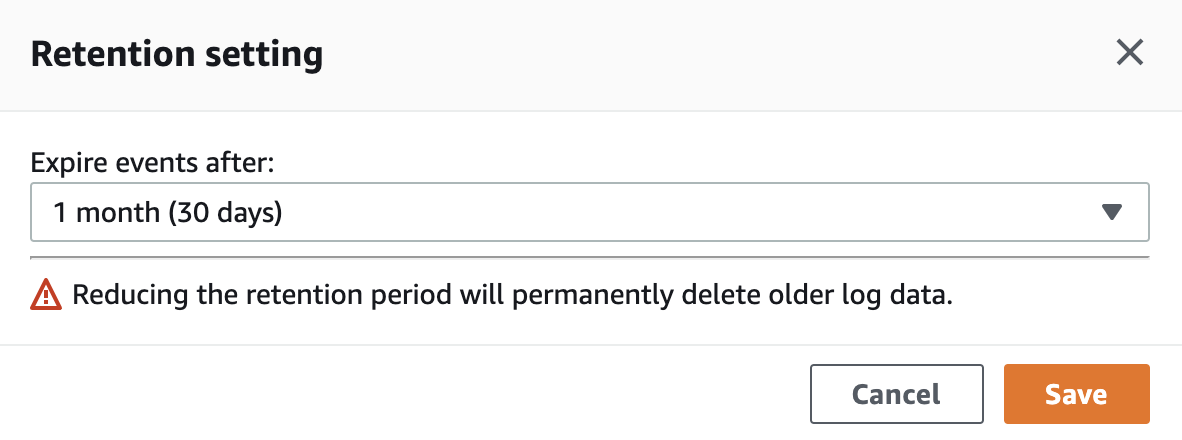
Storage and Logging. Configure the logging to the CloudWatch Logs (AWS log service). It is enough to mark the checkbox Auto-configure CloudWatch Logs. After creating Task Definition, a log group will be created in CloudWatch. Logs are stored there by default forever. I would recommend changing the Retention period from Never Expire to the exact period. Do it in CloudWatch Log groups, just click on the current period and choose the new one.
Go to ECS → Clusters to create a cluster. Choose EC2 Linux + Networking as a template.
Cluster name. It is very important to give the same name to the cluster as in Launch Template in ECS_CLUSTER parameter, in our case, it is DemoApiClusterProd. Tick a checkbox Create an empty cluster. Optionally you may turn on the Container Insights to see metrics by service in CloudWatch. If you did everything right, in ECS Instances you will see the machines that are managed by the Auto Scaling group.

Go to the Capacity Providers tab and create a new one. You need it to manage the creation and turning off the machines depending on the number of ECS running tasks. Important: provider can be linked to only one group.
Auto Scaling group. Choose the group we created earlier.
Managed scaling. Turn it on so that the provider could scale the service.
Target capacity % is in charge of the loading percent of machines with the tasks. If you indicate 100%, all the machines will always be busy with running tasks. If you indicate 50%, half of the machines will always be free. In this case, if there is a sharp increase in the load, new tasks will immediately go to free machines, without any need to wait for the instances to launch.
Managed termination protection. Turn it on. This parameter allows the provider to remove instance protection when needed.
To create a service, you need to go to the cluster we created earlier to the Services tab.
Launch type. Click Switch to capacity provider strategy and choose the earlier created provider.

Task Definition. Choose the earlier created Task Definition and its revision.
Service name. We give the same name as the Task Definition.
Service type is always Replica.
Number of tasks is the desirable number of running tasks in the service. This parameter is managed by scaling, but you still need to specify it.
Minimum healthy percent and Maximum percent define the behavior of the task during deployment. The default values are 100 and 200. They mean that while deploying the number of tasks will be increased two times and then will be back to the desirable. If you have one running task, min=0 and max=100, then it will be killed while deploying. After, a new one will be launched, so there will be a downtime. If there is one running task, min=50, max=150, then there will be no deployment at all, because you cannot divide one task in two or increase one and a half times.
Deployment type. Leave the Rolling update type.
Placement Templates. These are the rules to deploy the tasks on the machines. The default value is AZ Balanced Spread which means that every new task will be deployed on the new instance until the machines will be launched in all the availability zones. We usually do like this BinPack — CPU and Spread — AZ, with this policy, tasks are placed as tightly as possible on one machine by CPU. If it is necessary to cr
Recommended posts

Product-releases
May 5, 2022
Product-releases
September 2, 2021